


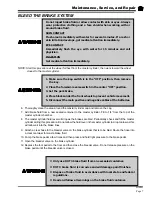


Motor Service
Motor
Page 6
REPLACING THE BEARINGS
1. The motor must be removed from the vehicle for
this procedure. Refer to
Transmission Service
section for information on removing the motor.
2. Remove the armature. Refer to
Motor Inspection-
Disassembly
section for information on taking the
motor apart.
3. Press the armature bearing(s) off of the armature
shaft.
4. Press new bearing(s) onto the shaft.
5. Reassemble the motor.
REPAIRING THE COMMUTATOR
1. The motor must be removed from the vehicle for
this procedure. Refer to
Transmission Service
section for information on removing the motor.
2. The armature must be removed from the motor
for this procedure. Refer to
Motor Inspection-
Disassembly
section for information on taking
the motor apart.
3. Using a lathe, cut the armature just enough to
remove all grooves, depressions or ridges.
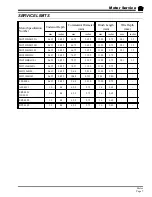
4. Measure the diameter of the commutator. If the
commutator is less than the minimum diameter
specified in
Service Limits
,
then the motor must
be replaced.
5. Thoroughly clean all copper debris from between
the commutator segments.
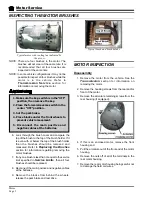
Do not press against the outer race of the
bearing. Pressing against the outer race
will damage the bearing and may result in
premature failure of the bearing. See the
illustration below
Example of freshly cut commutator
Properly undercut and cleaned
commutator segments
6. Measure the commutator undercut depth in 5-
places around the commutator. If any one of the
measurements is less than the minimum undercut
depth specified in
Service Limits
, then the
commutator must be undercut.
7. While still in the lathe, smooth the commutator
with fine emery cloth.
Undercutting the commutator
1. Using a small straight cut saw blade, cut the
commutator insulation to the proper depth. Refer
to undercut depth in
Service Limits
.
2. Once all segments have been properly undercut,
mount the armature in a lathe and smooth the
commutator with fine emery cloth.
3. Inspect the armature for shorts. Refer to
Motor
Inspection
section for information on testing the
armature.
NOTE: Copper debris in the undercut area can give
a reading of a shorted armature.
Содержание ET-015-00
Страница 2: ......
Страница 14: ...TAYLOR DUNN...
Страница 28: ...TAYLOR DUNN...
Страница 48: ...Maintenance Service and Repair Steering Page 12 Exploded View of Steering Gear...
Страница 60: ...Maintenance Service and Repair F2 F3 Transmission Page 12 EXPLODED VIEW...
Страница 71: ...Maintenance Service and Repair Brakes Page 11 Rear Brake left side shown...
Страница 72: ...TAYLOR DUNN...
Страница 80: ...TAYLOR DUNN...
Страница 90: ...TAYLOR DUNN...
Страница 91: ...TABLE OF CONTENTS Throttle Linkage Adjustments 2 Magnetic Module 2 Pot Box module 3 Throttle Linkage...
Страница 94: ...TAYLOR DUNN...
Страница 100: ...TAYLOR DUNN...
Страница 114: ...TAYLOR DUNN...
Страница 116: ...TAYLOR DUNN...
Страница 120: ...Illustrated Parts Parts Page 4 Steering Linkage 1 2 2 2 3 4 5 5 6 4 1 7 8 9 1 1 7 7 18 4 1 1 10 11 12 13 14 15 16 17...
Страница 122: ...Illustrated Parts Parts Page 6 Steering Gear 10 9 17 16 2 3 14 15 12 11 13 6 8 7 5 4 1 Steering Column...
Страница 128: ...Illustrated Parts Parts Page 12 Transmission Differential Case Seal with 94 430 03 RTV SILICON GSKT SLR BLUE...
Страница 130: ...Illustrated Parts Parts Page 14 Rear Axle Axle tube 4 5 6 7 3 2 Rear Brakes...
Страница 132: ...Illustrated Parts Parts Page 16 Rear Suspension 1 2 3 4 5 6 7 8 9 10 11 12 13 14 Drive Shaft...
Страница 134: ...Illustrated Parts Parts Page 18 Motor direct drive Motor Mount direct drive...
Страница 140: ...Illustrated Parts Parts Page 24 Brake linkage parking brake 1 2 3 4 5 6 7 8 9 Spacer Included with 1...
Страница 142: ...Illustrated Parts Parts Page 26 Instrument Panel dash...
Страница 144: ...Illustrated Parts Parts Page 28 Speed Control Panel 1 2 3 4 5 6 7 8 9 10 11 12 4...
Страница 152: ...Illustrated Parts Parts Page 36 Charger 2 1 15 12 11 4 3 5 8 10 6 7 9 13 14 16...
Страница 156: ...Illustrated Parts Parts Page 40 Decals...


