Motor Service
Motor
Page 3
Inspection
1. Measure the length of each motor brush.
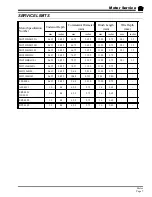
• If any one brush is less than or equal to the
service limit specified in section
Service
Limits
, then all four brushes should be
replaced. Refer to
Replacing the Brushes
section for information regarding replacing the
motor brushes.
2. Measure the diameter of the commutator.
• If the commutator is less than the minimum
diameter specified in section
Service Limits
,
then the motor must be replaced.
3. Measure the commutator undercut depth in 5-
places around the commutator.
• If any one of the measurements is less than the
minimum undercut depth specified in
Service
Limits
above, then the commutator must be
undercut. Refer to
Repair Commutator
section for information regarding undercutting
the commutator.
4. Inspect the commutator for grooves.
• If the commutator is groved then it must be
machined on a lathe. Do not machine the
commutator past the minimum diameter
specified in
Service Limits
section. Refer to
Repair Commutator
section for information
regarding machining the commutator.
Insulation
Commutator
Incorrect
Hacksaw blade
Correct
Min. OD
Armature
Undercut
5. Inspect the commutator for burn marks.
• Burn marks and/or raised commutator segments
90 or 180 degrees apart is evidence of a shorted
armature. A tool called a growler is required to
reliably test for a shorted armature.
6. Inspect the commutator for raised segments.
Raised segments could be a result of a stalled
motor or shorted armature. A tool called a growler
is required to reliably test for a shorted armature.
• If the armature is not shorted then the raised
segments can be removed by machining the
commutator. Do not machine the commutator
past the minimum diameter specified in
Service Limits
section. Refer to
Repair
Commutator
section for information regarding
machining the commutator.
7. Visually inspect the armature windings for burnt
insulation. Burnt insulation is a direct result of
motor overheating and could lead to a shorted
armature.
• If the insulation is cracked or burnt, then it is
recommend that the armature or motor be
replaced.
NOTE: If the armature has been burnt then there is a
good possibility that the field windings may
also be burnt. Symptoms indicating a shorted
field include high motor current, lack of power
and possibly excessive speed.
8. Using a growler, test the armature for shorts.
• If the armature is shorted, then we recommend
that the armature or motor be replaced.
9. Using the continuity function of digital multi meter,
check the continuity around the entire commutator
by placing one test lead against one of the
commutator segments and the other test lead
against all of the other segments one at a time.
There should be continuity around the entire
commutator. If any segment indicates an open
circuit, then the motor must be replaced.
Typical burn mark on a shorted armature
Содержание ET-015-00
Страница 2: ......
Страница 14: ...TAYLOR DUNN...
Страница 28: ...TAYLOR DUNN...
Страница 48: ...Maintenance Service and Repair Steering Page 12 Exploded View of Steering Gear...
Страница 60: ...Maintenance Service and Repair F2 F3 Transmission Page 12 EXPLODED VIEW...
Страница 71: ...Maintenance Service and Repair Brakes Page 11 Rear Brake left side shown...
Страница 72: ...TAYLOR DUNN...
Страница 80: ...TAYLOR DUNN...
Страница 90: ...TAYLOR DUNN...
Страница 91: ...TABLE OF CONTENTS Throttle Linkage Adjustments 2 Magnetic Module 2 Pot Box module 3 Throttle Linkage...
Страница 94: ...TAYLOR DUNN...
Страница 100: ...TAYLOR DUNN...
Страница 114: ...TAYLOR DUNN...
Страница 116: ...TAYLOR DUNN...
Страница 120: ...Illustrated Parts Parts Page 4 Steering Linkage 1 2 2 2 3 4 5 5 6 4 1 7 8 9 1 1 7 7 18 4 1 1 10 11 12 13 14 15 16 17...
Страница 122: ...Illustrated Parts Parts Page 6 Steering Gear 10 9 17 16 2 3 14 15 12 11 13 6 8 7 5 4 1 Steering Column...
Страница 128: ...Illustrated Parts Parts Page 12 Transmission Differential Case Seal with 94 430 03 RTV SILICON GSKT SLR BLUE...
Страница 130: ...Illustrated Parts Parts Page 14 Rear Axle Axle tube 4 5 6 7 3 2 Rear Brakes...
Страница 132: ...Illustrated Parts Parts Page 16 Rear Suspension 1 2 3 4 5 6 7 8 9 10 11 12 13 14 Drive Shaft...
Страница 134: ...Illustrated Parts Parts Page 18 Motor direct drive Motor Mount direct drive...
Страница 140: ...Illustrated Parts Parts Page 24 Brake linkage parking brake 1 2 3 4 5 6 7 8 9 Spacer Included with 1...
Страница 142: ...Illustrated Parts Parts Page 26 Instrument Panel dash...
Страница 144: ...Illustrated Parts Parts Page 28 Speed Control Panel 1 2 3 4 5 6 7 8 9 10 11 12 4...
Страница 152: ...Illustrated Parts Parts Page 36 Charger 2 1 15 12 11 4 3 5 8 10 6 7 9 13 14 16...
Страница 156: ...Illustrated Parts Parts Page 40 Decals...


