Chapter 6: Advanced Chassis Setup
6-7
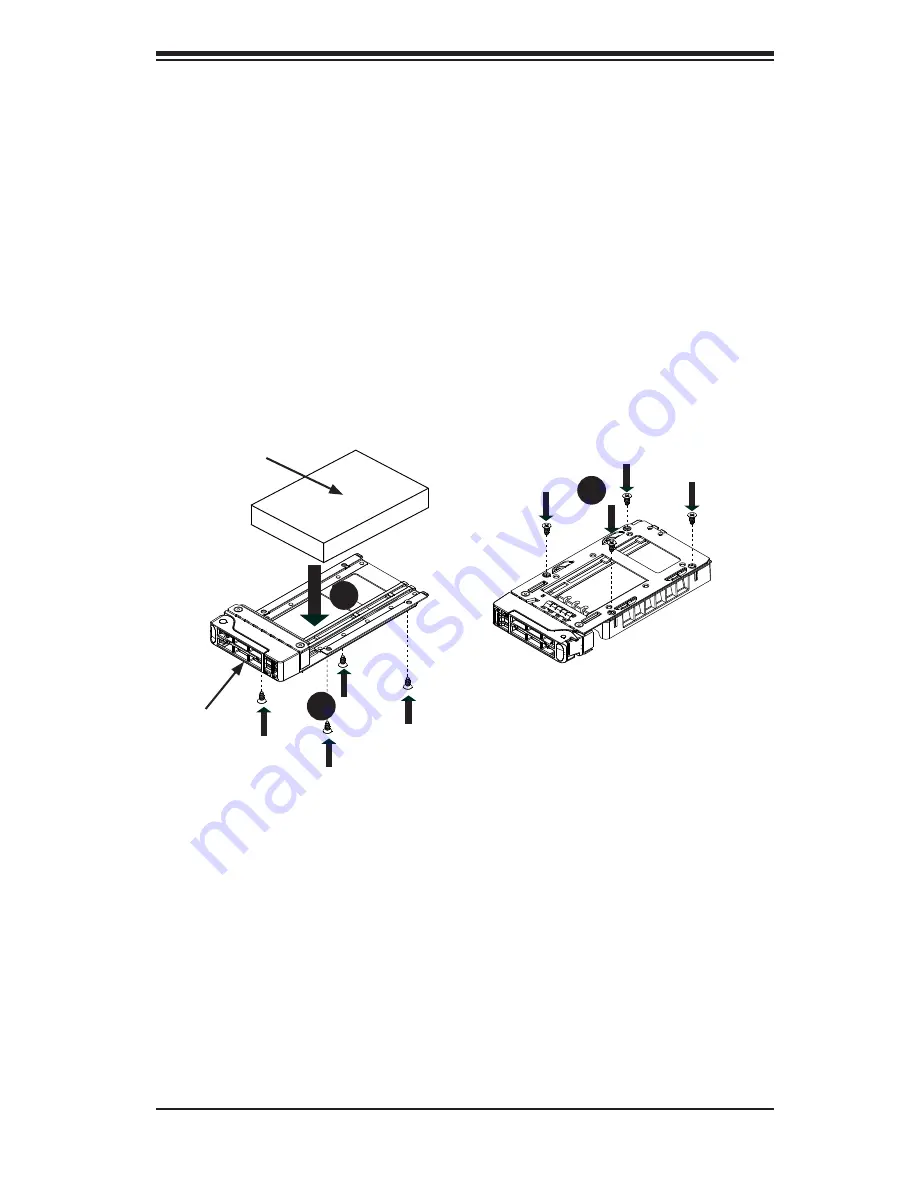
Installing a Hard Drive into the Drive Carrier
1. Place the hard drive carrier on a fl at surface.
2. Insert the hard drive into the carrier with the printed circuit board side facing
downward and so that the mounting holes in the drive align with those in the
drive carrier.
3. Secure the hard drive to the carrier with the four screws included with the
hard drive, securing it from the bottom of the carrier.
4. Use the open handle of the drive carrier to insert the drive carrier into the
open drive bay.
5. Secure the drive carrier into the drive bay by closing the drive carrier handle.
Caution: Enterprise level hard disk drives are recommended for use in
Supermicro chassis and servers. For information on recommended HDDs,
visit the Supermicro Web site at
http://www.supermicro.com/products/nfo/fi les/
storage/SAS-CompList.pdf
Figure 6-5: Installing a Hard Drive into the Drive Carrier
Drive Carrier
2.5" Hard
Disk Drive
1
3
1
2
1
3
Содержание FatTwin F627R2-F73
Страница 1: ... SUPER USER S MANUAL Revision 1 0 FatTwin F627R2 F73 ...
Страница 5: ...v FatTwin F627R2 F73 USER S MANUAL Notes ...
Страница 10: ...x Notes FatTwin F627R2 F73 USER S MANUAL ...
Страница 20: ...1 10 FatTwin F627R2 F73 USER S MANUAL Notes ...
Страница 30: ...2 10 FatTwin F627R2 F73 USER S MANUAL Notes ...
Страница 34: ...FatTwin F627R2 F73 USER S MANUAL 3 4 Notes ...
Страница 84: ...5 30 FatTwin F627R2 F73 USER S MANUAL Notes ...
Страница 104: ...6 20 FatTwin F627R2 F73 USER S MANUAL Notes ...
Страница 138: ...7 34 FatTwin F627R2 F73 FatTwin Notes ...
Страница 140: ...A 2 FatTwin F627R2 F73 USER S MANUAL Notes ...


