Page 14
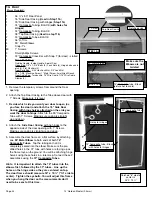
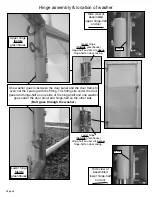
12’ Garden Master (3.5mm)
A.
B.
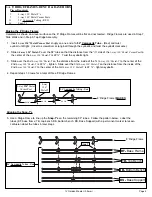
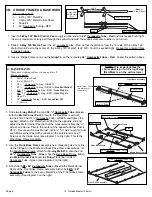
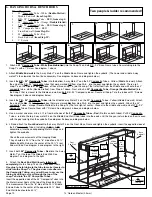
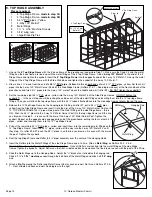
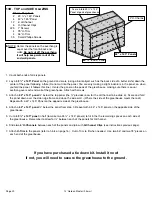
1. Line up the
8’ Top Ridge Frame
with the 8’ base frame of the greenhouse (see picture Step 7). Make sure the Snap-T’s and the metal
fittings on the base frame are lined up with the metal fittings of the 8’ Top Ridge Frame. Add a
4-way 120° Metal-T
to the end of the 8’
Ridge Frame and tighten the eyebolt. Insert the
4’ Top Ridge Frame
into the opposite end of the 4-way 120° Metal-T. Line up the metal
fittings of the 4’ Top Ridge Frame with the Side Wall tubes and tighten the eyebolt of the 4-way 120° Metal-T.
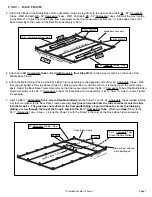
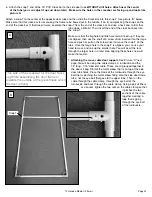
2. Draw a line 2 ¾” down from the end of a
54 ¼” PVC pipe - Yellow.
Do this on both ends of six 54 ¼” PVC pipes - yellow. Set four 54 ¼”
pipes into the 3-way 120° Metal Corner Posts of the Side Ridge Frame (Rafters #1 & 7 - See diagram above) at the front and back of the
greenhouse and two 54 ¼” pipes into the 4-way 120° metal-T above the middle end wall (rafter #5). DO NOT tighten the eyebolts!!!
3. Set the remaining eight 54 ¼” PVC pipes - yellow into the 4-way 120° Metal-T’s of the Side Ridge Frames. DO NOT tighten the
eyebolts!!! - In the next step you will be pulling these tubes out of the side wall fittings and inserting them into the 12’ top ridge frame
fittings. Then you will attach the top ridge frame with the 54 ¼” tubes attached back into the side ridge frames to form the roof framing.
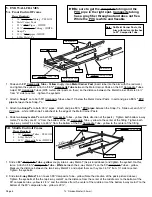
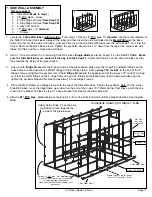
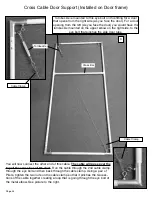
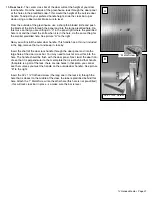
4. Balance the 12’ Top Ridge Frame on the hanging rods. Starting at rafter #1, pull a 54 ¼” PVC pipe -
yellow from the Side Ridge Frame and insert it into the arm of the 3-way 120° Metal Corner Post on the
12’ TOP RIDGE FRAME (54 ¼” pipe will pop out of the Metal Fitting on the side Ridge frame - this is
OK). Push the 54 ¼” pipe into the 3-way 120° Metal Corner Post (On the top ridge frame) until the line
you drew on it in step 9 - 2 is even with the arm of the 3-way 120° Metal Corner Post. Tighten the
eyebolt. Repeat on the opposite side and opposite end of the greenhosue, pulling the four corner 54 ¼”
pipes - yellow and inserting them into the 12’ Top Ridge Frame.
5. Pull out the remaining 54 ¼” PVC pipes - yellow and insert them into the remaining metal fittings on the
12’ Top Ridge Frame. Insert the 54 ¼” pipes - yellow all the way into the 4-way 120° Metal-T’s until
they stop. On rafter #5 & #7 push the 54 ¼” pipes in so the line you drew on it is even with the arm on
the post. Tighten the eyebolts.
6. Rest the top Ridge Frame and Rafter (54 ¼” pipe) assembly over the center of the Hanging Rods.
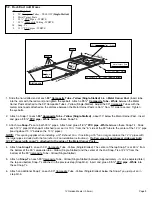
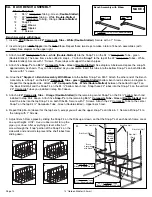
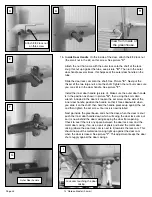
7. Insert the Rafters into the Metal Fittings of the side Ridge Frame one at a time. Slide a
Metal Ring
on Rafters #2, 3, 4 & 6.
Do not tighten the eyebolts until all the Rafters are in place. Once all Rafters are inserted into the metal fittings of the side Ridge
frames, tighten the eyebolts. Adjust Rafters on the front, middle and back end walls so the line drawn is even with the post of the fitting.
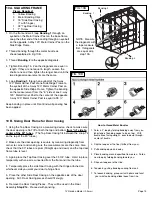
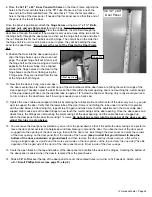
8. Slide the Metal Rings up to the Hanging Rods. Adjust the “U” bracket so it straddles the hanging rod.
Slide a
1 ½” x 3/16” machine screw
through the bolt hole of the Metal Rings and attach a
3/16” wing
nut
.
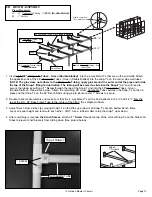
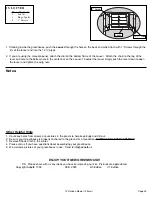
9. Attach a
Zip Tie
around the Rafter and Metal Corner Post at each end wall. Do this on Rafters #1, 5 &
7 - Front, middle and back end wall. See diagram to the right.
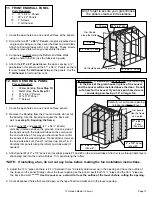
9. TOP RIDGE ASSEMBLY
Pieces required:
1 8’ Top Ridge Frame,
made in step 3A
1 4’ Top Ridge Frame,
made in step 3B
14 54 ¼” PVC pipes - Yellow
1 4-Way 120° Metal-T
8 Metal Rings
8 1 ½” x 3/16” Machine Screws
8 3/16” wing nuts
6 Large Black Zip Ties
Metal Ring
Rafter
Hanging Rod
4-Way 120° Metal-T
8’ Top Ridge Frame
4’ Top Ridge Frame
54 ½” PVC pipe
(Rafter #1)
Zip Tie
Rafter #7
Rafter #5


