

Sitex SP38 Installation and Operation
Document PN
29010101
V2r0
- 6
6
-
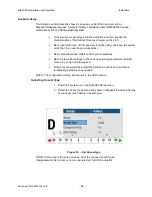
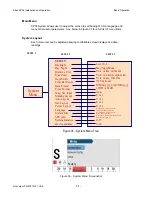
Drive Setup Continued
After detecting the drive type, a
SP38
with an RFU gives you the option to bleed your
hydraulic steering system. If you wish to do this, please refer to the hydraulic system’s
manual. When all bleeding is done, press the
ENTER
button on the Control Head.
If you do not have a hydraulic system, just press the
ENTER
button on the Control Head.
When the
SP38
with an RFU is testing the drive system’s performance, it will run the
rudder from hard-over port to hard-over starboard a number of times. It will also make a
series of short movements of the rudder – quick starts and stops – in order to determine
a base reference for how the steering system responds to the typical small movements
the autopilot uses during normal operation.
After the autopilot has determined the time span for a Hard Over to Hard Over movement
of the rudder, there are several possible results:
If the HO-HO time is fast, the autopilot will have difficulty
steering the vessel properly and you need to revisit the
hydraulic setup.
If the HO-HO time is too slow (more than ~22 seconds), you
will see a message on the screen.
In either case, you will need to make some changes to the drive system, to slow it
down or speed it up, as determined by your specific application.
On most boats, it is probably not necessary to slow down the rudder, unless the
HO-HO time is less than ~8 seconds. However, every vessel is different, and so the
choice is left up to you.
Adjust your Hydraulic pump for either more or less flow depending on the HO-HO time
change needed.
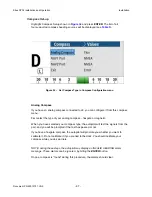
. When Drive Setup is all done, record the settings and choices you made, in
Settings
- Compass Setup – Dockside
Installation
Содержание SP38 Autopilot
Страница 2: ......
Страница 14: ...Sitex SP38 Installation and Operation Document PN 29010101 V2r0 13 ...
Страница 15: ...Sitex SP38 Installation and Operation Document PN 29010101 V2r0 14 Introduction ...
Страница 16: ...Sitex SP38 Installation and Operation Document PN 29010101 V2r0 15 ...
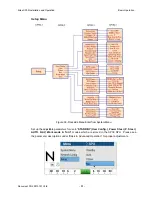
Страница 25: ...System Overview Sitex SP38 Installation and Operation Document PN 29010101 V2r0 24 System Overview ...
Страница 26: ...Sitex SP38 Installation and Operation Document PN 29010101 V2r0 25 ...
Страница 35: ...Sitex SP38 Installation and Operation Document PN 29010101 V2r0 34 Installation ...
Страница 36: ...Sitex SP38 Installation and Operation Document PN 29010101 V2r0 35 ...
Страница 73: ...Sitex SP38 Installation and Operation Basic Operation Document PN 29010101 V2r0 72 Basic Operations ...
Страница 74: ...Sitex SP38 Installation and Operation Document PN 29010101 V2r0 73 ...
Страница 108: ...Sitex SP38 Installation and Operation Document PN 29010101 V2r0 107 ...
Страница 109: ...Sitex SP38 Installation and Operation Document PN 29010101 V2r0 108 Advanced Operations ...
Страница 110: ...Sitex SP38 Installation and Operation Document PN 29010101 V2r0 109 ...
Страница 123: ...Sitex SP38 Installation and Operation Document PN 29010101 V2r0 122 Care and Maintenance ...
Страница 124: ...Sitex SP38 Installation and Operation Document PN 29010101 V2r0 123 ...
Страница 127: ...Sitex SP38 Installation and Operation Document PN 29010101 V2r0 126 Appendices ...
Страница 128: ...Sitex SP38 Installation and Operation Document PN 29010101 V2r0 127 ...
Страница 156: ...Sitex SP38 Installation and Operation Document PN 29010101 V2r0 155 Warranty ...
Страница 157: ...Sitex SP38 Installation and Operation Document PN 29010101 V2r0 156 User Notes and Settings ...
Страница 158: ...Sitex SP38 Installation and Operation Document PN 29010101 V2r0 157 ...
Страница 162: ...Sitex SP38 Installation and Operation User Notes and Settings Document PN 29010101 V2r0 161 User Notes ...