60 90 570 D 3485
26
D 3485.201.04.09.02
09.2007
4 Installation
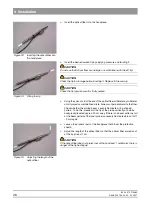
¾
Insert the optical fiber in to the handpiece.
¾
Insert the desired curved tip by applying pressure and twisting it.
CAUTION
Do not use the 320 µm fiber or one larger in combination with the 60° tip!
CAUTION
Check the tip for damage before inserting it. Replace it if necessary.
CAUTION
Check the tip to make sure it is firmly seated.
¾
Using the scissors, trim the end of the optical fiber millimeter by millimeter
until it projects a well-defined circle. Always cut perpendicular to the fiber.
Check whether the aiming beam is evenly illuminated, ring-shaped
pattern. To do this, please aim the tip of the probe vertically at a white
background located approx. 20 cm away. If there is no beam pattern at all
or the beam pattern of the laser probe is unevenly illuminated pls. cut off 1
- 2 mm again.
¾
Loosen the proximal part of the handpiece that blocks the protective
sheath
.
¾
Adjust the length of the optical fiber so that the optical fiber projects out
of the tip at least 1 cm.
CAUTION
If the optical fiber does not project out of the tip at least 1 centimeter, there is
danger of the tip heating up.
Figure 18:
Inserting the optical fiber into
the handpiece
Figure 19: Fitting the tip
Figure 20: Adjusting the length of the
optical fiber
Содержание sirolaser blue
Страница 1: ...k W MVKOMMT b pfoli l f...
Страница 57: ......


