background image

60 90 570 D 3485
D 3485.201.04.09.02

09.2007

41

7  Cleaning and sterilization 

båÖäáëÜ

båÖäáëÜ

Handpiece

¾

Remove the tip from the handpiece.

¾

Disassemble the handpiece by unscrewing the two threaded joints.

¾

Clean the handpiece and tip by scrubbing them with a suitable brush 
under running water. Clean the distal end of the optical fiber using a soft, 
damp cloth.

¾

If a finger switch is installed, remove it as described in Chapter 4.6 
Installation (page 21).

7.2

Disinfection

¾

Disinfect the optical fiber and the take-up reel by spray or wipe 
disinfection.

¾

Disinfect the finger switch by spray or wipe disinfection.

NOTICE 

i

Use only disinfectants that comply with the requirements of your national 
authorities and whose bactericidal, fungicidal and virucidal properties have 
been tested and properly certified.

You can use for instance: MinutenSpray classic from Alpro; MinutenWipes 
from Alpro. In the USA: Cavicide

®

 and Caviwipes

TM

.

Observe the instructions provided by the manufacturers of these disinfec-
tants.

CAUTION 

The optical fiber may be damaged if it is seriously bent or improperly routed in-
side the handpiece. This may constitute a health hazard for patients, dentists 
and dental assistants. The minimum bending radius of the light guide is 4.5 cm 
(diameter: 9 cm). Be careful not to pinch or tear the optical fiber when inserting 
or cleaning it.

7.3

Sterilization

WARNING 

The handpiece and tips must be sterilized prior to initial use and before each 
subsequent use.

NOTICE 

i

Remove any possible water residues from the handpiece and tips.

¾

The disassembled handpiece and the tips may be sterilized only in 
autoclaves with saturated water vapor at 135 °C (275 °F), 3 min. holding 
time and 2.13 bar (33.88 psi) overpressure. 

CAUTION 

The optical fiber may be damaged if it is seriously bent or improperly routed in-
side the handpiece. This may constitute a health hazard for patients, dentists 
and dental assistants. The minimum bending radius of the light guide is 4.5 cm 
(diameter: 9 cm). Be careful not to pinch or tear the optical fiber when inserting 
or cleaning it.

Содержание sirolaser blue

Страница 1: ...k W MVKOMMT b pfoli l f...

Страница 2: ...out the prior written consent from Sirona Dental Systems GmbH Fabrikstrasse 31 64625 Bensheim Germany Sirona Dental Systems GmbH reserves the right to correct or modify the present document without pr...

Страница 3: ...2 3 3 Transport and storage 14 3 3 1 Transport and storage 14 3 3 2 Operating conditions 14 3 4 Precautions 15 4 Installation 17 4 1 Packaging contents 17 4 2 Spare parts 18 4 2 1 Accessories 18 4 3 L...

Страница 4: ...Cleaning and sterilization 40 7 1 Cleaning 40 7 2 Disinfection 41 7 3 Sterilization 41 7 4 Cleaning of the laser unit and finger switch 42 8 Maintenance and service 43 8 1 Calibration Check 43 8 1 1 C...

Страница 5: ...rings 21 Figure 11 Connection of the finger switch 22 Figure 12 Take up device 23 Figure 13 Connector 23 Figure 14 Optical fiber with protection caps 23 Figure 15 Optical fiber with magnet 23 Figure...

Страница 6: ...utinely inspected and maintained in accordance with the instructions given in the maintenance section of this manual Accidental irradiation to other than the target tissue may result in laser burn Sur...

Страница 7: ...tions must be complied with WARNING Using controls or settings or performing procedures other than those specified in this manual may result in hazardous radiation exposure 1 3 Instructions on use of...

Страница 8: ...formation 1 5 Disposal If you plan to discontinue the use of your SIROLaser and intend to dispose of the unit make sure to observe the applicable legal provisions Please contact your local dental dist...

Страница 9: ...part according to IEC 60601 1 Please refer to manual first Refers to directive 2002 96 EC and EN 50419 Do not dispose with domestic waste Socket for DC input from Sinpro MPU50 105 switching power sup...

Страница 10: ...in auto claves with saturated water vapor at 135 C 275 F 3 min holding time 2 13 bar 30 89 psi overpressure 1 Software extention CU NU SA Laser STOP CONTINUOUS EMISSION Continuous laser emission PULS...

Страница 11: ...ymbols and abbreviations b b 2 3 Abbreviations cm2 Square centimeter Hz Hertz s Seconds W Watt mW Milliwatt one thousandth of a Watt J Joule nm Nanometer V Volt IR Infrared diode NOHD Nominal Ocular H...

Страница 12: ...unit is not suitable for use in the presence of anesthetics that are flammable when in contact with air oxygen or nitrogen monoxide 3 2 Safety precautions SIROLaser is manufactured in compliance with...

Страница 13: ...cal instruments such as microscopes eye loupes or magnifiers together with the original protective goggles Adequate eye protection is no longer ensured in this case CAUTION Always cover the optical fi...

Страница 14: ...and easy transport However please observe the following CAUTION Do not leave the laser unit in a car parked in the sun The temperature inside the car can reach levels that may damage its components T...

Страница 15: ...y before putting it into operation see chapter 4 Make sure that the electrical system is equipped with the required devices for protection against direct and indirect contact thermomagnetic switches r...

Страница 16: ...the special protection caps Do not allow dust dirt or other foreign bodies to enter the optical fiber socket Always make sure that the optical system is clean be fore connecting the optical fiber WAR...

Страница 17: ...are included in the scope of supply of the SIROLaser Qty Designation 1 SIROLaser unit 1 Transport case Power cord 1 1 Dependent on the SIROLaser version 1 Switching power supply 1 Interlock connector...

Страница 18: ...Power cord EU 60 56 613 1 Power cord AUS 61 29 741 1 Power cord DK 61 30 012 1 Interlock connector 60 56 472 1 Y connector 60 56 506 1 Interlock jumper 61 47 024 1 Take up reel incl 200 m optic fiber...

Страница 19: ...n and maintenance of the electrical system to which the SIROLaser is connected Please request the technical data sheet with wiring diagram for installation of the interlock device NOTICE i If national...

Страница 20: ...socket 4 5 Connection of the foot switch Plug the foot switch cable into the socket of the Y connector or into the interlock jumper NOTICE i The degree of protection of the foot switch is IPX5 Therefo...

Страница 21: ...Mount the finger switch Screw the distal part of the handpiece back onto the rest of the handpiece Run the optical fiber through the guiding rings on the finger switch supply cable Figure 7 Distal par...

Страница 22: ...vary For this reason Sirona Dental Systems GmbH assumes no liability in such cases Use Sirona optical fibers only 4 7 2 Initial use of an optical fiber Initial check Before using an optical fiber for...

Страница 23: ...cal part NOTICE i The SIROLaser detects that the optical fiber is also properly connected only if it is connected to the connector If the connector or the optical fiber is missing an error message is...

Страница 24: ...chanical damage to the optical fiber Protect the optical fiber socket see Fig 17 page 24 as well as the optical fiber see Fig 14 page 23 itself with the special protection caps CAUTION Always protect...

Страница 25: ...cal fiber either turn off the laser and contact Sirona Dental Systems GmbH your local dental distributor or your authorized service center WARNING Using the laser unit without a properly working aimin...

Страница 26: ...fiber Check whether the aiming beam is evenly illuminated ring shaped pattern To do this please aim the tip of the probe vertically at a white background located approx 20 cm away If there is no beam...

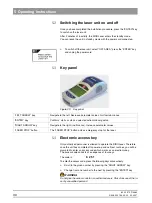
Страница 27: ...your thumbnail NOTICE i After stripping the optical fiber bend it back and forth to make sure it has not been damaged 4 8 Power supply connection Connect the power cord to the DC IN socket at the back...

Страница 28: ...ppear automatically If this message is displayed you must select an optical fiber diameter with the RIGHT ARROW key and then confirm your selection with the ENTER key If this message is displayed you...

Страница 29: ...switch was pressed during menu selection or that you foot switch or finger switch is defective short circuited Please make sure that neither the finger switch nor the foot switch is pressed during men...

Страница 30: ...ch works as an electronic key The access code consists of a sequence of four keys The code is 6 2 5 1 To enter the access code press the following keys consecutively Scroll to the given number by pres...

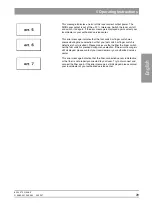
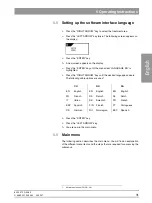
Страница 31: ...ighlighted Press the RIGHT ARROW key until the desired language appears The following abbreviations are used1 Press the ENTER key Press the LEFT ARROW key You are now in the main menu 5 6 Main menu Th...

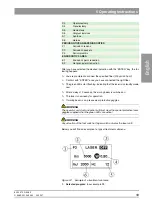
Страница 32: ...enus with preset treatment parameters Press the ENTER key to access the periodontics area PERIODONTICS AREA In this area you will find a number of periodontic submenus with preset treatment parameters...

Страница 33: ...f aiming beam is on please wear protective goggles WARNING The operator assistant and patient all must wear the special protective laser goggles supplied when the green LEDs are active WARNING Any act...

Страница 34: ...power levels may result in reduced treatment efficacy 5 Frequency Modulation frequency of the laser unit The frequency range is from 1 to 10 000 Hz If set to zero CW for continuous wave mode is displ...

Страница 35: ...itch or finger switch If set to zero appears on the display and the laser remains activated as long you press the foot switch or finger switch You can set a time between 100 ms and 60 s 60000 ms in 50...

Страница 36: ...a tion To change the output parameters press the ENTER key As soon as the area has been selected you can change the parameters by pressing the RIGHT ARROW or LEFT ARROW key When you press the red LASE...

Страница 37: ...ting Instructions b b A function is activated when it is highlighted To save the changes made press the ENTER key Pressing the ENTER key again highlights the next function To quit the SETUP AREA press...

Страница 38: ...Risk Soft and hard tissue necrosis or overheating of the tooth Countermeasure Use the laser beam like a scalpel perpendicular to the treated area and never direct it to one single spot for too long D...

Страница 39: ...art in the apical re gion and work upward toward the crown z Gangrenous canals WARNING Risk Contraction fusion and bone necrosis Countermeasure Measure the depth and stop 1 mm above the apex Never dir...

Страница 40: ...e case 7 1 Cleaning NOTICE i Manual cleaning must always be combined with disinfection NOTICE i All tissue residues must be removed from the optical fiber before it is detached from the handpiece This...

Страница 41: ...instructions provided by the manufacturers of these disinfec tants CAUTION The optical fiber may be damaged if it is seriously bent or improperly routed in side the handpiece This may constitute a he...

Страница 42: ...all products commonly used for medical electrical equipment such as MinutenSpray classic CAVICIDE or Caviwipe Observe the instructions provided by the manufacturers of these disinfec tants Disinfect...

Страница 43: ...m a power between 0 5 W and 7 W and a resolution better than 5 that has been properly calibrated 8 1 1 Calibration Check without use of an external power meter WARNING You must wear the laser protecti...

Страница 44: ...interlock device or is locked Switch on the SIROLaser and go to the SETUP AREA Select SERVICE Check to see that the fiber is neatly cut and that the laser beam projects a red circle The circle must be...

Страница 45: ...the follow ing flow chart Start One of the three power values is outside the permissible range Has the optical fiber been properly prepared Trim the end of the fiber so that it projects a well define...

Страница 46: ...be complied with and the corresponding checks must be performed The manufacturer accepts responsibility for the safety of the laser unit only if the following prerequisites are fulfilled z Modificati...

Страница 47: ...d by Sirona only to authorized agents and after providing a training course to the technical personnel Please contact your local dental distributor or authorized service center for technical support T...

Страница 48: ...pped mode Single or repeated pulse Pulse duration 100 ms 60 s in 50 ms intervals Optical fiber thicknesses 200 320 and 400 m NA 0 22 Start Electrical foot switch finger switch plus electronic access k...

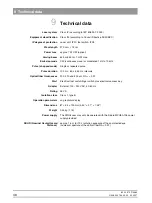
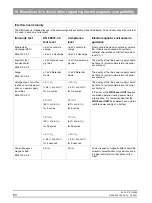
Страница 49: ...n electromagnetic interference that affects a particular device or system where the device or system remains operative with a certain level of performance ELECTROMAGNETIC EMISSION Emission test Compli...

Страница 50: ...ital environment Surge EN 61000 4 5 1 kV differential mode 1 kV differential mode The quality of the line power supply should be that of a typical commercial or hospital environment Voltage dips short...

Страница 51: ...part of the unit including cables than the recommended separation distance calcu lated from the equation applicable to the fre quency of the transmitter d 1 2 P from 150 kHz to 80 MHz d 1 2 P from 80...

Страница 52: ...ximum output power of transmitter in watt Separation distance according to frequency of transmitter in meters From 150 kHz to 80 MHz d 1 2 P From 80 MHz to 800 MHz d 1 2 P From 800 MHz to 2 GHz d 2 3...

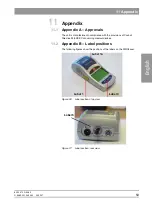
Страница 53: ...manufactured in compliance with the provisions of Council Directive 93 42 EEC concerning medical devices 11 2 Appendix B Label positions The following figures show the positions of the labels on the...

Страница 54: ...60 90 570 D 3485 54 D 3485 201 04 09 02 09 2007 11 Appendix Figure 28 Label positions bottom view Label 2 Label 6 Label 3 Label 8 Label 7...

Страница 55: ...60 90 570 D 3485 D 3485 201 04 09 02 09 2007 55 11 Appendix b b B2 Label list The following labels are attached to the SIROLaser Label 1a Label 1 Label 2 Label 3 Label 4...

Страница 56: ...60 90 570 D 3485 56 D 3485 201 04 09 02 09 2007 11 Appendix Label 5 Label 6 Label 7 Label 8 CU1 NU1 SA1 1 Software extention CU NU SA CU NU SA1 1 Software extention CU NU SA GUS1...

Страница 57: ......

Страница 58: ...t K p a p d e OMMRJOMMT p W m d a PQURKOMNKMQKMVKMO MVKOMMT KJk KW NMT UMQ f p a p d e rp W c PN SQSOR _ d K K p a p ii QUPR p a I p NMM I k OUOTP rp l k SM VM RTM a PQUR...

Отзывы: