5-26
SENDING AN IMAGE IN SCAN MODE
This section explains the basic procedure for transmission in scan mode (Scan to E-mail, Scan to FTP, Scan to
Desktop, and Scan to Network Folder).
TRANSMITTING AN IMAGE
When a default address is configured in "Default Address Setting" in the system settings (administrator), the mode cannot be
changed, the destination cannot be changed, and destinations cannot be added. If you wish to change the mode or
destination, touch the [Cancel] key in the touch panel and then follow the procedure below.
1
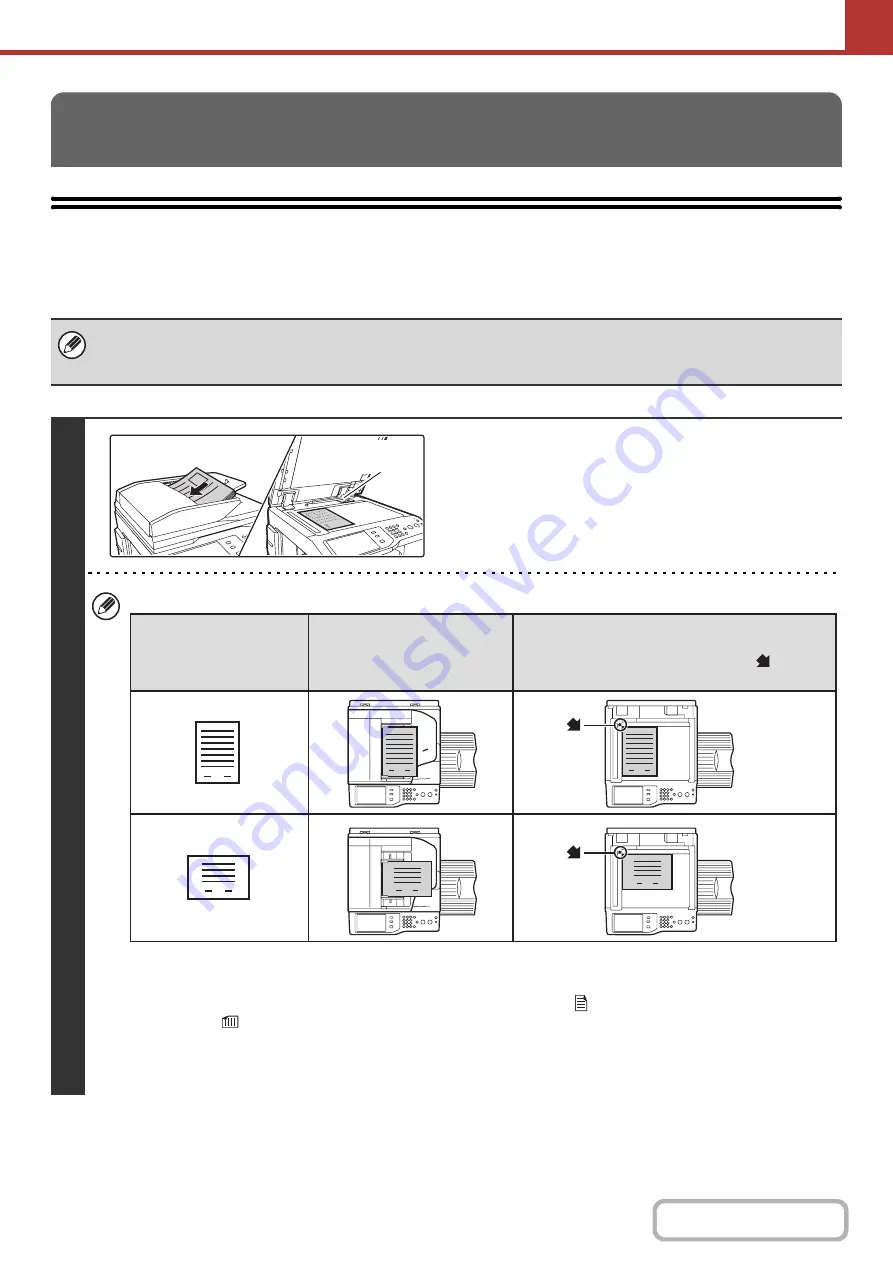
Place the original.
Do not place any objects under the original size detector.
Closing the automatic document feeder with an object
underneath may damage the original size detector plate and
prevent correct detection of the document size.
• When placing the originals, orient them as shown below.
* To place a large portrait-oriented original, place it as shown above in "Landscape orientation" and specify the
placement orientation in step 3.
• Place 5-1/2" x 8-1/2" (A5) size originals in portrait (vertical) orientation (
). If placed in landscape (horizontal)
orientation (
), an incorrect size will be detected. For a 5-1/2" x 8-1/2"R (A5R) size original, enter the original size
manually.
• Originals cannot be scanned in succession from both the automatic document feeder and the document glass and
sent in a single transmission.
1
1
Original size
detector
1
1
1
1
1
1
Document feeder tray
Place the original face up.
Portrait orientation*
Landscape orientation
Document glass
Place the original face down and align the
corner with the tip of the arrow mark
in the
top left corner of the document glass scale.
Originals
Содержание MX-2600N
Страница 11: ...Conserve Print on both sides of the paper Print multiple pages on one side of the paper ...
Страница 34: ...Search for a file abc Search for a file using a keyword Search by checking the contents of files ...
Страница 35: ...Organize my files Delete a file Delete all files Periodically delete files Change the folder ...
Страница 282: ...3 18 PRINTER Contents 4 Click the Print button Printing begins ...


