3-58
SAVING AND USING PRINT FILES
(Retention/Document Filing)
This function is used to store a print job as a file on the
machine's hard drive, allowing the job to be printed from
the operation panel when needed. The location for
storing a file can be selected to prevent the file from
being mixed together with files of other users.
When printing from a computer, a password (5 to 8
digits) can be set to maintain the secrecy of information
in a stored file.
When a password is set, the password must be entered
to print a stored file from the machine.
Hold Only
This setting is used to hold a print job on the machine's hard drive without printing it.
Hold After Print
This setting is used to hold a print job on the machine's hard drive after it is printed.
Sample Print
When a print job is sent to the machine, only the first set of copies is printed. After checking the contents of the first set
of copies, you can print the remaining sets from the operation panel of the machine. This prevents the occurrence of
excessive misprints.
To print files stored on the machine's hard drive, see "
" (page 6-30) in "6. DOCUMENT
FILING".
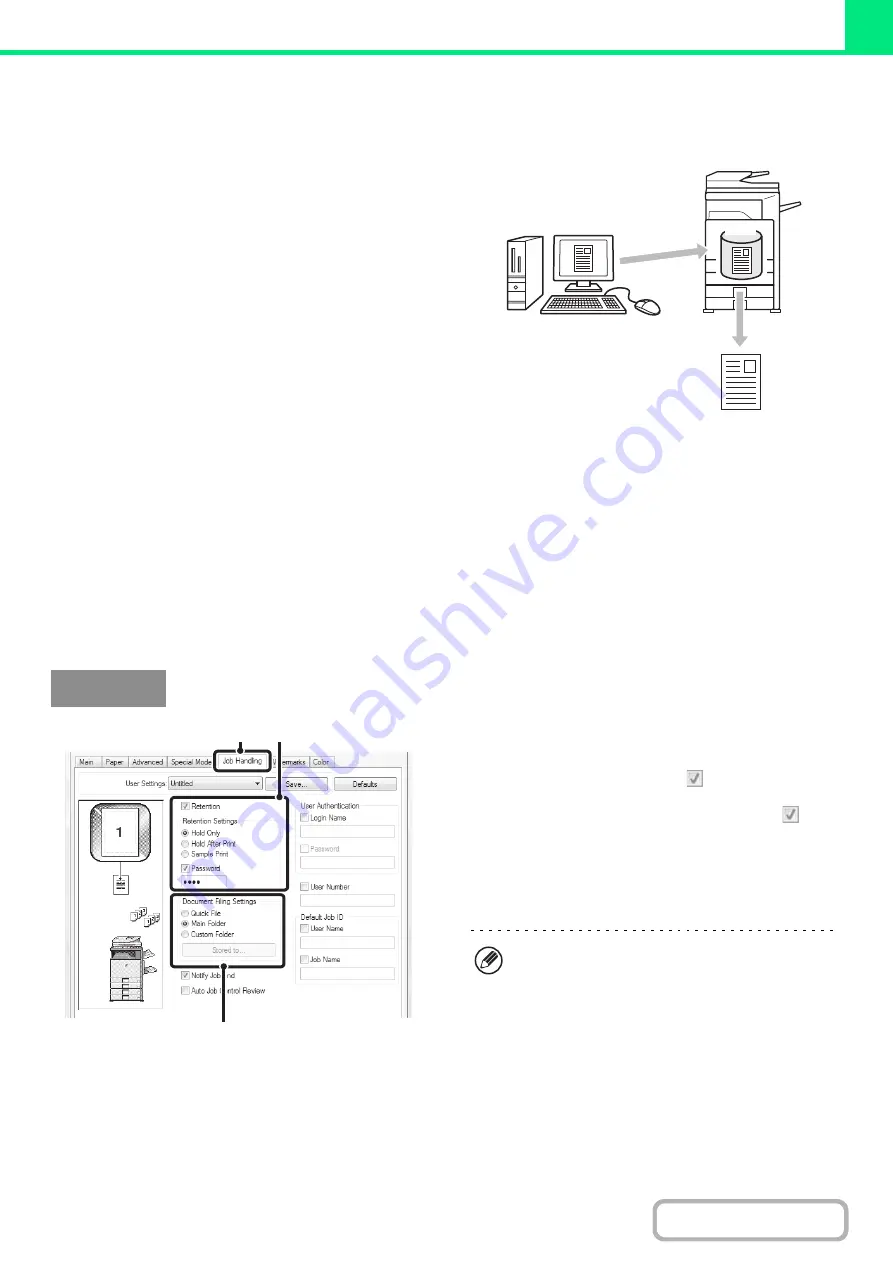
(1) Click the [Job Handling] tab.
(2) Select the retention setting.
Click the [Retention] checkbox
. Select the retention
method in "Retention Settings". To enter a password (5 to
8 digit number), click the [Password] checkbox
.
(3) Select document filing settings.
Select the folder for storing the file in "Document Filing
Settings". If you selected [Custom Folder], click the
[Stored to] button to select the folder.
HDD
Windows
(1)
(2)
(3)
• When [Quick File] is selected, "Retention Settings"
will be set to [Hold After Print] only.
• When [Quick File] is selected, the password entered
in "Retention Settings" is cleared and cannot be
used.
• To store a file in a custom folder, the custom folder
must first be created using "Document Filing
Control" in the system settings (administrator). If a
password has been established for a custom folder,
enter the "Folder Password" in the folder selection
screen.
Содержание MX-2600N
Страница 11: ...Conserve Print on both sides of the paper Print multiple pages on one side of the paper ...
Страница 34: ...Search for a file abc Search for a file using a keyword Search by checking the contents of files ...
Страница 35: ...Organize my files Delete a file Delete all files Periodically delete files Change the folder ...
Страница 282: ...3 18 PRINTER Contents 4 Click the Print button Printing begins ...


