


3: Working on the PaperPort Desktop
42
Table
of Contents
W
ORKING
IN
P
AGE
V
IEW
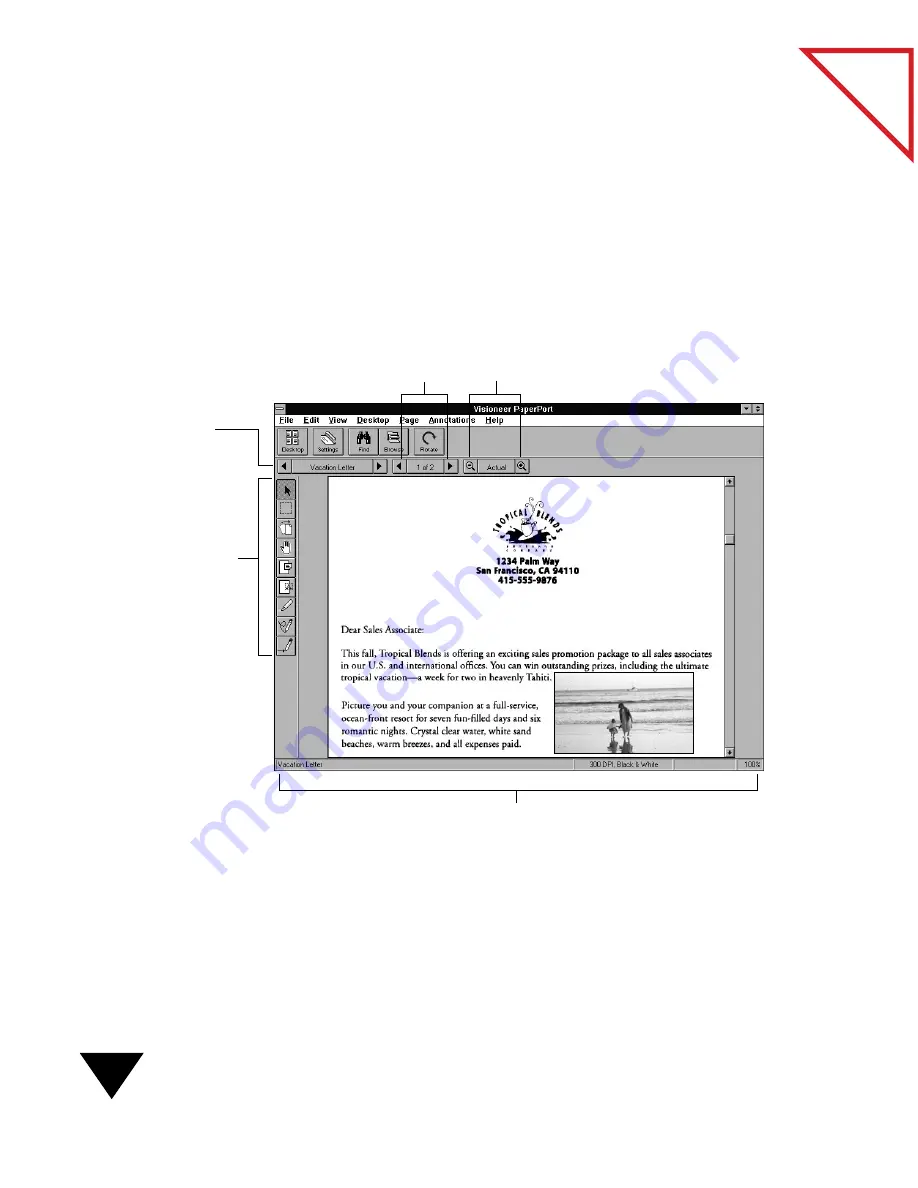
Page View displays one page at a time. Page View is also where you can
add annotations to a page. Use the “navigators” to display other pages of a
stack, see other items, or reduce and enlarge the image. The folders do
not appear in Page View so you can have the entire window for viewing
the page.
T
HE
C
OMMAND
B
AR
The buttons on the Command Bar in Page View are a subset of the ones
that appear in Desktop View. The rest of the buttons do not apply to the
Page View of the scanned item. For more information, see “The
Command Bar” earlier in this chapter.
Page Navigator. Click the
arrows to scroll between pages
in a stack. Click the middle
area to go to a specific page.
Annotation Tool Bar. Use
these Annotation tools to
add notes, highlight areas,
or cut and paste sections.
Document Navigator.
Click the arrows to
scroll among items on
the PaperPort Desktop.
Click the middle area to
see a list of items on the
PaperPort Desktop.
Zoom Navigator. Click the “minus” and “plus” magnifying
glasses to reduce or enlarge the image. Click “Actual” to return
the image to actual size. The scale of the image is shown at the
lower right of the Status Bar.
Status Bar shows the item’s title, scanned dpi, or the page’s percentage of
enlargement or reduction when the cursor is in the page boundaries.
Содержание SCANSOFT PAPERPORT 3.6
Страница 6: ...viii...
Страница 7: ...V I S I O N E E R T a b l e o f C o n t e n t s P A R T O N E Getting Started...
Страница 8: ...T a b l e o f C o n t e n t s...
Страница 28: ...1 Quick Guide 20 T a b l e o f C o n t e n t s...
Страница 29: ...V I S I O N E E R T a b l e o f C o n t e n t s P A R T T W O Using PaperPort...
Страница 30: ...T a b l e o f C o n t e n t s...
Страница 42: ...2 Scanning Items 34 T a b l e o f C o n t e n t s...
Страница 58: ...3 Working on the PaperPort Desktop 50 T a b l e o f C o n t e n t s...
Страница 104: ...6 Getting Items On and Off the PaperPort Desktop 96 T a b l e o f C o n t e n t s...
Страница 126: ...7 Annotating Items 118 T a b l e o f C o n t e n t s...
Страница 142: ...8 Using PaperPort Links 134 T a b l e o f C o n t e n t s...
Страница 143: ...V I S I O N E E R T a b l e o f C o n t e n t s P A R T T H R E E Appendixes...
Страница 144: ...T a b l e o f C o n t e n t s...
Страница 152: ...A Messages 144 T a b l e o f C o n t e n t s...
Страница 166: ...C Obtaining and Installing PaperPort Viewer 158 T a b l e o f C o n t e n t s...
Страница 170: ...D Technical Information 162 T a b l e o f C o n t e n t s...
Страница 186: ...178 T a b l e o f C o n t e n t s...
Страница 187: ...179 1 Cut along the dotted line 2 Insert the page this way into the scanner Use this page to calibrate your scanner...
Страница 188: ......


