


7: Annotating Items
100
Table
of Contents
▼
NOTE: Another copy and paste option is the Copy As Text command
in the Edit menu. This option uses the OCR features of PaperPort for
text being copied from PaperPort to another application. For more
information about the Copy As Text feature, see Chapter 8, “Using
PaperPort Links.”
To copy and paste information from PaperPort:
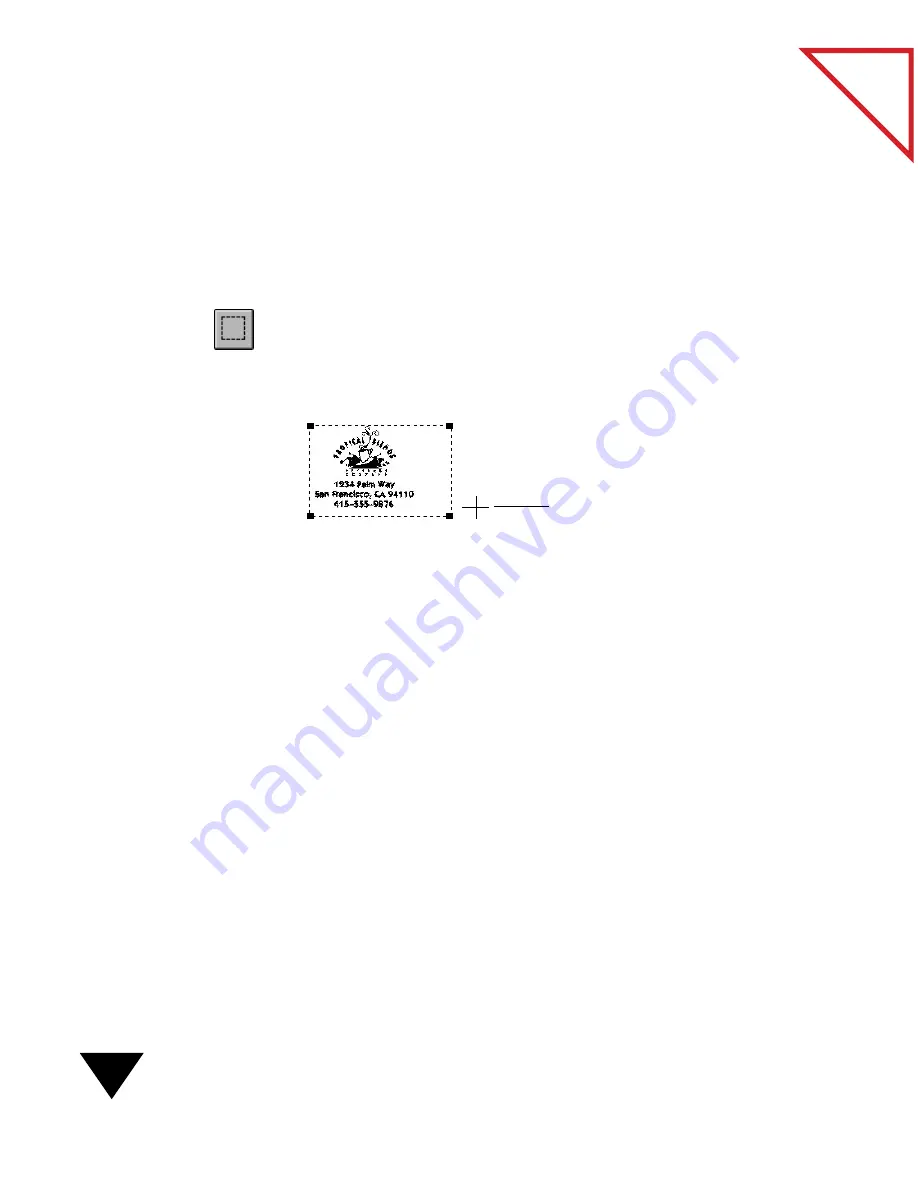
1. In Page View, click the Selection tool on the Annotation Tool Bar.
The cursor changes to a crosshair.
2. Drag the crosshair to surround the area that you want to copy. A
dashed box appears around the area as you select it.
If you need to increase or decrease the size of the area that you
selected, drag one of the handles on the dashed selection box.
3. From the Edit menu, choose Copy.
4. To paste onto another page, display that page in Page View.
To paste the selection into another application file, such as a
Microsoft Word file, switch to that file and click where you want the
selection to be pasted.
To paste the selection to the PaperPort Desktop, click the Desktop
button on the Command Bar.
5. From the Edit menu, choose Paste. The copied information appears.
A pasted selection is treated as a graphic; you cannot edit any copied
text in the word-processing file.
If you paste the selection onto another PaperPort page, it appears at
the upper-left corner.
If you paste the selection to the PaperPort Desktop, a new item
appears and it is selected.
Drag the crosshair around the
area that you want to paste.
Содержание SCANSOFT PAPERPORT 3.6
Страница 6: ...viii...
Страница 7: ...V I S I O N E E R T a b l e o f C o n t e n t s P A R T O N E Getting Started...
Страница 8: ...T a b l e o f C o n t e n t s...
Страница 28: ...1 Quick Guide 20 T a b l e o f C o n t e n t s...
Страница 29: ...V I S I O N E E R T a b l e o f C o n t e n t s P A R T T W O Using PaperPort...
Страница 30: ...T a b l e o f C o n t e n t s...
Страница 42: ...2 Scanning Items 34 T a b l e o f C o n t e n t s...
Страница 58: ...3 Working on the PaperPort Desktop 50 T a b l e o f C o n t e n t s...
Страница 104: ...6 Getting Items On and Off the PaperPort Desktop 96 T a b l e o f C o n t e n t s...
Страница 126: ...7 Annotating Items 118 T a b l e o f C o n t e n t s...
Страница 142: ...8 Using PaperPort Links 134 T a b l e o f C o n t e n t s...
Страница 143: ...V I S I O N E E R T a b l e o f C o n t e n t s P A R T T H R E E Appendixes...
Страница 144: ...T a b l e o f C o n t e n t s...
Страница 152: ...A Messages 144 T a b l e o f C o n t e n t s...
Страница 166: ...C Obtaining and Installing PaperPort Viewer 158 T a b l e o f C o n t e n t s...
Страница 170: ...D Technical Information 162 T a b l e o f C o n t e n t s...
Страница 186: ...178 T a b l e o f C o n t e n t s...
Страница 187: ...179 1 Cut along the dotted line 2 Insert the page this way into the scanner Use this page to calibrate your scanner...
Страница 188: ......


