- 101 -
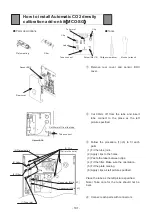
How to install Automatic CO2 density
calibration add-on kit
䠄
MCO-SG
䠅
䕔
Parts descriptions
㻌 㻌 㻌
䕔
Tools
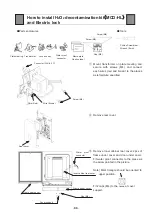
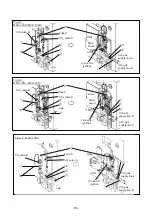
䐟
Remove rear cover and sensor BOX
cover.
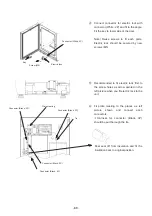
䐠
Cut 30mm off from the tube and insert
tube connect to the place as the left
picture specified.
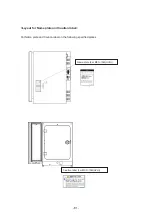
䐡
Follow the procedure (1)~(6) to fit each
parts.
(1) Fit the tube joint.
(2) Apply clips to the holes.
(3) Paste the label between clips.
(4) Fit the filter. Make sure the orientation.
(5) Fit the plate meeing.
(6) Apply clips as left picture specified.
Place the tube as the left picture specified.
Note
䠅
Take care for the tube should not be
bent.
䐢
Connect each parts with connectors.
Plate meeting
Filter
Tube joint
Clip
Label
Tube connect
Screw (M4×10)
Clip
Philips screwdriver
Monkey wrench
Sensor BOX
Rear cover
(1) Tube joint
(4) Filter
(3) Label
(5) Plate meeting
(2) Clip
Connector (White
㻌
5P)
Connector (White, 2P)
(6)Clip
(Put into the hole)
Cut 30mm off from the tube
Tube connect
Sensor BOX
Содержание MCO-19M
Страница 7: ... 4 Dimensions Power cord ...
Страница 16: ...Wiring diagram 13 ...
Страница 17: ...Circuit diagram Main PCB 14 ...
Страница 18: ... LCD PCB 15 ...
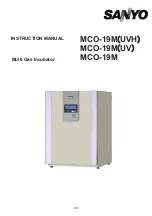
Страница 110: ...MCO 19M UVH MCO 19M UV MCO 19M Multi Gas Incubator INSTRUCTION MANUAL 107 ...
Страница 112: ...CONTENTS SPECIFICATIONS P 74 PERFORMANCE P 75 SAFETY CHECK SHEET P 76 109 2 ...
Страница 183: ...Fig A Stacking plate B Stacking plate A Protective sticker Front panel Hook Front 180 73 ...
Страница 187: ...SANYO Electric Co Ltd Printed in Japan DC3186 150B ...

