- 63 -
䣊 䢴 䣑 䢴
䣆 䣧 䣥 䣱 䣰
䣗 䣘
䣔 䣧 䣵 䣱 䣮 䣸 䣧
䣕 䣶 䣧 䣲 䢼
䢵
䣖 䣧 䣯 䣲 䢼 䢶 䢷 䢰 䢲
䣅
䣙 䣣 䣴 䣯 䣫 䣰 䣩
䣗 䣲
䣆 䣱 䣱 䣴 䢼 䣎 䣱 䣥 䣭 䣧 䣦
䢻
䣫 䣰
䢲
䣯
䢹
㻌
㻌
㻌
㻌
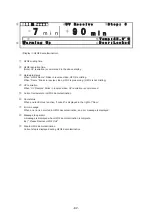
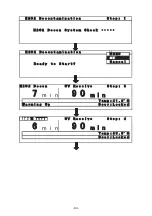
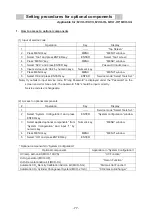
H2O2 decontamination
Procedures
MENU
key
0
Locate trays and humidifying pan to the position.
Fill 6% H2O2 solution in optional H2O2 unit (MCO-HP).
Connect the cable to the port in the inner rear wall and close both inner and outer door.
1
Press H2O2 key for 3 seconds in Top Screen.
2
“H2O2 Decon System Check…” is displayed and an appratus ensures to connect the cable
correctly or to check H2O2 solution level or to check door open.
3
“Ready to Start?” is displayed and press MENU key to select “OK” and press ENTER key.
OK
4
Warming up and H2O2 misting is commenced.
“H2O2 Decon” blinks in reverse video in the upper left corner of the display.
5
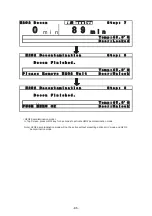
An apparatus stops H2O2 misting when it reaches predetermined amount and starts
UV resolution. “UV Resolve” blinks in reverse video in the upper center of the display.
6
“Please Remove H2O2 Unit” is displayed after H2O2 decontamination is complete.
Open both outer and inner door, then disconnect the cable from H2O2 unit.
7
“PUSH MENU OK” is displayed in the lower left side of the display.
Press MENU key and select “OK”.
OK
8
Press ENTER key to return to Top Screen.
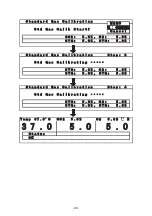
Step 0 1 2
3
4
5 6 7 8
Status
Run in the
specificati
on
Check
H2O2 unit
Stand-by Warming
up
Primary
H2O2
misting
Primary
H2O2
preservati
on
Secondary
H2O2
misting
UV
resolution
Finish
Ultrasonic
oscillator
OFF
ĺ
ĺ
ĺ
ĺ
ĺ
ĺ
ĺ
ĺ
ĺ
ON OFF ON OFF
OFF
UV
Lamp
OFF
ĺ
ĺ
ĺ
ĺ
ĺ
ĺ
ĺ
ĺ
ĺ
ĺ
ĺ
ĺ
ĺ
ĺ
ĺ
ĺ
ĺ
ĺ
ON OFF
Chamber
temp.
37.0
䉝
ĺ
ĺ
ĺ
ĺ
ĺ
ĺ
37.0
䉝
Ļ
45.0
䉝
45.0
䉝
ĺ
ĺ
ĺ
ĺ
ĺ
ĺ
ĺ
ĺ
ĺ
45.0
䉝
Electric
lock
OFF
ĺ
ĺ
ĺ
ĺ
ĺ
ĺ
ON
ĺ
ĺ
ĺ
ĺ
ĺ
ĺ
ĺ
ĺ
ĺ
ĺ
ĺ
ĺ
OFF
Display
Warming up
temp. blinks
“H2O2
Decon”
blinks n
reverse
video
“Decon”
blinks in
reverse
video
“H2O2
Decon”
blinks n
reverse
video
“UV
Resolve”
Blinks in
reverse
video
Diagnosis
to proceed
next step
Select
“Start OK”
“Decon”
temperature
is +/-1.0
䉝
H2O2
resolution
level or
H2O2
misting time
is over
15min.
(Skip) (Skip)
Note) In default setting, Step 5 (Primary H2O2 preservation time) and 6 (Secondary H2O2 misting time) are set in 0
minute, so it means that Step 7 will be commenced after Step 4.
When both setting times for Step 5 and 6 are 0 minute, the display will be changed from “Step 5” to “Step 6” if
primary H2O2 misting is not complete until predetermined time expires.
Set temperature will return to 37
䉝
when press MENU key and select “OK” and press ENTER key in Step 8.
㻌
㻌
㻌
Содержание MCO-19M
Страница 7: ... 4 Dimensions Power cord ...
Страница 16: ...Wiring diagram 13 ...
Страница 17: ...Circuit diagram Main PCB 14 ...
Страница 18: ... LCD PCB 15 ...
Страница 110: ...MCO 19M UVH MCO 19M UV MCO 19M Multi Gas Incubator INSTRUCTION MANUAL 107 ...
Страница 112: ...CONTENTS SPECIFICATIONS P 74 PERFORMANCE P 75 SAFETY CHECK SHEET P 76 109 2 ...
Страница 183: ...Fig A Stacking plate B Stacking plate A Protective sticker Front panel Hook Front 180 73 ...
Страница 187: ...SANYO Electric Co Ltd Printed in Japan DC3186 150B ...

