background image

93 


The screen displays: current chainage, the azimuth angle of the tangent on the 

chainage, and the function key of the establishing new line. The system provides 

four functions: defining line, curve, spiral, and point.   

Select  a  function  key,  enter  the  detailed  information  of  the  chainage,  the 

alignment elements will be created. Press  BACK to calculate the new chainage 

and  azimuth  angle  automatically  and  return  to  the  alignment  main  menu.  Now 

other line type can be defined. Press ESC to quit the present screen and return 

to  the  screen  of  alignment  element.  Modification  on  the  element  entered 

previously is available.     

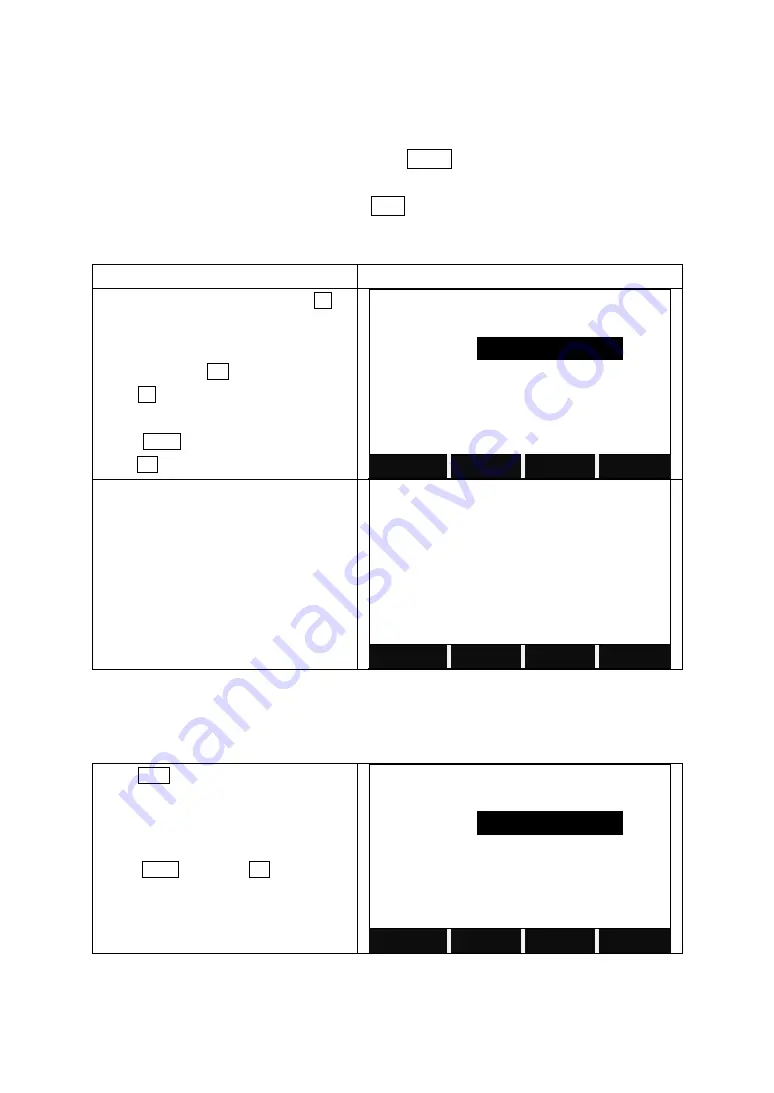
STEPS 

DISPLAY 

On  Page  3/3  of  Programs,  press  F1  to 

start 

Roads. 

After  setting  the  job,  station  and 

orientation, press F4. 

Press F1 to start to 

Define HZ Alignment.


Input the chainage, N/X, Y/E. 

Press  NEXT,  and  confirm  to  save  by 

press OK 

Define HZ AL

    1/0


Type 

Start  Pt 


Chain. 

1000.000  m 


X/N 

1050.000  m 


Y/E 

1100.000  m 


PREV 

NEXT 

SEARCH 


Then  it  displays  the  main  menu  of 

defining alignment.   

HZ Alignment Type


Chain. 

1000.000  m 


AZ 

00°00

00” 


LINE 

ARC 

SPRIAL 

POINT 


Line 

When  the  start  point  or  other  line  type  is  defined,  user  can  define  line.  A  line 

consists of azimuth angle and distance. The distance value can not be negative. 

Press LINE to start 

Define HZ Alignment

Input  the  azimuth  and  the  length  of  the 

line.   


Press  NEXT  and  then  OK  to  save  the 

edited alignment data.   

Define HZ AL

    2/1


Type 

LINE 


AZ 

----°--

′--

” 


Length 

----.---  m 


PREV 

NEXT 

SEARCH 


Содержание STS-750RC Series

Страница 1: ......

Страница 2: ...G AND STORE OF INSTRUMENT 12 2 2 INSTRUMENT SETUP 12 2 3 BATTERY POWER REMAINING DISPLAY 14 2 4 REFLECTOR PRISMS 15 2 5 MOUNTING AND DISMOUNTING INSTRUMENT FROM TRIBRACH 16 2 6 EYEPIECE ADJUSTMENT AND COLLIMATING OBJECT 16 2 7 INPUTTING MODE 16 2 8 POINTSEARCH 17 2 9 WILDCARD SEARCH 19 3 ROUTINE MEASUREMENT 20 3 1 DISTANCE SURVEY CAUTIONS 20 3 2 EDM SETTINGS 20 3 3 START SURVEY 25 4 FUNCTIONS 31 4...

Страница 3: ... 5 PROGRAMS 42 5 1 SETTING JOB 42 5 2 SETTING STATION 43 5 3 SETTING ORIENTATION 44 5 4 SURVEYING 48 5 5 STAKING OUT 49 5 6 FREE STATION 57 5 7 COGO 60 5 8 TIE DISTANCE 70 5 9 AREA MEASUREMENT PLANE 73 5 10 REMOTE HEIGHT MEASUREMENT REM 75 5 11 REFERENCE LINE ARC 77 5 12 ROAD 92 5 13 CONSTRUCTION SITE STAKE OUT 105 6 FILE MANAGEMENT 110 6 1 JOB 110 6 2 KNOWN POINT 114 6 3 MEASUREMENT DATA 117 6 4 ...

Страница 4: ...32 10 5 VERTICAL INDEX DIFFERENCE COMPENSATION 134 10 6 VERTICAL INDEX DIFFERENCE I ANGLE SETTING VERTICAL INDEX 0 135 10 7 TRANSVERSE AXIS ERROR COMPENSATION ADJUSTMENT 136 10 8 OPTICAL PLUMMET 137 10 9 INSTRUMENT CONSTANT K 138 10 10 PARALLEL BETWEEN LINE OF SIGHT AND EMITTING PHOTOELECTRIC AXIS 140 10 11 REFLECTORLESS EDM 140 10 12 TRIBRACH LEVELING SCREW 141 10 13 RELATED PARTS FOR REFLECTOR 1...

Страница 5: ...embled Absolute Encoding Disk enables the user to start measurement directly after switching on the instrument Even if the user changes the battery during operation the azimuth data will not be deleted Reflectorless EDM The reflectorless laser EDM function equipped in Total Station STS 750RC Series can be operated the measurement on various materials of different colors such as the wall surface of...

Страница 6: ...inum tripod 8 Clean exposed optical parts with degreased cotton or lens tissue only 9 Clean the instrument surface with a woolen cloth If it gets wet dry it immediately 10 Before working check the power functions and indications of the instrument as well as its initial settings and correction parameters 11 Unless the user is a maintenance specialist do not attempt to disassemble the instrument by ...

Страница 7: ...eveling a Only specialists who are trained related course and authenticated are allowed to install adjust and operate this kind of laser instrument b Stand related warning symbols in the scale of use c Prevent any person to look straight at or use optical instrument to observe the laser beam d To prevent the harm caused by laser block the laser beam at the end of the working route When the laser b...

Страница 8: ... lock 3 eyepiece 11 laser plummet optical plummet 4 telescope focusing knob 12 leveling screw 5 collimator 13 plate vial 6 Ni H rechargeable battery 14 vertical tangent screw 7 horizontal tangent screw 15 SD card and USB port 8 display 16 tribrach 17 circular vial 1 2 5 4 6 3 7 8 9 11 12 17 15 10 13 16 9 14 ...

Страница 9: ...R HT 1 000 m HZ 0 00 00 V 90 00 00 Ⅰ m Mem m ALL DIST RECORD 1 3 KEYPAD 1 Focus Actively measured field 2 Symbols 3 Fixed keys Keys with firmly assigned functions 4 Alphanumeric keys STS 750RC SD20125 Version 12 09 17 1 5 2 3 4 3 3 6 7 ...

Страница 10: ...sfer System Information PAGE Page key Turn to next page if several pages are available ESC Quit a dialog or the edit mode without saving the changes Return to an upper menu ENT Confirm an input and continue to the next input field 1 5 TRIGGER KEY The measurement trigger key has three settings All DIST OFF which can be defined in Settings 1 6 SOFT KEYS Measure 1 4 PtID A1 R HT 0 000m HZ 0 00 00 V 9...

Страница 11: ...dicates a particular operating status depending on different software versions Key Meaning A double arrow indicates choice fields Using the navigation keys the desired parameter can be selected Quits a selection with the enter key or navigation keys Indicates that several pages are available which can be selected with PAGE Ⅰ Ⅱ Telescope position is on Face Ⅰor Face Ⅱ Hz is set to left angle measur...

Страница 12: ...11 1 8 MENU TREE Menu F1 F4 Confirms the selected menu Press PAGE to view the next page ...

Страница 13: ...ipod to a suitable length make the tripod head approximately parallel to the ground and tighten the screws Make the centre of the tripod and the occupied point approximately on the same plumb line Step on the tripod to make sure if it is well stationed on the ground 2 Mount the instrument on the tripod Put the instrument carefully on the tripod head and level the instrument by loosening the tripod...

Страница 14: ...tions b Center by using the optical plummet 1 Set tripod Lift tripod to suitable height ensure equal length of three legs spread and make tripod head parallel to the ground and place it right above the measurement station point Prop up tripod on the ground and fix one leg 2 Install instrument and collimate the point Set instrument carefully on tripod tighten the central connecting screw and adjust...

Страница 15: ...t Then tighten the central connecting screw and level the instrument precisely again Repeat this operation till the instrument collimate precisely to the measurement station point 2 3 BATTERY POWER REMAINING DISPLAY Battery power remaining display indicates the power capacity Measure 1 4 PtID A1 R HT 0 000 m HZ 0 00 00 V 90 00 00 Ⅰ m Mem m All DIST RECORD Note The battery operating time will vary ...

Страница 16: ...e the battery at a temperature from 0 to 45 C Recharging may be abnormal beyond the specified temperature range When the indicator lamp does not flash after connecting the battery and charger either the battery or the charger might be damaged Please contact specialists for repairing Rechargeable battery can be repeatedly recharged 300 to 500 times Complete discharge of the battery may shorten its ...

Страница 17: ...OLLIMATING OBJECT Method of Collimating Object Sight the telescope to bright place and rotate the eyepiece tube until you can see the reticle clearly Collimate the target point with top of the triangle mark in the rough collimator Keep a certain distance between eye and the collimator Make the target image clear with the telescope focusing screw If there is parallax when your eye moves up down or ...

Страница 18: ...ged The decimal place is skipped All keys can be entered into screen Use navigation key to move the cursor Use navigation key to delete the relevant character 2 8 POINTSEARCH Pointsearch is a comprehensive function which uses a procedure to search measurement points or known points in internal memory The searching scope can be limited to a particular job or the whole storage The search procedure a...

Страница 19: ...put the coordinates Coordinate Input Job A DEFAULT PTS PtID 01 X N 0 226 m Y R 0 020 m H Z 20 546 m BACK SAVE If the point doesn t exist in the current job then after pressing ENT it will display another screen User can search the point from other job Pt Search Job DEFAULT PtID 001 More Job Select job input PT coord FIND OSET ENH LIST Press LIST to view the disk of the instrument and select the jo...

Страница 20: ...A All points of any length starting with A are found e g A8 A71 ABDE 1 All points of any length with a 1 as the second character are found e g W1 F15 A1R A 1 All points of any length with an A as the first character and a 1 as the third character are found e g AD1 AR100 AS16 STEPS DISPLAY MENU Programs Surveying Setting Station Input StnPt 2 SEARCH Setting Station Input Station PtID StnPt 2 SEARCH...

Страница 21: ...46 m Mem 1 254 m All DIST RECORD F1 F4 Calling up the assigned functions 3 2 EDM SETTINGS 3 2 1 Setting EDM Mode Reflector Modes and Prism Constant The measurement modes available are Fine r Tracking Fine s Fine 2 Fine 3 Fine 4 Fine 5 The Reflector Modes available are Prism Non P Sheet STEPS DISPLAY Press F4 to turn to the function key bar as shown on the right Press EDM Measure 1 4 PtID A1 R HT 1...

Страница 22: ... CANCEL OK 3 2 2 Setting Atmospheric Data Refraction modules The instrument will automatically correct the effect of atmosphere refraction and the earth curvature when calculating the horizontal distance and the height differences The correction for atmosphere refraction and the earth curvature are done by the formulas as follows Corrected Horizontal Distance D S cosα sinα S cosα K 2 2Re Corrected...

Страница 23: ...mospheric correction parameters Temperature Air temperature at instrument location Pressure Air pressure at instrument location Atmos PPM Calculated and indicated atmospheric PPM The calculating formula for atmospheric correction is as follows calculating unit meter PPM 273 8 0 2900 Pressure Value hPa 1 0 00366 Temperature value If the pressure unit adopted is mmHg make conversion with 1hPa 0 75mm...

Страница 24: ...culated according to the temperature and pressure value entered 3 2 3 Grid Factor In coordinate calculation use horizontal distance to multiply scale factor Calculation Formula 1 HEIGHT FACTOR ELEV R R R The average radius of the earth ELEV The height of the mean sea level 2 SCALE FACTOR Scale factor the scale on the measurement station 3 GRID FACTOR Grid factor height factor scale factor Distance...

Страница 25: ...ction displays the intensity of returned light signal signal intensity being received by the total station step length 1 Once reflected light from the prism is received the total station will make beeping sound and show the laser intensity which is expressed by STEPS DISPALY Press to turn to next page of the function key bar Press SIGNAL EDM Settings EDM Mode Fine r Reflect Prism Prism 30 0 mm SIG...

Страница 26: ...outine survey is divided into four pages of menu including all routine measurement functions such as angle measurement distance measurement and coordinate measurement which are shown as the pictures below Measure 1 4 PtID A1 R HT 1 000 m HZ 34 40 09 V 55 06 54 Ⅰ 20 546 m Mem 1 254 m All DIST RECORD Measure 2 4 PtID A1 R HT 1 000 m HZ 34 40 09 V 55 06 54 Ⅰ 21 866 m Mem 1 254 m Set Hz TILT BEEP Meas...

Страница 27: ...SET Hz Settings HZ 34 40 09 0SET SET 3 3 2 Setting the Instrument Height and Prism Height After setting the relative coordinate of the occupied point according to origin point the instrument automatically converts and displays the prism point Coordinate based on the origin and occupied point STEPS DISPLAY Turn to the second page of the function key bar and press SetStn Measure 1 4 PtID A1 R HT 1 0...

Страница 28: ...termath Or press DIST to measure first and press RECORD to save the results Measure 1 4 PtID A1 R HT 1 000m HZ 00 00 00 V 90 00 00 Ⅰ m Mem m All DIST RECORD After the measuring the point name will automatically plus by 1 Measure 1 4 PtID A2 R HT 1 000m HZ 00 00 00 V 90 00 00 Ⅰ 7 235 m Mem 1 921 m All DIST RECORD The other soft keys in function key bar TILT Sets the compensator with options of 1 ax...

Страница 29: ...simple coding 1 Move the cursor to the Code column 2 Input coding name 3 Press All to start distance measure and record the code and measurement result together Press Code to search the code entered and modify the attributes STEPS DISPLAY Turn to Page 3 4 of the measure screen Measure 3 4 PtID A2 Code R HT 1 000 m HZ 70 43 23 Ⅰ V 210 36 08 Mem 7 235 m All CODE EDM Input the code Measure 3 4 PtID A...

Страница 30: ...E Code name DESC Additional remark Info1 Editable information including more content Info8 Lines If the code is existed in the storage it can be edited Here the edited data cannot be kept in the storage any more You may press RECORD to save it as a single coding data or press All or DIST RECORD to save it in the file together with measured data as a single coding data If the code entered does not ...

Страница 31: ...der in which the codes were entered in the code list e g 01 first code in the code list 10 tenth code in the code list About the coding format please refer to appendix A STEPS DISPLAY Turn the page of function key bar until Q CODE is shown on the bar and press Q CODE Measure 3 4 PtID A2 Code R HT 1 000 m HZ 70 43 23 Ⅰ V 210 36 08 Mem 7 235 m All Q CODE EDM Input the 2 digit number which is predefi...

Страница 32: ...tation STS 750 Series compensates the vertical angle reading due to inclination of the vertical axis in the X directions Tilt Adjust BACK When the instrument is placed on an unstable stage or in a windy condition the display of vertical angle is unstable You can switch off the compensator When the compensator is switched on in the condition that the total station is not leveled the program will de...

Страница 33: ...idity duration of this function all offsets reset to 0m after recording or permanent activating this function Press OK after the settings Target Offset Input Offset T_Offset 0 000 m L_Offset 0 000 m H_Offset 0 000 m Mode 0set After REC 0SET OK The offset values are always reset to 0 when the application is 0set After REC If the setting is Permanent then the measuring will always be the offset resu...

Страница 34: ...OFF Configuration of the trigger key MEAS on the keyboard OFF Trigger key deactivated All Trigger key with same function as the All key Dis Trigger key with same function as the Dist key User Key Tracking Check Tie Settings Pointer Light Level Ht Transfer Offset Code Dist Unit Angle Unit Hidden Pt Delete Rec Configure the USER key with a function from the FNC key V Setting Zenith Horizon V The 0 o...

Страница 35: ...eep switched on OFF Beep switched off HZ Right Ang Left Ang Hz Increment Direction Right Ang Set right Hz for clockwise direction measurement Left Ang Set left Hz for Counter clockwise direction measurement Counter clockwise directions are only displayed but saved as clockwise direction Face Ⅰ Def VK Left VK Right Defines the telescope face Ⅰ in relation to the position of the V circle Data Output...

Страница 36: ...Press Unit hPa mbar mmHg inHg hPa Hecto Pascal mbar Milliba mmHg Millimeter mercury column inHg Inch mercury column Code Rec Save before Save after Sets if the code block is saved before or after the measurement GSI 8 16 GSI 8 GSI 16 Select GSI output format GSI 8 81 00 12345678 GSI 16 81 00 1234567890123456 Mask1 2 Mask1 Mask2 Select GSI output mask Mask1 PtlD Hz V SD ppm mm hr hi Mask2 PtlD Hz V...

Страница 37: ...nstrument height Height Transfer StnPt OCC1 Ins HT 2 000 m Y0 E0 100 000 m X0 N0 100 000 m H0 10 000 m BACK OK Call up a existed point by pressing LIST or SEARCH in the function key bar If the point does not exist input a PtID and press ENH to input the height of the point Press All to trigger the measurement Height Transfer Select Target Meas PtID 1 R HT 1 500 M H Z 10 000 m Ⅰ m Mem EHN INS HT VI...

Страница 38: ...nown point or new added point in both Face Ⅰ and Face Ⅱ You can measure maximum 5 points Height Transfer Select Target Meas PtID R HT 1 500 M H Z m Ⅰ m Mem EHN INS HT VIEW You can measure maximum 5 points Ht Tran Result 1 2 StnPt OCC1 H0 8 252 m Corr 0 002 m NoPts 5 AddPt FACE BACK OK Press OK to confirm the height transfer result BACK Back to the height transfer result OLD Maintain the original s...

Страница 39: ... 00 V 87 40 00 Ⅰ m Mem All DIST RECORD ROD ED Press ROD ED Input the rod length distance between R1 and R2 and the measure tolerance Meas Tol is the limit for difference between the given and measured distance of these 2 prisms If the tolerance value is exceeded the program will issue a warning Rod Length Settings RodLengt 3 000 m DistR1 R2 1 000 m Meas Tol 0 010 m 01 INSERT DELETE CLEAR Focus on ...

Страница 40: ...NISH REMEAS If the result is over the tolerance press ACCEPT to accept the difference Or press REMEAS to measure again Hidden Point Over Limit 0 010 m Diff 0 185 m ACCEPT REMEAS 4 7 FREE CODING Starts Coding to select a code from a code list or enter a new code Same functionality like soft key CODE 4 8 CHECKING TIE Calculation and display of the slope and horizontal distance height difference azim...

Страница 41: ...Tie 1 2 AZ 186 28 36 Grade 9 0 4 298 m 4 316 m 0 396 m OK Check Tie 2 2 AZ 186 28 36 Grade 9 0 X N 0 466 m Y N 4 273 m H 0 396 m OK 4 9 EDM TRACKING Switches on or off the tracking measurement mode The new setting is displayed for approximately one second and then set The function can only be activated from within the same EDM type and prism type Every time when pressing the soft key that sets EDM...

Страница 42: ...rument is switched off 4 10 LIGHT ON OFF Switches display light on off 4 11 LASER POINTER ON Switches the visible laser pointer on It will be switched off after 60 seconds automatically 4 12 RETICLE ILLUMINATION ON OFF Switches the reticle illumination on or off ...

Страница 43: ...t individual start up programs on the subsequent pages 5 1 SETTING JOB All data is saved in JOBS like directories Jobs contain measurement data of different types e g measurements codes fixed points stations etc and are individually manageable and can be readout edited or deleted separately STEPS DISPLAY Enter to Setting Job by pressing F1 Choose the job Press F1 to enter the Disk list Setting Job...

Страница 44: ...ob Job SANDING Name Date 2012 03 01 Time 14 40 40 Note1 Note2 OK Or select an existing job as the current job Press ENT View Job DEFAULT RAW 1 82KB 02 03 SANDING RAW 1 26KB 02 04 Attr PrevPG NextPG 5 2 SETTING STATION Each coordinate computation relates to the currently set station At least plan coordinates E N are required for the station The station height can be entered The coordinates can be e...

Страница 45: ...tion Input INS HT INS Ht 2 000m PtID OK 5 3 SETTING ORIENTATION With the orientation Hz direction can be input manually or set by points with known coordinates can be set 5 3 1 Manually Inputting STEPS 1 Press F1 to input a random HZ orientation 2 Input Hz direction reflector height and PtID 3 Press All to start measurement and set orientation Or press RECORD to record HZ direction and set orienta...

Страница 46: ...eturn to the highest level Setting Meas F1 Setting Job 1 F2 Setting Station 2 F3 Set Orientation 3 F4 Start 4 F1 F2 F3 F4 5 3 2 With Coordinates A target with known coordinates can also be used to determine the orientation For determine the orientation a maximum of 5 target points with known coordinates can be used 1 Backsight Point 1 2 Backsight Point 2 3 Backsight Point 3 STEPS 1 Press F2 to set...

Страница 47: ...ecessary input the reflector height before entering the BsPt Known Pt Input BsPt BsPt BS1 R HT 1 860 m LIST ENH Collimate the backsight point and press All or DIST RECORD to trigger the measurement Press EDM to change the EDM setting Known Pt 1 2 1 BsPt BS R HT 1 500 m HZ 0 00 00 m Ⅰ m Mem All DIST RECORD EDM Then a dialog saying Want More Measurement pops up Press OK to start another measurement ...

Страница 48: ...on set Orientation Result Nopts 5 Station 1 HzCor 172 22 57 St Dev 0 00 20 RESID OK Or press RESID to show the residuals Orientation Residuals BsPt BS1 Hz 0 00 02 0 005 m 0 003 m BACK 1 Actual measurement point 2 Design point Orientation Residuals BsPt BS1 Hz 0 00 02 0 005 m 0 003 m BACK Hz Correction of HZ angle Height correction Correction of the horizontal distance ...

Страница 49: ...osition the last valid measurement is used for the computation If no orientation was set and an application was started and if in Measure All or REC was triggered then the current HZ direction and V angle are set as orientation 5 4 SURVEYING The measurement of an unlimited number of points is supported in surveying program It is comparable to Measure but includes stationing orientation and quick c...

Страница 50: ...the previous measurement 5 4 2 Coding Three Coding Methods are available 1 Simple Coding remark Input a code into the relevant field This text is stored with the corresponding measurement with All The code is not related to a codelist it is just a simple remark A codelist on the instrument is not necessary 2 Expanded Coding Press CODE The code entered is searched within the code list and it is pos...

Страница 51: ...n and orientation presses F4 to start to stake out Stake Out 1 3 Find PtID 5 Type Known Hz 85 51 31 Ⅰ 2 055 m Mem m All DIST RECORD Input the PtID you want to stake out in the field of Find or search via wildcard Or turn to the second page of the function key bar and press ENH to a new point to stake out by inputting its coordinates Coordinate Input Job SANDING PtID X N m Y E m H Z m BACK SAVE 5 5...

Страница 52: ...lculation of the stake out elements RECORD Saves the displayed values 5 5 2 Polar Stake Out 1 Actual 2 Point to be staked out Normal indication of polar stake out offsets Hz Angle offset Positive if point to be staked out is to the right of the actual direction Longitudinal offset Positive if point to be staked out is further away Height offset Positive if point to be staked out is higher than mea...

Страница 53: ...1 3 Find PtID 5 Type Known Hz 85 51 31 Ⅰ 0 082 m Mem 0 019 m All DIST RECORD Rotate the objective lens to make the Hz at 0 00 00 Then indicate the person who holds the prism to move the prism Move the prism leftward Move the prism rightward Stake Out 1 3 Find PtID 5 Type Known Hz 85 51 31 Ⅰ 5 082 m Mem 1 119 m All DIST RECORD Set the prism at the 0 00 00 direction where the objective lens is point...

Страница 54: ...int and stake out point is indicated in a longitudinal and transversal element 1 Actual 2 Point to be staked out LOff Longitudinal offset Positive if the stake out point is further away TOff Transversal offset Perpendicular to line of sight Positive if the stake out point is to the right of measured point STEPS DISPLAY Turn to Page 2 3 to start Orthogonal Stake Out Select or input the point to sta...

Страница 55: ...urrent position of the prism is the point to stake out H indicates the distance to dig or fill Stake Out 2 3 PtID 6 Type Meas R HT 1 800 m LOff 0 000 m Ⅰ TOff 0 000 m Mem H 0 822 m All DIST RECORD 5 5 4 Coordinates Offset Stake Out Staking out is based on a coordinate system and the offset is divided into a north and east element 1 Actual prism position 2 Point to be staked out Meaning of several ...

Страница 56: ...0 m If Y E value is positive it means the point to stake out is on the right of the current prism Move the prism rightward If Y E value is negative it means the point to stake out is on the left of the current prism Move the prism leftward Stake Out 3 3 PID 6 Type Meas R HT 2 000 m X N 2 689 m Ⅰ Y E 0 000 m Mem H 0 396 m All DIST RECORD Move the prism on N direction until the X N is 0 m If X N val...

Страница 57: ...l angle to stake out New Point Side Shot Input TGT Pt AZ Dist PtID 50 AZ 26 00 00 10 000 m BACK Collimate the current prism and press DIST to measure The system calculate and display the offsets between the measured point and the point to stake out Side Shot Stake Out PtID 50 Hz 85 51 31 1 509 m Ⅰ Mem NewPt2 DIST RECORD BACK Rotate the telescope until the Hz is 0 00 00 Indicate the person who move...

Страница 58: ...rd deviations and residuals for accuracy assessments are provided Measuring Techniques 1 Single face I or II measurements are always applicable 2 There is no specific point sequence or specific face sequences that are required 3 Gross errors checks are made for dual face measurements in order to the same point s are sighted with the other face 4 If a target point is measured several times in the s...

Страница 59: ...Station F1 Setting job 1 F2 Setting limit 2 F4 Start 4 F1 F2 F4 Press F1 to set a job Select the job name or create a new job by press ADD After setting the job press OK The screen returns to upper level Setting Job 5 8 Job SANDING Name JOHN Date 2011 01 01 Time 16 02 09 ADD OK Press F2 to set the limit Input all the deviation limits as shown on the right Press SET to confirm The screen returns to...

Страница 60: ...tation Measure PtID 2 R HT 1 500 m HZ 38 26 06 V 20 00 05 m Ⅰ RESULT NextPt All When at least 2 points and 1 side are measured the coordinates of station point can be calculated and displayed Limit Check St DevX0 0 010 m St DevY0 1 010 m St DevH0 0 010 m StDevAng 0 00 00 Continue BACK OK Press OK to view the free station result Free Station Result StnPt OCC1 INS HT 2 000 m X0 Y0 10 000 m Y0 E0 10 ...

Страница 61: ... compute a final station height Insufficient space in job The present selected job is full and does not allow further storage More points or distances are required There is insufficient data measured to be able to compute a position Either there are not enough points used or not enough distances measured 5 7 COGO COGO is an application program to perform coordinate geometry calculations such as Co...

Страница 62: ...ISPLAY Press F4 to start COGO And press F1 to select Inverse Traverse And press F1 to start Traverse Traverse PtID 2 AZ H Dist m Offset m MEAS CALC SEARCH There re some ways to set the known PtID Input a known PtID Call up a existed point from the list Input the coordinates directly Or press MEAS to trigger the measurement and get the result After setting the PtID input the azimuth horizontal dist...

Страница 63: ... 923 m H Z 0 000 m Hz 50 10 50 Ⅰ 1 966 m Mem 2 369 m All DIST RECORD EDM Rotate the telescope until the Hz is 00 00 00 Indicate the person to move the prism Hz is positive The prism should be moved rightward Hz is negative The prism should be moved leftward COGO Stake Out PtID 5 R HT 1 923 m H Z 0 000 m Hz 0 00 00 Ⅰ 0 000 m Mem 0 000 m All DIST RECORD EDM 1 If staking out directly without inputtin...

Страница 64: ...een P1 and P2 STEPS DISPLAY Press F2 to start Inverse Input 2 known points one as the point to start and the other as the point to end Or you can call up the points from the LIST Inverse From 21 To 22 MEAS CALC SEARCH Press CALC to calculate the display the result Press RECORD to save the result Press ESC to quit and start a new Inverse calculation Inverse Result Point1 21 Point2 21 AZ 90 00 00 10...

Страница 65: ...s F1 to start Bearing Bearing Intersection calculation Enter the PtID of Point1 Input the bearing azimuth from P1 to P3 Input the PtID of Point2 Input the bearing azimuth from P2 to P3 Bearing Bearing Input Data Point1 10 AZ 45 00 00 Point2 11 AZ 315 00 00 MEAS CALC SEARCH Press CALC to calculate and display the result To stake out this point input a new PtID and press STAKE To save the result pre...

Страница 66: ...GO calculation Enter the PtID of Point1 Input the bearing azimuth from P1 to unknown points P3 and P4 Input the PtID of Point2 Input the horizontal distance between P2 and P3 or P4 Bearing Distance Input Data Point1 10 AZ 45 00 00 Point2 11 H Dist 2 000 m MEAS CALC SEARCH Press CALC to calculate and display the result Press STAKE to start staking out the point Press RECORD to save the result Press...

Страница 67: ... start Distance Distance COGO calculation Enter the PtID of Point1 Input the horizontal distance from P1 to P3 Input the PtID of Point2 Input the horizontal distance between P2 and P3 or P4 Distance Distance Input Data Point1 10 H Dist 50 000 m Point2 11 H Dist 20 000 m MEAS CALC SEARCH Press CALC to calculate and display the result Press STAKE to start staking out the point Press RECORD to save t...

Страница 68: ...oint STEPS DISPLAY In Intersection menu press F4 to start By Points COGO calculation Input the known PtID from P1 to P4 By Points Input Data Point1 10 Point2 11 Point3 12 Point4 13 MEAS CALC SEARCH Press CALC to calculate and display the result Press STAKE to start staking out the point Press RECORD to save the result Press ESC to start a new COGO COGO New Point New Pt X N 40 000 m Y E 40 000 m ST...

Страница 69: ...n Menu press F3 to start Offset COGO Press F1 to start Distance Offset Enter the known PtID of P1 and P2 Input the PtID of the target point P3 Distance Offset Define Baseline Point1 20 Point2 21 Input Pt Offset OffsPt 8 MEAS CALC SEARCH Press CALC to calculate and display the result Press STAKE to start staking out the point Press RECORD to save the result Press ESC to start a new COGO COGO New Po...

Страница 70: ...2 to start Point Offset Enter the known PtID of P1 and P2 Input the T offset and L offset Point Offset Define Baseline Point1 20 Point2 21 Input TOff LOff Line 12 000 m Offset 20 200 m MEAS CALC SEARCH Press CALC to calculate and display the result Press STAKE to start staking out the point Press RECORD to save the result Press ESC to start a new COGO COGO New Point Nw Pt X N 5 657 m Y E 22 627 m ...

Страница 71: ...ine Baseline Point1 20 Point2 22 H Dist 20 000 Select Base Pt BasePt 20 MEAS CALC SEARCH Press CALC to calculate and display the result Press STAKE to start staking out the point Press RECORD to save the result Press ESC to start a new COGO COGO New Point New Pt X N 25 000 m Y E 20 000 m STAKE RECORD 5 8 TIE DISTANCE The application Tie Distance computes slope distance horizontal distance height d...

Страница 72: ... Ⅰ Mem All SEARCH LIST You can set the P1 via following ways 1 Input a PtID and prism height collimate the prism and press All or DIST RECORD on 2 nd page of function key bar 2 Call up a known point by SEARCH or LIST 3 Input a PtID and press ENH to input the coordinates Polygonal 1 2 Point1 1 R HT 1 500 m m m m Ⅰ Mem All SEARCH LIST Use the ways above to confirm the P2 Polygonal 1 2 Point1 1 Point...

Страница 73: ...663 m 0 741 m 0 329 m NewPt1 NewPt2 RADIAL Soft keys polygonal method F1 NewPt1 An additional missing line is computed Program starts again at point 1 F2 New Pt2 Point 2 is set as starting point of a new missing line New point Pt2 must be measured F4 RADIAL Switch to radial method 5 8 2 Radial A B A C STEPS DISPLAY In Tie Distance Menu press F2 to start Radial A B A C Input the PtID of the central...

Страница 74: ...GE to display the azimuth between Point A and Point B Tie Distance 1 2 Point1 1 Point 2 2 Grade 49 6 0 663 m 0 741 m 0 329 m NewPt1 NewPt2 RADIAL Soft keys radial method F1 NewPt1 Determine new central point F2 NewPt2 Determine new radial point F4 POLY Switch to polygonal method 5 9 AREA MEASUREMENT PLANE The application program Area is used to calculate online areas of a number of points connecte...

Страница 75: ... by SEARCH or LIST 3 Input a PtID and press ENH to input the coordinates if the point does not exist Area 1 2 PtID 1 R HT 1 500 m m NoPts 0 Area 0 000 m2 Ⅰ Mem All SEARCH LIST Enter the other points through the ways above The areas will be displayed automatically according to the points that are employed to calculate the area Area 1 2 PtID 4 R HT 2 000 m m NoPts 4 Area 20 158 m2 Ⅰ Mem All EDM RESU...

Страница 76: ...is known e g prism height h 1 500m STEPS DISPLAY On Page 2 3 of Programs press F3 to start Remote Height After setting the job station and orientation press F4 to start Input the PtID of Base Point its prism height Base Point Sight Meas Base Pt BasePt 10 R HT 1 500 m m Ⅰ Mem All DIST RECORD Collimate the prism and press All or DIST RECORD to start measurement The base point is confirmed Then rotat...

Страница 77: ...and press All or DIST RECORD to start measurement Base Point Sight Meas Base Pt BasePt 10 m Ⅰ Mem All DIST RECORD It displays the horizontal distance between the instrument and the prism Base Point Sight Meas Rem Pt BasePt 10 R HT 0 000 m 1 968 m V 92 05 52 Ⅰ Mem BACK V ANG Collimate the ground point of the base point and press V ANG the base point is confirmed Then rotate the telescope to shoot t...

Страница 78: ...ion of Base Line The base line is fixed by 2 base points that can be defined in 3 ways Measured points Enter coordinates using keypad Select point from memory 1 1st base point 2 2nd base point 3 Baseline 4 Reference line STEPS DISPLAY On Page 2 3 of Programs press F4 to start Reference Line Arc After setting the job station and orientation press F4 Press F1 to start Reference Line Input the PtID o...

Страница 79: ...en a Base Line is defined Ref Line Define Baseline Shifts 1 369 m Offset 0 000 m Line 0 000 m H Z 0 000 m Rotate 0 00 00 NewBL MEAS STAKE 0SET 5 11 1 2 Reference Line In the process of using base line the base line can be offset longitudinally parallel and vertically or rotated This new line is called the reference line All measured data refers to the reference line ...

Страница 80: ...e Rotation of the reference line clockwise around the reference point The meaning of soft keys under the screen of Ref Line Define F1 NewBL Return to Ref Line Define screen to re define base line F2 MEAS The offset value of point to be measured related to the reference line F3 STAKE Activate the Orthogonal Stake Out F4 0SET Set all offset values rotate to zero 5 11 1 3 Line Offset Subapplication T...

Страница 81: ...ress All to start measurement You can also call up the point by SEARCH or LIST or input the coordinates of the PtID which does not exist After measuring one point collimate the next target point to measure via the methods above Line Offset Meas PtID 10 R HT 2 000 m LOff 1 025 m TOff 2 037 m 1 410 m Ⅰ Mem All DIST RECORD After measuring one point collimate the next target point to measure via the m...

Страница 82: ...Offset p and the polar pHz differences STEPS DISPLAY Set the base line and reference line as introduced above Press STAKE to start the Orthogonal Stake Out Ref Line Define Baseline Shifts 1 369 m Offset 0 000 m Line 0 000 m H Z 0 000 m Rotate 0 00 00 NewBL MEAS STAKE 0SET Input the PtID and its prism height as well as the T offset L offset elevation Press OK to start to stake out Input Orthogonal ...

Страница 83: ...sured point Positive when the point to stake out is higher than the measured point Press PAGE to view the other results Loff Positive when the point to stake out is far ahead Toff Positive when the point to stake out is to the right side of the measured point when the Hz and is 0 it means the current pint is the position of the point to stake out indicates the distance to fill or dig Orthogonal SO...

Страница 84: ...stake out 1 Line Offset measurement 2 Stake out of reference arc a stake out point b stake out arc c stake out chord d stake out central angle 5 11 2 1 Defining Reference Arc a Center Point Start Point STEPS DISPLAY On Page 2 3 of Programs press F4 to start Reference Line Arc After setting the job station and orientation press F4 Press F2 to start Reference Arc Press F1 to choose to define the ref...

Страница 85: ...Arc 1 3 Sight Meas CenterPt Center 10 StartPt 11 R HT 1 500 m m Ⅰ m Mem All SEARCH LIST Then a reference arc is defined Now you are to decide whether to measure or to stake out Reference Arc Window Center 10 StartPt 11 End Pt Radius 2 650 m NewArc MEAS STAKE b CenterPt EndPt Radius Press F2 to choose to define the reference arc by StartPt EndPt Radius Define Ref Arc Method F1 CenterPt StartPt F2 S...

Страница 86: ...prism height and press All to start measurement You can also call up the point by SEARCH or LIST or input the coordinates by pressing ENH if the PtID does not exist Line Offset Measure PtID 21 R HT 2 000 m Line m Offset m m Ⅰ Mem All DIST RECORD Input the radius and press OK Reference Arc Input Arc Radius Radius m OK Then a reference arc is defined Now you are to decide whether to measure or to st...

Страница 87: ...sure PtID 21 R HT 2 000 m Line 14 125 m Offset 2 364 m 10 000 m Ⅰ Mem All DIST RECORD 5 11 2 3 Stake Out Subapplication Hz Difference in horizontal angle HD Difference in distance measurement A negative line is impossible to stake out The application provides 4 ways to stake out Ref Arc Stake out Menu F1 Stake Out Point F2 Stake Out Arc F3 Stake Out Chord F4 Stake Out Angle F1 F2 F3 F4 ...

Страница 88: ...t Stake Out Point PtID 20 Line 0 000 m Offset 0 000 m NewArc MEAS STAKE Input the PtID of the point to measure and its prism height Collimate the prism and press DIST to start measurement The system calculates and displays the stake out offsets between the prism and the point to stake out Stake out Reference Arc PtID 21 R HT 2 621 m Hz 20 00 00 0 282 m 0 019 m Ⅰ Mem DIST RECORD NextPt When Hz and ...

Страница 89: ...mode chosen Input the offset and press OK Pressing PT and PT can display each line of the arc to stake out Stake Out Arc PtID 20 Miscls End Arc Arclen 0 000 m Line 0 000 m Offset 0 000 m 0SET PT PT OK Input the PtID of the point to measure and its prism height Collimate the prism and press DIST to start measurement The system calculates and displays the stake out offsets between the prism and the ...

Страница 90: ... All of the misclosure will be added to the last arc section 3 Equal The misclosure will be equally distributed between all sections 2 Arc length Enter the length of the arc segment to be staked out 3 Line Shows the line value of the stake out point This is calculated by the arc length and the selected misclosure distribution 4 Offset Here you can enter the offset value Soft keys F1 0SET Set the v...

Страница 91: ...g to the distributing mode chosen Input the offset and press OK Pressing PT and PT can display each line of the arc to stake out Stake Out Chord PtID 20 Miscls End Arc ChordL 0 000 m Line 0 000 m Offset 0 000 m 0SET PT PT OK Input the PtID of the point to measure and its prism height Collimate the prism and press DIST to start measurement The system calculates and displays the stake out offsets be...

Страница 92: ...Arc Angle 0 000 m Line 0 000 m Offset 0 000 m 0SET PT PT OK Input the PtID of the point to measure and its prism height Collimate the prism and press DIST to start measurement The system calculates and displays the stake out offsets between the prism and the point to stake out Stake out Reference Arc PtID 21 R HT 2 621 m Hz 20 00 00 2 082 m 0 019 m Ⅰ Mem DIST RECORD NextPt When Hz and is 0 it mean...

Страница 93: ...nment F3 Stake Out Roads F1 F2 F3 5 12 1 Define HZ Alignment Horizontal alignment consists of the following elements start point line curve and spiral To define a horizontal alignment user should first input the detailed information Chain N E coordinate of start point Define HZ AL 1 0 Type Start Pt Chain 1000 000 m X N 1050 000 m Y E 1100 000 m PREV NEXT SEARCH The element of start point consists ...

Страница 94: ...le STEPS DISPLAY On Page 3 3 of Programs press F1 to start Roads After setting the job station and orientation press F4 Press F1 to start to Define HZ Alignment Input the chainage N X Y E Press NEXT and confirm to save by press OK Define HZ AL 1 0 Type Start Pt Chain 1000 000 m X N 1050 000 m Y E 1100 000 m PREV NEXT SEARCH Then it displays the main menu of defining alignment HZ Alignment Type Cha...

Страница 95: ...he rule of radius value along the forward direction of the curve When the curve turns right the radius value is positive while the curve turns to left the radius value is minus The arc length can not be negative Press ARC to start to define the arc HZ Alignment Type Chain 1048 420 m AZ 25 00 00 LINE ARC SPRIAL POINT Input the radius and length of the arc Press NEXT and then OK to save the edited a...

Страница 96: ...ion of the curve When the curve turns right the radius value is positive When the curve turns to left the radius value is minus The arc length can not be negative Press SPRIAL to start to define the spiral HZ Alignment Type Chain 1071 561 m AZ 91 17 38 LINE ARC SPRIAL POINT Input the radius and arc length of the spiral Press NEXT and then OK to save the edited alignment data Define HZ AL 4 3 Type ...

Страница 97: ...tors A1 and A2 Radius A1 and A2 can not be negative As radius is entered an arc with specified radius inserted between current point and next point As spiral factors A1 or A2 are entered a curve with specified length is inserted between line and arc NOTE If user input A1 A2 from according to the lengths L1 L2 of spiral the following formulas are used to calculate A1 and A2 A1 A2 Press POINT to sta...

Страница 98: ...gnment editing is available Define HZ AL 4 3 Type POINT X N 100 m Y E 100 m Radius 20 m A1 80 m A2 80 m PREV NEXT SEARCH START LAST DELETE LIST Soft Keys PREV F1 Displays the previous point data NEXT F2 Displays the next point data If the present data is at the end of horizontal alignment press NEXT to return to the alignment main screen and it means to add a new alignment data SEARCH F3 Searches ...

Страница 99: ...a by pressing SEARCH and input the chainage Define HZ AL 4 3 Type POINT X N 100 000 m Y E 100 000 m Radius 20 000 m A1 80 000 m A2 80 000 m PREV NEXT SEARCH START LAST DELETE Enter the new data and press NEXT to save the change Define HZ AL 2 1 Type LINE AZ 50 16 10 Length 10 000m PREV NEXT SEARCH 5 12 3 Deleting Horizontal Alignment Data The horizontal alignment data in internal memory can be del...

Страница 100: ...ing STEPS DISPLAY Press F2 to start to Define VT Alignment Roads F1 Define HZ Alignment F2 Define VT Alignment F3 Stake Out Roads F1 F2 F3 Input the chainage elevation and curve length Then press NEXT The curve lengths of the start point and end point should be 0 000 m Confirm to save the vertical alignment data The system will return to define the next vertical alignment data Define VT AL 1 0 Cha...

Страница 101: ... on the 2 nd page of the function key bar and press OK to confirm to delete Define VT AL 16 16 Chain 500 000 m H Z 25 010 m Length 0 000 m START LAST DELETE Notice All the vertical alignment data will be deleted The system will return to Define VT AL screen and you can define new vertical alignment again 5 12 7 Road Stake Out To stake out alignment the alignment type should be defined first 2 meth...

Страница 102: ...d first stake out points on the central line then the featured points on both sides The method to stake out alignment is similar to that of point stake out Press PAGE to switch among the three stake out mode Here take Polar Stake Out as an example to introduce the operation steps of alignment stake out in detail For more information about other methods of stake out please refer to 5 5 STAKE OUT ST...

Страница 103: ...nge Press L_OFFS and R_OFFS will show the correspondent chainage offset and height different The chainage and offsets can be entered manually Offset is positive the offset point is on the right of central line Offset is negative the offset point is on the left of central line Alignment S O Chain 100 000 m Offset 0 000 m HtDiff 0 000 m R HT 1 598 m STAKE L_OFFS R_OFFS When the chainage and offset i...

Страница 104: ... the chainage Means to stake out points of the right chainage While staking out points of the left chainage it shows or behind the number is the distance between points of right chainage and central line i e the data of the right offset or left offset data Here the points on the central line read 0 0 For instance PtID C100 2 0 expresses the point on the right chainage is 2 m away from the central ...

Страница 105: ...t according to the actual position of the point Dig fill is decided via the estimated height of hinge point If the height is above the hinge point the dig slope is used otherwise the fill slope is used STEPS DISPLAY Turn to 2 nd page of the function key bar Choose the side chainage which is to be staked out the slope Press SLOPE to start Slope Stake Out Alignment S O Chain 100 000 m Offset 0 000 m...

Страница 106: ...ot be calculated 2 As the fill dig value of calculated point is zero therefore the fill dig value is not displayed 5 13 CONSTRUCTION SITE STAKE OUT This application allows defining a construction site by combining set up of the instrument along a construction line measuring and stake out points related to the line After activating the application you have 2 options a New construction site b Contin...

Страница 107: ...w site F4 Skips set up F1 F2 F3 F4 Input the starting PtID of the construction site and its prism height Collimate the prism and press All or DIST RECORD to start measurement Defining new Site Sight Meas Start Pt StartP 1 R HT 2 000 m m Ⅰ m Mem All DIST RECORD Input the end PtID of the construction site and its prism height Collimate the prism and press All or DIST RECORD to start measurement Defi...

Страница 108: ... 000 m 0SET REVERS OK 5 13 3 As Build Check This function shows you the line difference offset and the height difference of a measured point in relation to the line STEPS DISPLAY Press CHECK Input the PtID of the point to measure and its prism height AS BuiltCheck PtID 3 R HT 1 5000 m Ln m Of m H m All DIST STAKE Collimate the prism and press DIST It displays the longitude offset transversal offse...

Страница 109: ... DISPLAY Press STAKE to start to stake out Stake Out PtID R HT 1 5000 m Ln m Of m H m All DIST CHECK Input the PtID of the point to stake out and its prism height If the PtID entered exists it will display the position against the construction site If there re more than 1 points with the same PtID it will show a list to choose If the point does not exist you will be requested to input the coordina...

Страница 110: ...at the station point moves in the graphic Be aware that the start point and the end point of the line are measured in the previous coordinate system When staking out these points they appear in the old system and appear as shifted During operating the application the previous Orientation and Station parameters will be replaced by the new calculated ones ...

Страница 111: ...t 2 3 F1 Initialize Memory 5 F2 Memory Statistic 6 F3 U Disk Mode 7 F1 F2 F3 File Management 3 3 F1 Data Output 8 F2 Data Import 9 F3 USB Send Data 10 F4 USB Receive 11 F1 F2 F3 F4 6 1 JOB All measurement data is stored in selected job such as the known points measurement points coding and results etc This function can launch new establishment selection deletion of a job The definition of job incl...

Страница 112: ...IST OK Press the navigation key to select the disk Disk A the internal memory Disk B the SD card memory View Job Disk A Disk B Attr FORMAT OK The screen shows the file list Select the right Job and Press ENT Then the job will be set to the current job View Job DEFAULT RAW 1 82KB 02 03 SANDING RAW 1 26KB 02 04 12 RAW 1 20KB 02 12 Attr PrevPG NextPG 6 1 2 Establishing New Job There are 16 characters...

Страница 113: ... Note 1 Note 2 LIST OK Press the navigation key to select the disk Disk A the internal memory Disk B the SD card memory View Job Disk A Disk B Attr FORMAT OK The screen shows the file list Press F4 to the next page then press NEW to add a new job View Job DEFAULT RAW 1 82KB 02 03 SANDING RAW 1 26KB 02 04 NEW Rename DELETE Enter the job name operator name etc Then press OK to save and set the job N...

Страница 114: ...fore if it is not assured whether the newly established job name exists in internal memory you may view the job names existing in internal memory via before setting a new job 6 1 3 Deleting Selected Job STEPS DISPLAY Press F1 File Management 1 3 F1 Job 1 F2 Known points 2 F3 Measurements 3 F4 Codes 4 F1 F2 F3 F4 It displays the information of the current job Press F1 to view the files in the disk ...

Страница 115: ...points contain at least the PtID and the coordinates E N or height H STEPS DISPLAY Press F2 to manage the known points File Management 1 3 F1 Job 1 F2 Known points 2 F3 Measurements 3 F4 Codes 4 F1 F2 F3 F4 Insert the job name to be checked then press OK to enter the job Or press LIST to select the job in the memory View Known Pt Job ABCC LIST OK The screen shows the information of the point Press...

Страница 116: ...TE ADD EDIT Input the PtID or wildcard and press ENT Search Job A SANDING PTS PtID BACK It will display the searching result View Known Pt Job A SANDING PTS PtID 1 X N 0 000 m Y E 0 000 m H Z 0 000 m SEARCH DELETE ADD EDIT 6 2 2 Adding Known Point A dialog of inputting PtID and coordinate of a new known point is displayed STEPS DISPLAY Press ADD to add a point View Known Pt Job A SANDING PTS PtID ...

Страница 117: ...he data CANCEL input a new point name OK cover the existed point Input Known Pt Pt exist Want to cover the data CANCEL OK 6 2 3 Editing the Known Points This function allows editing known points in internal memory STEPS DISPLAY Choose the job and the point and press EDIT View Known Pt Job A SANDING PTS PtID 1 X N 0 000 m Y E 0 000 m H Z 0 000 m SEARCH DELETE ADD EDIT Edit the point selected and pr...

Страница 118: ...Part of them can be deleted 6 3 1 Viewing Measurement Data Viewing measurement data is based on the unit of measurement station in selected job User may view one or all points on a measurement station in a certain job or a certain PtID or all measurement data of all measurement stations in internal memory 6 3 1 1 Viewing All Measurement Points in Job Confirm the searching scope first they may be a...

Страница 119: ...s Value LIST VIEW View 1 Type Station COGO StnPt OCC INS HT 1 500 m Date 2011 04 11 Time 14 44 14 START LAST FIND 6 3 1 2 Viewing Designated PtID in Job Starts searching point Total Station STS 750 Series provides point search function based on taking measurement station as searching condition Determine the searching scope at first it may be one PtID of one station in job Or all measurement data n...

Страница 120: ...ted PtID designated the designated point based on the certain station point 2 StnPt designated PtID all the measurement point based on the certain station point 3 StnPt PtID designated the designated point on all the station point 4 StnPt PtID all the measurement point of the whole job using the navigation key to view all the points view the other information by pressing PAGE 6 3 2 Deleting Measur...

Страница 121: ...ach code has one item of explanation and a maximum of 8 attributes that has no more than 16 characters Input Code 1 2 Find Code NR01 Desc SITELINE Info1 NR 12 Info2 12 54 Info3 NEW START LAST DELETE GSI CODING Code Code name Desc Appended description Info1 Editable information which includes more contents Info8 Other information lines 6 4 2 Viewing Code STEPS DISPLAY A Press to view all the codes ...

Страница 122: ...he code you want to delete and press DELETE Code View Del 1 2 Find Code NR01 Desc SITELINE Info1 NR 12 Info2 12 54 Info3 NEW START LAST DELETE 6 5 INITIALIZING INTERNAL MEMORY Deletes jobs single data areas of a job or all data STEPS DISPLAY In Page 2 2 of the File Management press F1 to start to Initialize Memory File Management 2 3 F1 Initialize Memory 5 F2 Memory Statistic 6 F3 U Disk Mode 7 F1...

Страница 123: ...d known points The amount of the recorded data block measurement points codes etc The amount of jobs which can be used or still not determined STEPS DISPLAY Press F2 to enter to Memory Statistic File Management 2 3 F1 Initialize Memory 5 F2 Memory Statistic 6 F3 U Disk Mode 7 F1 F2 F3 Choose the job you want to view the memory statistic Memory Information Job 5 Station 63 Known Pt 201 Meas Rec 428...

Страница 124: ...stic 6 F3 U Disk Mode 7 F1 F2 F3 Screen shows Connected to PC Then users can check the local disk in MY COMPUTER U Disk Mode Connected to PC EXIT Local disk F stands for the internal memory of the total station Removable Disk H stands for the SD card Then user can view copy and edit the data directly from this ...

Страница 125: ...1 Data Output 8 F2 Data Import 9 F3 USB Send Data 10 F4 USB Receive 11 F1 F2 F3 F4 Press F2 to output the code data to an SD card Enter the file name to contain the code data or press LIST to select the TXT file in the SD card Press OK Data Output F1 Job data 1 F2 Code 2 F3 HZ Alignment 3 F4 VT Alignment 4 F1 F2 F3 F4 Output file File name SANDING Time 2010 10 20 Time 12 00 00 LIST OK Start export...

Страница 126: ...ard Press OK Data Import F1 Job data 1 F2 Code 2 F3 HZ Alignment 3 F4 VT Alignment 4 F1 F2 F3 F4 Import file File name SANDING Time 2010 10 20 Time 12 00 00 LIST OK Start importing the HZ Alignment data to SANDING TXT in the SD card HZ Alignment data From B SANDING TXT To A Road HAL 1 BACK All the HZ Alignment data stored in the Road HAL file 6 9 USB SEND DATA USB RECEIVE Before transferring data ...

Страница 127: ...Import 9 F3 USB Send Data 10 F4 USB Receive 11 F1 F2 F3 F4 Press F1 to send the code data to PC through SANDING SURVEY OFFICE The screen shows USB initializing And it starts sending the code data USB Send Data F1 Code 1 F2 HZ Alignment 2 F3 VT Alignment 3 F1 F2 F3 USB Send Data F1 Code 1 F2 HZ Alignment 2 F3 VT Alignment 3 USB initializing F1 F2 F3 Code Send Transfer USB A PCODE DAT Sending 0 BACK...

Страница 128: ...eceive the known point data from a PC through SANDING SURVEY OFFICE Choose the job to receive the known point Or press LIST to select the job from the disk Then press OK After USB initializing it starts receiving the known point USB Send Data F1 KnownPt 1 F2 Code 2 F3 HZ Alignment 3 F4 VT Alignment 4 F1 F2 F3 F4 KnownPt Job Job DEFAULT LIST OK Receive Known Point Transfer USB A DEFAULT PTS Receivi...

Страница 129: ... baud rates are as follows 1200 2400 4800 9600 19200 38400 57600 and 115200 BIT SECOND DATA BITS 7 Data will be transmitted by 7 bit As setting Parity check it is set as 7 bit automatically 8 Data will be transmitted by 8 bit The parity is set as none automatically PARITY Even Even check Odd Odd check None None verify If set data bit is 8 data bit END MARK CR LF Carriage returns and line feed CR C...

Страница 130: ...M port or USB port Format Select output format GSI is the fixed setting STEPS DISPLAY In Page 2 2 of Menu press F3 to enter to Data Transfer Menu 2 2 F1 Adjustment 5 F2 Comm Parameter 6 F3 Data Transfer 7 F4 System Information 8 F1 F2 F3 F4 Enter the job name or search the job by pressing LIST to view all the jobs Choose the data type you want to transfer Choose the transfer mode COM or USB Send D...

Страница 131: ... Version The software of instrument may have different versions which depend on those software packages composing the instrument software Type STS 750R for instance Number Serial number of leaving factory for total station instrument Data Set system date and format Soft Keys DATE Set the date Format Select modes of date displaying yy mm dd dd mm yy mm dd yy Date Input and display the date accordin...

Страница 132: ...180 watch the offset of plate level 3 Tweak adjustment screws on the right of the plate vial with the correction pin to make plate bubble to move half of the offset back 4 Rotate the instrument 180 check adjustment result 5 Repeat the steps above until the plate level is centered in all directions 10 2 CIRCULAR VIAL Check No adjustment is required if the bubble of circular vial is in the center af...

Страница 133: ...ect A does not move along with the vertical line firstly remove the eyepiece cover to expose the three or four reticle adjusting screws 2 Loosen all the reticle adjusting screws uniformly with an adjusting pin Rotate the reticle around the sight line and align the vertical line of the reticle with pointA 3 Tighten the reticle adjusting screws uniformly Repeat the inspection and adjustment to see i...

Страница 134: ...t your local dealer for support if there is problem with the parameter Press F1 on Page 2 2 of the main menu to enter to Adjustment Press OK to enter the menu of Adjustment Press CANCEL to quit Remind Please don t modify any parameter without permission CANCEL OK Adjust A Electronic Adjustment Operation Steps STEPS DISPLAY Press F1 on Page 2 2 of the main menu to enter to Adjustment Press F2 to st...

Страница 135: ...sting screws by loosening one and tightening the other Move the reticle to sight object A exactly 3 Repeat inspection and adjustment until 2C 20 4 Replace the cover of the reticle Note After adjustment need to check the photoelectricity coaxiality 10 5 VERTICAL INDEX DIFFERENCE COMPENSATION Check 1 Mount and level the instrument and make the telescope parallel with the line connecting the center o...

Страница 136: ... and adjust the Session 10 3 and 10 5 Check 1 Power on after leveling the instrument Collimate object A in Face I and read the Vertical angle value L 2 Rotate the telescope Sight object B in Face Ⅱ and read the Vertical angle value R 3 If the vertical angle is 0 in zenith i L R 360 2 If the vertical angle is 0 in horizon i L R 180 2 or L R 540 2 4 If i 10 you should set the Vertical Angle 0 Datum ...

Страница 137: ...he requirement after the repeated operation the instrument should be returned to factory for inspection and repair 10 7 TRANSVERSE AXIS ERROR COMPENSATION ADJUSTMENT As the transverse axis error only affects the angle of sight it can be only confirmed through observing the target the height of which is obviously lower or higher than the instrument To avoid the influence of sight axis user must hav...

Страница 138: ...ss MEAS Horizontal Axis 0 10 STEP 2 Reverse Hz 155 27 01 V 252 43 47 Sight target MEAS INPUT It shows the difference Press SET to correct the difference Press BACK to quit without saving the correction Horizontal Axis H0 Axis 0 00 36 BACK SET 10 8 OPTICAL PLUMMET Check 1 Set the instrument on the tripod and place a piece of white paper with two crisscross lines on it right below the instrument 2 A...

Страница 139: ... Draw lines that attach AC and BD and mark the intersection point of the two lines as O 4 Adjust the four adjusting screws of the optical plummet with an adjusting pin until the center mark coincides with Point O 5 Repeat the inspection and adjusting steps to make the instrument meets the requirements 6 Replace the protective cover 10 9 INSTRUMENT CONSTANT K Instrument constant has been checked up...

Страница 140: ...t should set Stadia Constant according to the Constant K Set the orientation via the Vertical Hair to maintain Point A B C on the same line precisely There must be a fixed and clear centering mark on the ground of Point B Whether the prism center of Point B coincides with the Instrument Center is a significant step to inspect the accuracy So on Point B the tripod or compatible tribrach should be u...

Страница 141: ...ted the red measuring beam will coincide with the visual line of sight External influences such as shock or large temperature fluctuations can displace the red measuring beam relative to the line of sight The direction of the beam should be inspected before precise measurement of distances because an excessive deviation of the laser beam from the line of sight can result in imprecise distance meas...

Страница 142: ...ism pole on the Point C and do not move during the inspection Place the two feet tine of Bipod on the cross lines of Point E and F Adjust the two legs e and f to make the bubble on the prism pole centered Set and level the instrument on Point A near the cross Sight the tine of Point C with the center of reticle and fix the Horizontal Clamp Screw Rotate the telescope upward to make D near the horiz...

Страница 143: ...tion ANGLE MEASUREMENT measuring method absolute encoding diameter of raster disk 79mm minimum reading 1 5 selectable accuracy 2 5 detection method horizontal dual vertical dual TELESCOPE image erect tube length 154mm effective aperture Telescope 45mm EDM 50mm magnification 30X field of view 1 30 resolving power 3 min focusing distance 1m AUTO VERTICAL COMPENSATOR system 2 axis liquid electric wor...

Страница 144: ...ield of view 5 OTHER Display type 2 sides alphanumeric keyboard Laser plummet optional ON BOARD BATTERY type rechargeable Ni H battery voltage 6V operating time 8 hours DIMENSION WEIGHT dimension 200 X 190 X 350mm weight 6 0kg ...

Страница 145: ...M NO Carrying Case 1 pc Main Body 1 pc Backup on board Battery 1 pc Charger 1 pc Plumb Bob 1 pc Correction Pin 2 pcs Fur Brush 1pc Screwdriver 1pc Hexagon Wrench 2 pcs Cloth 1pc Dryer 1pc Operation Manual 1pc Certificate 1pc ...

Страница 146: ...e STS 750RC series How to enter the alignment data is explained below Alignment Element Parameter Straight Bearing Distance Transition Curve Radius Length of Transition Curve Arc Radius Length of Arc PT N E radius A1 A2 NOTE When downloading from computer or selecting PT option you do not have to calculate the Parameter Pt Northing Easting Radius Transition Curve A1 Transition Curve A2 BP 1100 000...

Страница 147: ...f the data above transmitted to computer is as follows START 0 000 1050 000 1100 000 CRLF PT 1750 000 1300 000 100 000 80 000 80 000 CRLF PT 1400 000 1750 000 200 000 0 000 0 000 CRLF PT 1800 000 1800 000 2000 000 CRLF 2 CALCULATION ROAD ALIGNMENT ELEMENTS 1 Calculation of the length of transition curve L 2 1 R A 2 2 1 L 2 1 Length of clothoid A 2 1 Parameter of clothoid R Radius L1 R A 2 1 100 80...

Страница 148: ... 7560 1320 42 3 32 0 32 0 32 0 32 0 7 5 3 0 0000025 0 00078019 0 10666667 0 64 6 777 This example is symmetry spiral transition N1 N2 E1 E2 4 Calculation of shift value R cos 1 R E R 18 cos 1 100 777 6 R 20 06 1 700 Symmetry spiral transition R R 2 1 5 Calculation of Spiral Transition coordinate sin R N Nm 63 348 100sin18 20 06 31 891 Symmetry spiral transition N N m m 2 1 6 Calculation of Tangent...

Страница 149: ...gth 2 1 LA R L R 111 55 47 2 18 20 06 100 75 15 35 180 131 353 m 9 Calculation of the coordinate KA2 2 2 1 2 cos D N N IP KA 2 2 1 2 sin D E E IP KA Bearing from IP1 to IP2 2 322 07 30 1 NKA2 1300 182 468 cos 322 07 30 1 1444 032 m EKA2 1750 182 468 sin 322 07 30 1 1637 976 m 10 Calculation of coordinates BC EC which is ARC IP1 IP2 EP Arc length IA R CL IA 95 52 11 CL 200 95 52 11 180 334 648 m 2 ...

Страница 150: ...750 221 615 cos57 59 40 6 1867 456 m EEC 1400 221 615 sin57 59 40 6 1587 929 m The calculated results display as below The coordinates and the distance are calculated as below 1 Compute the length of straight line Straight line BP KA1 543 545 1050 553 1574 000 1100 872 1249 2 2 m straight line KA2 BC 005 166 976 1637 058 1536 032 1444 068 1575 2 2 m straight line EC EP 084 250 929 1587 1800 456 18...

Страница 151: ... between KE1 and KE2 Radius 100 m sign is turn left curve toward the end point Length 131 354 m Transition Between KE2 and KA2 Radius 100 m sign is turn left curve toward the end point Length 64 m Straight line between KA2 and BC Bearing 322 07 30 1 Distance 166 004 m Arc between BC and EC Radius 200 without sign is turn right curve toward the end point Length 334 648 m Straight line between EC an...

Страница 152: ......

Отзывы: