


ESPAÑOL
Grabación avanzada
✤
La función AUDIO DUBBING sólo opera en la modalidad PLAYER.
✤
Se puede añadir un sonido al sonido original de una cinta grabada en la
modalidad SP de 12 bits de sonido.
✤
Puede usar el micrófono incorporado o uno externo u otro equipo de audio.
✤
El sonido original no se borrará.
✤
También puede utilizar la función WIND CUT en el modo de doblaje de AUDIO.
(Consulte la página 58.)
Grabación de sonido adicional
1.
Ajuste la videocámara en la modalidad PLAYER.
(ver página 29)
■
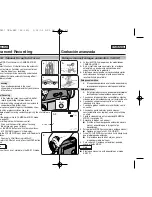
Si va a usar un micrófono externo, conéctelo en el
conector MIC de la videocámara.
■
Si desea doblar el sonido mediante la entrada de A/V
externa, conecte el cable Multi-AV al jack Multi-AV del
lateral derecho de la videocámara.
-
Pulse el botón MENU, mueva el SELECTOR DE
MENÚ hasta resaltar A/V y pulse el SELECTOR
DE MENÚ.
-
Mueva el SELECTOR DE MENÚ para resaltar AV
IN/OUT y pulse el SELECTOR DE MENÚ para
seleccionar AV IN/OUT.
-
Mueva el SELECTOR DE MENÚ para resaltar AV
IN (o S-VIDEO IN) y pulse el SELECTOR DE
MENÚ para seleccionar AV IN ( o S-VIDEO-IN).
2.
Pulse el botón
(PLAY/STILL) y busque el principio
de la escena en la que desea hacer la mezcla.
3.
Pulse el botón
(PLAY/STILL) para hacer una
pausa en la escena.
4.
Pulse el botón A.DUB del mando a distancia.
■
Aparecerá la señal A.DUB en la pantalla LCD.
■
La videocámara estará lista para la mezcla.
5.
Pulse el botón
(PLAY/STILL) para empezar la
mezcla.
■
Pulse el botón
(STOP) para detener la mezcla.
Notas
■
La función de mezcla de audio no se puede emplear si la cinta está protegida
contra grabación.
■
Debe utilizar una toma de micrófono externa de un tamaño inferior a 11,5 ø.
■
Si desea hacer una mezcla usando la entrada de A/V externa, debe conectar el
cable Multi-AV al sistema de audio desde el que desee grabar.
■
Si añade sonido mediante el micrófono incorporado, asegúrese de que no ha
conectado ningún cable a la videocámara.
■
No puede mezclar sonido en una cinta grabada en la modalidad LP o de 16 bits.
Audio dubbing (Mezcla de audio)
ENGLISH
70
70
Advanced Recording
✤
The AUDIO DUBBING function only works in PLAYER Mode.
✤
You can add sound to the original sound on a pre-recorded tape, recorded in SP
mode with 12bit sound.
✤
Use the internal and external microphones or other audio equipment.
✤
The original sound will not be erased.
✤
You can also use the WIND CUT function in AUDIO dubbing mode. (see page 58).
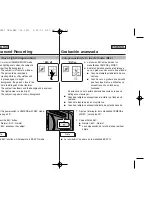
Dubbing sound
1.
Set the camcorder to PLAYER mode. (see page 29)
■
If you want to use an external microphone, connect
the microphone to the external MIC input jack on the
camcorder.
■
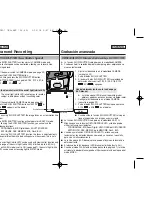
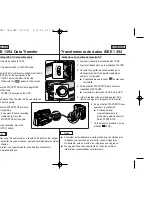
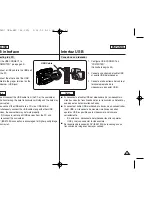
When you wish to dub using the External A/V input,
connect the Multi-AV cable to the Multi-AV Jack at
the right side of the camcorder.
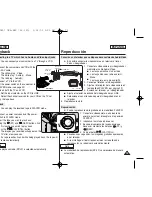
-
Press the MENU button, move the MENU
SELECTOR to highlight A/V and push the MENU
SELECTOR.
-
Move the MENU SELECTOR to highlight AV IN/
OUT and push the MENU SELECTOR to select
AV IN/OUT.
-
Move the MENU SELECTOR to highlight AV IN
(or S-VIDEO IN) and push the MENU
SELECTOR to select AV IN (or S-VIDEO IN).
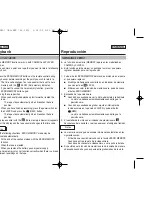
2.
Press the
(PLAY/STILL) button and find the
timeframe of the scene to be dubbed.
3.
Press the
(PLAY/STILL) button to pause the scene.
4.
Press the A.DUB button on the Remote Control.
■
A.DUB will be displayed on the LCD.
■
The camcorder is in a ready-to-dub state for
dubbing.
5.
Press the (PLAY/STILL) button to start dubbing.
■
Press the
(STOP) button to stop the dubbing.
Notes
■
You can not use the audio dubbing function while
playing a write protected video tape.
■
You must use the external microphone jack size of below Ø11.5.
■
When you wish to dub using the External A/V input, you must connect the Multi-
AV cable to the audio system from which you wish to record.
■
When adding sound using the built-in microphone, make sure not to connect any
cables to the camcorder.
■
You can not dub sound on a pre-recorded tape in LP mode or 16 bit mode.
Audio dubbing
Camcorder
AV IN
Audio (L)
Audio (R)
Video Yellow
S-VIDEO
00811D SCD907 USA+ESP (66~120) 3/16/05 9:50 AM Page 70


