36
EB 8091-1 EN
Servicing
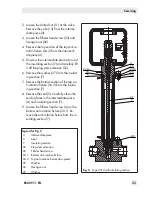
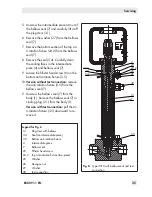
12. Remove gasket (2.3). Carefully clean the
sealing faces in the valve body (1) and
on the bellows seal (7).
13. Insert a new gasket (2.3) into the body.
14. Apply a suitable lubricant to the thread
of the bellows seal (7).
15.
Version with test connection:
slide the
bottom anti-rotation fixture (3.5, with
'bellows' inscribed on it) downward onto
the bellows seal (7).
The anti-rotation fixture must be pushed onto
the bellows seal in such a way that its fasten
-
ing hole is located directly over the threaded
hole in the body after the bellows seal is
bolted on.
16. Place the bellows seal (7) together with
the plug (2.1) onto the body. Use a suit-
able tool to screw it into the body (1).
Observe tightening torques.
Version without test connection:
slide the
anti-rotation fixture (3.5, with 'bellows'
inscribed on it) from the top over the bel-
lows seal (7).
17. Lock the anti-rotation fixture (3.5) in
place with the fillister head screw (6).
18. Push the bottom section of the top an-
ti-rotation fixture (24.2, without inscrip-
tion) with its bent end facing downward
onto the bellows seal (7).
19. Insert the new seal (3.4) into the bellows
seal (4).
20. Place the washer (27) on the bellows seal
(7).
21. Apply a suitable lubricant to the thread
of the intermediate piece (4).
22. Carefully place the intermediate piece (4)
over the plug stem (3.1) onto the bellows
seal (7). Use a suitable tool to screw it in.
Observe tightening torques.
It must be possible to turn the washer (27)
easily after the intermediate piece is fastened
tight. It must not be clamped down.
23. Push the top section of the top anti-rota-
tion fixture (24.2, with 'plug, seat' etc.
inscribed on it) with the bent end facing
upward over the intermediate piece (4).
24. Insert the fillister head screw (23) through
both parts of the anti-rotation fixture
(24.2). Push the washer (25) from below
onto the screw and lock in place with the
hexagon nut (26).
25. Place the yoke (13) onto the intermediate
piece (4) and secure with slotted nut
(11). Observe tightening torques.
26. Mount actuator. See associated actuator
documentation.
7.2 Replacing the packing
Risk of control valve damage due to incorrect
service or repair.
The packing can only be replaced when all
the following conditions are met:
−
The valve does not have a bellows seal.
Note
Note
NOTICE
!
Содержание 3510
Страница 29: ...EB 8091 1 EN 29...

