


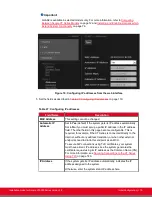


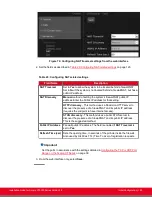


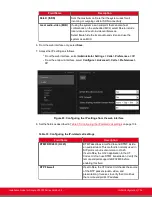
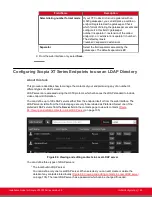

Figure 76: Configuring NAT traversal settings from the web interface
2. Set the fields as described in
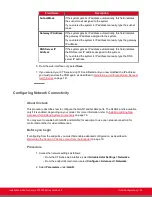
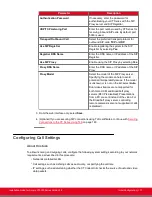
Table 29: Configuring NAT-related settings
Table 29: Configuring NAT-related settings
Field Name
Description
NAT Traversal
Set to
Yes
to allow the system to be located behind a firewall/NAT.
Set to
No
if the system is not located behind a firewall/NAT, but has a
public IP address.
NAT Discovery
Manual
method of setting the system’s firewall/NAT public IP
address. Enter the Public IP address for that setting.
HTTP discovery
- This method uses a Radvision HTTP server to
discover the presence of a firewall/NAT and its public IP address
(requires the endpoint to have internet access).
STUN discovery
- This method uses a public STUN server to
discover the presence of a firewall/NAT and its public IP address.
This is the suggested method.
Public IP Address
Firewall public IP address. The field is enabled if
NAT Traversal
is
set to
Yes
.
Refresh Time (sec)
Sets the opening time, in seconds of the pinhole inside the firewall.
Also used by H.460 as TTL (Time To Live) of registration requests.
Important:
Set the ports in accordance with the settings detailed in
Configuring the TCP or UDP Port
on page 30.
3. From the web interface only, select
Save
.
Installation Guide for Scopia XT5000 Series Version 3.2
Initial Configuration | 123


