


Table 19: Configuring general camera settings
Field Name
Description
Default camera
Select the port of the XT Codec Unit which you connected the
default camera, which is automatically activated when the
system powers up.
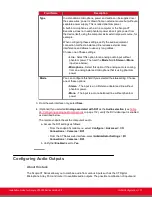
Figure 65: Video inputs of the XT Codec Unit
•
HD1
: Select if you connected the default camera to the
HDMI input of the XT Codec Unit.
This is the most common configuration.
If you connected multiple cameras using the Scopia XT
Camera Switch, select the HD port of the Scopia XT
Camera Switch to which you connected the default
camera, from
HD1- HD4
.
•
USB
: Select if you connected the default camera to the
USB input of the XT Codec Unit.
•
DVI
: Select if you connected the default camera to the
DVI input of the XT Codec Unit.
For more information about connecting your camera to the
XT Codec Unit, see
Connecting the Video Equipment to the
on page 47.
Important:
When using the Scopia XT Camera Switch, do not connect
cameras to ports
HD1
and
USB
on the XT Codec Unit, as
these are used to connect the Scopia XT Camera Switch
itself. For more information, see
on page 53.
Driver
Select the camera driver for the connected camera.
Automatic
allows automatic identification of the correct driver
at system start up. Automatic detection for HD camera is
available only if the camera is connected using a VISCA
Cross cable.
Camera control by far site
Enables/disable control of my camera(s) by the remote
endpoint.
Bring back to place
If enabled, the system stores camera positions when the
camera is switched off, and restores this position the next
time the camera is switched on.
Installation Guide for Scopia XT5000 Series Version 3.2
Initial Configuration | 102


