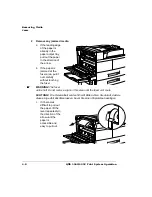
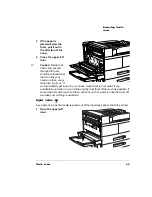
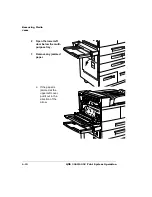
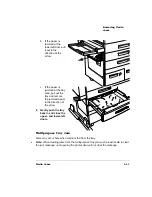
background image


This chapter explains automatic jam recovery, discusses how to prevent media jams, 
and then provides detailed information on how to find and remove media jams.

 (

The QMS 3260/4032 Print System provides automatic jam recovery (when enabled 
through the Administration/Engine/Page Recovery menu). After you remove any 
jammed media, printing automatically resumes from the page the printer stopped at 
when the jam occurred.

»

Note: 

For automatic jam recovery to work, it is necessary to leave the printer turned 

on when you remove the jammed media. 

There are several things you can do to reduce the occurrence of media jams.

Use paper, envelopes, labels, and transparencies that match the printer specifica-
tions.

Make sure the media is not folded, wrinkled, or excessively curled.

Do not overfill the media tray. The tray has a fill-limit mark on the inside left side.

If you have problems with double feeding, remove the media from the tray and fan 
the sheets. They may be sticking together. 

»

Note: 

Do not fan transparencies since this causes static.

Store media in a dry location away from excessive heat, moisture, and humidity.

Содержание 3260

Страница 1: ......

Страница 2: ...LaserWriter LocalTalk Macintosh TrueType Apple Computer Inc VINES Banyan Centronics Centronics Color Solutions ColorBlind Color Solutions DEC DECnet LN03 LN03 Plus VMS Digital Equipment Corporation P...

Страница 3: ...Introduction 1 2 About This Manual 1 2 Typographic Conventions 1 3 Introduction 2 2 Loading the Media Trays 2 2 Prepare the Paper 2 2 Load the Tray 2 2 Loading the High Capacity Input Feeder 2 4...

Страница 4: ...aning the Printer 2 19 Cleaning the Exterior of The Printer 2 19 Guidelines for Cleaning Inside the Printer 2 19 Preventive Maintenance 2 21 Replacing the Fuser 2 22 Replacing the Transfer Roller 2 26...

Страница 5: ...wnView Printer Webpage 3 18 Setting up the Printer Webpage 3 18 Printer Home Page 3 20 Introduction 4 2 Automatic Jam Recovery 4 2 Preventing Media Jams 4 2 Understanding the Media Path 4 3 Base Model...

Страница 6: ...Paper Jam Message Stays On 5 22 Printer Resets 5 22 PostScript Errors 5 22 Windows Driver Problems 5 23 Printer Description Files 5 23 CrownNet Problems 5 23 Kanji Option Kit Problems 5 24 Can t Downl...

Страница 7: ...duction B 2 Menu Chart Conventions B 2 Operator Control Menu B 3 Administration Menu B 4 Administration Communications Resident NIC CrownNet Menu B 5 Installation Menu B 10 Introduction C 2 What s Inv...

Страница 8: ......

Страница 9: ...Introduction on page 1 2 About This Manual on page 1 2...

Страница 10: ...n describes how to replace the toner cartridge fuser and maintenance kits Advanced Printing Features Explains how to collate output print a status page cancel a print job and end a print job contains...

Страница 11: ...packing the Printer Explains how to repack the printer in case you need to relocate or ship your printer after it s been installed Mixed Case Courier Text you type and messages and information display...

Страница 12: ......

Страница 13: ...age 2 2 Using Media Other than Paper on page 2 6 Using Toner Cartridges on page 2 10 Replacing a Toner Cartridge on page 2 11 Handling the Printer on page 2 18 Cleaning the Printer on page 2 19 Preven...

Страница 14: ...1 ream Note Don t unwrap the paper above the printer as this might cause paper particles to fall into the printer 2 Holding the stack with one hand fan the paper with the other This gets air through t...

Страница 15: ...ners of the paper and place the paper in the tray The paper should enter eas ily between the guides Make sure the paper does not get bent upwards by the guides Note Make sure the guide stopper is lock...

Страница 16: ...properly aligned 4 Insert the paper into the com partment 5 Repeat steps 2 and 3 with another ream of paper Note Make sure the paper stack does not exceed the paper limit mark The multipurpose tray c...

Страница 17: ...a along the right side of the multipur pose tray 3 Push the media guide to slightly touch the media stack 4 Insert the media stack as far as it can go into the printer The media is now ready for print...

Страница 18: ...ont side only Some parts of the envelope consist of three layers of paper the front back and flap Anything printed in these layered regions may be lost or faded See your application documentation for...

Страница 19: ...es pass through heated rollers the gummed area on the flaps may seal Using envelopes with emulsion based glue avoids this problem Formatting Format label data within your application Try printing your...

Страница 20: ...toward the front of the tray Formatting Format letterhead or memo data within your application Try printing your data on a plain sheet of paper first to check placement Input Source Trays 2 3 or 5 Cap...

Страница 21: ...static buildup thus causing feeding problems Type Refer to the specifications in chapter 4 Print Media in the Reference Notes Keep the media path clean Transparencies are especially sensitive to a dir...

Страница 22: ...in toner quality and reliability and may reduce the print quality of your documents In addition toner leaks affect your warranty Keep toner cartridges in their packaging until you re ready to install...

Страница 23: ...1 Open the upper left cover Note If your printer has a duplexer attached open the duplexer and then open the inner door Without a duplexer With a duplexer...

Страница 24: ...andle on the cartridge to gently take it out Then hold the handle and com pletely remove the cartridge Watch out for loose toner fall ing out Caution Dispose of the old toner cartridge according to lo...

Страница 25: ...e toner inside 6 While holding the orange handle with one hand align the toner cartridge with the cartridge guides and gently push the cartridge all the way into the printer Caution If a toner cartrid...

Страница 26: ...can break 8 Close the front door and the upper left door Caution The upper left door can be closed only when the toner cartridge is inside the printer If you have not installed the toner cartridge do...

Страница 27: ...the front door of the high capacity output stacker HCOS 2 Push the release lever down to release the sta ple cartridge 3 Remove the staple car tridge 4 Remove the empty staple box from the staple car...

Страница 28: ...5 Place a staple refill into the staple box and insert the full staple box into the staple cartridge 6 Pull the sealing tape out of the cartridge to pre pare the staples 7 Insert the staple car tridge...

Страница 29: ...8 Pull the release lever up to lock the full sta ple cartridge into place and close the front door of the HCOS 9 Close the front door of the high capacity out put stacker...

Страница 30: ...mage the toner cartridge Do not open the printer during printing and do not tap paper stacks on the printer Do not tilt lubricate or disassemble the printer Do not touch the electrical contacts gears...

Страница 31: ...nce clean the exterior about once a month Use the following guidelines Use only a dry or slightly damp lint free soft cloth moistened only with water with water For stubborn stains dampen the cloth wi...

Страница 32: ...interior of the printer body Use only dry lint free cotton cloths or swabs Make sure any parts removed during cleaning are replaced before you plug in the power cord reconnect the interface cables an...

Страница 33: ...ov erage usually 5 coverage of letter A4 size media The actual life expectancy will vary depending on these and other printing variables including continuous or intermit tent printing ambient temperat...

Страница 34: ...t is hot ACHTUNG Die Fixiereinheit wird sehr hei 1 Open the upper left door and the front door Note If your printer has a duplexer attached open the duplexer and then open the inner door Without a dup...

Страница 35: ...n the two locking screws you cannot remove them com pletely 3 Holding the two rings indicated pull out the fuser Dispose of the fuser according to local regulations 4 Unpack the new fuser from its sto...

Страница 36: ...5 While holding the two rings of the new fuser push it into the printer as shown 6 Tighten the two locking screws...

Страница 37: ...7 Use a coin to loosen and remove the locking screw from the rear side of the fuser 8 Use a coin to loosen and remove the locking screw from the front side of the fuser 9 Close the printer doors...

Страница 38: ...1 Open the upper left door and the front door Note If your printer has a duplexer attached open the duplexer and then open the inner door Without a duplexer With a duplexer...

Страница 39: ...2 Lift up the handles to unlock the transfer roller 3 Remove the transfer roller...

Страница 40: ...4 Insert the new transfer roller and press down to hold the roller in place 5 Push the handles to lock the transfer roller in place 6 Close the doors of the printer...

Страница 41: ...1 Remove the media tray by pulling it out all the way until it stops and then lift ing slightly and pull ing to release from the printer...

Страница 42: ...2 Look inside the tray com partment While pressing the white tab remove the lower feed roller 3 Flip down the cover for the upper roller 4 Press the white tab for the upper roller and remove it...

Страница 43: ...w upper feed rollers on the shaft 6 Close the upper roller cover 7 Insert the new lower feed rollers on the shaft 8 Follow steps 1 through 7 to replace the feed rollers for tray 3 and tray 5 9 Replace...

Страница 44: ...1 To change the right tray of the high capacity input feeder remove tray 5 to access the feed rollers 2 Pull out the tray 7 of the high capacity input feeder...

Страница 45: ...ull the feed roller cover towards you 4 While pressing the white tab remove the three feed rollers one at a time 5 Insert the three new feed rollers 6 Replace the feed roller cover 7 Push back the tra...

Страница 46: ...1 Pull out the tray 6 2 Open the lower left door of the high capacity input feeder...

Страница 47: ...3 While pressing the white tab of each roller remove the three feed rollers one at a time 4 Insert the three new feed rollers 5 Push the left tray back in and close the lower left door...

Страница 48: ......

Страница 49: ...g on page 3 2 Tray Chaining on page 3 6 Collating Output on page 3 8 Stacking and Stapling on page 3 10 Working with Status Pages on page 3 14 Cancelling Ending Print Jobs on page 3 15 CrownView Print...

Страница 50: ...300x300 dpi Built into all QMS 3260 4032 Print Systems this resolution has the fastest processing time for producing draft quality output 300x300 dpi resolution is also required by some printer emulat...

Страница 51: ...Commands DOCs If you want the printer to use a lower default resolution when you restore defaults set this option to your choice and make any other necessary configuration settings and then use the Ad...

Страница 52: ...SIMMs for the following To print complex graphics or complex PostScript documents For increased collation performance For increased spooling performance The ability of the printer to produce halftone...

Страница 53: ...ted in this table are optimized for performance and the advanced settings are optimized for quality Menu Administration Emulations PostScript Halftone Type Choices Basic See the following table for de...

Страница 54: ...ng the Administration Engine Toner Density setting You can choose to have the printer automatically draw media from the other tray inputbin when the current tray empties or switch to another output tr...

Страница 55: ...t switch trays uses only the default tray On Any Switches to the next tray regardless of the size and type of media installed when the default input bin is empty Default On Notes Use the Operator Con...

Страница 56: ...ach copy of the document exists as a whole unless chunk collation has occurred There are five ways to enable disable collation Use your application Check the documentation to see if your application i...

Страница 57: ...n copies a and b of each set must be manually combined to create one collated document The order of printing is copy 1 a copy 2 a copy 3 a copy 4 a copy 1 b copy 2 b copy 3 b and copy 4 b Note If chun...

Страница 58: ...application sends the complete job the requested number of times rather than sending it once and holding data in printer memory Also if you are collating stapled jobs your output will print better whe...

Страница 59: ...job by job basis The configuration menu option allows you to select options from the printer control panel 2 This menu option allows you to select chaining for the output bins When your print jobs ex...

Страница 60: ...again Note When removing paper from the output bins you must remove all the sheets from the tray for the printer to be able to update the counter on the bin For example if the bin was full at 670 shee...

Страница 61: ...ge size the selected staple position and the selected orientation Menu Operator Control Output Finishing Staple Position Choices Off Front Corner Back Corner Center Default Off Paper Size Staple Posit...

Страница 62: ...umables tracking period Administration Consumables Start Period menu Printer settings printer set up options for paper handling Current memory configuration printer memory settings Timeouts printer ti...

Страница 63: ...terminating or spooled status It allows you to send an end of job indicator to a currently compiling print job wait ing on incoming data You don t have to press the Online button before using the Can...

Страница 64: ...r to chapter 3 Additional Technical Information in the Reference Manual for a complete discussion of End Job Mode Press this button to The message window reads Cancel Access the Job Cancel menu JOB CA...

Страница 65: ...1 0 2 Next twice Advance to the End Job mode JOB CANCEL END JOB Cancel or Select Select End Job END JOB IS SELECTED...

Страница 66: ...browser software This section provides you with details on Setting up and using the webpage Configuring the printer to send email on error conditions and printer status The different types of pages i...

Страница 67: ...ry and then type the printer name or the IP address of your QMS 3260 4032 6 Choose OK 7 Enter the printer name or IP address in the Go to URL address box to access the printer home page 1 8 1 Start yo...

Страница 68: ...e is the starting point for all access to the printer webpages On this page you will find hotlinks to all of the supporting webpages for your printer Printer Graphic Information Product Printer Name H...

Страница 69: ...enu Operator Control Inputbin Sheets Printed Lists the number of sheets of media printed to date during the current consumables tracking period Administration Consumables Start Period menu This number...

Страница 70: ...link on the home page jumps to the Operator Control page This page contains a form which allows you to configure settings in your printer After you make your choices choose the Submit button to make t...

Страница 71: ...Operator Control Orientation Default Inputbin Allows you to choose Upper or Optional as the input source Configuration Menu Operator Control Inputbin Outputbin Allows you to choose the default output...

Страница 72: ...groups of printer configuration settings Each is described in more detail in the following pages Printer Setting on page 3 25 Communication Settings Input Buffer Sizes on page 3 26 Paper Sources on p...

Страница 73: ...rors encountered during a print job Configuration Menu Administration Startup Options Do Error Handler Do Sys Start Identifies whether the printer controller checks the hard disk for a PostScript file...

Страница 74: ...Resolution Identifies the printer resolution Configuration Menu Administration Engine Def Resolution Serial IF Identifies the settings for the serial interface Configuration Menu Administration Commun...

Страница 75: ...e and type of media currently installed in the optional lower input feeder Configuration Menu Operator Control Custom Bin Optional Operator Control Media For Optional Bin Disk s Identifies how many ha...

Страница 76: ...s downloaded fonts PostScript operators and forms Configuration Menu Administration Memory Manual Config K Menu for PSHeap Framebuffer Shows the size in KB of the Frame Buffer This client holds raster...

Страница 77: ...ystem It s never increased or decreased The system memory subtracted from the total amount of RAM identifies the amount of RAM available for all the other memory clients Configuration Menu No equivale...

Страница 78: ...ut Emulation Shows the maximum number of seconds emulations other than PostScript wait for incoming data Configuration Menu Administration Communications Timeouts Emulation Timeout ESP Shows the maxim...

Страница 79: ...hotlink on the home page jumps to the Printer Jobs page This page contains information about the current jobs the printer is processing and information on the previous five jobs printed Current Job S...

Страница 80: ...nting Printed Configuration Menu No equivalent Prio rity Shows the priority of each job Configuration Menu No equivalent Owner Shows the name of the owner of each current job Configuration Menu No equ...

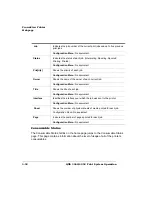
Страница 81: ...actual life expectancy will vary depending on these and other printing variables including continuous or intermittent printing ambient temperature and humidity Consumable Name Identifies the consumab...

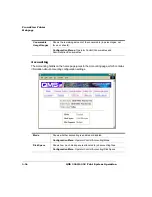
Страница 82: ...aining amount of the consumable in percentages not faces or sheets Configuration Menus Operator Control Consumables and Administration Consumables Mode Shows whether accounting is enabled or disabled...

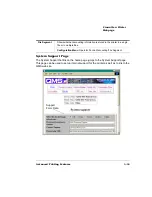
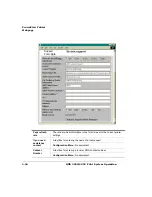
Страница 83: ...page can be used to set up internal support for the printer as well as to link to the QMS web site File Segment Shows whether accounting information is stored in the printer in a single file or in mu...

Страница 84: ...reset to the current printer settings If you need assistance contact A text box for entering the name of a local expert Configuration Menu No equivalent Contact Number A text box for entering a local...

Страница 85: ...e domain name of the printer Configuration Menu No equivalent Sender s address A text box for entering the address of the printer on the network Configuration Menu No equivalent To A text box for ente...

Страница 86: ...r consumables such as the number of sheets faces and planes printed as well as the average coverage of toner Note The number of sheets faces printed statistics differ from the number of sheets printed...

Страница 87: ...2 3 2 1...

Страница 88: ...support 2 The Online Help hotlink on the home page jumps to any help information that has been configured on the System Support page Printer Help URL You can configure this to jump to your own help we...

Страница 89: ...button on the printer home page you ll be linked to an HTML page located at the QMS web site From here you can link to a topic which applies to your specific problem You can also access a list of curr...

Страница 90: ......

Страница 91: ...Automatic Jam Recovery on page 4 2 Preventing Media Jams on page 4 2 Understanding the Media Path on page 4 3 Understanding Jam Status Messages on page 4 6 Removing Media Jams on page 4 7...

Страница 92: ...rk it is necessary to leave the printer turned on when you remove the jammed media There are several things you can do to reduce the occurrence of media jams Use paper envelopes labels and transparenc...

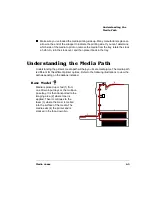
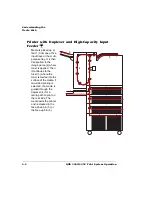
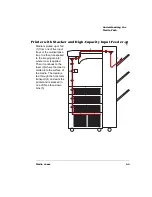
Страница 93: ...ing the printer s media path will help you locate media jams The media path is different for the different printer options Refer to the following illustrations to view the path depending on the option...

Страница 94: ...toner is applied Then it continues to the fuser 3 where the toner is melted into the surface of the media If two sided printing is selected the media is guided through the duplexer 4 for a return pat...

Страница 95: ...then transported to the imaging area 2 where toner is applied Then it continues to the fuser 3 where the toner is melted into the surface of the media The media is fed through the horizontal transpor...

Страница 96: ...he standard tray multipurpose tray or optional high capacity input feeder A misfeed jam may be as simple as a sheet of media not being picked up or it may be that the media was picked up but not fed p...

Страница 97: ...earing jams from the multipurpose tray or the envelope feeder you must reload paper or envelopes to clear the jam message Just opening the printer door will not clear the message Caution To avoid dama...

Страница 98: ...without touching the fuser WARNING The fuser unit is hot Do not remove a jam in this area until the fuser unit cools ACHTUNG Die Fixiereinheit wird sehr hei Bitte achten Sie darauf da sie diese einige...

Страница 99: ...thes or any thing else it gets on If you accidentally get toner on your hands wash them in cool water If you accidentally get toner on your clothes lightly dust them off as much as possible If some to...

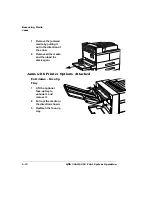
Страница 100: ...4 2 Open the lower left door below the multi purpose tray 3 Remove any jammed paper a If the paper is jammed at the upper left cover pull it out in the direction of the arrow...

Страница 101: ...the tray and remove the jammed paper in the direction of the arrow 4 Gently push the tray back in and close the upper and lower left doors Jams may occur here when media is fed from the tray Note When...

Страница 102: ...ulling it out in the direction of the arrow 2 Remove all the media and then load the stack again 8 0 1 Lift the optional face up tray to unhook it and remove it 2 Pull out the media in the direction s...

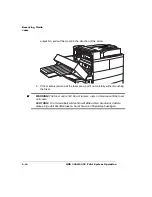
Страница 103: ...4 4 8 5 8 1 Open the duplexer 2 Open the upper left door 3 Remove any jammed media a If the leading edge of the media is already in the output bin pull out...

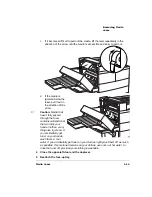
Страница 104: ...fuser area pull it out carefully without touching the fuser WARNING The fuser unit is hot Do not remove a jam in this area until the fuser unit cools ACHTUNG Die Fixiereinheit wird sehr hei Bitte acht...

Страница 105: ...t fully passed through the fuser contains unfused toner that can dirty your hands clothes or any thing else it gets on If you accidentally get toner on your hands wash them in cool water If you accide...

Страница 106: ...4 5 8 1 Open the duplexer 2 Open the upper left door 3 Open the lower left door...

Страница 107: ...d media shown a If the media is jammed at the upper left cover pull it out in the direction of the arrow b If the media is jammed at tray 2 3 or 5 pull out the tray and remove the jammed media in the...

Страница 108: ...4 c Open the door below the multipurpose tray to check for jammed media d Pull out any jammed media...

Страница 109: ...4 e If the media is jammed in the lower right tray 7 of the high capacity input feeder pull out and remove tray 5 and remove any jammed media f Pull out the lower left tray 6 and remove any jammed med...

Страница 110: ...ay 7 check the paper feed area and remove any jammed paper there h If the media is jammed at the lower left door pull it out in the direction of the arrow 5 Gently push in the input trays 6 Close the...

Страница 111: ...4 4 5 8 1 Pull on the latch to open the duplexer 2 Open the cover inside of the duplexer...

Страница 112: ...4 3 Remove any media jam by pulling it out in the direction of the arrow 4 Close the inside cover and then close the duplexer...

Страница 113: ...clearing jams from the envelope feeder you must reload envelopes to clear the jam message Just opening the printer door will not clear the message 1 Remove the enve lope feeder 2 Remove any jammed en...

Страница 114: ...4 3 Reinsert the enve lope feeder...

Страница 115: ...4 4 2 1 If media is jammed at the docking cover lift the handle and remove any jammed media 2 Open the cover of the media horizontal transport and remove any jammed media...

Страница 116: ...4 3 Open the top cover of the stacker and remove any jammed media 4 Check jammed media at the output tray of the stacker and remove any paper found there...

Страница 117: ...or Codes on page 5 13 Toner Cartridge Problems on page 5 20 Control Panel Problems on page 5 21 Windows Driver Problems on page 5 23 CrownNet Problems on page 5 23 Kanji Option Kit Problems on page 5...

Страница 118: ...lacing a service call if one becomes necessary Status and service messages are displayed in the control panel message window They provide information about your printer and help you locate many proble...

Страница 119: ...host computer using ftp if available Then reset the accounting files so that new jobs can be accepted If you don t want to use accounting you can disable it ACC FILE 95 FULL ACC FILE 90 FULL ACC FILE...

Страница 120: ...e print queue will be canceled CANCEL ALL JOBS The Cancel key has been pressed and one or more of the print jobs in the print queue are being canceled Press Select for all jobs with a printing interpr...

Страница 121: ...EX JAM Media is jammed in the duplexer Remove the jam END JOB The Cancel key has been pressed Press Select to provide an end of job indicator for a print job that does not have one EXTENDED ACCOUNTING...

Страница 122: ...ersonnel only Contact your QMS vendor FINISHER MECHANICAL FAILURE There is a mechanical problem with the HCOS Correction of these errors is performed by qualified QMS service personnel only Contact yo...

Страница 123: ...emove the jam PAPER MISMATCH The paper size specified in the print job is not in the tray selected Make sure the tray selected and the paper size match PRINTING STATUS A status page is printing Wait u...

Страница 124: ...rvice message Correction of these errors is performed by qualified QMS service personnel only Contact your QMS vendor STAPLE CARTRIDGE NOT INSTALLED The staple cartridge is empty or has not been repla...

Страница 125: ...e The job may not have an end of job indicator and therefore cannot end The message clears if more input arrives from the port or if you press the Cancel key No other jobs can be printed until this jo...

Страница 126: ...ERVICE CALL MEMORY 06 Nonvolatile memory is broken down SERVICE CALL MEMORY 10 Malfunction of nonvolatile memory read write is detected SERVICE CALL FUSER 02 A timing error is detected in fuser SERVIC...

Страница 127: ...switch is on FINISHER MECH L LIMIT 04 Finisher stacker tray 2 lowerlimit switch is on FINISHER MECH L LIMIT 06 Finisher stacker tray 3 lowerlimit switch is on FINISHER MECH FAILURE 02 Finisher mechan...

Страница 128: ...al failure stapling operation FINISHER MECH STAPLING 12 Mechanical failure stapling operation FINISHER MECH STAPLING 14 Mechanical failure stapling operation FINISHER MECH STAPLING 15 Mechanical failu...

Страница 129: ...ory for job 0 Not enough memory for job 1 Too many transformations 1 State lost 2 Math error 2 Math error 3 Job aborted 3 Job aborted 4 Instruction not recognized 4 Out of memory for macros 5 Wrong nu...

Страница 130: ...ile you type the appropriate letters d and z These characters signify the end of the file and must always be included 1 To send the PRINTEST PS file you just created to the printer type copy b printes...

Страница 131: ...the printer s serial port settings match those of the PC a Look for a command line like this in your AUTOEXEC BAT file MODE COM1 9600 N 8 1 P In this example the serial port settings are 9600 for baud...

Страница 132: ...e AUTOEXEC BAT file Use the information in the follow ing table Pressthis key to The message window reads Online Offline Turn off the Ready indicator and enable printer configuration IDLE Menu Access...

Страница 133: ...one or more times Advance to the correct baud rate BAUD RATE Select Select the displayed baud rate IS SELECTED SERIAL BAUD RATE Note If you need to change other settings press the Next key to access t...

Страница 134: ...m the File menu choose Print Directory or Print Window A dialog box appears b Select the printing options you want and then choose OK This section contains a list of possible printer problems and solu...

Страница 135: ...there a media jam If a paper jam message displays and the Error indi cator lights see chapter 4 Media Jams for information on clearing media jams 3 Is the printer receiving data from the computer If...

Страница 136: ...or instructions If you continue to have problems with the ESP mode selecting the appro priate printer emulation contact your QMS vendor The toner cartridge is extremely sensitive to bright light and d...

Страница 137: ...Type menu to print an advanced sta tus page your printer probably doesn t have enough free memory available To print an advanced status page you may need to reduce the amount of memory assigned to one...

Страница 138: ...here is a cor relation between your use of a certain application and the printer resetting If so contact the application developer Downloading too many typefaces can overload the printer memory and ca...

Страница 139: ...lled in the printer Is the printer connected to the network Is the printer plugged in turned on and correctly configured Do the printer start up and status pages list the interface Is the configuratio...

Страница 140: ...mber of fonts that you are downloading When downloading a large number of fonts packet them in smaller groups for downloading For example instead of downloading 4 fonts at one time download 2 Are you...

Страница 141: ...About Check that you are using the QMS Windows 3 1J driver If you are using a Macintosh ensure that the system is KanjiTalk and the appro priate Kanji screen fonts are installed The two Morisawa scree...

Страница 142: ...it 3 If this solution doesn t work contact your QMS vendor to purchase another toner cartridge If the printer stops printing in the middle of your file try the following 1 Check your cable You could...

Страница 143: ...s with possible solutions Try the solu tions in the sequence given If the solutions listed don t solve the problem place a ser vice call to your QMS vendor See the next section in this chapter Placing...

Страница 144: ...in the sequence given If the solutions listed do not solve the problem place a service call to your QMS vendor 5 1 The toner cartridge may be defective Remove it and install a new toner cartridge 2 Y...

Страница 145: ...toner cartridge may be defective Install a new toner car tridge If toner smudges are also on the back of the page the image transfer roller may be dirty Open the printer once and close it again to cle...

Страница 146: ...ew toner car tridge if needed 1 Remove the toner cartridge and rock it as you do before install ing a new cartridge This redistributes toner inside the cartridge Reinstall the cartridge 2 If step 1 do...

Страница 147: ...paper sup ply Toner does not adhere well to paper at the positions where it has become wet Replace the paper in the tray with dry paper and retest for irregular print 1 The components inside the tone...

Страница 148: ...exhausted all efforts to revive it using the procedures in this chapter then you should be able to reload the system software to revive your printer You must contact QMS or your QMS vendor to obtain n...

Страница 149: ...c Disk 2 system software disk 2 d Disk 3 system software disk 3 5 7 1 7 1 Turn the printer off 2 Connect the printer to a PC through the parallel port 3 While holding down any two buttons on the prin...

Страница 150: ...are is loading the Online LED blinks off and on and the message window displays Downloading image via parallel port 9 After the new system software has been written to ROM the printer returns to IDLE...

Страница 151: ...have the answers to these questions handy to help our technicians serve you more quickly 1 What is your phone number fax number and shipping address 2 What is the description of the problem 3 What is...

Страница 152: ......

Страница 153: ...Sources of Support on page A 2 QMS World wide Offices on page A 4...

Страница 154: ...t printer specifications options accessories consumables and prices In the United States and Canada call 800 633 7213 to reach Q FAX In all other countries call 334 633 3850 Have your fax number handy...

Страница 155: ...pe of host computer you re using The type and version of operating system you re using The interface you re using and if serial the protocol for example XON XOFF The application and version you re usi...

Страница 156: ...1 334 639 3347 National Service Service Information Installation and Maintenance Pricing 1 800 762 8894 On Site Service and Depot Repair Information 1 800 858 1597 7 00 am 7 00 pm Central Time Spare P...

Страница 157: ...gium Netherlands and all unlisted coun tries Planetenbaan 60 Corner Plaza 3606 AK Maarssen The Netherlands 31 346 551333 Fax 31 346 550170 Internet http www qms nl V lizy Plus 1 Bis Rue du Petit Clama...

Страница 158: ...01 30 Fax 46 8 600 01 33 Saskay House Unit 24 Sunninghill Business Park Peltier Road Sunninghill Johannesburg Republic of South Africa 27 11 807 6957 Fax 27 11 807 6960 United Kingdom and Ireland Old...

Страница 159: ...Menu Chart Conventions on page B 2 Operator Control Menu on page B 3 Administration Menu on page B 4 Installation Menu on page B 10...

Страница 160: ...nistration menu on page B 4 Installation menu on page B 10 The following conventions are used in the menu charts Some menu choices are marked as optional or with a indicating that the selection appear...

Страница 161: ...ce up Order Reverse Normal Chain Inputbins Off On On Any Chain Option Multipurpose Sz Letter Legal Folio Executive 11x17 A3 A4 A5 B4 B5 Statement Postcard COM10 DL Monarch C5 Envelope Accounting Mode...

Страница 162: ...r Handler Quick Config Manual Config Enable Disk Swap Toner Low Act Energy Saver Def Resolution Maintenance Image Alignment Default Paper Inputbin 1 7 Name Outputbin 1 5 Name Page Recovery Toner Low A...

Страница 163: ...esident NIC CrownNet Mode Min K Spool Def Job Prio PS Protocol Spooling HW Config Factory Soft On On Idle On Input Idle Address No Yes No Yes No Yes Address Page Reset Reset Ring Speed Source Routing...

Страница 164: ...P IP Protocol Network Ident Connection Zone Name Disabled LaserWriter QMS RC Res Conventional Spooling Zone Part 1 Zone Part 2 Enabled HP Zoner Res Both Default Idle Administration Communications Resi...

Страница 165: ...4 Common EtherTalk LAN Manager NetWare TCP IP Protocol Printer Name Default Disabled Yes No Enabled Idle Administration Communications Resident NIC CrownNet Optional NIC Optional...

Страница 166: ...Srv Name 3 PServer Name 2 Printer Name 3 Frame Type 802 3 IPX Addr Ether 2 IPX Addr 802 2 IPX Addr Default PServer Name 1 PServer Name 2 PServer Name 3 Job Check Delay Conf Check Delay Burst Mode PSe...

Страница 167: ...istration Communications Resident NIC CrownNet Internet Default Secure Accnting LPD SNMP Mask Chan Assignment NMS 1 5 Router Address Files Timeout Banner None Community Internet Address Access Remove...

Страница 168: ...Operator Control Idle Administration Installation Enter password Use Operator Pwd Off On Admin Password Enter password Use Admin Pwd Off On Operator Passwrd Optional...

Страница 169: ...on page C 2 Remove the HCOS on page C 3 Remove the Face Up Tray on page C 7 Remove the Duplexer on page C 7 Removing the Envelope Feeder on page C 9 Removing the HCIF on page C 10 Repacking the Printe...

Страница 170: ...00 If you need to return the printer for service in the US call QMS Customer Service at 1 334 633 1072 for an RMA Return Merchandise Authorization number before shipping the printer In other countries...

Страница 171: ...Skip this section if you do not have the optional HCOS 1 Unplug the interface cable from the rear of the printer 2 Unscrew the locking screw that secures the HCOS to the printer...

Страница 172: ...3 Pull the HCOS away from the printer 4 Push the locking bar away from the HCOS to free it from the printer...

Страница 173: ...5 Unplug the power cable connected to the right side of the printer 6 Move the HCOS away from the printer...

Страница 174: ...screws on the con necting bracket on the right side of the printer to remove it 8 Remove the vertical transport unit from the top of the printer 9 Store the HCOS and its components in a safe place for...

Страница 175: ...ray 1 Unhook the face up tray from the left side of the printer 2 Store the face up tray in a safe place for reinstalling later 4 Skip this section if you do not have the optional duplexer 1 Disconnec...

Страница 176: ...Open the duplexer and unhook the safety wire at the rear 3 Lower the duplexer to a horizontal posi tion and gently lift the duplexer straight up 4 Store the duplexer in a safe place for rein stalling...

Страница 177: ...f you do not have the optional envelope feeder 1 Pull out the envelope feeder by grasping the sides and firmly pulling 2 Store the envelope feeder in a safe place for reinstalling later 3 Replace the...

Страница 178: ...Skip this section if you do not have the optional high capacity input feeder 1 Disconnect the HCIF interface cable from the rear of the printer 2 Remove trays 3 and 5...

Страница 179: ...nt ing bracket on the right side of the printer HCIF frame by loosening and removing the thumb screw 4 Remove the mount ing bracket on the left side of the printer HCIF frame by loosening and removing...

Страница 180: ...grasping the hand holds WARNING Your printer weighs approximately 91 lbs 41 3 kg without consumables Be sure to have help when lifting and moving it ACHTUNG Das Gewicht dieses Druckers betr gt ohne V...

Страница 181: ...d tape the shipping spacer between the folded up multipurpose tray and the printer 4 Reinsert the shipping spacers in the paper trays and tape the trays closed 5 With another person stand on the left...

Страница 182: ...0 6 Place the printer back onto the sup ports on top of the original shipping pal let 7 Replace the original consumables box and the shipping spacers...

Страница 183: ...acers 9 Slide the corner sup ports into the ship ping carton and replace the top ship ping spacer and cover 10 Close the top and secure with shipping tape 11 Reinsert the four shipping plugs to secure...

Страница 184: ......

Страница 185: ...paper file full message 5 3 Active jobs message 5 3 Adjust x bin message 5 4 Administration menu B 4 AppleTalk Testing communication 5 18 Automatic jam recovery 4 2 Bin jam message 5 7 Blank pages 5 2...

Страница 186: ...e Toner option 3 6 Consumables Status hotlink 3 32 Control panel Cancel button 3 15 Messages 5 2 Problems 5 21 Created files message 5 5 Creating x file message 5 5 CrownNet Troubleshooting 5 23 Crown...

Страница 187: ...hanical failure message 5 6 Fuser Replacing 2 22 Fuser jam message 5 6 General settings Hotlink 3 24 Halftone Type menu 3 5 Halftone types 3 4 Hard disk status Hotlink 3 29 High capacity feeder Jam re...

Страница 188: ...Removing exit jams 4 12 Removing face up tray 4 12 Removing high capacity output stacker 4 25 Removing input jams 4 9 4 16 Removing multipurpose tray jams 4 11 Job offset See Offset stacking Jobs Inc...

Страница 189: ...3 27 Minimum 3 4 Requirements 3 4 Menus Administration B 4 CrownNet B 5 Installation B 10 Operator Control B 3 Messages 5 2 See Service Message See Status Message Misfeed jam message 4 6 Mode command...

Страница 190: ...aning 2 19 Cleaning exterior 2 19 Handling 2 18 Home page 3 20 Jobs hotlink 3 31 Lifting 2 18 Maintenance Preventive 2 21 Name assigning 3 18 Preventive maintenance 2 21 Printer Setting hotlink 3 25 P...

Страница 191: ...ser software 3 18 Printer webpage 3 18 Shipping printer C 2 Replacement packaging C 2 RMA number C 2 showpage operator PostScript 5 14 SIMMs 3 4 Software Macintosh 5 22 Solid black image 5 28 Stacking...

Страница 192: ...er cartridge 5 5 Toner cartridge failure warning 5 6 Toner low 5 8 Toner out 5 8 Transport jam 5 8 Waiting for idle 5 9 Waiting on input end job 5 9 Waiting on input end job 5 9 Warming up 5 9 x Activ...

Страница 193: ...ript errors 5 22 Print quality 5 26 Printer problem checklist 5 18 Printer resets 5 22 Reloading system software 5 32 RMA number C 2 See also Print quality problems Service call placing 5 35 Service m...

Страница 194: ......

Отзывы: