


+&#
#
-
#"
1
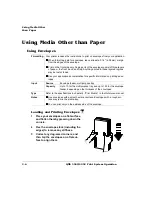
Load labels in the multipurpose tray the same way you load paper.
»
Note:
If your label stock has a top-of-page, place the top-of-page toward the rear
of the printer.
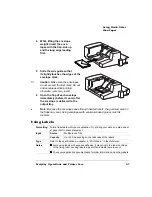
2
In the Operator Control/Multipurpose Sz menu, select the correct label
paper size.
»
Note:
The top sheet in the tray will be the first sheet printed for your job.
$$
Load letterhead and memo media the same way you would load paper.
»
Note:
Load the media printing-side up with the top of the media (the letterhead or
memo information) toward the front of the tray.
Formatting
Format letterhead or memo data within your application. Try printing your data on a
plain sheet of paper first to check placement.
Input
Source
Trays 2,3, or 5
Capacity
Up to 500 sheets, depending on the thickness of the media
Type
Refer to the specifications in chapter 4, “Print Media,” in the Reference.
Notes
Check your application documentation for other information about printing
on letterhead and memo media.
The top sheet in the tray will be the first sheet printed for your job.
Formatting
Format the information to be printed on the transparencies within your
application. Try printing your data on a plain sheet of paper first to check
placement.
Содержание 3260
Страница 1: ......
Страница 8: ......
Страница 9: ...Introduction on page 1 2 About This Manual on page 1 2...
Страница 12: ......
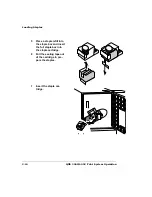
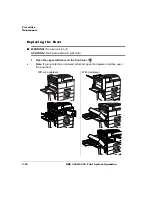
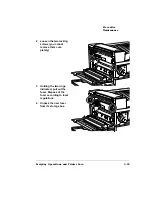
Страница 39: ...2 Lift up the handles to unlock the transfer roller 3 Remove the transfer roller...
Страница 46: ...1 Pull out the tray 6 2 Open the lower left door of the high capacity input feeder...
Страница 48: ......
Страница 87: ...2 3 2 1...
Страница 90: ......
Страница 106: ...4 5 8 1 Open the duplexer 2 Open the upper left door 3 Open the lower left door...
Страница 108: ...4 c Open the door below the multipurpose tray to check for jammed media d Pull out any jammed media...
Страница 111: ...4 4 5 8 1 Pull on the latch to open the duplexer 2 Open the cover inside of the duplexer...
Страница 114: ...4 3 Reinsert the enve lope feeder...
Страница 152: ......
Страница 153: ...Sources of Support on page A 2 QMS World wide Offices on page A 4...
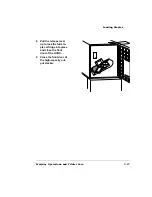
Страница 172: ...3 Pull the HCOS away from the printer 4 Push the locking bar away from the HCOS to free it from the printer...
Страница 173: ...5 Unplug the power cable connected to the right side of the printer 6 Move the HCOS away from the printer...
Страница 184: ......
Страница 194: ......


