Publication No. 5106226
26
Commissioning
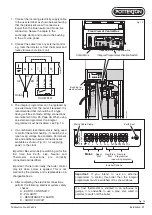
3. Press the DHW select button to switch hot water on
(green neon stays on).
4. Press reset button to scroll through LH window until
display shows “p 1.5” to check that system pressure
is between 0.9 to 2.5 bar. Adjust as necessary. The
fan starts to rotate after a slight delay and a few
seconds later the automatic ignition sequence will
be initiated. The green burner neon will indicate when
the burner lights.
5. If the burner fails to light, the ignition sequence will
be automatically repeated until either the burner
lights or a safety LOCK-OUT condition is signalled by
the red neon. If red neon shows, press the reset
button indicated.
6. With the boiler operating check the flame is stable.
Note:
After first filling with cold water some noise
may occur within the combustion chamber as the
flame settles on the burner. This is normal and will
soon disappear.
7. Record the “working” inlet gas pressure at inlet
pressure test nipple in “Benchmark” logbook.
8. Check gas valve differential (offset) - See Fig. 28,
Page 42
Note:
This valve has been factory pre-set and
adjustment is not normally required.
a. Loosen screw in outlet pressure test point and
connect to “+” (positive) side of differential micro-
manometer.
b. Tee the “-” (negative) side of the micro-manomter
into the air signal tube as shown in Fig. 28.
c. Switch on central heating using CH select button
and switch off hot water. The boiler will re-start in
CH mode after approx. 1 minute.
d. After boiler has been operating in CH mode for
several minutes, simultaneously press the “+” and
“STEP” buttons and hold down for 5 to 6 seconds.
After a minute the boiler will be operating at low
input and the differential can be checked.
e. Ensure micro-manometer has been zeroed (if in
doubt re-zero).
f. Check the differential reading. This should be zero
to minus 5 Pa (0.00 to - 0.05 mbar). If adjustment
is required refer to Page 42.
g. Disconnect micro-manometer,
re-instate signal
tube between air duct and gas valve
, and test
for gas soundness.
9. Turn boiler off, remove gauge, tighten test screws
and test for gas soundness.
Central Heating System
1. Press button to select heating (indicated by stable
green neon).
2. Check that any connected room thermostat is calling
for heat.
3. Note that the 3-way diverter valve does not allow
circulation to the CH circuit until the storage cylinder
contents have reached the selected temperature.
After filling with cold water, this will normally take
between 20 to 25 minutes.
4. With flow to the CH circuit, bleed every radiator and
the pipework high points until all air or air/water mix
has been removed.
5. Vent the boiler again if necessary - note that the
burner control goes to safety shut-down if the
system pressure drops below 0.5 bar.
6. Wait until the central heating circuit has reached its
normal temperature of approx. 80 °C before
balancing the radiators in the usual way to achieve
a temperature drop of 10 °C.
7. Allow system to reach full temperature (all radiators
at working temp.) and note “hot system” pressure.
Switch boiler off, drain and flush the system.
8. Refill (using a suitable inhibitor) and remove all air
and air/water mix. Check the relief valve is not
“letting” by observing pipe outlet for several minutes.
(“Letting” is usually due to debris on valve seat.
Snapping the valve open-shut a few times will
normally cure this).
9. Check that the system final pressure equals “hot
system” pressure as noted in 7. above. Adjust if
necessary.
10.Set the room thermostat or programmer according
to the manufacturer’s instructions.
11.Disconnect filling loop flexible hose and leave in a
secure place for householder.
Domestic Hot Water System
1. With the cylinder fully heated, check DHW output
temperature is approximately 45 to 65 °C (as
selected) using nearest tap and a flow rate of
approximately 5 l/min. Record inlet and outlet
temperatures in “Benchmark” log book.
2. Measure hot water flow rate at bath rap (fully open)
and record in “Benchmark” log book.
3. Refit outer covers in reverse order.
3.2 Hand Over to the User
1. Explain the boiler controls
2. Give guidance if the system is to be shut down for
long periods when freezing is possible
3. Advise the User that for continued efficient and safe
operation of the boiler it is important that adequate
servicing is carried out.
4. Explain how to re-start boiler if red neon indicates
lockout.
5. Hand over the User’s Instructions.
6. Carefully read and complete all sections of the
“Benchmark” Installation, Commissioning and
Service Record Log Book that are relevant to the
appliance and installation. The details of the Log
Book will be required in the event of any warranty
work. The Log Book must be handed to the user for
safe keeping and each subsequent regular service
visit recorded. For IE, it is necessary to complete a
“Declaration of Conformity” to indicate compliance to
I.S. 813. An example of this is given in I.S. 813
“Domestic Gas Installations”. This is in addition to the
“Benchmark” Log Book.


