25
Ch
ap
te
r
2
Ba
sic O
p
era
tio
n
NA
V
I
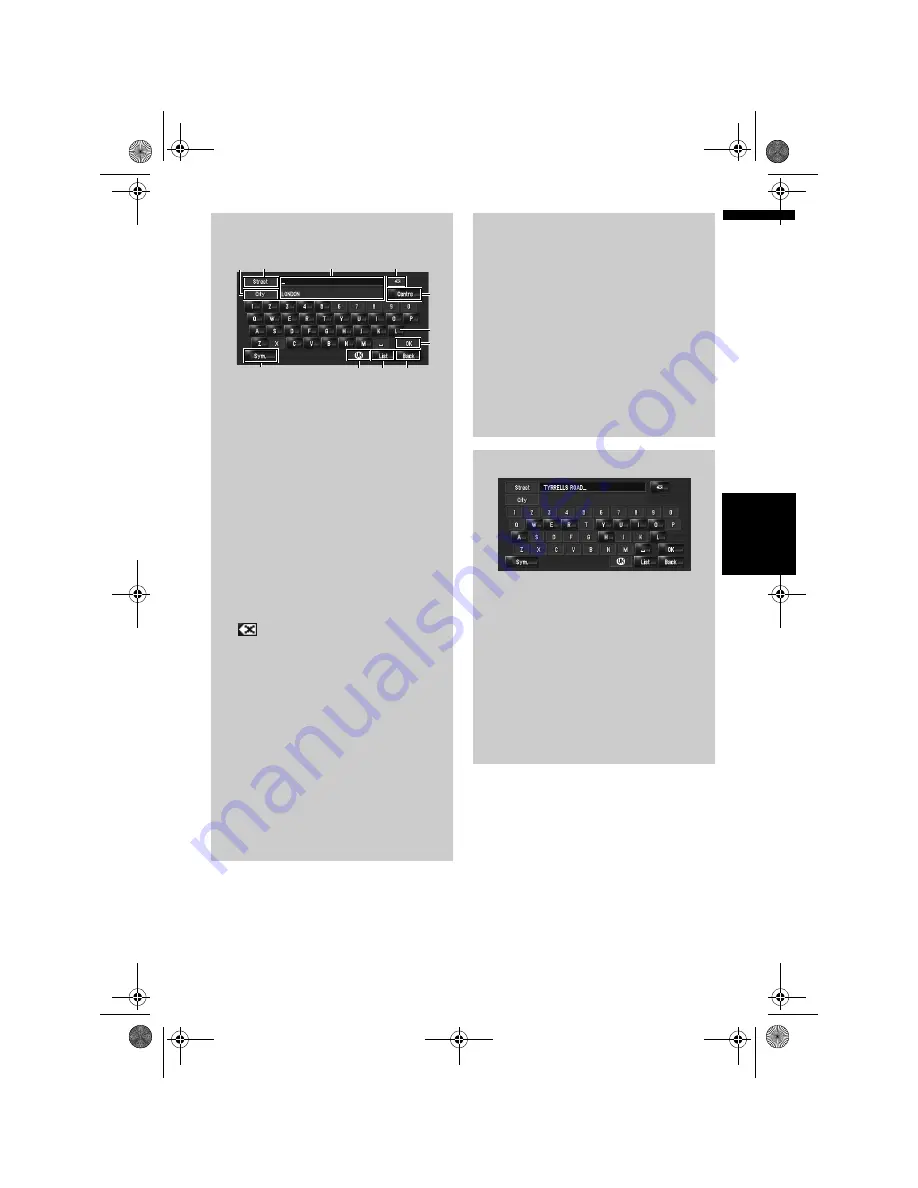
Operation of street name or city name
input screen (e.g. QWERTY keyboard)
(1) Country code key:
Jump to the country selection screen.
(Selected country code is displayed.)
(2) [OK]:
Confirms the characters displayed in (4), and
proceeds to the next step.
(3) [List]:
Lists candidates based on yellow characters
in (4). Touch the desired item in the list to pro-
ceed to the next step.
(4) Text box:
Displays the characters that are entered.
(5) Keyboard:
Use to enter the text.
(6) [Back]:
Returns previous screen.
(7) :
Deletes the input text one letter at a time from
the end of the text. Continuing to touch the
button deletes all of the text.
(8) [City]:
Touch if you want to specify the destination
city or area first. (This is available only when
street name is blank.)
(9) [Others], [Sym.], [0-9]:
You can enter other characters of alphabet.
You can also enter text with marks such as
[
&
] or [
+
] or numbers.
Touch to toggle the selection.
❒
When you use any of “
A
”, “
Ä
”, “
Å
”, “
Æ
”,
the displayed result is the same.
(4)
(7)
(10)
(1) (3)
(6)
(2)
(5)
(9)
(8)
(11)
(10) [Street]:
Touch if you want to return the street input
mode. (This is available only when city name
is blank.)
(11) [Centre]:
This can be selected when you enter a city or
area name first. Touch this button to display
the central point of the entered city or area.
Touching [
OK
] searches the route to the cen-
tral point. Proceed to Step 9.
❒
You can customise the keyboard type to be
displayed on the screen.
➲
“Setting the keyboard layout”
➞
Page 82
Auto fill-in function
The previously entered characters are stored
for each country and each search function.
The next time a character is entered, sug-
gested characters will be shown. For exam-
ple, if [HOLLYBUSH HILL] has been entered
in the past, when you input just the letter [H],
[HOLLYBUSH HILL] will be filled in automati-
cally. The manually input characters are dis-
played in yellow, and the suggested
characters are displayed in white, so you can
distinguish them. To confirm the filled-in
characters, touch [
OK
].
MAN-HD3-SOFTW-EN.book Page 25 Wednesday, January 10, 2007 9:33 AM
Содержание AVIC-HD3
Страница 18: ...16 MAN HD3 SOFTW EN book Page 16 Wednesday January 10 2007 9 33 AM ...
Страница 36: ...34 Chapter 2 Basic Operation NAVI MAN HD3 SOFTW EN book Page 34 Wednesday January 10 2007 9 33 AM ...
Страница 50: ...48 Chapter 4 Modifying Map Configurations NAVI MAN HD3 SOFTW EN book Page 48 Wednesday January 10 2007 9 33 AM ...
Страница 72: ...70 Chapter 7 Using Traffic Information NAVI MAN HD3 SOFTW EN book Page 70 Wednesday January 10 2007 9 33 AM ...
Страница 132: ...130 Chapter 13 Using the AV Source AV EXT AUX AV MAN HD3 SOFTW EN book Page 130 Wednesday January 10 2007 9 33 AM ...
Страница 200: ...198 Appendix NAVI AV MAN HD3 SOFTW EN book Page 198 Wednesday January 10 2007 9 33 AM ...
Страница 201: ...MAN HD3 SOFTW EN book Page 1 Wednesday January 10 2007 9 33 AM ...


