background image

SMART I/O User’s Manual

©1996 PEP Modular Computers GmbH

March 12, 1996

Page 5 - 67

5

Chapter 5  Analog Modules

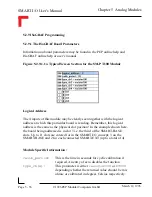
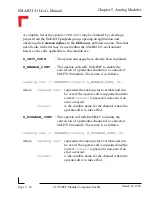
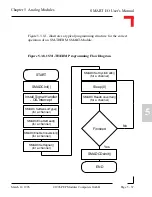
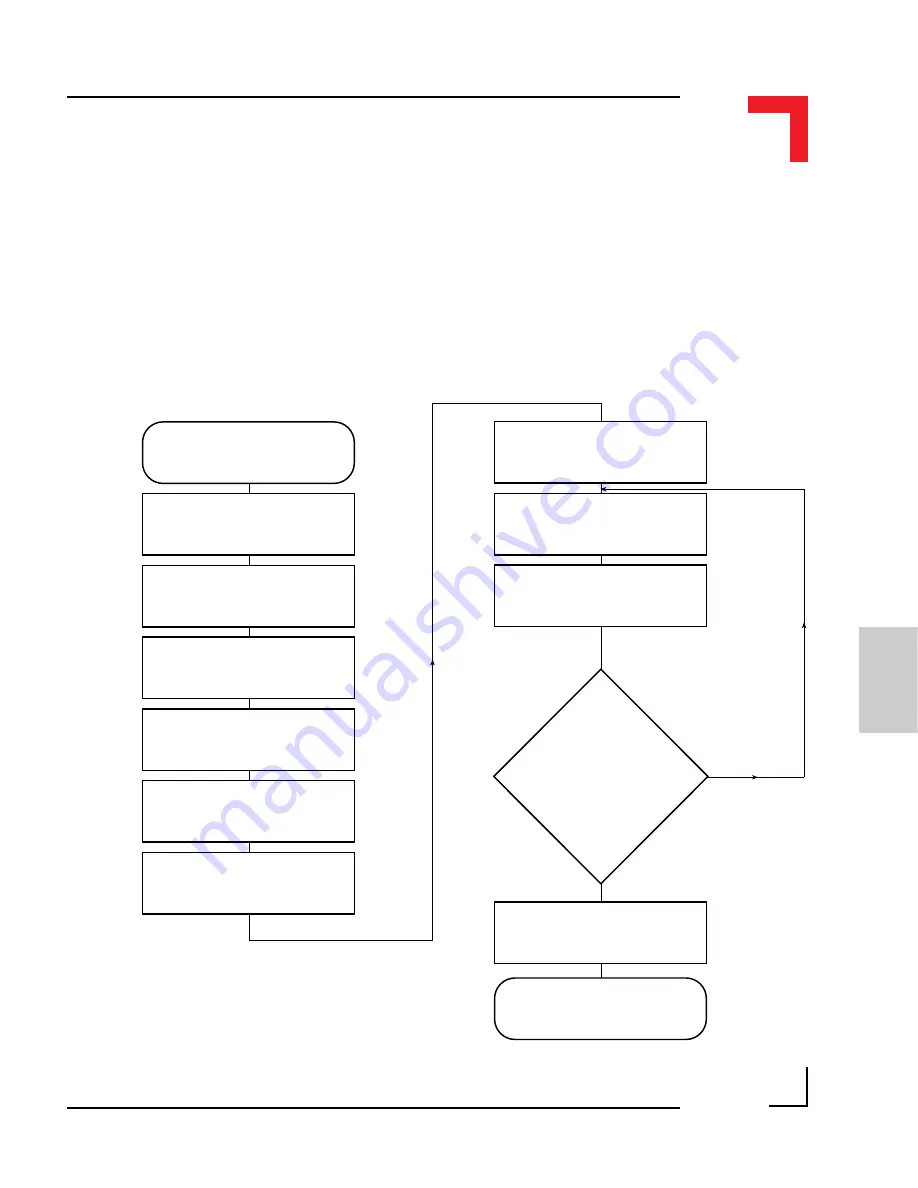
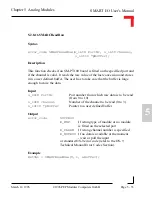
Figure 5.3.8.1. illustrates a typical programming structure for the correct

operation of an SM-THERM SMART-Module.

Figure 5.3.8.1 SM-THERM Programming Flow Diagram

SMADCSetCyclicCalib()

(for a channel)

Sleep(0)

SMADCReadConverted()

(for a channel)

Finished

SMADCDeinit()

END

START

SMADCInit()

Install Signal Handler

- OS-Intercept

SMADCSetSensorType()

(for a channel)

SMADCEnableRead()

(for a channel)

SMADCEnableConversion()

(for a channel)

SMADCSetSignal()

(for a channel)

Yes

No

Содержание Modular Computers RS232

Страница 1: ...SMART I O User s Manual 8 Channel AC Input Unit Micro PLCs and Real Time Computers Manual ID 09901 Rev Index 0500 of 08 Jan 98 ...

Страница 2: ...This page was intentionally left blank ...

Страница 3: ... O User s Manual Page 0 3 Manual ID 09901 Rev Index 0500 Preface Revision History 0 4 For Your Safety 0 5 Special Handling and Unpacking In structions 0 6 HV Safety Instructions 0 6 Two Years Warranty 0 7 Table of Contents 0 9 ...

Страница 4: ... the consequences thereof nor for any liability arising from the use or application of any circuit product or example shown in this document PEP Modular Computers reserve the right to change modify or improve this document or the product described herein as seen fit by PEP Modular Comput Manual Product Title SMART I O User s Manual Manual ID Number 09901 Rev Index Brief Description of Changes PCB ...

Страница 5: ... which are not explicitly approved by PEP Modular Computers and described in this manual or received from PEP Technical Support as a special handling instruction will void your warranty This device should only be installed in or connected to systems that ful fill all necessary technical and specific environmental requirements This applies also to the operational temperature range of the specific b...

Страница 6: ... metal part of your system housing Particularly observe standard anti static precautions when changing pig gybacks ROM devices jumper settings etc If the product contains bat teries for RTC or memory back up ensure that the board is not placed on conductive surfaces including anti static plastics or sponges They can cause short circuits and damage the batteries or tracks on the board HV Safety Ins...

Страница 7: ...or maintenance or which has been damaged as a result of excessive current voltage or tempera ture or which has had its serial number s any other markings or parts thereof altered defaced or removed will also be excluded from this warranty If the customer s eligibility for warranty has not been voided in case of any claim he may return the product at the earliest possible convenience to the origina...

Страница 8: ...explicit or implicit with respect to its products reliability fitness quality marketabil ity or ability to fulfil any particular application or purpose As a result the prod ucts are sold as is and the responsibility to ensure their suitability for any given task remains of the purchaser In no event will PEP be liable for direct indirect or consequential damages resulting from the use of our hardwa...

Страница 9: ...ts Chapter 1 1 General Information 1 3 1 1 Product Overview 1 8 1 2 Ordering Information 1 9 1 3 Product Information 1 10 1 4 Installation 1 13 1 5 ISaGRAF Installation 1 18 Chapter 2 2 SMART BASE 2 3 2 1 Specifications 2 4 2 2 Board Overview 2 5 2 3 Functional Description 2 6 2 4 Configuration 2 8 ...

Страница 10: ...0500 2 5 Pinouts 2 9 2 6 C Programming 2 17 2 7 ISaGRAF Programming 2 32 2 8 Flash Utility 2 37 Chapter 3 3 SMART EXT 3 3 3 1 Specifications 3 3 3 2 Board Overview 3 4 3 3 Functional Description 3 5 3 4 Pinouts 3 6 Chapter 4 4 Digital Modules 4 5 4 1 SM DIN1 4 5 4 2 SM DOUT1 4 19 ...

Страница 11: ...Manual ID 09901 Rev Index 0500 4 3 SM REL1 4 33 4 4 SM ACI1 4 51 Chapter 5 5 Analog Modules 5 7 5 1 SM DAD1 5 7 5 2 SM PT100 5 29 5 3 SM THERM 5 59 5 4 SM ADC1 5 89 5 5 SM DAC1 5 107 Chapter 6 6 Communications Modules 6 5 6 1 SM RS232 6 5 6 2 SM SSI 6 17 ...

Страница 12: ...This page was intentionally left blank ...

Страница 13: ... Information 1 10 1 4 Installation 1 13 1 4 1 Overview 1 13 1 4 2 SMART I O Module Installation 1 15 1 4 3 RJ45 Telephone Connector Installation 1 16 1 4 4 Screw Terminal Block Installation 1 16 1 4 5 Battery Installation 1 17 1 5 ISaGRAF Installation 1 18 1 5 1 Before Installing 1 18 1 5 2 Installation of the ISaGRAF for Windows Workbench 1 19 1 5 3 Installation of PEP Library Functions 1 21 1 5 ...

Страница 14: ...SMART I O User s Manual March 12 1996 1996 PEP Modular Computers GmbH Page 1 2 Introduction This page has been left blank intentionally ...

Страница 15: ...rbance sources are present and effect the performance characteristics of the controller However by observing the following precautions many of the bad effects can be mini mized Earth protect the controller fixing Use screened shielded cable connections Place cables according to relevant standards Observe the use of the correct cable diameter and type For unused module sockets install a blank front...

Страница 16: ...r Computers GmbH Page 1 4 Introduction Weights Measures The following line drawings serve to illustrate the method of fixing the controller to a DIN rail or brackets for wall cabinet mounting Note that all measurements are in millimetres DIN Rail Mounting ...

Страница 17: ...SMART I O User s Manual 1996 PEP Modular Computers GmbH March 12 1996 Page 1 5 Introduction 1 Optional Bracket Mounting ...

Страница 18: ...SMART I O User s Manual March 12 1996 1996 PEP Modular Computers GmbH Page 1 6 Introduction ...

Страница 19: ...Computers GmbH March 12 1996 Page 1 7 Introduction 1 Unit Weight Unit Weight SMART BASE 650g SM THERM 40g SMART EXT 250g SM ADC1 70g SM DIN1 40g SM DAC1 70g SM DOUT1 70g SM SSI 70g SM REL1 61g SM CNT1 N A SM DAD1 70g SM RS232 40g SM PT100 40g ...

Страница 20: ...e MC68302 CPU from Motorola which has two on chip microprocessors One is the industry standard 68HC000 running at 20MHz and the second is a communication orientated RISC processor Fieldbus protocols use the power of this RISC CPU freeing the 68HC000 for other tasks Communication between the 68HC000 and the communication processor is made using on chip dual ported RAM Nonvola tile memory battery ba...

Страница 21: ...A D 10V 2 channel D A 10V 0 10V 9868 SM PT100 SMART Module with 4 optoisolated 2 3 or 4 wire PT100 inputs 12405 SM THERM SMART Module with 4 optoisolated thermocouple inputs 12426 SM REL1 SMART Module with 6 optoisolated normally open relay outputs 12238 SM RS232 SMART Module with RS232 Rx Tx interface 12461 SM SSI SMART Module with 1 SSI channel providing a 24V DC digital input and a 24V DC 500mA...

Страница 22: ... SMART FT OS 9 PROFIBUS starter kit II for 1 node operating under FasTrak for Windows Includes license disk and manual 12666 Cable 3 meters with 9 pin D Sub female RJ45 connectors for PC operation 10890 Cable 3 meters with 25 pin D Sub male RJ45 connectors for modem operation 10891 Screw Term For the SMART BASE timer I O Pack of 5 2x3 array 10892 SCR 2 7 For the SMART Modules Pack of 5 2x7 array 1...

Страница 23: ...g tables that show the individual component power requirements The maximum of 6750mW should not be exceeded as damage to the on board DC DC converter may result due to overheating or entering a reset status due to the thermal cutoff protection switching mechanism Voltage Current min max Continuous Peak 18V 36V 400mA 1 5A 2ms SM BASE Power Consumption min max CPU Core 1500mW 1700mW Profibus 250mW 7...

Страница 24: ...oltages being inadvertently applied to the system This fuse should it be assumed defect the Power In LED on the housing will not be illuminated may be accessed by removing the cover of the SMART BASE and accessing the holder on the left hand side as shown in the illustration below In the event of a blown fuse replace it with the same size and type as the one installed D3 D4 C6 C7 C1 SCR2 1 2 3 R77...

Страница 25: ... 1 13 Introduction 1 1 4 Installation 1 4 1 Overview The SMART BASE and SMART EXT units are supplied without screw terminal blocks for the I O slots SMART Module piggybacks or blank panels These must be ordered separately to meet the requirements of indi vidual specifications ...

Страница 26: ...power con sumption of the individual SMART Modules SMART I O Modules or blank panels must be ordered separately to the SMART BASE or SMART EXT units Blank panels come in packs of 20 Two RS232 cables are available One terminates with a female 9 pin D Sub connector for PC use and the other terminates in a male 25 pin D Sub connector for Modem operation ...

Страница 27: ...ule Screw terminal connectors are available in packs of 5 1 4 2 SMART I O Module Installation The SMART I O Modules are fitted into the relevant sockets ST1 ST6 3 slots on the SMART BASE or in sockets on the SMART EXT unit It is important that the Modules are inserted the correct way The Figure below illustrates this procedure Figure 1 4 2 1 SMART I O Module Installation SMART Module Socket SMART ...

Страница 28: ...ector BU1 on the SMART BASE This is illustrated in the Figure below Figure 1 4 3 1 RJ45 Telephone Connector Installation 1 4 4 Screw Terminal Block Installation The Screw Terminal Blocks are easily fitted to the SMART BASE or SMART EXT by pushing them onto the relevant Screw Terminal as shown in the figure below Figure 1 4 4 1 Screw Terminal Block Installation BU1 SCR2 RJ45 Connector SMART BASE ...

Страница 29: ...attery should be on the right hand side of the SMPBBAT piggyback If the battery needs to be replaced it must only be done with a replacement SMPBBAT piggyback the order number of which is shown in the Ordering Information section of this manual The temperature on the battery must not exceed 70 C due to the risk of battery damage For SMART I O modules with extended temperature ranges of up to 85 C ...

Страница 30: ...n the Disk menu in the File Manager to create backup disks with the original volume labels and disk contents If it is intended to install ISaGRAF in a directory other than the default C ISAWIN then remember to provide the full path of the new directory when prompted during installation Altogether 10 DOS disks and 2 OS 9 disks are supplied for ISaGRAF installation four for the Workbench two composi...

Страница 31: ...ion of the ISaGRAF software Initially the disk labelled Workbench Disk 1 4 will be required Start Windows Insert diskette Workbench Disk 1 4 into the floppy drive usually A Select File from the Windows Program Manager and select Run Type A INSTALL in the command field and select OK The ISaGRAF installation will start automatically Figure 1 5 2 1 illustrates a typical opening screen Figure 1 5 2 1 ...

Страница 32: ...nstalled or just certain sections The selection possibilities are shown in figure 1 5 2 2 Figure 1 5 2 2 Installation Selection The default is for a complete installation i e all files Once confirmed the installation copies the required files to the installation directory and unpacks their contents This procedure will take a few minutes Upon completion the windows desktop will show a new program g...

Страница 33: ...12 1996 Page 1 21 Introduction 1 Figure 1 5 2 3 ISaGRAF Program Group 1 5 3 Installation of PEP Library Functions The library functions are adapted to suit the SMART I O and other PEP products and should be installed using the two diskettes labelled LIB APPLI HELP ...

Страница 34: ...e extracted by following the described procedure Start Windows if not already started Insert diskette Lib Appli Help Disk 1 2 into the floppy drive Select File from the Windows Program Manager and select Run Type A INSTALL in the command field and select OK Figure 1 5 3 1 illustrates the Installation Start up screen Figure 1 5 3 1 The Installation Start up Screen ...

Страница 35: ...re the possibility exists to select the desired communications port When leaving the ISA Terminal environment remember to save the configuration if changes have been made The installation of the ISaGRAF development tool is now complete and access is provided to a full IEC1131 3 programming platform The following sections deal with the application of this tool with the SMART I O and other PEP PLCs ...

Страница 36: ...rt of the computer The other end with the telephone type connector should be pushed into place in the RS232 port of the SMART I O base see figure 1 4 3 1 With the power supply turned OFF connect the power plug to SCR 2 on the SMART base Start the ISA Terminal program Switch on the power supply to the SMART I O three green LEDs should illuminate on the control panel not the SMART Modules The termin...

Страница 37: ...s trying to create files or directories in the RAM disk that are already present If no further messages appear then the installation is complete Should the terminal result in anything different than shown then check through the installation steps again before contacting PEP for help The three green LEDs mentioned earlier show the state of PROFIBUS 5V System 5V and Power ON ...

Страница 38: ... I O has the SM_DOUT1 module in the first of the SMART Module slots and has SM_DIN1 in slot 2 the last on the SMART BASE SM_DEMO2 should be used if the modules are reversed To install the demonstrations correctly observe the following procedure and make sure the correct diskette is in place Run the Projects Program and select SM_DEMO1 or SM_DEMO2 by double clicking on the icon Go to the Debug PC P...

Страница 39: ...ill begin automatically This is a simple SFC program which will activate channel 7 of the SM DOUT1 when the first SFC step init is encountered thereby illuminating the diode During the next cycle step 2 is encountered and activates channel 2 and at the same time deactivates channel 3 The program will wait for 1 second in this state before reversing the action The effect is that the second and thir...

Страница 40: ...SMART I O User s Manual March 12 1996 1996 PEP Modular Computers GmbH Page 1 28 Introduction This page has been left blank intentionally ...

Страница 41: ...ule Piggyback Connectors 2 10 2 5 2 Screw Terminal Pinouts 2 12 2 5 3 Timer I O Screw Terminal SCR1 2 12 2 5 4 Supply Screw Terminals SCR2 2 14 2 5 5 RS232 Telephone Connector BU1 2 15 2 5 6 RS485 D Sub Connector for Half Duplex Operation Profibus 2 15 2 5 7 SPI Connector ST7 2 16 2 6 C Programming 2 17 2 6 1 SMART BASE Library 2 17 2 6 2 SMTselIn 2 18 2 6 3 SMTsettout 2 20 2 6 4 SMTpre 2 21 2 6 5...

Страница 42: ...r s Manual March 12 1996 1996 PEP Modular Computers GmbH Page 2 2 Chapter 2 SMART BASE 2 7 ISaGRAF Programming 2 32 2 7 1 The ISaGRAF Board Parameters 2 32 2 7 2 The ISaGRAF Operate Calls 2 33 2 8 Flash Utility 2 37 ...

Страница 43: ...ntroller The driving force behind the SMART BASE is the MC68302 microprocessor from Motorola operating at 20MHz The SMART BASE complete with built in RS232 and RS485 PROFIBUS interfaces is connected to the outside world by RJ45 and 9 pin D Sub connectors respectively Connected SMART Modules use industrial stand ard plug in screw terminals Program code is stored in EPROM or FLASH memory thereby doi...

Страница 44: ... Galvanic Isolation 500V DC max to from supply source Controlling Unit CPU MC68302 20MHz EPROM or FLASH 1 MByte or 256 kByte on Jedec 32 pin sockets 16 bit access FLASH 1 MByte or 256 kByte additionally soldered on rear side of the board 16 bit access DRAM 512 kByte byte word access 16 bit SRAM 64 kByte byte word access 16 bit EEPROM 93C46 32 byte system data Galvanic Isolation 2 5kV DC to from pr...

Страница 45: ...1 SCR5 SCR4 SCR3 ST6 ST4 ST2 ST5 ST3 ST1 ST7 DRAM EPROM FLASH SRAM 68302FC20 I O C o n t r o l l e r SPI I O Slot 2 I O Slot 1 I O Slot 0 Timer I O RS232 24V DC RS485 Isolated PROFIBUS Status Piggyback SMPBLED BU3 Battery Piggyback SMPBBAT SMART Modules J6 UD LD EPROM FLASH Rear View J15 2 1 3 Optional FLASH RTC Quartz RTC Full DUPLEX RS485 Option RS232 Driver ...

Страница 46: ...Generators The MCU an MC68302 microprocessor operating at 20 MHz is responsible for handling all communication between the various interfaces and on board memory An RS485 highspeed PROFIBUS 2 wire interface is optically isolated from the system and may be configured for full duplex operation a 4 wire inter face available on request for OEM volume Likewise a fully configured RS232 modem interface i...

Страница 47: ...RT BASE unit with connection to the outside world being provided by industrial standard screw terminals The same calibre of terminal is used for the counter timer which is directly coupled to the system I O controller A more detailed description of the counter timer appears in the pinout section of this chapter Figure 2 3 0 2 shows the interrupt handling capability of the I O controller It should ...

Страница 48: ...ont View J13 J1 DC DC BU2 BU1 SCR2 SCR1 SCR5 SCR4 SCR3 ST6 ST4 ST2 ST5 ST3 ST1 ST7 DRAM EPROM FLASH SRAM 68302FC20 I O C o n t r o l l e r SPI I O Slot 2 I O Slot 1 I O Slot 0 Timer I O RS232 24V DC RS485 Isolated PROFIBUS Status Piggyback SMPBLED BU3 Battery Piggyback SMPBBAT SMART Modules J6 UD LD EPROM FLASH 2 4 1 Jumper J1 Boot Selection Pin Connector The jumper J1 selects whether the SMART I ...

Страница 49: ...BASE Connector Overview B17 B10 B7 B11 B9 B16 B1 J6 J13 J1 DC DC BU2 BU1 SCR2 SCR1 SCR5 SCR4 SCR3 ST6 ST4 ST2 ST5 ST3 ST1 ST7 68302FC20 Pin 1 Pin 2 Pin 15 Pin 16 Pin 1 Pin 2 Pin 15 Pin 16 Pin 1 Pin 2 Pin 15 Pin 16 Pin 1 Pin 2 Pin 15 Pin 16 Pin 1 Pin 2 Pin 15 Pin 16 Pin 1 Pin 2 Pin 15 Pin 16 Pin 1 Pin 2 Pin 10 Pin 9 Pin 1 Pin 2 Pin 13 Pin 14 Pin 1 Pin 2 Pin 13 Pin 14 Pin 1 Pin 2 Pin 13 Pin 14 Pin 1...

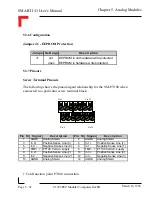
Страница 50: ...ontroller Port B3 5 PITB4 I O Controller Port B4 6 PITB5 I O Controller Port B5 7 PITB6 I O Controller Port B6 8 PITB7 I O Controller Port B7 9 System GND GND 10 Serial RxD RxD 11 System VCC 5V VCC 12 Serial TxD TxD 13 CS SM2 Port Select Module 1 14 Serial CLK CLK 15 Reset Reset Power ON OFF 16 SM2 Interrupt PI T INT2 to the I O Controller Pin Nr Signal Description Pin Nr Signal Description 1 PA8 ...

Страница 51: ...Select Module 2 14 Serial CLK CLK 15 Reset Reset Power ON OFF 16 SM3 Interrupt PI T INT1 to the I O Controller Pinouts process side ST6 ST4 and ST2 for Modules 0 to 2 WARNING Dangerous voltages may be present at the terminals Pin Nr Signal Pin Nr Signal 1 Screw Terminal 13 2 Screw Terminal 13 3 Screw Terminal 1 4 Screw Terminal 2 5 Screw Terminal 3 6 Screw Terminal 4 7 Screw Terminal 5 8 Screw Ter...

Страница 52: ...he pinout for a screw terminal block suited for use with SMART Modules The pinouts of these blocks depends on the SMART Modules that are fitted Pin Nr Signal Description Pin Nr Signal Description 1 External VCC 5V VCC 2 TOUT Timer OUT 3 External GND Ground for TIN TOUT 4 TIN Timer IN 5 External GND Ground for TGATE 6 GATE GATE Connection Pin 1 Pin 2 Pin 5 Pin 6 Pin 1 Pin 2 Pin 13 Pin 14 ...

Страница 53: ...and TGATE Figure 2 5 3 1 shows the block diagram of TIN Figure 2 5 3 1 Timer I O TIN Schematic The I O Controller timer is used for the generation of the TOUT and TIN functions with the three timer I O lines being fully isolated from the system The internal clock of the timer counter is 6MHz and can be prescaled to enable lower frequencies as necessary With the GATE permanently active relay closed...

Страница 54: ...remented to 0 The driving stage of the output consists of a Darlington connected transistor pair protected from inductive loads by a clamp diode This TOUT line can generate square wave pulses from 0 2ms to 178ms and can deliver 500mA continuously at 24V DC The maximum frequency of TOUT is 5kHz Figure 2 5 3 2 Timer I O TOUT Schematic Load Vcc common Gnd Digital Output Timer I O TOUT Output Stage 1 ...

Страница 55: ...RS485 D Sub Connector BU2 for Half Duplex Operation Profibus Pin Nr Signal Description Pin Nr Signal Description 1 SHIELD Shield Isolation 6 Aux 5V Auxiliary 5V 2 N C Not Connected 7 N C Not Connected 3 T RxD Transmit Receive Line 8 T RxD Transmit Receive Line 4 CNTR Control Line 9 CNTR Control Line 5 Aux GND Auxiliary Ground 1 5 6 9 1 2 8 Pin Nr Signal Description 1 DSR Data Set Ready 2 RTS Ready...

Страница 56: ...n the right hand side of the SMART BASE to enable easy connection of the SMART EXT module using a flat ribbon cable connection The line termination is achieved as shown in the figure Assuming a power supply voltage of 5V emanating from the PROFIBUS connector pin 6 the following resistor values are recommended Rt 150Ω 2 min 0 25W RU 390Ω 2 min 0 25W Rd 390Ω 2 min 0 25W Pin Nr Signal Pin Nr Signal 1...

Страница 57: ...eatures of the SMART BASE All functions are written in ANSI C Prototypes are to be found in the file BSP SMART DEFS SMAC h Hardware Requirements SMART I O Base Module Software Requirements The compiler from one of the following Ultra C Version 1 1 2 or higher FasTrak 2 0 2 or higher The examples provided here are primarily concerned with the timer counter Other aspects of SMART BASE programming ma...

Страница 58: ...r is decremented on the falling transition of the clock pin the 24 bit counter is decremented rolls over or is loaded from the counter preload registers when the prescaler rolls over from 00 to 1F MODE01 The Simple I O TIN serves as a timer input and the CLK and prescaler are used The prescaler and counter are decremented as in MODE00 MODE10 The Simple I O TIN pin serves as a timer input and the p...

Страница 59: ... prescaler is used it may be clocked by the system clock 6 MHz CLK pin or by the TIN external input The counter signals the occurrence of an event primarily through zero detection A zero is when the counter of the 24 bit timer is equal to zero This sets the zero detect status ZDS bit in the timer status register It may be checked by the proces sor or may be used to generate a timer interrupt The Z...

Страница 60: ...MODE_PORTC tout has the Simple I O function MODE_SQUARE tout toggles on counter zero When the timer is stopped tout is high see diagram Output error_code SUCCESS E_BMODE Unsupported mode or standard OS 9 error code refer to the OS 9 Technical Manual Error Codes Section Example RetVal SMTsettout MODE_SQUARE TOUT OFF ON Timer Stop t The high state of TOUT illustrated in the above diagram shows that ...

Страница 61: ...nction reads sets the timer preload register Input u_int32 value Pointer to a variable that holds the value to set The previous value is returned to the variable If value is 0 only the read is performed Output error_code SUCCESS E_BMODE Requested value is out of range or standard OS 9 error code refer to the OS 9 Technical Manual Error Codes Section Example RetVal SMTpre 0 ...

Страница 62: ...cuitry The TIN pin may be used as a clock input The processor loads the counter preload registers and the timer control register and then enables the timer When the 24 bit counter passes from 000001 to 000000 the ZDS status bit is set and the TOUT is toggled At the next clock to the 24 bit counter it is again loaded with the contents of the CPRs and thereafter decrements 7 6 5 4 3 2 1 0 TOUT TIAC ...

Страница 63: ...tect control bit is set at the start the counter rolls over on reaching zero or is loaded with the value set in the preload register and continues counting down Input u_int8 mode Two modes are available They are TMR_STRT Start timer TMR_STOP Stop timer Output error_code SUCCESS E_BMODE Unsupported mode or standard OS 9 error code refer to the OS 9 Technical Manual Error Codes Section Example RetVa...

Страница 64: ...unt value NOTE A stable read value can only be achieved if the timer is not running There fore a read request to the running timer terminates with E_DEVBSY Input u_int32 value Pointer to a variable in which to place the read value Output error_code SUCCESS E_DEVBSY Timer is currently running or standard OS 9 error code refer to the OS 9 Technical Manual Error Codes Section Example RetVal SMTrd buf...

Страница 65: ... SMTtin u_int8 value Description This function reads the current level present on TIN PC2 Input u_int8 value Pointer to a variable in which to place the read value 0 represents low 1 represents high Output error_code SUCCESS or standard OS 9 error code refer to the OS 9 Technical Manual Error Codes Section Example RetVal SMTin buffer ...

Страница 66: ... the OS 9 Technical Manual Error Codes Section Example RetVal SMTstat buffer Description of the Timer Status Register TSR The timer status register contains one bit from which the zero detect status can be determined The ZDS status bit bit 0 is an edge sensitive flip flop that is set to one when the 24 bit counter decrements from 000001 to 000000 The ZDS status bit is cleared to zero following the...

Страница 67: ...nt8 value Description This function reads the actual status of the TOUT pin Input u_int8 value Pointer to a variable in which to place the read value 0 represents a low level while a 1 represents a high level Output error_code SUCCESS or standard OS 9 error code refer to the OS 9 Technical Manual Error Codes Section Example RetVal SMTout buffer ...

Страница 68: ...LED s Input u_int8 led Two options are available They are USERL1 Yellow LED on piggyback USERL2 Red LED on piggyback only if the LED is not jumpered as 68302 HALT u_int8 value Indicates the status of the LED 0 Switch LED off Not 0 Switch LED on Output error_code SUCCESS E_BMODE LED does not exist or standard OS 9 error code refer to the OS 9 Technical Manual Error Codes Section Example RetVal SMLe...

Страница 69: ...hed the system is reset in normal operating mode this must be avoided by periodically triggering the watchdog using the function SMwdtrig Input u_int32 time Time in ms The range is from 1ms to approx 13 seconds The function returns the real set time in time Output error_code SUCCESS E_BMODE Time is out of range or subse quent error or standard OS 9 error code refer to the OS 9 Technical Manual Err...

Страница 70: ...BASE 2 6 12 SMwdtrig Syntax error_code SMwdtrig void Description This function re triggers the watchdog of the 68302 preventing a timeout and subsequent system reset Output error_code SUCCESS or standard OS 9 error code refer to the OS 9 Technical Manual Error Codes Section Example RetVar SMwdtrig ...

Страница 71: ...6 Page 2 31 2 Chapter 2 SMART BASE 2 6 13 SMwdoff Syntax error_code SMwdoff void Description This function deactivates the watchdog timer Output error_code SUCCESS or standard OS 9 error code refer to the OS 9 Technical Manual Error Codes Section Example RetVar SMwdoff ...

Страница 72: ...e found in the PEP online help and ISaGRAF online help or user s manual Figure 2 7 1 1 Typical Screen Section for the SMART BASE Because the communication to the timer counter is performed using Operate Calls there is no need for manual selection of such things as a logical address etc t_in represents a variable for the counter timer and is used for the operate call to decide which port to access ...

Страница 73: ... selected COMMAND parameter A number of these COMMANDS exist for the SMART BASE Example error code OPERATE channel O_INIT_CODE 0 O_INIT_CODE is one of a number of distinct commands recognized by the PEP Modular Computers implementation of board drivers and checks for example that a SMART Module is located where the program expects it to be channel provides channel specific information and in the e...

Страница 74: ...pose of this operate call is to detect when if the power to the PLC SMART I O has failed The function is normally built into the initialization stage of an application and has the following syntax RetVar OPERATE s_time O_POWERFAIL_SET 0 When the application is initialized the start time is recorded in battery backed ram 1 at the given address s_time If the power to the PLC fails 2 and recovers at ...

Страница 75: ...o timeslicing during timer stop and start operations Therefore it is recommended that this call be only used for low frequency inputs 1kHz There is no detection for counter overflow and the call should not be used for count down operations or square wave generation It s syntax is as follows RetVar OPERATE iovar O_READ_COUNTER null where the iovar is typically t_in O_STOP_COUNTER This call stops th...

Страница 76: ...e preload register which lies between 1 and 0xFFFFFF O_START_CNTDWN This function starts the counter counting down When the counter reaches zero it rolls over to the maximum value of 0xFFFFFF on the following clock pulse and starts afresh The syntax is as follows RetVar OPERATE iovar O_START_CNTDWN prevar where the iovar is a variable attached to the Timer I O typically t_in and prevar may be one ...

Страница 77: ...pending on the version or dered If an application is stored in FLASH then it will be loaded into the system at start up The main features of this utility are Erase memory Fill memory Append memory Read memory The following syntax should be observed flash b board parameter s Examples To erase the FLASH Isa flash b SMART p ff To write a file to FLASH base address is D00000 flash b SMART d d00000 i p...

Страница 78: ...on the target system Isa kermit ri ENTER Select the menu item transfers send binary file from the windows terminal and select the file flash on the PC to transfer Load flash into memory Isa load ld dd APL flash Start kermit on the target system again Isa kermit ri ENTER Select the menu item transfers send binary file from the windows terminal and select the file isa11 on the PC to transfer Append ...

Страница 79: ... Chapter 3 SMART EXT Table Of Contents 3 SMART EXT 3 3 3 1 Specifications 3 3 3 2 Board Overview 3 4 3 3 Functional Description 3 5 3 4 Pinouts 3 6 3 4 1 SMART Module Piggyback Connectors 3 7 3 4 2 Parallel I O Screw Terminals SCRA and SCRB 3 8 3 4 3 SPI Connectors ST5 and BU1 3 9 ...

Страница 80: ...SMART I O User s Manual March 12 1996 1996 PEP Modular Computers GmbH Page 3 2 Chapter 3 SMART EXT This page has been left blank intentionally ...

Страница 81: ...e a common interface between modules a SMART I O C library is provided by PEP 3 1 Specifications Controller Frequency Firmware MC68HC705C8A 4 MHz PEP Firmware for OTP device Interface Speed Set to 1 MHz Power Consumption Typ 25 mW Temperature Range Storage Standard Extended 20 C to 125 C 0 C to 70 C 40 C to 85 C Operating Humidity 0 to 95 non condensing Weight 260g without modules blank panels or ...

Страница 82: ...996 PEP Modular Computers GmbH Page 3 4 Chapter 3 SMART EXT 3 2 Board Overview SCRA SCRB ST4 ST2 ST3 ST1 ST5 MCU 68HC05C4 SPI I O Slot B I O Slot A SMART Modules To further SMART EXT Modules From SMART BASE or other SMART EXT Modules SPI BU1 ...

Страница 83: ...ypical response time from an addressed extension slot of approximately 50µs The MCU Micro Controller Unit 68HC05C4 handles the SPI transfers and the slot dependent commands and actions through the SMART EXT firmware burned into the MCU mask or in an OTP One Time Programma ble PROM area In order to communicate with a particular SMART EXT slot a specific PEP defined protocol has to be observed All n...

Страница 84: ... voltages may be present at the terminals SCRA SCRB ST2 ST4 ST1 ST3 ST5 Pin 1 Pin 2 Pin 15 Pin 16 Pin 1 Pin 2 Pin 15 Pin 16 Pin 1 Pin 2 Pin 15 Pin 16 Pin 1 Pin 2 Pin 15 Pin 16 Pin 1 Pin 2 Pin 10 Pin 9 Pin 1 Pin 2 Pin 13 Pin 14 Pin 1 Pin 2 Pin 13 Pin 14 Digital Side Process SIde Slot A Slot B Slot 3 5 7 9 Slot 4 6 8 10 SPI BU1 Pin 1 Pin 2 Pin 10 Pin 9 SPI Slot A Slot B ...

Страница 85: ...Port A Pin 2 3 PA3 Port A Pin 3 4 PA4 Port A Pin 4 5 PA5 Port A Pin 5 6 PA6 Port A Pin 6 7 PA7 Port A Pin 7 8 PA8 Port A Pin 8 9 System GND GND 10 Serial RxD RxD to SM BASE 11 System VCC System 5V VCC 12 Serial TxD TxD from SM BASE 13 CS SLOTA Chip Select A 14 Serial CLK CLK from SM BASE 15 Reset Power ON OFF Reset 16 Slot A Interrupt line INT4 to the I O Controller Pin Nr Signal Description Pin N...

Страница 86: ... are individually composed of 7 free connections which when stacked provide 14 free connections per I O slot The pinout functionality depends on the type of SMART Modules fitted and the relevant module should be referred to in the appropriate section of this manual Pin Nr Signal Pin Nr Signal 1 Screw Terminal 13 2 Screw Terminal 13 3 Screw Terminal 1 4 Screw Terminal 2 5 Screw Terminal 3 6 Screw T...

Страница 87: ...s the SMART BASE module or other earlier cascaded SMART EXT modules Pinouts for this 10 pin connector Note Pin 10 of BU1 is only useful on the first SMART EXT connected to the SMART BASE For this reason SMART Modules utilizing this feature can only be connected to the first slot of the first extension unit Pin Nr Signal Pin Nr Signal 1 System VCC 5V 2 Serial RxD from SMART BASE 3 System VCC 5V 4 S...

Страница 88: ...SMART I O User s Manual March 12 1996 1996 PEP Modular Computers GmbH Page 3 10 Chapter 3 SMART EXT This page has been left blank intentionally ...

Страница 89: ...Digital Modules 08 Jan 98 SMART I O User s Manual Page 4 1 Manual ID 09901 Rev Index 0500 Digital Modules ...

Страница 90: ...ications 4 5 4 1 3Front Panel Layout 4 6 4 1 4Board Overview 4 7 4 1 5Functional Description 4 8 4 1 6Configuration 4 9 4 1 7Pinouts 4 10 4 1 8 C Programming 4 12 4 1 9ISaGRAF Programming 4 16 4 2 SM DOUT1 4 19 4 2 1Introduction 4 19 4 2 2Specifications 4 19 4 2 3Front Panel Layout 4 20 4 2 4Board Overview 4 20 4 2 5Functional Description 4 21 4 2 6Configuration 4 22 ...

Страница 91: ...ront Panel Layout 4 34 4 3 4Board Overview 4 34 4 3 5Functional Description 4 35 4 3 6Configuration 4 36 4 3 7Pinouts 4 36 4 3 8 C Programming 4 38 4 4 SM ACI1 4 53 4 4 1Introduction 4 53 4 4 2Specifications 4 54 4 4 3Front Panel Layout 4 55 4 4 4Board Overview 4 56 4 4 5Functional Description 4 58 4 4 6Configuration 4 59 4 4 7Screw Terminal Pinouts 4 61 4 4 8 C Programming 4 64 4 4 9ISaGraf Progr...

Страница 92: ...This page was intentionally left blank ...

Страница 93: ...ne per input channel which illuminate when the input exceeds 10V DC and a configurable filter on the last channel for INTx interrupts where x lies between 1 and 4 depending on which slot the module is located 4 1 2 Specifications Isolation 2 5 kV optoisolated from the system Input 8 Digital Channels 24V DC 10 6 Independent Groups Common GND 5mA Input Current Filter set to 200 Hz 5ms Overvoltage Pr...

Страница 94: ...SMART I O User s Manual March 12 1996 1996 PEP Modular Computers GmbH Page 4 6 Chapter 4 Digital Modules 4 1 3 Front Panel Layout Green LEDs User Descriptor Fields ...

Страница 95: ...r 4 Digital Modules 4 1 4 Board Overview Component Side Solder Side Pin 16 Pin 2 Pin 16 Pin 2 BU1 BU2 LED 0 LED 7 J1 2 1 3 J2 2 1 3 BU1 BU2 LED 0 LED 7 Low Pass Filter ID Register Input Circuit Digital Input and LED Drivers Optoisolation Pin 1 Pin 15 Pin 2 Pin 16 Pin 1 Pin 15 Pin 2 Pin 16 ...

Страница 96: ...ording to customer specifications The LED driver activates the relevant LED when the input exceeds 10V DC As previously mentioned the last channel is capable of issuing IRQx inter rupts when enabled by software This interrupt will only be acknowledged under OS 9 if the module is on the SMART BASE or occupies the first slot of the first attached SMART EXT unit This channel is factory set at 200Hz b...

Страница 97: ...ng components Figure 4 1 6 1 SM DIN1 Configurable Filter Surface Mounted Devices SMD are used in the production of the SM DIN1 modules The components to be changed marked with an asterisk in figure 4 1 6 1 need not necessarily be SMD Refer to the Board Overview solder side for the approximate position of these jumpers It should be noted that when calculating component values for a specific filter ...

Страница 98: ...screw terminal block Pin 1 Pin 2 Pin 13 Pin 14 Pin Nr Signal Description Pin Nr Signal Description 1 G0EXT GND for channel 0 2 G4EXT GND for channel 4 3 IN0 Input Channel 0 4 IN4 Input Channel 4 5 IN1 Input Channel 1 6 IN5 Input Channel 5 7 G1EXT GND for channel 1 8 G5EXT GND for channel 5 9 IN2 Input Channel 2 10 IN6 Input Channel 6 11 IN3 Input Channel 3 12 IN7 Input Channel 7 13 G23EXT GND for ...

Страница 99: ...11 4 Chapter 4 Digital Modules Connection Input Circuit Vcc 24V Gnd 0V IN0 G0EXT K1 5K1 8V2 Typ Common GND LL4448 System Interface User Input Interface Vcc 24V Gnd 0V G0EXT G4EXT G1EXT G5EXT G23EXT G67EXT IN7 IN3 IN6 IN2 IN5 IN1 IN4 IN0 Digital Sensors Pin 1 Pin 2 Pin 13 Pin 14 ...

Страница 100: ...ersion 1 1 2 or higher FasTrak 2 0 2 or higher The leftmost SM Module has number 0 assigned to it a far as programming is concerned although physically this is slot 1 Before a library function can be used the function SMDIN1Init must first be called This allocates the requested resources Furthermore this function needs to be called for each SM DIN1 Module called within the task Upon completion of ...

Страница 101: ...Description This function initialises the SM DIN1 Module on port PortNr by allocating space in memory for resources and resetting all inputs Input u_int8 PortNr SM Port number to initialise from 0 to 10 Output error_code SUCCESS E_BMODE If the module is unknown or standard OS 9 error code refer to the OS 9 Technical Manual Error Codes Section Example RetVal SMDIN1Init 0 ...

Страница 102: ...u_int8 PortNr Description This function de initialises the SM DIN1 Module on port PortNr by releas ing all resources assigned to it thereby freeing memory for other uses Input u_int8 PortNr SM Port number to de initialise Output error_code SUCCESS or standard OS 9 error code refer to the OS 9 Technical Manual Error Codes Section Example RetVal SMDIN1DeInit 0 ...

Страница 103: ...nd writes it to the address pointed to by buffer with bit 0 of the buffer represent ing input 0 of the module Input u_int8 PortNr SM Port number to fetch data u_int8 buffer Pointer to Buffer where data is to be stored Output error_code SUCCESS or OS 9 error code refer to the OS 9 Technical Manual Error Codes Section Example RetVal SMDIN1Get 0 buffer Buffer Explanation D7 D0 Ch 7 Ch 6 Ch 5 Ch 4 Ch ...

Страница 104: ... a Typical Screen Section for the SM DIN1 Module Logical Address The 8 inputs of this module may be clearly seen together with the logical address at which this particular board is residing Remember this logical address is the same as the physical slot position In the example shown here the board being addressed is in slot 2 i e the second of the SMART BASE slots Up to 11 slots are catered for in ...

Страница 105: ...he selected COMMAND parameter Each SMART Module possesses its own set of these COMMANDS Example error code OPERATE channel O_INIT_CODE 0 O_INIT_CODE is one of a number of distinct commands recognized by the PEP Modular Computers implementation of board drivers and checks for example that the board is located where the program expects it to be channel provides channel specific information and in th...

Страница 106: ...ay be obtained by selecting a project from the ISaGRAF projects group opening an application and observing the Common defines in the Dictionary pull down menu Note that not all calls in the list may be used within the SMART I O environment however the calls applicable to this module are O_INIT_CODE The syntax and usage have already been explained ...

Страница 107: ...ellow LEDs 1 per output channel which illuminate when the output is ON 4 2 2 Specifications Isolation 2 5 kV optoisolated from the system Output 8 Digital Channels 2 Independent Groups High Side Switch Common Vcc 500mA Continuous Current per channel Inductive Load Protection clamp diode Power ON OFF Protection Overvoltage Protection Output Voltage Switch ON Delay resistive Switch OFF Delay resisti...

Страница 108: ...4 20 Chapter 4 Digital Modules 4 2 3 Front Panel Layout 4 2 4 Board Overview Component Side BU1 BU2 LED 0 LED 7 LED Driver Output Transistors Digital Output Network Optoisolation Pin 1 Pin 15 Pin 2 Pin 16 Pin 1 Pin 15 Pin 2 Pin 16 ID Register Yellow LEDs User Descriptor Fields ...

Страница 109: ...protected against inductive loads by an additional clamp diode Furthermore because each output stage requires three terminals to remain independent and only 14 such terminals are available the common Vcc and GND lines have been grouped Hence each pair of outputs is coupled to one Vcc line and to each pair of Vcc lines is one ground Warning Individual outputs should not be cascaded as it cannot be ...

Страница 110: ...hip for the SM DOUT1 when connected to a particular screw terminal block Pin 1 Pin 2 Pin 13 Pin 14 Pin Nr Signal Description Pin Nr Signal Description 1 V01EXT Vcc for channels 0 1 2 V45EXT Vcc for channels 4 5 3 OUT0 Output 0 4 OUT4 Output 4 5 OUT1 Output 1 6 OUT5 Output5 7 V23EXT Vcc for channels 2 3 8 V67EXT Vcc for channels 6 7 9 OUT2 Output 2 10 OUT6 Output 6 11 OUT3 Output 3 12 OUT7 Output 7...

Страница 111: ...T0 G03EXT V01EXT Typ PNP Load BYM05 100 6 8 k TIP125 Opto TLP521 System Interface User Interface Vcc 24V Gnd 0V G03EXT G47EXT OUT7 OUT3 OUT6 OUT2 OUT5 OUT1 OUT4 OUT0 V01EXT V45EXT V23EXT V67EXT Pin 1 Pin 2 Pin 13 Pin 14 Digital Actuators Vcc Common 24V V01EXT Channel 0 Channel 1 Vcc Common 24V V23EXT Channel 2 Channel 3 G03EXT OUT 0 OUT 1 OUT 2 OUT 3 ...

Страница 112: ...ersion 1 1 2 or higher FasTrak 2 0 2 or higher The leftmost SM Module has number 0 assigned to it a far as programming is concerned although physically this is slot 1 Before a library function can be used the function SMDOUT1Init must first be called This allocates the requested resources Furthermore this function needs to be called for each SM DOUT1 Module called within the task Upon completion o...

Страница 113: ...by using for example semaphores within OS 9 4 2 8 2 SMDOUT1Init Syntax error_code SMDOUT1Init u_int8 PortNr Description This function initializes the SM DOUT1 Module on port PortNr and sets all output lines to OFF Input u_int8 PortNr SM Port number to initialize from 0 to 10 Output error_code SUCCESS E_BMODE If the module is unknown or standard OS 9 error code refer to the OS 9 Technical Manual Er...

Страница 114: ...u_int8 PortNr Description This function de initializes the SM DOUT1 Module on port PortNr by releasing all resources assigned to it thereby freeing memory for other uses Input u_int8 PortNr SM Port number to de initialize Output error_code SUCCESS or standard OS 9 error code refer to the OS 9 Technical Manual Error Codes Section Example RetVal SMDOUT1DeInit 0 ...

Страница 115: ... location pointed to by buffer This buffer shows the status of all 8 outputs with bit 0 representing output 0 of the module Input u_int8 PortNr SM Port number to fetch data u_int8 buffer Pointer to a buffer where data is to be stored Output error_code SUCCESS or standard OS 9 error code refer to the OS 9 Technical Manual Error Codes Section Example RetVal SMDOUT1Get 0 buffer Buffer Explanation D7 ...

Страница 116: ...ddress pointed to by buffer When writing to this buffer observe that all 8 outputs are set at the same time Input u_int8 PortNr SM Port number to fetch data u_int8 buffer Pointer to buffer where the data is to be written Output error_code SUCCESS or standard OS 9 error code refer to the OS 9 Technical Manual Error Codes Section Example RetVal SMDOUT1Set 0 buffer Buffer Explanation D7 D0 Ch 7 Ch 6 ...

Страница 117: ...f this module may be clearly seen together with the logical address at which this particular board is residing Remember this logical address is the same as the physical slot position In the example shown here the board being addressed is in slot 1 i e the first of the SMART BASE slots Up to 11 slots are catered for in the SMART I O concept 3 on the SMART BASE and 2 for each connected SMART EXT up ...

Страница 118: ...e selected COMMAND parameter Each SMART Module possesses its own set of these COMMANDS Example error code OPERATE channel O_INIT_CODE 0 O_INIT_CODE is one of a number of distinct commands recognized by the PEP Modular Computers implementation of board drivers and checks for example that the board is located where the program expects it to be channel provides channel specific information and in the...

Страница 119: ...may be obtained by selecting a project from the ISaGRAF projects group opening an application and observing the Common defines in the Dictionary pull down menu Note that not all calls in the list may be used within the SMART I O environment however the calls applicable to this module are O_INIT_CODE The syntax and usage have already been explained ...

Страница 120: ...SMART I O User s Manual March 12 1996 1996 PEP Modular Computers GmbH Page 4 32 Chapter 4 Digital Modules This page has been left blank intentionally ...

Страница 121: ... 2 5 kV Optoisolated Between Channels 1 5 kV Between Contacts 1 0 kV Surge Voltage 1 5 kV Output 6 Normally Open Relay Contacts Max Switching Voltage 250V AC 220V DC Max Switching Current 2A Max Switching Load Resistive 60W 125 VA Switch ON Current Rate 8A 3ms Sustained Current 3A Switch OFF Current Rate 2A 2ms Max Switching Frequency 100 Hz Contact Resistance 50mΩ Settling Time 4ms Power ON OFF P...

Страница 122: ... 34 Chapter 4 Digital Modules 4 3 3 Front Panel Layout SM REL1 6 N O Relay Outputs Yellow LEDs Green LED Yellow LED User Descriptor Fields 4 3 4 Board Overview Component Side BU1 BU2 LED 0 LED 7 EEPROM Filters Relay Relays J1 Relay Driver Optocouplers Relay 1 15 2 16 1 15 2 16 ...

Страница 123: ...ional life of the relays is recorded in terms of operating cycles and refers to mechanical failure The contacts however could be damaged through excessive load switching causing sparks to break down the contact surface This in turn could increase the resistance and lead to an MTBF that is shorter than that quoted in the specifications 256 bytes of serial EEPROM contain the module ID number and pro...

Страница 124: ... Pin 14 Pin Nr Signal Description Pin Nr Signal Description 1 NO0 N O Relay 0 Conn 2 COM0 Relay 0 Common Conn 3 NO1 N O Relay 1 Conn 4 COM1 Relay 1 Common Conn 5 NO2 N O Relay 2 Conn 6 COM2 Relay 2 Common Conn 7 NO3 N O Relay 3 Conn 8 COM3 Relay 3 Common Conn 9 NO4 N O Relay 4 Conn 10 COM4 Relay 4 Common Conn 11 NO5 N O Relay 5 Conn 12 COM5 Relay 5 Common Conn 13 VCCEXT External 24V DC VCC 14 GNDE...

Страница 125: ...I O User s Manual Chapter 4 Digital Modules 1996 PEP Modular Computers GmbH March 12 1996 Page 4 37 4 Connection Vcc 24V Gnd 0V NO1 GNDEXT COM1 VCCEXT 6 8 K PC829 ULN2002 100Ω 10 nF Load Input Circuit 24V DC ...

Страница 126: ...ersion 1 1 2 or higher FasTrak 2 0 2 or higher The leftmost SM Module has number 0 assigned to it a far as programming is concerned although physically this is slot 1 Before a library function can be used the function SMREL1Init must first be called This allocates the requested resources Furthermore this function needs to be called for each SM REL1 Module called within the task Upon completion of ...

Страница 127: ... semaphores within OS 9 4 3 8 2 SMREL1Init Syntax error_code SMREL1Init u_int8 PortNr Description This function initializes the SM REL1 Module on port PortNr by setting the relays to OPEN relay LED status to OFF and the external Vcc as input Input u_int8 PortNr SM Port to initialize from 0 to 10 Output error_code SUCCESS E_BMODE if the module is unknown or standard OS 9 error code refer to the OS ...

Страница 128: ...s the SM REL1 Module on the port PortNr by freeing the resources tied up with this module and setting all relays to OPEN all LEDs to OFF and setting the ext Vcc line to input Input u_int8 PortNr SM Port number to de initialize from 0 to 10 Output error_code SUCCESS E_BMODE if the module is unknown or standard OS 9 error code refer to the OS 9 Technical Manual Error Codes Section Example RetVal SMR...

Страница 129: ...ule by setting all relays to OPEN and all LEDs to OFF This function does not free the resources as with the SMRELl1DeInit function call but it does ensure that the relay status and LEDs is as expected Input u_int8 PortNr Number of the SM port to reset Output error_code SUCCESS E_BMODE if the module is unknown or standard OS 9 error code refer to the OS 9 Technical Manual Error Codes Section Exampl...

Страница 130: ...of the port PortNr and writes it to the buffer Bits 0 5 of the buffer reflect the Relay setting 0 relay closed 1 relay open Bits 6 and 7 are cleared Input u_int8 PortNr SM Port number to get data u_int8 buffer Pointer to Buffer where data is written Output error_code SUCCESS E_BMODE if the module is unknown or standard OS 9 error code refer to the OS 9 Technical Manual Error Codes Section Example ...

Страница 131: ... of the port PortNr with the buffer contents Bits 0 5 of the buffer are used to set the Relays 0 close relay 1 open relay Bits 6 and 7 have no function Input u_int8 PortNr SM Port number to set data u_int8 buffer Pointer to buffer where data is stored Output error_code SUCCESS E_BMODE if the module is unknown or standard OS 9 error code refer to the OS 9 Technical Manual Error Codes Section Exampl...

Страница 132: ... LED on the port PortNr and writes it to the buffer If the LED is OFF then it returns 0 otherwise it returns 1 This function of the LED is for the user to decide Input u_int8 PortNr SM Port number to get data u_int8 buffer Pointer to buffer where data is written Output error_code SUCCESS E_BMODE if the module is unknown or standard OS 9 error code refer to the OS 9 Technical Manual Error Codes Sec...

Страница 133: ... the status of the User LED on the port PortNr with the contents of the buffer If a bit is set to 0 then the LED is OFF otherwise it is ON Input u_int8 PortNr SM Port number to write data u_int8 buffer Pointer to buffer where data is stored Output error_code SUCCESS E_BMODE if the module is unknown or standard OS 9 error code refer to the OS 9 Technical Manual Error Codes Section Example RetVal SM...

Страница 134: ...tion gets the input of the port PortNr and writes it to buffer If there is no external Vcc then it returns 0 otherwise it returns 1 Input u_int8 PortNr SM Port number to get data u_int8 buffer pointer to buffer where data is written Output error_code SUCCESS E_BMODE if the module is unknown or standard OS 9 error code refer to the OS 9 Technical Manual Error Codes Section Example RetVal SMREL1GetE...

Страница 135: ...e 6 outputs of this module may be clearly seen together with the logical address at which this particular board is residing Remember this logical address is the same as the physical slot position In the example shown here the board being addressed is in slot 3 i e the third of the SMART BASE slots Up to 11 slots are catered for in the SMART I O concept 3 on the SMART BASE and 2 for each connected ...

Страница 136: ...e selected COMMAND parameter Each SMART Module possesses its own set of these COMMANDS Example error code OPERATE channel O_INIT_CODE 0 O_INIT_CODE is one of a number of distinct commands recognized by the PEP Modular Computers implementation of board drivers and checks for example that the board is located where the program expects it to be channel provides channel specific information and in the...

Страница 137: ...DE Syntax and usage as explained above O_SET_LED This operate call allows the user to control the yellow LED on the board s front panel The syntax is as follows analog var OPERATE iovar O_SET_LED var where analog var represents the analog return variable and can be zero if the operate call is supported and the correct var is passed or non zero if an error occurred iovar represents any module varia...

Страница 138: ...Jan 98 Manual ID 09901 Rev Index 0500 O_EXT_POWER 0 where analog var represents the analog return variable and can be zero if the operate call is supported and the correct var is passed or non zero if an error occurred iovar represents any module variable ...

Страница 139: ...h the system registering a logical 1 when the input is active A logical 0 is returned when the input is no longer active However a low pass filter restricts signals exceeding the filter limit thus registering a logical 0 with the system The user interface is realized by eight green LEDs one per input channel which switch on when the inputs are energized and by a configurable filter on the last cha...

Страница 140: ...t current Input frequency range Overvoltage protection continu ous Switch ON delay Switch OFF delay High level Low level 47 63 Hz 350 V AC 21 ms 16 ms 20 V 10 V Front panel Green LEDs switched on when INPUT is active Options User configurable RC filter on the last channel for INTx generation Power con sumption 3 mW min 70 mW max Temperature range Standard 0 C to 70 C Extended 40 C to 85 C Module w...

Страница 141: ...Digital Modules 08 Jan 98 SMART I O User s Manual Page 4 55 Manual ID 09901 Rev Index 0500 4 4 3Front Panel Layout Figure 4 1 Front Panel Layout ...

Страница 142: ...SMART I O User s Manual Page 4 56 Digital Modules 08 Jan 98 Manual ID 09901 Rev Index 0500 4 4 4Board Overview Figure 4 2 Component Side ...

Страница 143: ...Digital Modules 08 Jan 98 SMART I O User s Manual Page 4 57 Manual ID 09901 Rev Index 0500 Figure 4 3 Solder Side ...

Страница 144: ...Digital Modules 08 Jan 98 SMART I O User s Manual Page 4 58 Manual ID 09901 Rev Index 0500 4 4 5Functional Description Figure 4 4 SM ACI1 Schematic Diagram ...

Страница 145: ...t of the attached SMART EXT unit This channel is manufacturer set at 40 Hz but other frequencies may be catered for The table below shows the settings of the solder jumpers for this filter configuration 4 4 6Configuration Although two solder jumpers J3 and J4 exist on the board they should remain at their manufacturer settings unless a user spe cific filter is required that for instance cuts off a...

Страница 146: ...Digital Modules 08 Jan 98 SMART I O User s Manual Page 4 60 Manual ID 09901 Rev Index 0500 Figure 4 5 SM ACI1 Configurable Filter ...

Страница 147: ...pers Notice should be taken of the fact that when calculating component values for a specific filter the capacitor resistor relationship is almost linear For this purpose it is suggested that only the capacitor be changed Hence for a doubling of the filter frequency input the value of the capacitor should be reduced by half 4 4 7Screw Terminal Pinouts In the following the pinout signal relationshi...

Страница 148: ...ption Pin Sign al Description 1 N0 Neutral channel 0 2 N4 Neutral channel 4 3 P0 Phase channel 0 4 P4 Phase channel 4 5 P1 Phase channel 1 6 P5 Phase channel 5 7 N1 Neutral channel 1 8 N5 Neutral channel 5 9 P2 Phase channel 2 10 P6 Phase channel 6 11 P3 Phase channel 3 12 P7 Phase channel 7 13 N23 Neutral channels 2 3 14 N67 Neutral channels 6 7 ...

Страница 149: ...Digital Modules 08 Jan 98 SMART I O User s Manual Page 4 63 Manual ID 09901 Rev Index 0500 Figure 4 7 Connection ...

Страница 150: ...nnel Shown 4 4 8ANSI C Programming 4 4 8 1 SM ACI1 Library The SM ACI1 library of functions smartio l provide a conve nient way of accessing the SM ACI1 module All functions are written in ANSI C Prototypes are to be found in the file aci1lib h Hardware Requirements SMART I O Base Module or Base Module and Extension unit SM ACI1 Module ...

Страница 151: ...st By this the requested resources are allo cated Beyond this function needs to be called for each SM ACI1 Module called within the task Upon completion of the application the function SMACI1DeInit needs to be called for each SM ACI1 Module that has been initialized In order to illustrate the use of the SM ACI1 library an applica tion facsimile called demoaci1 c can be found in the SMART I O appli...

Страница 152: ...Technical Manual Error Codes Section Example RetVal SMACI1Init 0 4 4 8 3 SMACI1DeInit Syntax error_code SMACI1DeInit u_int8 PortNr Description This function de initializes the SM ACI1 Module on port PortNr by releasing all resources assigned to it thereby freeing memory for other uses Input u_int8 PortNr SM Port number to de initialize Output error_code SUCCESS or standard OS 9 error code refer to...

Страница 153: ...ction fetches the status of ALL 8 input lines of the port PortNr and writes it to the address pointed to by buffer with bit 0 of the buffer representing input 0 of the module Input u_int8 PortNr SM Port number to fetch data u_int8 buffer Pointer to buffer where data is to be stored Output error_code SUCCESS or OS 9 error code refer to the OS 9 Technical Manual Error Codes Section Example RetVal SM...

Страница 154: ...lue 0 No input or not connected 1 Input Active 4 4 9ISaGRAF Programming 4 4 9 1 ISaGRAF Board Parameters Information on board parameters may be found in the PEP on line help and ISaGRAF on line help or user s manual Figure 4 9 Typical Screen Section for the SM ACI1Module D7 D0 Ch 7 Ch 6 Ch 5 Ch 4 Ch 3 Ch 2 Ch 1 Ch 0 ...

Страница 155: ...rate Calls Operate calls are built into a program using ST or FBD lan guages when defining the project A typical use could be at the initialization stage to check that the SMART Modules are in fact located where they have been programmed to be The syntax of the operate call is as follows Syntax return variable OPERATE source var COMMAND source data Here the return variable is assigned a value asso...

Страница 156: ...o error was detected otherwise it returns a non zero value depending on the error encountered A list of these error codes may be found in the PEP on line help A complete list of the operate COMMANDS may be obtained by selecting a project from the ISaGRAF projects group opening an application and observing the Common defines in the Dictio nary pull down menu Note that not all calls in the list may ...

Страница 157: ...SMART I O User s Manual 1996 PEP Modular Computers GmbH March 12 1996 Page 5 1 5 Chapter 5 Analog Modules Analog Modules for SMART I O ...

Страница 158: ...5 12 5 1 7 Pinouts 5 13 5 1 8 C Programming 5 16 5 1 8 1 SM DAD1 Library 5 16 5 1 8 2 SMDAD1Init 5 17 5 1 8 3 SMDAD1DeInit 5 18 5 1 8 4 SMDAD1GetVRaw 5 19 5 1 8 5 SMDAD1GetV 5 20 5 1 8 6 SMDAD1PutVRaw 5 21 5 1 8 7 SMDAD1PutV 5 22 5 1 8 8 SMDAD1SetLed 5 23 5 1 8 9 SMDAD1ClrLed 5 24 5 1 9 ISaGRAF Programming 5 25 5 1 9 1 The ISaGRAF Board Parameters 5 25 5 1 9 2 The ISaGRAF Operate Calls 5 26 5 2 SM...

Страница 159: ...al 5 48 5 2 8 12 SMADCSetGain 5 49 5 2 8 13 SMADCGetGain 5 50 5 2 8 14 SMADCEnableRead 5 51 5 2 8 15 SMADCEnableConversion 5 52 5 2 8 16 SMADCReadRaw 5 53 5 2 8 17 SMADCReadConverted 5 54 5 2 8 18 SMADCDeinit 5 55 5 2 9 ISaGRAF Programming 5 56 5 2 9 1 The ISaGRAF Board Parameters 5 56 5 2 9 2 The ISaGRAF Operate Calls 5 57 5 3 SM THERM 5 59 5 3 1 Introduction 5 59 5 3 2 Specifications 5 59 5 3 3 ...

Страница 160: ...ADCReadConverted 5 83 5 3 8 18 SMADCDeinit 5 84 5 3 9 ISaGRAF Programming 5 85 5 3 9 1 The ISaGRAF Board Parameters 5 85 5 3 9 2 The ISaGRAF Operate Calls 5 86 5 4 SM ADC1 5 89 5 4 1 Introduction 5 89 5 4 2 Specifications 5 89 5 4 3 Front Panel Layout 5 90 5 4 4 Board Overview 5 90 5 4 5 Functional Description 5 91 5 4 5 1 Input Circuitry 5 91 5 4 6 Configuration 5 92 5 4 7 Pinouts 5 92 5 4 8 C Pr...

Страница 161: ...on 5 109 5 5 5 1 Output Circuitry 5 109 5 5 6 Configuration 5 110 5 5 7 Pinouts 5 110 5 5 8 C Programming 5 113 5 5 8 1 SM DAC1 Library 5 113 5 5 8 2 SMDAC1Init 5 114 5 5 8 3 SMDAC1OpenLoop 5 115 5 5 8 4 SMADAC1Operate 5 116 5 5 8 5 SMDAC1StandBy 5 117 5 5 8 6 SMDAC1PutVRaw 5 118 5 5 8 7 SMDAC1PutV 5 119 5 5 8 8 SMDAC1SetLed 5 120 5 5 8 9 SMDAC1ClrLed 5 121 5 5 8 10 SMDAC1DeInit 5 122 5 5 9 ISaGRA...

Страница 162: ...SMART I O User s Manual March 12 1996 1996 PEP Modular Computers GmbH Page 5 6 Chapter 5 Analog Modules This page has been left blank intentionally ...

Страница 163: ...ge Inputs Input Range 10V 12 bit ADC with 1 bit non linearity 10 bit repeating accuracy Overvoltage Protection 35V Input Impedance approx 450 kΩ Filter set to 10kHz On chip Reference Voltage 13µs Conversion Time 1MHz SCLK Output 2 Unipolar Bipolar Outputs Short Circuit Protected 12 bit DAC with 1 bit non linearity Output Range 10V or 0 10V 5mA max Output Current Power up Reset without glitch Unipo...

Страница 164: ...SMART I O User s Manual March 12 1996 1996 PEP Modular Computers GmbH Page 5 8 Chapter 5 Analog Modules 5 1 3 Front Panel Layout Red LEDs User Descriptor Fields ...

Страница 165: ...6 Page 5 9 5 Chapter 5 Analog Modules 5 1 4 Board Overview Component Side Solder Side 2 16 BU1 BU2 LED 0 LED 1 Input Multiplexer Input Amplifier EEPROM DAC Reference Output Amplifier DAC DC DC ADC 1 15 2 16 1 15 Pin 16 Pin 2 Pin 16 Pin 2 BU1 BU2 LED 0 LED 1 J3 J2 J5 J4 ...

Страница 166: ...C first order low pass filter to prevent noise and signals greater than 10kHz from entering the system a 1 4 channel multiplexer followed by a differential amplifier divider and a 12 bit fast analog to digital converter ADC Figure 5 1 5 1 SM DAD1 Input Schematic Diagram The ADC using successive approximation and input track and hold is referenced by its own on chip voltage source supplying 4 096V ...

Страница 167: ...tput Schematic Diagram Load 10V 10V 0 10V AGND VOUTx Output Amplifier Uni Bipolar Switch J4 J5 DAC Ref System Interface The DAC is a complete dual 12 bit multiplying DAC without the need for external trimming Bipolar unipolar mode is selected via jumpers J4 and J5 which allow both output channels to be configured separately It should be noted that in bipolar mode the power up condition is not glit...

Страница 168: ...ved for PEP use only Jumper J3 EEPROM Protection Jumper J4 and J5 DAC Output Jumper Settings Description J3 set EEPROM is not hardware write protected open EEPROM is hardware write protected Jumper Settings Description J4 open VOUT0 unipolar 0V 10V set VOUT0 bipolar 10V 10V J5 open VOUT1 unipolar 0V 10V set VOUT1 bipolar 10V 10V Note If altering the mode unipolar bipolar of the DAC output be sure ...

Страница 169: ...icular screw terminal block Pin 1 Pin 2 Pin 13 Pin 14 Pin Nr Signal Description Pin Nr Signal Description 1 IN0P Analog Input Ch 0 2 IN2P Analog Input Ch 2 3 IN0N Analog Input Ch 0 4 IN2N Analog Input Ch 2 5 AGND Analog GND 6 AGND Analog GND 7 IN1P Analog Input Ch 1 8 IN3P Analog Input Ch 3 9 IN1N Analog Input Ch 1 10 IN3N Analog Input Ch 3 11 VOUT0 Analog Output Ch 0 12 VOUT1 Analog Output Ch 1 1...

Страница 170: ...alog Modules Connection Gnd 0V AGND AGND VOUT1 VOUT0 Pin 1 Pin 2 Pin 13 Pin 14 Analog Actuators Analog Sensors IN0P IN2P IN0N IN2N IN1P IN3P IN1N IN3N AGND AGND A D Circuit IN0N MUX 1 4 MAX359 4 7 k IN0P AGND 15V 15V 15V 1 k 15V MAX427 4 7 k 1 nF 220 k 220 k 220 k 220 k ADC MAX191 5V 5V 3 9 k ...

Страница 171: ...AGND 15V 15V LT1013 1 2 J4 20 k 15V 15V 20 k 20 k 20 k 15V 10 V DAC MAX532 REF MAX876 Jumpers J4 and J5 should be set if the DAC should operate in bipolar mode It should be noted that the D A circuit shown above represents only one of the two output channels J5 is naturally the jumper for mode switching on the second channel ...

Страница 172: ...rsion 1 1 2 or higher FasTrak 2 0 2 or higher The leftmost SM Module has number 0 assigned to it a far as programming is concerned although physically this is slot 1 Before a library function can be used the function SMDAD1Init must first be called This allocates the requested resources Furthermore this function needs to be called for each SM DAD1 Module called within the task Upon completion of t...

Страница 173: ... the EEPROM setting the ADC to bipolar mode and the DAC to unipolar mode fetching the resources Input u_int8 PortNr SM Port number to initialize from 0 to 10 Output error_code SUCCESS or E_BMODE if wrong or no module E_MEMFUL if no memory resources available or standard OS 9 error code refer to the OS 9 Technical Manual Error Codes Section Example RetVal SMDAD1Init 0 Note If the same SM DAD1 Modul...

Страница 174: ...his function de initializes the SM DAD1 Module on the port PortNr by freeing the resources tied up with it and setting all outputs and inputs to zero Input u_int8 PortNr SM Port number to de initialize from 0 to 10 Output error_code SUCCESS E_SEEK if module not initialized or standard OS 9 error code refer to the OS 9 Technical Manual Error Codes Section Example RetVal SMDAD1DeInit 0 ...

Страница 175: ...ction returns the 2 s complement value of the original read Input u_int8 PortNr SM Port to be accessed u_int8 Channel Number of the ADC input channel to access 0 3 int16 pValue Pointer to the location where the conversion result will be stored Output error_code SUCCESS E_SEEK if module was not initialized E BMODE if the module is unknown or standard OS 9 error code refer to the OS 9 Technical Manu...

Страница 176: ...selected the function returns the 2 s complement value of the original read Input u_int8 PortNr SM Port to be accessed u_int8 Channel Number of the ADC input channel to access 0 3 int16 pValue Pointer to the location where the conversion result will be stored Output error_code SUCCESS E_SEEK if module was not initialized E BMODE if the module is unknown or standard OS 9 error code refer to the OS ...

Страница 177: ...ed Input u_int8 PortNr SM Port number to be accessed u_int8 Channel Number of the DAC output channel to access 0 1 u_int16 Value Value to be written Output error_code SUCCESS E_SEEK if module was not initialized E BMODE if the module is unknown or standard OS 9 error code refer to the OS 9 Technical Manual Error Codes Section Example RetVal SMDAD1PutVRaw 0 1 0x0FFF Value 16 bit HEX Unipolar Bipola...

Страница 178: ...or not Hence if a user defined table exists then this will be used otherwise the default factory set table will be used Input u_int8 PortNr SM Port number to be accessed u_int8 Channel Number of the DAC output channel to access 0 1 int16 Value Value to be written Output error_code SUCCESS E_SEEK if module was not initialized E BMODE if the module is unknown or standard OS 9 error code refer to the...

Страница 179: ...Description This function switches on one of the two LEDs fitted to the SM DAD1 Input u_int8 PortNr SM Port number to be accessed u_int8 LedNr Number of the LED to switch on 1 2 Output error_code SUCCESS E_SEEK if module was not initialized E BMODE if the module is unknown or standard OS 9 error code refer to the OS 9 Technical Manual Error Codes Section Example RetVal SMDAD1SetLed 0 2 ...

Страница 180: ...scription This function switches off one of the two LEDs fitted to the SM DAD1 Input u_int8 PortNr SM Port number to be accessed u_int8 LedNr Number of the LED to switch off 1 2 Output error_code SUCCESS E_SEEK if module was not initialized E BMODE if the module is unknown or standard OS 9 error code refer to the OS 9 Technical Manual Error Codes Section Example RetVal SMDAD1ClrLed 0 2 ...

Страница 181: ... this particular board is residing Remember this logical address is the same as the physical slot position In the example shown here the board being addressed is in slot 2 i e the second of the SMART BASE slots Up to 11 slots are catered for in the SMART I O concept 3 on the SMART BASE and 2 for each connected SMART EXT up to a total of 4 Module Specific Information UNIPOLAR_bipolar Like all I O b...

Страница 182: ... selected COMMAND parameter Each SMART Module possesses its own set of these COMMANDS Example error code OPERATE channel O_INIT_CODE 0 O_INIT_CODE is one of a number of distinct commands recognized by the PEP Modular Computers implementation of board drivers and checks for example that the board is located where the program expects it to be channel provides channel specific information and in the ...

Страница 183: ... syntax is as follows analog var OPERATE iovar O_SET_LED var where analog var represents the analog return variable and can be zero if the operate call is supported and the correct var is passed or non zero if an error occurred iovar represents any module variable and var represents the LED to be controlled and must be one of OA_LED1_ON or OA_LED1_OFF O_ENABLE_CONV This operate calls tells ISaGRAF...

Страница 184: ...on of a particular channel of a connected SM DAD1 module The syntax is as follows analog var OPERATE iovar O_DISABLE_CONV 0 where analog var represents the analog return variable and can be zero if the operate call is supported and the correct iovar is passed or non zero if an error occurred iovar is the variable name for the channel where the operate call is to take effect ...

Страница 185: ...accuracy of 0 2 C 5 2 2 Specifications Isolation 1 0 kV Optoisolated from the system Input 4 PT100 groups 4 wire connection supported Open Sensor Detection Self Calibration Overvoltage Protection Temperature Range Temperature Drift Conversion Time Input Impedance Resolution Absolute Accuracy Linearization 25V power connected 35V power disconnected 200 C to 850 C 1 LSB C not compensated typ 125 ms ...

Страница 186: ...bH Page 5 30 Chapter 5 Analog Modules 5 2 3 Front Panel Layout SM PT100 4 Ch 4 wire PT100 Inputs Red LEDs User Descriptor Fields 5 2 4 Board Overview Component Side 2 16 BU1 BU2 LED 0 LED 1 Multiplexers EEPROM Optocouplers DC DC ADC J1 Optocouplers Logic 1 15 2 16 1 15 ...

Страница 187: ...ided by a 256 bytes of serial EEPROM for ID number production and board specific calibration data Two front panel LEDs show the conversion calibration activity The PT100 is a platinum resistance which at 0ºC has a resistance of 100Ω and conforms to the international DIN IEC 751 standard for Industrial Platinum Resistance Thermometer Sensors Two classes A and B exist under this standard with class ...

Страница 188: ...m line resistances Table 5 2 5 2 shows the deviation from the required temperature for both class A and class B PT100 sensors Table 5 2 5 2 Tolerances between Class A and Class B Sensors Temperature C Tolerance Class A Class B C Ω C Ω 200 0 55 0 24 1 3 0 56 100 0 35 0 14 0 8 0 32 0 0 15 0 06 0 3 0 12 100 0 35 0 13 0 8 0 30 200 0 55 0 20 1 3 0 48 300 0 75 0 27 1 8 0 64 400 0 95 0 33 2 3 0 79 500 1 ...

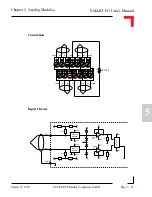
Страница 189: ...n Pin Nr Signal Description 1 Cur 0 400µA source for sensor 2 Cur 1 400µA source for sensor 3 In 0 Sense line 0 positive 4 In 1 Sense line 1 positive 5 In 0 Sense line 0 negative 6 In 1 Sense line 1 negative 7 AGND GND between 2 sensors 8 AGND GND between 2 sensors 9 In 2 Sense line 2 positive 10 In 3 Sense line 3 positive 11 In 2 Sense line 2 negative 12 In 3 Sense line 3 negative 13 Cur 2 400µA ...

Страница 190: ...ction Input Circuit CUR0 CUR1 CUR3 CUR2 IN0 IN0 AGND IN2 IN2 IN1 IN1 AGND IN3 IN3 PT100 PT100 PT100 PT100 In0 AD 7711 10 k MUX 8 1 AD508F MUX 8 1 AD508F 10 M 68 k 47 k 5V 5V 10 M 68 k 47 k 5V 5V In0 AGND 12V 12V 12V 12V 5V 5V 5V 5V 5V OP213 1 2 5V 5V MUX 8 1 AD508F 12V 12V Cur0 10 k 5V 5V OP213 1 2 ADC Exit Cur ...

Страница 191: ...sion 1 1 2 or higher FasTrak version 2 0 2 or higher The leftmost SM Module has number 0 assigned to it a far as programming is concerned although physically this is slot 1 Before a library function can be used the function SMADCInit must first be called This allocates the requested resources Furthermore this function needs to be called for each SM PT100 module called within the task Upon completi...

Страница 192: ...and SM THERM modules Initialization To start the HW Task the OS 9 module adc_task must be loaded then the function SMADCInit must be called To read data from a channel the type of sensor attached to it must be known The PEP header file BSP SMART SMADC DEFS smadc h contains a list of sensors that are supported To set the sensor type the function SMADCSetSensorType needs to be called Read RAW Data T...

Страница 193: ...k to execute a calibration cycle by calling either SMADCCalibrate for one calibration or SMADCSetCyclicCalib Then a calibration is executed if a user defined interval has expired Deinitialization If the task calling the SMADC library function finishes the function SMADCDeInit should be called by this task to free memory and resources otherwise tied up with the application Other Functions For more ...

Страница 194: ...ect operation of an SM PT100 SMART Module Figure 5 2 8 1 SM PT100 Programming Flow Diagram SMADCSetCyclicCalib for a channel Sleep 0 SMADCReadConverted for a channel Finished SMADCDeinit END START SMADCInit Install Signal Handler OS Intercept SMADCSetSensorType for a channel SMADCEnableRead for a channel SMADCEnableConversion for a channel SMADCSetSignal for a channel Yes No ...

Страница 195: ...r advice on sensors not included in this list creates or links the data module for communication with HW task the module name is ADC_Data starts the task accessing the Hardware HW task prepares parameters depending on the used SM PT100 module Input u_int8 PortNr Port number of module to initialize from 0 to 10 Output error_code SUCCESS E_MNF If wrong type of module or no module is fitted on the se...

Страница 196: ...automatically when the module is initialized and may be called at any time if the sensor for example is moved to a different location with different temperature ranges All 4 channels of the module will be calibrated simultaneously Input u_int8 PortNr Port number of module to calibrate from 0 to 10 Output error_code SUCCESS E_MNF If wrong type of module or no module is fitted on the selected port o...

Страница 197: ...etween two calibration cycles in seconds If secs 0 then cyclic calibration is disabled Input u_int8 PortNr Port number of module for calibration from 0 to 10 u_int16 secs Time in seconds between two calibration cycles Output error_code SUCCESS E_MNF If wrong type of module or no module is fitted on the selected port or standard OS 9 error code refer to the OS 9 Technical Manual Error Codes Section...

Страница 198: ...mode to their default values for the type of sensor connected Input u_int8 PortNr Port number om module to set from 0 to 10 u_int8 channel Number of specified channel 0 to 3 u_int16 sensorCode Code of the sensor a list of PEP defined sensor types can be found in the file linear h Output error_code SUCCESS E_MNF If wrong type of module or no module is fitted on the selected port E_PARAM If wrong ch...

Страница 199: ... user defined buffer The user has to take care that there is enough place to store the data A list of PEP supported sensor types can be found in the file linear h Input u_int8 PortNr Port number from which to fetch sensor type from 0 to 10 u_int8 channel Number of specified channel 0 to 3 u_int16 pBuffer Pointer to a user defined buffer Output error_code SUCCESS E_MNF If wrong type of module or no...

Страница 200: ...s are defined in the file smadc h Note that large precision filter values cause longer AD conversion times Input u_int8 PortNr Port number to set precision from 0 to 10 u_int8 channel Number of specified channel 0 to 3 u_int8 precision Resolution of ADC filter value Output error_code SUCCESS E_MNF If wrong type of module or no module is fitted on the selected port E_PARAM If wrong channel number i...

Страница 201: ...he AD Converter and stores the value in a user defined buffer The user has to take care that there is enough space to store the data Input u_int8 PortNr Port number from which to get data from 0 to 10 u_int8 channel Number of specified channel 0 to 3 u_int16 pBuffer Pointer to a user defined buffer Output error_code SUCCESS E_MNF If wrong type of module or no module is fitted on the selected port ...

Страница 202: ... mode of the AD Converter The valid values BIPOLAR UNIPOLAR are defined in the file smadc h Input u_int8 PortNr Port number to set mode 0 to 10 u_int8 channel Number of specified channel 0 to 3 u_int8 mode Mode of ADC BIPOLAR or UNIPOLAR Output error_code SUCCESS E_MNF If wrong type of module or no module is fitted on the selected port E_PARAM If wrong channel number is specified E_BMODE Illegal m...

Страница 203: ...channel and stores the value in a user defined buffer The user has to take care that the buffer is large enough to store the data Input u_int8 PortNr Port number to fetch the mode 0 to 10 u_int8 channel Number of specified channel 0 to 3 u_int8 pBuffer Pointer to a user defined buffer Output error_code SUCCESS E_MNF If wrong type of module or no module is fitted on the selected port E_PARAM If wro...

Страница 204: ...sigCode is set to 0 no signal will be sent disable sending of signals Input u_int8 PortNr Port number of SM PT100 to set the signal from 0 to 10 u_int8 channel Number of specified channel 0 to 3 process_id procID ID of the process to send the signal to signal_code sigCode Signal code to be sent Output error_code SUCCESS E_MNF If wrong type of module or no module is fitted on the selected port E_PA...

Страница 205: ...in the file smadc h The default values for the attached sensor are substituted here when the sensor type is selected Input u_int8 PortNr Port number to set gain from 0 to 10 u_int8 channel Number of specified channel 0 to 3 u_int8 gain Value of gain amplifier 0 to 7 for gain factors from 1 to 128 Output error_code SUCCESS E_MNF If wrong type of module or no module is fitted on the selected port E_...

Страница 206: ...and stores the value in a user defined buffer where the user has to take care that the buffer is large enough to store the data Input u_int8 PortNr Port number to fetch the gain setting from 0 to 10 u_int8 channel Number of specified channel 0 to 3 u_int8 pBuffer Pointer to an user defined buffer Output error_code SUCCESS E_MNF If wrong type of module or no module is fitted on the selected port E_...

Страница 207: ...module If the flag enable is TRUE 0 then cyclic ADConversion is executed else enable FALSE and cyclic conversion is disabled The function invalidates RAW and Converted data within the data module Input u_int8 PortNr Port number to enable the reading function from 0 to 10 u_int8 channel Number of specified channel 0 to 3 BOOLEAN enable Flag for enabling or disabling reading of the specified channel...

Страница 208: ...cuted else if enable FALSE no conversion takes place The function invalidates converted data if enable is set to FALSE Input u_int8 PortNr Port number to enable data conversion from 0 to 10 u_int8 channel Number of specified channel 0 to 3 BOOLEAN enable Flag for enabling or disabling conversion of raw values Output error_code SUCCESS E_MNF If wrong type of module or no module is fitted on the sel...

Страница 209: ...ffer The user has to take care that the buffer is large enough to store the data Input u_int8 PortNr Port number from which raw data is to be read from 0 to 10 u_int8 channel Number of the channel to be read 0 to 3 u_int16 pBuffer Pointer to a user defined buffer Output error_code SUCCESS E_MNF If wrong type of module or no module is fitted on the selected port E_PARAM If wrong channel number is s...

Страница 210: ...tore the data Input u_int8 PortNr Port number from which the input is read from 0 to 10 u_int8 channel Number of the channel to be read 0 to 3 double pBuffer Pointer to a user defined buffer Output error_code SUCCESS E_MNF If wrong type of module or no module is fitted on the selected port E_PARAM If wrong channel number is specified E_NOTRDY If no data is available at the moment or the sensor is ...

Страница 211: ... Syntax error_code SMADCDeinit u_int8 PortNr Description This function frees the resources attached to this module if it was initialised Input u_int8 PortNr Number of the port to deinitialise Output error_code SUCCESS or standard OS 9 error code refer to the OS 9 Technical Manual Error Codes Section Example RetVal SMADCDeinit 0 ...

Страница 212: ...which this particular board is residing Remember this logical address is the same as the physical slot position In the example shown here the board being addressed is in slot 3 i e the third of the SMART BASE slots Up to 11 slots are catered for in the SMART I O concept 3 on the SMART BASE and 2 for each connected SMART EXT up to a total of 4 Module Specific Information calib_period This is the ti...

Страница 213: ...he selected COMMAND parameter Each SMART Module possesses its own set of these COMMANDS Example error code OPERATE channel O_INIT_CODE 0 O_INIT_CODE is one of a number of distinct commands recognized by the PEP Modular Computers implementation of board drivers and checks for example that the board is located where the program expects it to be channel provides channel specific information and in th...

Страница 214: ... a connected SM PT100 module The syntax is as follows analog var OPERATE iovar O_ENABLE_CONV 0 where analog var represents the analog return variable and can be zero if the operate call is supported and the correct iovar is passed or non zero if an error occurred iovar is the variable name for the channel where the operate call is to take effect O_DISABLE_CONV This operate call tells ISaGRAF to di...

Страница 215: ... Cold Junction 2 wire Open Sensor Detection Self Calibration Overvoltage Protection Temperature Range Temperature Drift Conversion Time Input Impedance Resolution Absolute Accuracy Linearization 25V power connected 35V power disconnected Refer to table below 1 LSB C not compensated typ 125 ms max 500 ms depends on filter settings 10 MΩ min 16 bit 0 2 C sensor errors excluded by software EEPROM 256...

Страница 216: ...Page 5 60 Chapter 5 Analog Modules 5 3 3 Front Panel Layout SM THERM 4 Channel Thermocouple Inputs Red LEDs User Descriptor Fields 5 3 4 Board Overview Component Side 2 16 BU1 BU2 LED 0 LED 1 Multiplexers EEPROM Optocouplers DC DC ADC J1 Optocouplers Logic 1 15 2 16 1 15 ...

Страница 217: ...sists of a channel multi plexer operational amplifier voltage feedback impedance converter and a high resolution 16 bit delta sigma converter 1000V system isolation is provided by an optoisolated DC DC converter while system flexibility is provided by 256 bytes of serial EEPROM for ID number production and board specific calibration data Two front panel LEDs show the conversion calibration activit...

Страница 218: ...PT100 connection Pin Nr Signal Description Pin Nr Signal Description 1 AGND Analog Shield 2 AGND Analog Shield 3 In 0 Positive Sense Line 0 4 In 1 Positive Sense Line 1 5 In 0 Negative Sense Line 0 6 In 1 Negative Sense Line 1 7 TMP PT100 Cold Jn supply 8 TMP PT100 Cold Jn supply 9 In 2 Positive Sense Line 2 10 In 3 Positive Sense Line 3 11 In 2 Negative Sense Line 2 12 In 3 Negative Sense Line 3 ...

Страница 219: ... Chapter 5 Analog Modules Connection Input Circuit AGND AGND AGND AGND IN0 IN0 IN2 IN2 IN1 IN1 IN3 IN3 TMP TMP PT100 In0 AD 7711 MUX 8 1 AD508F MUX 8 1 AD508F 10 M 68 k 47 k 5V 5V 10 M 68 k 47 k 5V 5V In0 AGND 12V 12V 12V 12V 5V 5V 5V 5V 5V 10 k 5V 5V OP213 1 2 10 k 5V 5V OP213 1 2 ...

Страница 220: ...ion 1 1 2 or higher FasTrak version 2 0 2 or higher The leftmost SM Module has number 0 assigned to it a far as programming is concerned although physically this is slot 1 Before a library function can be used the function SMADCInit must first be called This allocates the requested resources Furthermore this function needs to be called for each SM THERM module called within the task Upon completio...

Страница 221: ... and SM THERM modules Initialization To start the HW Task the OS 9 module adc_task must be loaded then the function SMADCInit must be called To read data from a channel the type of sensor attached to it must be known The PEP header file BSP SMART SMADC DEFS smadc h contains a list of sensors that are supported To set the sensor type the function SMADCSetSensorType needs to be called Read RAW Data ...

Страница 222: ... to execute a calibration cycle by calling either SMADCCalibrate for one calibration or SMADCSetCyclicCalib Then a calibration is executed if a user defined interval has expired Deinitialization If the task calling the SMADC library function finishes the function SMADCDeInit should be called by this task to free memory and resources otherwise tied up with the application Other Functions For more i...

Страница 223: ...rect operation of an SM THERM SMART Module Figure 5 3 8 1 SM THERM Programming Flow Diagram SMADCSetCyclicCalib for a channel Sleep 0 SMADCReadConverted for a channel Finished SMADCDeinit END START SMADCInit Install Signal Handler OS Intercept SMADCSetSensorType for a channel SMADCEnableRead for a channel SMADCEnableConversion for a channel SMADCSetSignal for a channel Yes No ...

Страница 224: ... advice on sensors not included in this list creates or links the data module for communication with HW task the module name is ADC_Data starts the task accessing the Hardware HW task prepares parameters depending on the used SM THERM module Input u_int8 PortNr Port number of module to initialize from 0 to 10 Output error_code SUCCESS E_MNF If wrong type of module or no module is fitted on the sel...

Страница 225: ... automatically when the module is initialised and may be called at any time if the sensor for example is moved to a different location with different temperature ranges All 4 channels of the module will be calibrated simultaneously Input u_int8 PortNr Port number of module to calibrate from 0 to 10 Output error_code SUCCESS E_MNF If wrong type of module or no module is fitted on the selected port ...

Страница 226: ...tween two calibration cycles in seconds If secs 0 then cyclic calibration is disabled Input u_int8 PortNr Port number of module for calibration from 0 to 10 u_int16 secs Time in seconds between two calibration cycles Output error_code SUCCESS E_MNF If wrong type of module or no module is fitted on the selected port or standard OS 9 error code refer to the OS 9 Technical Manual Error Codes Section ...
Страница 227: ... mode to their default values for the type of sensor connected Input u_int8 PortNr Port number om module to set from 0 to 10 u_int8 channel Number of specified channel 0 to 3 u_int16 sensorCode Code of the sensor a list of PEP defined sensor types can be found in the file linear h Output error_code SUCCESS E_MNF If wrong type of module or no module is fitted on the selected port E_PARAM If wrong c...

Страница 228: ...user defined buffer The user has to take care that there is enough place to store the data A list of PEP supported sensor types can be found in the file linear h Input u_int8 PortNr Port number from which to fetch sensor type from 0 to 10 u_int8 channel Number of specified channel 0 to 3 u_int16 pBuffer Pointer to a user defined buffer Output error_code SUCCESS E_MNF If wrong type of module or no ...

Страница 229: ...es are defined in the file smadc h Note that large preci sion filter values cause longer AD conversion times Input u_int8 PortNr Port number to set precision from 0 to 10 u_int8 channel Number of specified channel 0 to 3 u_int8 precision Resolution of ADC filter value Output error_code SUCCESS E_MNF If wrong type of module or no module is fitted on the selected port E_PARAM If wrong channel number...

Страница 230: ...e AD Converter and stores the value in a user defined buffer The user has to take care that there is enough space to store the data Input u_int8 PortNr Port number from which to get data from 0 to 10 u_int8 channel Number of specified channel 0 to 3 u_int16 pBuffer Pointer to a user defined buffer Output error_code SUCCESS E_MNF If wrong type of module or no module is fitted on the selected port E...

Страница 231: ...e mode of the AD Converter The valid values BIPOLAR UNIPOLAR are defined in the file smadc h Input u_int8 PortNr Port number to set mode 0 to 10 u_int8 channel Number of specified channel 0 to 3 u_int8 mode Mode of ADC BIPOLAR or UNIPOLAR Output error_code SUCCESS E_MNF If wrong type of module or no module is fitted on the selected port E_PARAM If wrong channel number is specified E_BMODE Illegal ...

Страница 232: ...hannel and stores the value in a user defined buffer The user has to take care that the buffer is large enough to store the data Input u_int8 PortNr Port number to fetch the mode 0 to 10 u_int8 channel Number of specified channel 0 to 3 u_int8 pBuffer Pointer to a user defined buffer Output error_code SUCCESS E_MNF If wrong type of module or no module is fitted on the selected port E_PARAM If wron...

Страница 233: ... sigCode is set to 0 no signal will be sent disable sending of signals Input u_int8 PortNr Port number of SM THERM to set the signal from 0 to 10 u_int8 channel Number of specified channel 0 to 3 process_id procID ID of the process to send the signal to signal_code sigCode Signal code to be sent Output error_code SUCCESS E_MNF If wrong type of module or no module is fitted on the selected port E_P...

Страница 234: ...n the file smadc h The default values for the attached sensor are substituted here when the sensor type is selected Input u_int8 PortNr Port number to set gain from 0 to 10 u_int8 channel Number of specified channel 0 to 3 u_int8 gain Value of gain amplifier 0 to 7 for gain factors from 1 to 128 Output error_code SUCCESS E_MNF If wrong type of module or no module is fitted on the selected port E_P...

Страница 235: ... and stores the value in a user defined buffer where the user has to take care that the buffer is large enough to store the data Input u_int8 PortNr Port number to fetch the gain setting from 0 to 10 u_int8 channel Number of specified channel 0 to 3 u_int8 pBuffer Pointer to an user defined buffer Output error_code SUCCESS E_MNF If wrong type of module or no module is fitted on the selected port E...

Страница 236: ...odule If the flag enable is TRUE 0 then cyclic ADConversion is executed else enable FALSE and cyclic conversion is disabled The function invalidates RAW and Converted data within the data module Input u_int8 PortNr Port number to enable the reading function from 0 to 10 u_int8 channel Number of specified channel 0 to 3 BOOLEAN enable Flag for enabling or disabling reading of the specified channel ...

Страница 237: ...ecuted else if enable FALSE no conversion takes place The function invalidates converted data if enable is set to FALSE Input u_int8 PortNr Port number to enable data conversion from 0 to 10 u_int8 channel Number of specified channel 0 to 3 BOOLEAN enable Flag for enabling or disabling conversion of raw values Output error_code SUCCESS E_MNF If wrong type of module or no module is fitted on the se...

Страница 238: ...fer The user has to take care that the buffer is large enough to store the data Input u_int8 PortNr Port number from which raw data is to be read from 0 to 10 u_int8 channel Number of the channel to be read 0 to 3 u_int16 pBuffer Pointer to a user defined buffer Output error_code SUCCESS E_MNF If wrong type of module or no module is fitted on the selected port E_PARAM If wrong channel number is sp...

Страница 239: ...ffer is large enough to store the data Input u_int8 PortNr Port number from which the input is read from 0 to 10 u_int8 channel Number of the channel to be read 0 to 3 double pBuffer Pointer to a user defined buffer Output error_code SUCCESS E_MNF If wrong type of module or no module is fitted on the selected port E_PARAM If wrong channel number is specified E_NOTRDY If no data is available at the...

Страница 240: ...yntax error_code SMADCDeinit u_int8 PortNr Description This function frees the resources attached to this module if it was initialized Input u_int8 PortNr Number of the port to de initialize Output error_code SUCCESS or standard OS 9 error code refer to the OS 9 Technical Manual Error Codes Section Example RetVal SMADCDeinit 0 ...

Страница 241: ... at which this particular board is residing Remember this logical address is the same as the physical slot position In the example shown here the board being addressed is in slot 3 i e the third of the SMART BASE slots Up to 11 slots are catered for in the SMART I O concept 3 on the SMART BASE and 2 for each connected SMART EXT up to a total of 4 Module Specific Information calib_period This is th...

Страница 242: ... selected COMMAND parameter Each SMART Module possesses its own set of these COMMANDS Example error code OPERATE channel O_INIT_CODE 0 O_INIT_CODE is one of a number of distinct commands recognized by the PEP Modular Computers implementation of board drivers and checks for example that the board is located where the program expects it to be channel provides channel specific information and in the ...

Страница 243: ...f a connected SM THERM module The syntax is as follows analog var OPERATE iovar O_ENABLE_CONV 0 where analog var represents the analog return variable and can be zero if the operate call is supported and the correct iovar is passed or non zero if an error occurred iovar is the variable name for the channel where the operate call is to take effect O_DISABLE_CONV This operate call tells ISaGRAF to d...

Страница 244: ...SMART I O User s Manual March 12 1996 1996 PEP Modular Computers GmbH Page 5 88 Chapter 5 Analog Modules This page has been left blank intentionally ...

Страница 245: ...ent input 0 20mA is also available 5 4 2 Specifications The conversion time applies per channel Isolation 1 0 kV Optoisolated from the system Input 6 Differential Inputs Input Range 10V 0 20mA 12 bit ADC with 1 bit non linearity 10 bit Repeating Accuracy Overvoltage Protection 35V Input Impedance approx 440kΩ 124Ω 10kHz Filter On Chip Ref Voltage 13µs Conversion Time 1MHz SCLK EEPROM 256 Byte seri...

Страница 246: ...ers GmbH Page 5 90 Chapter 5 Analog Modules 5 4 3 Front Panel Layout Red LEDs User Descriptor Fields 5 4 4 Board Overview Component Side 2 16 BU1 BU2 LED 0 LED 1 Multiplexers EEPROM Optocouplers DC DC ADC J4 Optocouplers Logic 1 15 2 16 1 15 Impedance Converter J2 ...

Страница 247: ...R C first order low pass filter to prevent noise and signals greater than 10kHz from entering the system a 1 6 channel multiplexer followed by a differential amplifier divider and a 12 bit fast analog to digital converter ADC Figure 5 4 5 1 SM ADC1 Input Shematic Diagram The ADC using successive approximation and input track and hold is referenced by its own on chip voltage source supplying 4 096V...

Страница 248: ...DC operation 5 4 7 Pinouts Screw Terminal Pinouts The following shows the pinout signal relationship for the SM ADC1 when connected to a particular screw terminal block Pin 1 Pin 2 Pin 13 Pin 14 Pin Nr Signal Description Pin Nr Signal Description 1 IN0 Analog Input Ch 0 2 IN3 Analog Input Ch 3 3 IN0 Analog Input Ch 0 4 IN3 Analog Input Ch 3 5 AGND Analog GND 6 AGND Analog GND 7 IN1 Analog Input Ch...

Страница 249: ...s Connection Input Circuit Vcc 24V Gnd 0V Pin 1 Pin 2 Pin 13 Pin 14 Analog Sensors IN0P IN3P IN0N IN3N IN1P IN4P IN1N IN4N AGND AGND IN2P IN5P IN2N IN5N IN0N MAX358 4 7 k IN0P AGND 15V 15V 15V 1 k 15V MAX427 MUX 1 8 4 7 k 1 nF 220 k 220 k 220 k 220 k MAX191 5V 5V ADC 3 9 k MAX358 MUX 1 8 J4 1k68 15V 15V 124 ...

Страница 250: ...ersion 1 1 2 or higher FasTrak 2 0 2 or higher The leftmost SM Module has number 0 assigned to it a far as programming is concerned although physically this is slot 1 Before a library function can be used the function SMADC1Init must first be called This allocates the requested resources Furthermore this function needs to be called for each SM ADC1 Module called within the task Upon completion of ...

Страница 251: ...D test the module s sub ID for the determination of bipolar or unipolar operation voltage current input reads the conversion table held in EEPROM allocates space for the fetched resources Input u_int8 PortNr Port number of module to initialise from 0 to 10 Output error_code SUCCESS or E_BMODE if wrong or no module E_MEMFUL if no memory resources available or standard OS 9 error code refer to the O...

Страница 252: ...nteger value Input u_int8 PortNr SM Port to be accessed u_int8 Channel Number of the ADC input channel to access 0 3 int16 pValue Pointer to the location where the conversion result will be stored Output error_code SUCCESS E_SEEK if module was not initialised E BMODE if the module is unknown or standard OS 9 error code refer to the OS 9 Technical Manual Error Codes Section Example RetVal SMADC1Get...

Страница 253: ...r value Input u_int8 PortNr SM Port to be accessed u_int8 Channel Number of the ADC input channel to access 0 3 int16 pValue Pointer to the location where the conversion result will be stored Output error_code SUCCESS E_SEEK if module was not initialised E BMODE if the module is unknown or standard OS 9 error code refer to the OS 9 Technical Manual Error Codes Section Example RetVal SMADC1GetV 0 2...

Страница 254: ...Description This function switches on one of the two LEDs fitted to the SM ADC1 Input u_int8 PortNr SM Port number to be accessed u_int8 LedNr Number of the LED to switch on 1 2 Output error_code SUCCESS E_SEEK if module was not initialised E BMODE if the module is unknown or standard OS 9 error code refer to the OS 9 Technical Manual Error Codes Section Example RetVal SMADC1SetLed 0 2 ...

Страница 255: ...Description This function switches off one of the two LEDs fitted to the SM ADC1 Input u_int8 PortNr SM Port number to be accessed u_int8 LedNr Number of the LED to switch off 1 2 Output error_code SUCCESS E_SEEK if module was not initialised E BMODE if the module is unknown or standard OS 9 error code refer to the OS 9 Technical Manual Error Codes Section Example RetVal SMADC1ClrLed 0 2 ...

Страница 256: ... This function deinitialises the SM ADC1 Module on the port PortNr by freeing the resources tied up with it and setting all outputs and inputs to zero Input u_int8 PortNr SM Port number to de initialise from 0 to 10 Output error_code SUCCESS E_SEEK if module not initialised or standard OS 9 error code refer to the OS 9 Technical Manual Error Codes Section Example RetVal SMADC1DeInit 0 ...

Страница 257: ... 1 1 Typical Screen Section for the SM ADC1 Module Logical Address The 6 inputs of this module may be clearly seen together with the logical address at which this particular board is residing Remember this logical address is the same as the physical slot position In the example shown here the board being addressed is in slot 3 i e the third of the SMART BASE slots Up to 11 slots are catered for in...

Страница 258: ...he selected COMMAND parameter Each SMART Module possesses its own set of these COMMANDS Example error code OPERATE channel O_INIT_CODE 0 O_INIT_CODE is one of a number of distinct commands recognized by the PEP Modular Computers implementation of board drivers and checks for example that the board is located where the program expects it to be channel provides channel specific information and in th...

Страница 259: ... of a connected SM ADC1 module The syntax is as follows analog var OPERATE iovar O_ENABLE_CONV 0 where analog var represents the analog return variable and can be zero if the operate call is supported and the correct iovar is passed or non zero if an error occurred iovar is the variable name for the channel where the operate call is to take effect O_DISABLE_CONV This operate call tells ISaGRAF to ...

Страница 260: ...rect iovar is passed or non zero if an error occurred iovar is the variable name for the channel where the operate call is to take effect var is not used O_DISABLE_LINE_CHECK This operate call allows the user to disable open loop checking on the current version of the SM ADC1 The syntax is as follows analog var OPERATE iovar O_DISABLE_LINE_CHECK var where analog var represents the analog return va...

Страница 261: ...ovar is passed or non zero if an error occurred iovar is the variable name for the channel where the operate call is to take effect var is the current value in mA and calculated using the following formula var 0xFFF0 mA 0x14 O_GET_LINE_STATE This operate call allows the user to check the line state on the current version of the SM ADC1 The syntax is as follows analog var OPERATE iovar O_GET_LINE_S...

Страница 262: ...SMART I O User s Manual October 01 1996 1996 PEP Modular Computers GmbH Page 5 106 Chapter 5 Analog Modules This page has been left blank intentionally ...

Страница 263: ...lable 5 5 2 Specifications The conversion time applies per channel for a full scale voltage swing of 10V 10V Isolation 1 0 kV Optoisolated from the system Output 2 6 Outputs Output Range 10V DC 0 20mA 12 bit DAC with 1 bit non linearity 11 bit Repeating Accuracy Glitch Free Power On Reset 2mA max output current voltage version 75µs Conversion Time 1MHz SCLK Ext Vcc 24V DC 10 20 EEPROM 256 Byte ser...

Страница 264: ...odular Computers GmbH Page 5 108 Chapter 5 Analog Modules 5 5 3 Front Panel Layout 5 5 4 Board Overview Component Side 2 16 BU1 BU2 LED 0 LED 1 DC DC Current Sense Circuitary Optocouplers 1 15 2 16 1 15 J2 D A Converters Red LEDs User Descriptor Fields ...

Страница 265: ...onal system isolation 5 5 5 1 Output Circuitry The output stage of the SM DAC1 comprises a fast D A converter followed by a software controlled switch that ensures the on board op amp remains inactive and produces 0V at it s output during power up The current version has an additional MOSFET after this op amp Figure 5 5 5 1 SM DAC1 Output Shematic Diagram The current version of this module utilize...

Страница 266: ...shows the pinout signal relationship for the SM DAC1 when connected to a particular screw terminal block Pin 1 Pin 2 Pin 13 Pin 14 Pin Nr Signal Description Pin Nr Signal Description 1 OUT0 Analog Output Ch 0 2 OUT3 Analog Output Ch 3 3 AGND Analog GND 4 AGND Analog GND 5 OUT1 Analog Output Ch 1 6 OUT4 Analog Output Ch 4 7 AGND Analog GND 8 AGND Analog GND 9 OUT2 Analog Output Ch 2 10 OUT5 Analog ...

Страница 267: ...er 01 1996 Page 5 111 5 Chapter 5 Analog Modules Connection Current Output Circuit Vcc 24V Gnd 0V Pin 1 Pin 2 Pin 13 Pin 14 Analog Sensors OUT0 OUT4 OUT2 AGND OUT3 AGND OUT1 AGND OUT5 AGND AGND AGND AGND AGND DAC 20k 2k7 1k 1k 24Ω AGND 0 20mA 1 4 DG413 1 2 LT1112 ...

Страница 268: ...er 01 1996 1996 PEP Modular Computers GmbH Page 5 112 Chapter 5 Analog Modules Voltage Output Circuit DAC 20k 20k GND 5k6 49k9 1 2 LT112 Software Controlled Switch 1 4 DG413 10V DC AGND 2 04V reference source for bipolar operation ...

Страница 269: ...k 2 0 2 or higher The leftmost SM Module has number 0 assigned to it a far as programming is concerned although physically this is slot 1 Before a library function can be used the function SMDAC1Init must first be called This allocates the requested resources and should be noted that it is not designed for multi tasking Furthermore this function needs to be called for each SM DAC1 Module called wi...

Страница 270: ...DAC1 Module on port PortNr and tests the module s ID reads the conversion table held in EEPROM allocates space for the fetched resources Input u_int8 PortNr Port number of module to initialise from 0 to 10 Output error_code SUCCESS or E_BMODE if wrong or no module E_MEMFUL if no memory resources available or standard OS 9 error code refer to the OS 9 Technical Manual Error Codes Section Example Re...

Страница 271: ...nel 0 connected and o k 101111 channel 4 connected and o k Input u_int8 PortNr SM Port to be accessed u_int8 pStatus Pointer to the location where the status is stored 0 line connected and o k 1 line below 4mA Output error_code SUCCESS E_SEEK if module was not initialised E BMODE if the module is unknown or standard OS 9 error code refer to the OS 9 Technical Manual Error Codes Section Example Ret...

Страница 272: ...as they are disconnected from the screw terminals by default This is the software control of the software switch shown in the schematics earlier in this section of the manual Input u_int8 PortNr SM Port to be accessed Output error_code SUCCESS E_SEEK if module was not initialised E BMODE if the module is unknown or standard OS 9 error code refer to the OS 9 Technical Manual Error Codes Section Exa...

Страница 273: ...s function places the module connected on Port PortNr in standby mode where the outputs are disconnected from the screw terminal block Input u_int8 PortNr SM Port number to be accessed Output error_code SUCCESS E_SEEK if module was not initialised E BMODE if the module is unknown or standard OS 9 error code refer to the OS 9 Technical Manual Error Codes Section Example RetVal SMDAC1StandBy 0 ...

Страница 274: ...lways be masked to a 12 bit value Input u_int8 PortNr SM Port number to be accessed u_int8 Channel Number of the DAC output channel to access 0 5 u_int16 Value Value to be written Output error_code SUCCESS E_SEEK if module was not initialized E BMODE if the module is unknown or standard OS 9 error code refer to the OS 9 Technical Manual Error Codes Section Example RetVal SMDAC1PutVRaw 0 1 0x0FFF V...

Страница 275: ...d or not Hence if a user defined table exists then this will be used otherwise the default factory set table will be used Input u_int8 PortNr SM Port number to be accessed u_int8 Channel Number of the DAC output channel to access 0 5 int16 Value Value to be written Output error_code SUCCESS E_SEEK if module was not initialized E BMODE if the module is unknown or standard OS 9 error code refer to t...

Страница 276: ...Description This function switches on one of the two LEDs fitted to the SM DAC1 Input u_int8 PortNr SM Port number to be accessed u_int8 LedNr Number of the LED to switch on 1 2 Output error_code SUCCESS E_SEEK if module was not initialized E BMODE if the module is unknown or standard OS 9 error code refer to the OS 9 Technical Manual Error Codes Section Example RetVal SMDAC1SetLed 0 2 ...

Страница 277: ...Description This function switches off one of the two LEDs fitted to the SM DAC1 Input u_int8 PortNr SM Port number to be accessed u_int8 LedNr Number of the LED to switch off 1 2 Output error_code SUCCESS E_SEEK if module was not initialized E BMODE if the module is unknown or standard OS 9 error code refer to the OS 9 Technical Manual Error Codes Section Example RetVal SMDAC1ClrLed 0 2 ...

Страница 278: ...cription This function deinitialises the SM DAC1 Module on the port PortNr by freeing the resources tied up with it and shuts down the outputs Input u_int8 PortNr SM Port number to de initialise from 0 to 10 Output error_code SUCCESS E_SEEK if module not initialised or standard OS 9 error code refer to the OS 9 Technical Manual Error Codes Section Example RetVal SMDAC1DeInit 0 ...

Страница 279: ...1 Typical Screen Section for the SM DAC1 Module Logical Address One of the outputs of this module may be clearly seen together with the logical address at which this particular board is residing Remember this logical address is the same as the physical slot position In the example shown here the board being addressed is in slot 3 i e the third of the SMART BASE slots Up to 11 slots are catered for...

Страница 280: ...he selected COMMAND parameter Each SMART Module possesses its own set of these COMMANDS Example error code OPERATE channel O_INIT_CODE 0 O_INIT_CODE is one of a number of distinct commands recognized by the PEP Modular Computers implementation of board drivers and checks for example that the board is located where the program expects it to be channel provides channel specific information and in th...

Страница 281: ...s as follows analog var OPERATE iovar O_SET_LED var where analog var represents the analog return variable and can be zero if the operate call is supported and the correct var is passed or non zero if an error occurred iovar represents any module variable and var represents the LED to be controlled and must be one of OA_LED1_ON OA_LED2_ON OA_LED1_OFF or OA_LED2_OFF O_ENABLE_CONV This operate calls...

Страница 282: ...he operate call is supported and the correct iovar is passed or non zero if an error occurred iovar is the variable name for the channel where the operate call is to take effect O_GET_LINE_STATE This operate call allows the user to check the line state on the current version of the SM DAC1 The syntax is as follows analog var OPERATE iovar O_GET_LINE_STATE var where analog var represents the analog...

Страница 283: ...SMART I O User s Manual 1996 PEP Modular Computers GmbH March 12 1996 Page 6 1 Chapter 6 Communications Modules 6 Communications Modules for SMART I O ...

Страница 284: ...GRAF Board Parameters 6 10 6 1 8 2 The ISaGRAF Operate Calls 6 12 6 1 9 OS 9 Programming 6 14 6 2 SM SSI 6 17 6 2 1 Introduction 6 17 6 2 2 Specifications 6 17 6 2 3 Front Panel Layout 6 18 6 2 4 Board Overview 6 18 6 2 5 Functional Description 6 19 6 2 6 SSI Operation 6 20 6 2 7 Register Description 6 22 6 2 7 1 Control Register 6 22 6 2 7 2 CTRL1 Register 6 23 6 2 7 3 CTRL2 Register 6 23 6 2 7 4...

Страница 285: ...Sensors 6 26 6 2 10 Configuration 6 27 6 2 11 Pinouts 6 27 6 2 12 C Programming 6 29 6 2 12 1 SM SSI Library 6 29 6 2 12 2 SMSSIInit 6 30 6 2 12 3 SMSSIDeInit 6 31 6 2 12 4 SMSSISetSetPoint 6 32 6 2 12 5 SMSSISetCtrlReg 6 33 6 2 12 6 SMSSIGetStatus 6 34 6 2 12 7 SMSSIGetData 6 35 6 2 13 ISaGRAF Programming 6 36 6 2 13 1 The ISaGRAF Board Parameters 6 36 ...

Страница 286: ...SMART I O User s Manual March 12 1996 1996 PEP Modular Computers GmbH Page 6 4 Chapter 6 Communications Modules This page has been left blank intentionally ...

Страница 287: ...dled directly by the SCC3 port of the 68302 chip on the SMART BASE hence this module can only be used in the first slot of the SMART BASE as this is the only slot where the CPU port lines can be used serially Two LEDs showing data transmission provide the user interface 6 1 2 Specifications CTS DTR lines are NOT supported by PEP standard software XON XOFF software protocol is used instead 6 Commun...

Страница 288: ...ers GmbH Page 6 6 Chapter 6 Communications Modules 6 1 3 Front Panel Layout 6 1 4 Board Overview Component Side SM RS232 1 Serial Interface Green LED Yellow LED TxD RxD User Descriptor Fields 2 16 BU1 BU2 LED 0 LED 1 EEPROM Inverter J1 Transceiver 1 15 2 16 1 15 ...

Страница 289: ...eated with the CTS line being con nected to the interrupt line that is routed to the I O controller of the SMART BASE Although it is beyond the scope of this manual to discuss this con nection PEP Modular Computers can provide advice on its implementation if required The two LEDs on the front panel indicate the status of the RxD and TxD lines ON means that the line is low An on board serial EEPROM...

Страница 290: ...7 CTS Clear to Send 8 N C No Connection 9 N C No Connection 10 N C No Connection 11 N C No Connection 12 N C No Connection 13 GND Ground 14 GND Ground Pin 1 Pin 2 Pin 13 Pin 14 6 1 7 Pinouts Screw Terminal Pinouts The following shows the pinout signal relationship for the SM RS232 when connected to a particular screw terminal block 6 1 6 Configuration Jumper J1 EEPROM Protection Jumper Settings De...

Страница 291: ...r s Manual 1996 PEP Modular Computers GmbH March 12 1996 Page 6 9 Chapter 6 Communications Modules 6 Connection TxD RxD DTR CTS GND Interface DTR MAX232A RxD GND Vcc TxD CTS Connector User Interface System Interface ...

Страница 292: ...icular module is accessed over an OS 9 device descriptor and driver which are already present in EPROM on the SMART BASE Because the SM RS232 module can only occupy the first slot on the SMART BASE the descriptor is able to access the module directly without the need of a manu ally entered logical address Module Specific Information dev_file_name This must be set to scc3 dev_mod_name This must be ...

Страница 293: ...for 1 stop bit 1 for 1 5 stop bits or 2 for 2 stop bits parity The parity bit of a data string may be 0 for no parity 1 for odd parity or 2 for even parity baud_rate The board rates supported by the SM RS232 are standard values up to 19200 baud xon_char XON character typically set to 11 hex xoff_char XOFF character typically set to 13 hex eor_char Character to be used to detect the end of record i...

Страница 294: ... the selected COMMAND parameter Each SMART Module possesses its own set of these COMMANDS Example error code OPERATE channel O_INIT_CODE 0 O_INIT_CODE is one of a number of distinct commands recognized by the PEP Modular Computers implementation of board drivers and checks for example that the board is located where the program expects it to be channel provides channel specific information and in ...

Страница 295: ... explained O_SERIAL_READ This operate call prevents the system from being blocked due to polling of incoming characters Hence during every ISaGRAF cycle the program checks if the buffer for incoming data contains data If so the data will be collected The syntax is as follows chars_in OPERATE ser_in O_SERIAL_READ chars where chars_in represents the actual number of characters read from the buffer s...

Страница 296: ...efore as follows From the prompt that is displayed under OS 9 copy the descriptor to the ramdisk thus save scc3 return change the revision number from 0 to 1 so that OS 9 selects the newest fixmod ua 8001 scc3 return Module scc3 Fixing header parity Fixing module CRC now load the new revision into memory i e a copy from the ramdisk load ld scc3 return load loaded scc3 delete the copy held on the r...

Страница 297: ...n check that the system has taken the parameters xmode scc3 return scc3 noupc bsp bsl echo if null 0 pause pag 24 bsp 08 del 18 eor 0D eof 1B reprint 04 dup 01 psc 17 abort 03 quit 05 bse 08 bell 07 type 00 baud 19200 xon 11 xoff 13 tabc 09 tabs 4 refer to the OS 9 help page for parameter descriptions by using the follow ing xmode return and finally initialise the device iniz scc3 return ...

Страница 298: ...SMART I O User s Manual March 12 1996 1996 PEP Modular Computers GmbH Page 6 16 Chapter 6 Communications Modules This page has been left blank intentionally ...

Страница 299: ...onfigurable RS422 type 2 optoisolated 24V DC digital inputs for common GND and End of Range switches with readback and IRQ support Output 2 optoisolated 24V DC 300mA digital outputs for Encoder Reset and Encoder Direction 1 optoisolated 24V DC 300mA digital output for Match SSI Interface None Even or Odd software configurable Data Parity Software configurable data bits parity encoder type Software...

Страница 300: ...r 6 Communications Modules 6 2 3 Front Panel Layout 6 2 4 Board Overview Component Side Red LEDs User Descriptor Fields 2 16 BU1 BU2 LED 0 LED 1 PROM Optocouplers 1 15 2 16 1 15 FPGA EEPROM X2 X1 Crystal J1 An option to install a 12 bit DAC on a special piggyback is reserved for future use ...

Страница 301: ...which further optimizes data security Simplicity in design with low conventional component count coupled with the inherent safety offered through accurate axis position reading even after power fail enable this compact module to be utilized for equipment operat ing even in extreme environmental conditions SSI Interface Comparator Comp Value 24 bit Configuration Control Logic Status Board ID Last V...

Страница 302: ...rsion by the parallel serial converter The controller SM SSI demands the axis angle from the encoder which starts the SSI clock the number of clock pulses required is dependent on the data width 24 bits Figure 6 2 6 1 SM SSI Timing Diagram m Stored parallel data T SSI clock period td Delay time for the first clock G0 LSB of Gray code Gn MSB of Gray code tm Monoflop time Tp Pause time in SSI clock ...

Страница 303: ...ed With every successive LOW to HIGH transition of the SSI clock the next bit in the data stream is transferred this action continues until all the data bits have been transferred The SSI clock continually retriggers the monoflop forcing it s output to remain low and thereby preventing unwanted data from being processed When the controller SM SSI has received the LSB of the data stream it stops th...

Страница 304: ...ta Register is read 256 bytes of serial EEPROM contain the module ID number and production data although and further space has been allocated for future use 6 2 7 1 Control Register The 24 bit control register is divided into three sub registers which are cleared after a power on reset and control FDL Format Data Length AR Automatic Reading Mode P Parity Enable Disable RST Encoder Reset Control EN...

Страница 305: ...ar 1 0 Reset output 6 2 7 3 CTRL2 Register FDL0 4 number of data bits excluding parity minus 1 P enable disable 1 0 use of parity encoder dependent CF1 0 data transmission frequency 0 0 62 5 kHz 1 0 125 kHz 0 1 250 kHz 1 1 500 kHz 6 2 7 4 CTRL3 Register CM A logical 1 clears the MATCH output and LED DT data type 0 Gray 1 Binary according to encoder type If 0 is set the result in the data register ...

Страница 306: ...eset and show IP Interrupt Pending flags DF Data Flow PE Parity Error ER1 End of Range 1 TC Transmission Complete ER2 End of Range 2 OL Open Line MH Match IP PE TC OL DF and MH flags are cleared after a reset ER1 and ER2 represent the current hardware condition 6 2 7 8 STAT1 Register IP0 PE interrupt pending on parity error IP1 TC interrupt pending on transmission complete IP2 ER1 interrupt pendin...

Страница 307: ...oders with less than 24 bit data the result is always aligned from the lowest significant bit and the used upper bits are always cleared Note Interrupt pending flags IP0 IP4 are set by the interrupt source if the corresponding line is not masked in the CTRL1 register All flags are cleared when the STAT1 register is read Note The MH flag is set internally as soon as the encoder reaches the preset r...

Страница 308: ... the comparator output as follows When counting up MATCH is set when A passes from A B to A B When counting down MATCH is set when A passes from A B to A B 6 2 9 Tested Sensors The sensors from the following manufacturers have been tested in conjunc tion with the SM SSI in an SSI environment and conform to the high stand ards set by PEP Modular Computers Hohner SSI AVM 10 10 Multi turn axial 24 bi...

Страница 309: ...en connected to a particular screw terminal block Pin 1 Pin 2 Pin 13 Pin 14 Jumper Settings Description J1 set EEPROM is not hardware write protected open EEPROM is hardware write protected Pin Nr Signal Description Pin Nr Signal Description 1 CLK SSI Clock 2 CLOCK SSI Clock 3 DATA SSI Data 4 DATA SSI Data 5 COM Common 6 MATCH Match 7 RESET Encoder Reset 8 DIR Direction 9 EORC EOR Common 10 GND Gr...

Страница 310: ...ions Modules Connection Input Circuit Vcc 24V Gnd 0V Pin 1 Pin 2 Pin 13 Pin 14 CLK CLK DATA DATA RESET DIR EORC EOR1 EOR2 COM MATCH GND Shift SO Si Driver Monoflop Input Switch Clock Serial Data Parallel Data Photo Receiver Photo Transmitter Encoder Wheel Schmitt Trigger Parallel Serial Converter SM SSI ...

Страница 311: ...ltra C Version 1 1 2 or higher FasTrak 2 02 or higher The leftmost SM Module has number 0 assigned to it a far as programming is concerned although physically this is slot 1 Before a library function can be used the function SMSSIInit must first be called This allocates the requested resources Furthermore this function needs to be called for each SM SSI Module called within the task Upon completio...

Страница 312: ...Nr Description This function initializes the SM SSI Module on port PortNr resetting and clearing the status of registers and allocating resource memory Input u_int8 PortNr SM Port to initialize from 0 to 10 Output error_code SUCCESS E_BMODE if the module is unknown or standard OS 9 error code refer to the OS 9 Technical Manual Error Codes Section Example RetVal SMSSIInit 0 ...

Страница 313: ...nt8 PortNr Description This function deinitializes the SM SSI Module on the port PortNr by freeing the resources tied up with this module Input u_int8 PortNr SM Port number to de initialize from 0 to 10 Output error_code SUCCESS E_BMODE if the module is unknown or standard OS 9 error code refer to the OS 9 Technical Manual Error Codes Section Example RetVal SMSSIDeInit 0 ...

Страница 314: ...er which will only be sent to the SM SSI when the function SMSSISetCtrlReg is called This function is used to set the preset value for the comparator if testing for a match Input u_int8 PortNr Number of the SM port to set u_int32 Setpoint Value of the comparator register 0x0 0xFFFFFF 24 bit Output error_code SUCCESS E_BMODE if the module is unknown or standard OS 9 error code refer to the OS 9 Tec...

Страница 315: ...multane ously the contents of the data register holding the last value is read back to the address pointed to by pData Input u_int8 PortNr SM Port number to send register 0 to 10 long CntrlReg1 Control register 1 value 0x0 0xFF long CntrlReg2 Control register 2 value 0x0 0xFF long CntrlReg3 Control register 3 value 0x0 0xFF u_int32 pData Pointer to the value returned from the data register 0x0 0xF...

Страница 316: ... reads the status of the module selected on port PortNr Input u_int8 PortNr SM Port number to get status u_int8 pStatus1 Pointer to the value read in the status register 1 0x0 0xFF u_int8 pStatus2 Pointer to the value read in the status register 2 0x0 0xFF Output error_code SUCCESS E_BMODE if the module is unknown or standard OS 9 error code refer to the OS 9 Technical Manual Error Codes Section E...

Страница 317: ... from the SM SSI If auto matic mode is selected then a wait will not be performed otherwise SOT will be set and the read performed only when TC has been set Input u_int8 PortNr SM Port number to get data u_int32 pData Pointer to the value returned from the data register 0x0 FFFFFF Output error_code SUCCESS E_BMODE if the module is unknown or standard OS 9 error code refer to the OS 9 Technical Man...

Страница 318: ...f the SM SSI Module Command One of FB_SSI_INIT This is the command that must be executed to initialize the module before operating the SSI interface normally at the beginning of an ISaGRAF program cycle Also prior to using this call if the ctrlx variables have been defined with a value then these will be sent to the SM SSI Module FB_SSI_SETPOINT This gives the user the possibility to enter a value...

Страница 319: ...indicated on the right hand side setpoint This is the register which contains the value of the setpoint which is sent to the SSI module with the Command statement port The port register is used for setting the port number of the attached SM SSI Module ctrx The control register elements for a description of the register please refer to the relevant section appearing earlier error If an error occurs...

Страница 320: ...SMART I O User s Manual October 01 1996 1996 PEP Modular Computers GmbH Page 6 38 Chapter 6 Communications Modules This page has been left blank intentionally ...

Отзывы: