background image

43856301TH  Rev.3 

58 /

Oki  Data  CONFIDENTIAL

3. Set up

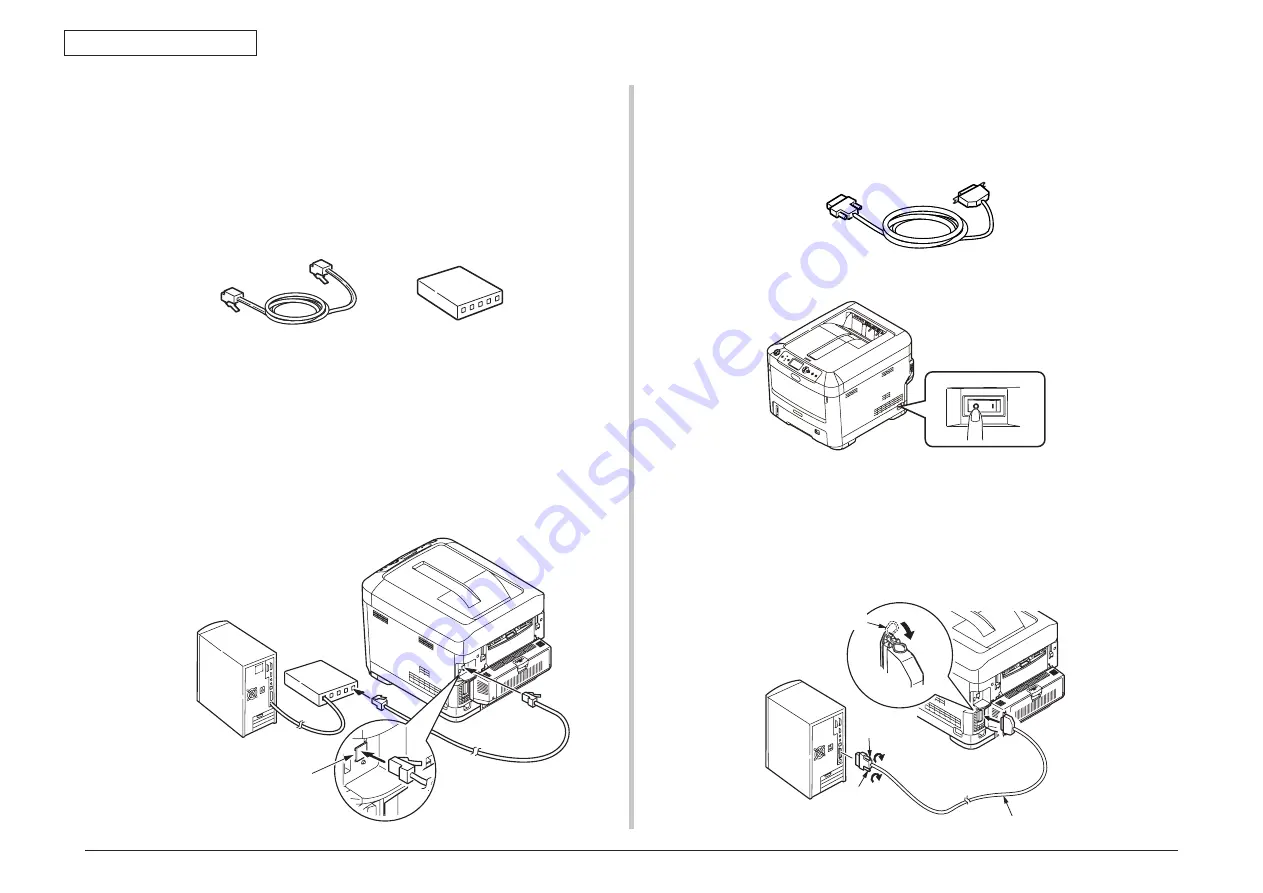
< Ethernet cable connection>

Note!

  Refer to user’s manual for operation environment.

Prepare for Ethernet cable

Note!

  The Ethernet cable and Hub is not included in printer.


Provide the Ethernet cable and Hub for special user.

Network interface

connector

Turn the printer and computer OFF.

Connect the computer to the printer.

(1) Insert the Ethernet cable into the network interface connector of printer.
(2) Insert the Ethernet cable into Hub.

Memo

 Refer to user’s manual for setup of printer driver.

<Ethernet cabl>

<Hub>

< Parallel connection>

Prepare for Ethernet cable

Note!

  The parallel cable is not included in printer. Provide it for special user.

Turn the printer and computer OFF.

Connect the computer to the printer.

(1)  Insert the parallel cable into the parallel interface connector of printer, and Lock 

it firmly by metal fittings.

(2)  Insert the parallel cable into the parallel interface connector of computer, and fix 

it firmly with screws.

Parallel cable

Screw

Screw

Metal fittings

O

I

Содержание C710

Страница 1: ...Maintenance Manual 072710C C710 MPS710...

Страница 2: ...other manufacturers and referred to in this guide will not affect the applicability of the information in it Mention of software products manufactured by other companies does not necessarily constitut...

Страница 3: ...orrected items Person in charge No Page Description of change 1 2008 05 07 Issue CSFP11 N Sunaga 2 2008 11 25 61 73 Addition of Warning etc EP5 T Sugiyama 3 2009 01 09 Drawing Maintenance EP5 Y Fujisa...

Страница 4: ...evised and updated at any time without notice Unexpected mistakes may exist in the manual OKI will not assume any responsibility whatsoever for damage to the equipmentrepaired adjusted changed by the...

Страница 5: ...sembling method 37 3 5 1 Assemble the main body of the printer 37 3 5 2 Cable connect 43 3 5 3 Optional part installation and confirmation 45 3 6 Setting content print Configuration 56 3 7 Connecting...

Страница 6: ...ontrol manual setting 116 5 6 Printer boot menu list 117 6 Periodic Maintenance 118 6 1 Cleaning 119 6 2 How to clean the LED lens array 120 6 3 How to clean the pickup roller 122 6 4 How to clean ins...

Страница 7: ...Oki Data CONFIDENTIAL 1 Configuration 1 1 System configuration 7 1 2 The Configuration of printer 8 1 3 Optional parts 9 1 4 Specifications 10 1 5 Specification of interface 13...

Страница 8: ...CB right Color blur PCB left Belt unit Fuse cut Fuser fuse Cut Upper center For correction Low thermistor Low voltage PCB FAN heater control others 5V 24V 0VL 0VP AC SW Heater power M HEAT ID cooling...

Страница 9: ...ation of printer Air flow Fig 1 2 The parts in the C710n are shown as below Electrophotography process mechanism Paper feed path Control part CU part PU part Operator panel Power part High voltage par...

Страница 10: ...AL 1 Configuration 1 3 Optional parts The optional parts for this printer are shown as below 1 Optional tray second tray third tray 2 Duplex Unit 3 Optional memory 4 Built in hard disk Standard built...

Страница 11: ...onsumption Input power supply 120V 110 127VAC 10 230V 220 240VAC 10 Power save mode Less than 17W Idle 100W Average Usual operation 530W It differs from operating environment Peak 1200W Operating envi...

Страница 12: ...ound During operation 55 6dBA ISO 7779 front without option unit During standby 37dB ISO 7779 front Power save mode Background level Division Item Paper handling Paper stack capacity 1st tray Legal Un...

Страница 13: ...h Auto Emulation Standard PCL PCL5c HP GL PCL XL2 1 PostScript3 Clone Emulation switch Auto Font Bitmap Typeface Have Scalable font Have Rasterizer Have Barcode Have OCR Have Japanese PCL font Have Ja...

Страница 14: ...vice 1 5 1 2 Connector and cable of USB interface 1 Connector Printer side B Receptacle female Up stream port UBR24 4K5C00 made by ACON Equivalent goods Connector pins array 2 Cable The length of the...

Страница 15: ...m 8 files sever 32 queue For encrypted password when it is print sever mode NetWare6J 5J 4 1J NDS bindery SNMP EtherTalk ELAP AARP DDP AEP NBP ZIP RTMP ATP PAP IEEE802 1X EAP TLS PEAP 2 Cable Non shie...

Страница 16: ...ompletion 11 Busy PtrBusy FROM PRINTER It is a signal that shows if the printer is receiving the data Data cannot be received when it is at the high level 12 PError AckDataReq FROM PRINTER The paper e...

Страница 17: ...Oki Data CONFIDENTIAL 2 Operating instructions 2 1 Electrophotographic processing mechanism 17 2 2 Printing process 21...

Страница 18: ...ated on the back of the paper by transfer roller the toner image is transcribed to the paper 5 Fusing Heat and pressure are applied to the toner image on the paper in order to make it fusing 6 Drum cl...

Страница 19: ...rum surface is visualized by toner 5 Transfer The paper is overlapped on the surface of the OPC drum and the electricity is generated on the back of the paper by transfer roller When high voltage is i...

Страница 20: ...e of backup roller is used for controlling the fusing temperature under specified conditions Furthermore a thermostat is used to limit the temperature rise if the temperature rise of heat roller excee...

Страница 21: ...ng instructions 9 Belt cleaning The toner left on the transport belt is cleaned up by the belt cleaning blade and all residual toner is collected in the waste toner box of the transport belt unit Belt...

Страница 22: ...g is described as above The operation of duplex printing is described as below As for the duplex print the paper passed the fuse unit after initially back printing is drawn into the Duplex unit by sep...

Страница 23: ...WR sensor Solenoid lever Solenoid ON Solenoid lever Solenoid OFF Hopping gear Assy IN2 sensor IN2 sensor IN1 sensor IN1 sensor Figure 2 1 Figure 2 2 Resist roller U Stop Paper Paper Paper feeding mot...

Страница 24: ...a transfer roller is set over under each color drum The belt is caught and installed between the transfer roller and drum As for the transport belt and transfer roller if the specified voltage is imp...

Страница 25: ...7 shows the operation of each ID unit when mono printing When the liftup motor is rotated clockwise the liftup link slides to right and each ID unit except K ID unit is in UP condition as shown in Fi...

Страница 26: ...very roller rotates 6 Cover open operation of color blur sensor and density sensor 1 As shown in Fig 2 9 when the fuse motor is rotated clockwise the cover open gear is operated and the cover of color...

Страница 27: ...n more than 400 copies are printed or when more than 6 hours have elapsed since the last print The amount of toner of the pattern the toner left on the sensor and the open close trouble of the shutter...

Страница 28: ...n the open and close operation is in trouble If there are no problems in check 1 2 and 3 please check the circuit Please exchange the color adjust sensor PCB relay PCB PU PCB and the cable one by one...

Страница 29: ...t from last operation When one or more UD is replaced with the new ID When the belt is replaced with the new belt When toner cartridge is replace due to Toner Low or Toner Empty so that Toner Low or T...

Страница 30: ...etected by the toner sensor reflect sensor installed in the equipment The light board is installed in ID and its rotation is synchronized with the mixing of toner Moreover the shutter is installed in...

Страница 31: ...mmed Cannot count when paper feeding hopping jam and feed jam are occurred It can count except the above mentioned jam As total printed page number is counted up when the front end of the page passes...

Страница 32: ...Letter conversion table The paper is counted up as this sheet Paper size Simplex Duplex LETTER 1 2 EXECUTIVE 1 2 LEGAL14 1 2 LEGAL13 5 1 2 LEGAL13 1 2 A4 1 2 A5 1 2 A6 1 B5 1 2 COM 9 1 COM 10 1 MONARC...

Страница 33: ...tes and precautions 33 3 2 Unpack method 34 3 3 Setting method 35 3 4 List of equipments and accessories 36 3 5 Assembling method 37 3 6 Setting content print Configuration 56 3 7 Connecting method 57...

Страница 34: ...f the cover becomes abnormally hot smoke rises it smells strange or it sounds abnormal please pull out the power plug from the outlet and contact the customer center It may cause fire If the liquid su...

Страница 35: ...all sides 3 2 Unpack method Personal injuries may occur Because the weight of the printer is approximately 33kg in a state of packing it needs more than two adults to lift it up Take out the gripe on...

Страница 36: ...wet bulb temperature 25 Protect the printer from dew formation Use the humidifier or the static electricity prevention mats etc when setting the printer in the environment where the humidity is 30 or...

Страница 37: ...diately Personal injuries may occur Because the weight of the printer body is approximately 28kg 33kg in a state of packing it needs more than two adults to lift it up Image drum cartridge 1 Cyan 1 th...

Страница 38: ...Peel off the desiccant and the protection tape four places on the printer 2 Peel off the paper on the front of printer 3 Peel off the protection tape 2 places on the back of the printer 4 Confirm that...

Страница 39: ...of the printer 7 Press down the OPEN button and open the top cover 8 Remove the stopper orange when pressing down the lever of the fuser unit blue in the direction of arrow Note If you do not use the...

Страница 40: ...light about 1500 lux And do not expose it to room light for more than 5 minutes 2 Put the image drum cartridge on the newspaper etc peel off the tape of protection sheet 1 and pull it out in the dire...

Страница 41: ...image drum cartridge back to the printer 6 Close the top cover Note If the message of please exchange the toner on the control panel doesn t disappear indefinitely please make sure that the lever of t...

Страница 42: ...an the mark on the paper guide 530 pieces for 70kg paper mark Paper guide Place the printed side facing down Paper size dial Paper set direction Set the paper into the paper cassette 1 Pull out the pa...

Страница 43: ...k and forth Straighten the edges on a level surface 4 Place the printed side facing up and insert the paper along the manual insertion guide straightly until bumping up 5 Press down the set button Mul...

Страница 44: ...damaged power supply cord Do not use a multiple outlet extension cord Please connect this printer into an outlet different from that to which other electric products is connected Especially the opera...

Страница 45: ...the power shutdown completely is displayed press down the power switch to OFF When you do not use the printer for long time Please explain to the customer about the following items Unplug the power c...

Страница 46: ...ff with following the procedure in chapter 3 5 2 Turn the power off Notes If you turn off the power without properly shutting down it may cause damage to the printer Please operate the shutdown menu I...

Страница 47: ...indows PS printer driver For Windows XP For Windows Vista click on start control panel printer For Windows XP click on start control panel printer and other hardware printers and Faxes For WindowsServ...

Страница 48: ...inter Utility to reset desktop printer If desktop printer is reset the setting should also be updated Memo Please refer to desktop printer setup of Set up for USB connection in Macintosh in user s man...

Страница 49: ...power and disconnecting the power cord Note If an expansion memory is installed with the power switched ON the printer may be broken 2 2 Peeling the protective tapes off the duplex unit 2 3 Install Du...

Страница 50: ...memory Type name Memory capacity Total memory capacity None Standard 256MB 256MB MEM256E 256MB 512MB MEM512C 512MB 768MB 3 1 Turn the power of printer off and pull out the power cord Turn off the powe...

Страница 51: ...he side cover to lift Notes Do not touch any electrical parts and terminals of connectors Be careful to install the memory in the proper direction A notch on the terminal of the memory is matched to t...

Страница 52: ...mory of System part Note If total memory capacity displayed in Total Memory is incorrect please reinstall the memory 3 7 Print the setting content and confirm if the optional memory is installed prope...

Страница 53: ...down menu It may cause damage to the printer if you install the optional memory with power ON 4 2 Open the top cover and front cover Open the multi purpose tray Press down the OPEN button and open the...

Страница 54: ...er 3 6 Confirm the built in hard disk capacity displayed in HDD Memo The capacity of built in hard disk might be different from the example of the above figure Note Please reinstall the built in hard...

Страница 55: ...e the Properties Choose get information from printer from installable options in Device options tab and click setup or get information from printer For USB connection set Hard disk as Install manually...

Страница 56: ...rk connection Double click Applications for hard disk utility print setting utility Applications Utility print center in Mac OS X Select C710 click Show info and open printer info Choose installable o...

Страница 57: ...button for several times so that printer Information is displayed and press down the button 3 Press the button and select Configuration press down the setting button 4 Press down the button The settin...

Страница 58: ...USB cable of less than 2m Turn the printer and computer OFF Memo Although USB cable can plug and play with computer and printer power on after this the setup of printer driver and USB driver may be re...

Страница 59: ...rk interface connector of printer 2 Insert the Ethernet cable into Hub Memo Refer to user s manual for setup of printer driver Ethernet cabl Hub Parallel connection Prepare for Ethernet cable Note The...

Страница 60: ...4 Envelope 4 Label paper Less than 0 1 0 17mm Heavy Label paper Label paper1 0 17 0 2mm Ultra heavy1 Label paper2 Transparencies Transparency film Transparency film 1 The factory default setting of m...

Страница 61: ...e parts Please install the new parts with following the replacement procedure in reverse order The parts such as shown in this manual are different from the parts used in the Disassembly for Maintenan...

Страница 62: ...sily please fix them to the original position temporarily 7 Do not use gloves that may cause static electricity easily when handling IC and the circuit board such as microprocessor ROM and RAM 8 Do no...

Страница 63: ...ation pliers 1 6 Handy cleaner the type corresponds to the toner 1 Refer to the following note 7 E Ring pliers 1 For E ring detaching Note Use the specified cleaner corresponding to the toner It may c...

Страница 64: ...es is described by the disassemble figures 4 2 1 Belt unit 1 Open the top cover 2 Remove the ID unit 3 Rotate the lock lever blue 2 places of the belt unit in the direction of arrow and hold the lever...

Страница 65: ...2 Push up the fix lever of fuser unit in the direction of arrow and remove the fuser unit Top cover Fix lever of fuser unit blue Fix lever of fuser unit blue 4 2 3 Left side cover 1 Open the top cove...

Страница 66: ...1 Open the top cover 2 Open the feeder unit 3 Loose the screw and remove the right side cover 4 2 5 Faceup tray 1 Draw out the duplex unit 2 Open the faceup tray in the direction of arrow and unlock...

Страница 67: ...h the lower side of the rear cover in the direction of B and disengage the claw C 3 places to remove the rear cover 4 2 7 LED Assy LED Assy spring 1 Open the top cover 2 After removing the cable as sh...

Страница 68: ...age the claw A to take the plate shield Assy PCL out 5 Remove the two screws silver and remove the HOST USB PCB by holding the tip of nylon stud with a pair of pliers 6 Remove the screw and disconnect...

Страница 69: ...roller PCB 1 Remove the plate shield Assy PCL See section 4 2 8 1 3 2 Remove all connectors and two screws silver to take the print engine controller PCB out DCHEAT RELAY POWER OPTION HVOLT BELIDUP CU...

Страница 70: ...ck full sensor cable Controller PCB ID Motor Cable DCHEAT RELAY POWER OPTION HVOLT BELIDUP CUIF IDFAN HOPSIZE FSNS PE STKFL RFID SSNS DCID OPE POWFAN HSOL 4 2 10 Top cover Assy 1 Remove the left side...

Страница 71: ...ssy See section 4 2 10 2 Remove ten screws Black and remove the top cover 4 2 12 Control panel Assy 1 Open the top cover 2 Insert the minus driver into the upper side of the slit 3 places to disengage...

Страница 72: ...AL 4 Component replacement 4 2 13 Board PRG LCD 1 Remove the control panel Assy See section 4 2 12 2 Remove the screws 2 places remove the connector and cable of LCD and remove the Board PRG 3 Remove...

Страница 73: ...sy 1 Open the top cover 2 Open the feeder unit 3 Remove the right side cover See section 4 2 4 4 Remove the plate shield Assy See section 4 2 8 3 5 Remove the connector of frame panel Assy and remove...

Страница 74: ...move the 3 or 4 screws silver and connector and take the fuse motor out 10 Remove the three screws silver and connector and take the ID motor out Notes Be careful to install the low voltage FAN in the...

Страница 75: ...ee section 4 2 8 4 2 9 4 2 15 3 3 Remove the connector of belt thermistor remove the two torsion springs and disengage four claws 4 places by minus driver remove the cover driver 4 Remove the screws s...

Страница 76: ...2 places and remove the cover open switch 5 Remove the 2 screws and connectors 2 places and disengage the claw B 7 places Remove the high voltage power supply Air Claw B Claw B Claw A Silver Black CN...

Страница 77: ...5 5 Disengage the claw and remove the cover sensor 6 Remove the connector and remove the Board RSF 7 Remove the MPT Assy See section 4 2 18 8 Rotate until the claw of lever is disengaged and remove it...

Страница 78: ...Fuser See section 4 2 17 8 Remove the latches 2 places and remove the gear remove the latch and remove the gear remove the gear of latch and remove the shaft 9 Remove the two screws silver and remove...

Страница 79: ...43856301TH Rev 3 78 Oki Data CONFIDENTIAL 4 Component replacement Side plate Assy 4 2 21 Feed roller 1 Remove the cassette 2 Remove the latch and remove the feed roller 2 pieces Latch...

Страница 80: ...t Assy FD Eject sensor 1 Remove the eject Assy See section 4 2 16 2 Disengage the claws 2 places and disassemble the Assy into guide eject lower and guide eject upper 3 Remove the gear idle eject and...

Страница 81: ...2 25 2 67 3 37 4 86 5 76 7 26 W This chapter shows the oiling spots Do not oil the other spots that are not shown here It is not necessary to inject the machine oil during disassembling However please...

Страница 82: ...th surfaces and end surfaces EM 30L Class C Gear bottom surfaces EM 30L Class A Sliding surfaces EM 30L Class A Posts EM 30L Class C End surfaces EM 30L Class A Both ended surfaces EM 30L Class A Both...

Страница 83: ...all around on the patching parts HP 300 Class B Spread a small amount of HP 300 all around on the patching parts Spring Planet Heat Holder Gear Planet Gear Idle Planet Z32 Gear Assy HP Gear Planet As...

Страница 84: ...Class C Spread MOLYKOTE EM 30L evenly on end surface Stopper GearID Gear Idle Z44 EM 30L Class C Spread MOLYKOTE EM 30L evenly all around on the patching parts Gear Idle DrumZ24 102 Gear LiftUp Z121Z...

Страница 85: ...ear tooth top surfaces Link LiftUp R Motor Pulse LiftUp EM 30L Class A Spread a small amount of MOLYKOTE EM 30L on the patching parts EM 30L Class C Spread MOLYKOTE EM 30L evenly all around on the gea...

Страница 86: ...lass C Spread MOLYKOTE EM 30L evenly on the patching part EM 30L Class C Spread MOLYKOTE EM 30L evenly on the gear tooth top surface Gear LiftUp Z56 Gear LiftUp Z32 EM 30L Class B Spread a small amoun...

Страница 87: ...ase EM 30L Class C Spread MOLYKOTE EM 30L evenly on the gear tooth surfaces EM 30L Class C Spread MOLYKOTE EM 30L evenly on the surface of the shafts and the flanges Do not touch the paper feeding sur...

Страница 88: ...he front end of terminals Grease spreading area Plate Contact TR Plate Driver PU Caulking EM 30L Class C Spread MOLYKOTE EM 30L evenly on the post Gear Idle Belt Z20Z93 EM 30L Class C Spread MOLYKOTE...

Страница 89: ...ide RAy Spring Torsion L Spring Torsion R 2 Printer Unit PX741 Belt Assy EM 30L Class A Spread a small amount of MOLYKOTE EM 30L on the inside of Bearing TR Belt total 8 places on both sides Roller Tr...

Страница 90: ...d a small amount of MOLYKOTE EM 30L on the patching parts Total 8 places on both sides Plate Sensor C Regist Gear Assy Shutter Do not touch the surface of Cover Sensor C Regist with MOLYKOTE Sensor As...

Страница 91: ...not touch this area with grease Grease spreading method Roller Assy BIAS FU C Cassette Assy PX741 Shaft Liftup Shaft Liftup Plate Receive Plate Receive EM 30L Class B Apply a small amount of MOLYKOTE...

Страница 92: ...printer contains the maintenance menu in addition to the normal operation menus Select an appropriate menu in accordance with the objective of adjustment 5 1 System maintenance menu for maintenance e...

Страница 93: ...of the setting change the system reboots automatically Some specific items are not initialized Category Item 1st Line Value 2nd Line DF Function Mainte nance Print Menu Maintenance Print Menu Enable D...

Страница 94: ...mode to the Shipping mode needs to be performed using this function Section 2 4 1 1 2 3 Section 5 3 2 10 Item Adjustment contents Maintenance Utilities Operation Manual item number Operation on the op...

Страница 95: ...alone printer and sends the downloaded file Section 2 4 1 4 1 Local print Refer to the system specification 20 Switch scan test Execution of switch scan test Adjustment objective Operation check of th...

Страница 96: ...IAG MODE and press ENTER LEVEL0 1 How to select the menu items Menu items can be selected by long pressing of BACK or ONLINE or by short pressing of MENU or ONLINE Menu items can be selected by pressi...

Страница 97: ...correction test result display item Items of 2 REG ADJ RSLT SNS CARIBRAT L FINE ADJ Y Y L SNS CARIBRAT R FINE ADJ Y Y L D RANGE L Y M C FINE ADJ Y Y R D RANGE R Y M C FINE ADJ Y Y R CRSE ADJ Y L R X...

Страница 98: ...atus check Respective FUSEs status display No 26 10 Engine parameter setting SENSOR SETTING Valid Invalid setups of error detection by various sensors No 27 11 NVRAM parameter setting NVRAM PARAMETER...

Страница 99: ...sent status of the corresponding unit are displayed PAPER ROTE PU 1 H 2 L 3 H 4 L Activate the respective units Figure 5 1 Status of the respective units are displayed on the corresponding areas of th...

Страница 100: ...lue H Humidity sensor k AD value H Humidity sensor YMC AD value H BELT_T Belt thermistor AD value H ID UP DOWN GREY GREY ID UpDown Sns H Down L Up RFID COLOR 1 RFID antenna K UID H RFID antenna Y UID...

Страница 101: ...Refer to Figure 5 2 Note After the corresponding unit has activated for 10 seconds it returns to the status of step2 and is re activated when the corresponding switch is pressed The clutch solenoid re...

Страница 102: ...OR FRONT MOTOR REGIST SHUTTER EXIT SOLENOID DUPLEX MOTOR DUPLEX CLUTCH T2 HOPPING MOTOR OPTION T2 FEED CLUTCH OPTION T3 HOPPING MOTOR OPTION T3 FEED CLUTCH OPTION ID UP DOWN TOP FRONT cover closed sta...

Страница 103: ...ns to step 2 Repeat step 3 as required TEST PATTERN 1 Display Setting value Function PRINT EXECUTE Pressing the ENTER key starts print Pressing the CANCEL key terminates print In units of page TEST PA...

Страница 104: ...est print Panel display Details STACKER FULL Stacker full PAPER END SELECTED TRAY No paper DUPLEX UNIT IS NOT INSTALLED DUPLEX is not installed SELECTED TRAY IS NOT INSTALLED Selected tray is not inst...

Страница 105: ...ransfer roller resistance value unit uA MR MAGENTA transfer roller resistance value unit uA CR CYAN transfer roller resistance value unit uA Displays are switched by pressing the MENU key ETMP UTMP RE...

Страница 106: ...ber unit HEX TR2 Transfer voltage parameter VTR2 table ID number unit HEX Displays are switched by pressing the MENU key TROFF BELT xxx TROFF Transfer OFF voltage setting table ID number unit HEX BELT...

Страница 107: ...y is pressed the test results are displayed by decrementing them Pressing the BACK key returns the screen to the state of step 2 Remarks The following message is displayed during initialization when t...

Страница 108: ...d by executing this test If an error is issued correct it by following section 2 Density correction method overview 1 Enter the self diagnostic mode level 1 and keep pressing the MENU or MENU key unti...

Страница 109: ...ESULT When the MENU key is pressed the test results are displayed by incrementing them When the MENU key is pressed the test results are displayed by decrementing them Pressing the BACK key returns th...

Страница 110: ...MAGES DEC Images C ID UNIT IMAGES DEC Images FUSER UNIT PRINTS DEC Prints Number of copies from the time of installation of a new fuser unit up to the present time is displayed TR BELT UNIT IMAGES DEC...

Страница 111: ...mode and the Shipping mode 1 Enter the self diagnostic mode level 1 and keep pressing the MENU or MENU key until the following message is displayed FACTORY MODE SET 2 When the ENTER key is pressed the...

Страница 112: ...ER key for long period 3 seconds that registers the displayed value in EEPROM Returns to the status of step 2 5 Repeat steps 2 to 4 as required 6 Pressing the BACK key terminates except the status of...

Страница 113: ...5 3 2 Various prints with the printer as a standalone unit Menu map print Information of the program version number and that of the control block configuration are printed out Operation While the sys...

Страница 114: ...program upgrade mode If the printer starts up in this mode the network does not function 2 BACK key ONLINE key CANCEL key The object that is added by the download mode is not started but the CU progra...

Страница 115: ...e EEPROM information and utilities are required CU board EEPROM replacement Be sure to use the EEPROM of the user s printer Note For compatibility between new old LEDs and identification refer to sect...

Страница 116: ...unts Total number of papers fed Printer life count Total number of papers fed Print Black Print Yellow Print Magenta Print Cyan Number of print copies of each ID Number of print copies after the new I...

Страница 117: ...mode is set to Manual density may change during usage of a printer Actions to be taken when density is not normal Note Perform the followings while a printer is in the still state Do not perform the...

Страница 118: ...ing Valid Invalid of the function that enables to keep the signal reception possible without changing I F signal even when an alarm is issued Disable Serial Number Enable Setting Valid Invalid of USB...

Страница 119: ...Oki Data CONFIDENTIAL 6 Periodic Maintenance 6 1 Cleaning 119 6 2 How to clean the LED lens array 120 6 3 How to clean the pickup roller 122 6 4 How to clean inside of printer 123...

Страница 120: ...dic Maintenance Clean inside and outside of the printer with clean dry cleaning cloth and small vacuum cleaner hand cleaner as required Note Be careful not to touch the image drum terminals the LED le...

Страница 121: ...n the LED lens array Perform cleaning of the LED head If any light print or white banding is recognized or if print character becomes blurred clean the LED head as descried below 1 Turn off the power...

Страница 122: ...3 Wipe the lens surface at the four positions of the LED head with soft tissue paper gently and lightly Note Do not use the solvents such as methyl alcohol or thinner for cleaning the LED head lens be...

Страница 123: ...separation roller Perform this cleaning when the error code 391 Paper jam occurs frequently 1 Draw out the paper tray 2 Clean the 2 feed rollers with a clean cloth stringently wrung out of clean wate...

Страница 124: ...EN to open the top cover Personal injuries may occur The fuser unit gets very hot Do not touch the fuser unit 3 Remove the image drum cartridge 1 Remove the four image drum cartridges and place them o...

Страница 125: ...the following steps 1 Raise the fuser unit lock levers two levers shown in blue in the direction shown by the arrow 2 Hold the handle of the fuser unit and remove it 5 Clean the metal shaft with soft...

Страница 126: ...s before taking corrective action against abnormalities 126 7 3 Precautions when taking corrective action against abnormality 126 7 4 Preparation for troubleshooting 126 7 5 Troubleshooting method 127...

Страница 127: ...tems toner drum cartridge replaced normally 3 Is the print media paper normal Refer to Specifications Paper in User s Manual 4 Is the drum cartridge installed normally 7 3 Precautions when taking corr...

Страница 128: ...twork initialization is in progress Flash Memory Check Off Off Indicates that the flash memory contents are being checked If a resident option flash memory that is not formatted yet is detected it is...

Страница 129: ...ace acquisition error 4 Device insufficient free space error 5 File write error 6 CU F W mismatch error PU Flash Error Off Off Indicates that the PU firmware has started up in the Loader mode It is in...

Страница 130: ...ss Varies Varies Indicates that a printer is in the midst of printing job Printing demo page Varies Varies Indicates that a printer is in the midst of printing demo page Printing setup contents Varies...

Страница 131: ...when switching paper size from narrow to wide In the power save mode Varies Varies Indicates that a printer is in the power save status When a printer enters the power save mode the LCD backlight turn...

Страница 132: ...ENU CONFIG MENU NEAR LIFE LED DISABLE the inspection LED turns off COLOR Y M C K Panel display The mark indicates no message in the upper row ON LINE lamp Inspection lamp Details Remedial measure COLO...

Страница 133: ...end not disclosed to user has been set to ON this warning is displayed instead of the fuser life end error Replace the fuser with the new fuser Panel display The mark indicates no message in the upper...

Страница 134: ...r environment Density Color Sensor Error Varies Varies Density correction color sensor error Because the PU firmware does not notice this status to the CU firmware in the Shipping Mode even when the P...

Страница 135: ...n the upper row ON LINE lamp Inspection lamp Details Remedial measure COLOR Head Data Error Varies On Cannot fine the correction data for the LED head Alternately the correction data for the LED head...

Страница 136: ...l Job Account related This error is kept displayed until the ON LINE key is pressed Executeto Acquire immediately on the server PC of the print job accounting Panel display The mark indicates no messa...

Страница 137: ...displayed the error code and the associated error information are displayed in the lower row of the LCD display at the same time Be sure to take note of this error information numerals indicating addr...

Страница 138: ...e tray Insert the MEDIA_SIZE MEDIA_TYPE and press the ON LINE switch For details see on line help Off Blink Indicates that the paper size of the tray or the paper size and the media type do not match...

Страница 139: ...hen a print from tray 2 is attempted Error 440 Insert a cassette ERRCODE The TRAY is not installed Off Blink Indicates that paper feeding is not possible because cassette has been removed from the cor...

Страница 140: ...panel ON LINE lamp Inspection lamp Contents Code nnn Check toner cartridge ERRCODE COLOR toner sensor error Off Blink Indicates that the toner sensor has detected the error Error 540 Yellow Error 541...

Страница 141: ...counter detects that the belt has reached end of life Print is stopped When the cover is opened closed it changes to the warning status Error 355 Display on operator panel ON LINE lamp Inspection lam...

Страница 142: ...write error 6 CU F W mismatch error Error Display on operator panel ON LINE lamp Inspection lamp Contents Code nnn Printer restart is in progress CODE Off On Indicates the reboot of the controller uni...

Страница 143: ...xception Does the error display recur Yes No If the RAM DIMM is installed remove it and turn off the power of the printer and back on Replace the CU board Re install the RAM DIMM Replace the RAM DIMM...

Страница 144: ...eplace the CU board Display Cause Error details Remedial measure Service call 081 Error Parameter integrity check Either EEPROM or Flash ROM cannot read write normally Turn the printer power off and t...

Страница 145: ...the LED head connected normally Is the LED HEAD fuse brown Does this error recur No Yes Yes No Yes Install the LED head unit normally Check the LED HEAD fuse After checking fuse Turn on the power aga...

Страница 146: ...oller thermistor is detected of its short circuit At high temperature Does this error recur Yes Turn on the power again Replace the fuser unit Display Cause Error details Remedial measure Service call...

Страница 147: ...thermistor to the high voltage board connected normally Does this error recur No Yes No Re connect the cables normally Turn on the power again Replace the belt thermistsor Display Cause Error details...

Страница 148: ...board Flash ROM hash check error Does this error recur Yes Turn on the power again Replace the PU board WDT ERROR R14 PU firmware runaway Does this error recur Yes Turn on the power again Replace the...

Страница 149: ...aper is taken into printer 167 7 3 Paper unloading jam occurs in the middle of paper running path 168 8 Two sided printing jam error code 370 371 372 373 383 168 8 1 Two sided printing jam occurs imme...

Страница 150: ...normally or not Check the CU board side in the same way Replace the low voltage power supply Note Check item Check work Action to be taken at NG 1 1 3 Check the peripherals of the power supplies Prima...

Страница 151: ...pearing Check item Check work Action to be taken at NG 1 4 1 Operator Panel display freezes Operator Panel display RAM check in progress or Initializing display is kept appearing Replace the ROM DIMM...

Страница 152: ...1 1 Any operation of a printer will not start until the Operator Panel is detected and is started of its operation Follow the contents of 1 1 2 2 Abnormal sound is heard Check item Check work Action...

Страница 153: ...CU and PU boards Remove the CU and PU board and inspect the installation conditions of the partition plate by visual inspection If they are not hooked on the normal specified positions correct them 2...

Страница 154: ...sor IN2 sensor WR sensor DUP F sensor EXITsensor J4 373 MULTIFEED IN DUPLEX UNIT J2 371 DUPLEX INPUT J11 392 TRAY2 J10 391 TRAY1 J3 372 MISS FEED AT DUPLEX J9 390 MISS FEED AT FRONTFEEDER J6 381 TRANS...

Страница 155: ...procedure Pull the tray Paper Jam Tray Name Pull the tray Paper Remains Tray Name When the above messages are displayed Tray1 is applied here as an example 1 Pull the displayed tray 2 Remove paper 3 R...

Страница 156: ...ins Front Cover When the above messages are displayed 1 Open the multipurpose tray 2 Push up the center handle blue to open the front cover 3 Slowly pull out the jammed paper 4 Close the front cover 5...

Страница 157: ...s Top Cover When the above messages are displayed 1 Open the top cover 2 Touch the screw with a hand to discharge static 3 2Uninstall the four image drum cartridges and put them on a flat table 4 Cove...

Страница 158: ...r is jammed in the fuser unit Pull the lock levers 2 levers of the fuser unit to remove the fuser unit Pull the jammed paper to the front side while pressing the jam release lever Set the fuser unit i...

Страница 159: ...ove messages are displayed 1 Hold and press down the jam release lever of the duplex print unit to open the duplex print unit cover 2 Release jammed paper If you do not see the paper by closing the du...

Страница 160: ...tages supplied to the front sensor board RSF PCB Check the 5V power at the FSNS connector of the front sensor board RSF PCB Pin 1 5V power supply Pin 5 0VL Replace the connection cable 3 2 Jam occurs...

Страница 161: ...peration check Paper feed solenoid Confirm that the paper feed solenoid works normally by using the Motor Clutch Test of the self diagnostic mode Remove the metal plate from the right side of a printe...

Страница 162: ...ensor 1 Pin 3 Paper entrance sensor 2 Pin 2 WR sensor Confirm that the above signal levels change when the sensor lever is operated Replace the front sensor board RSF PCB Check the power voltages supp...

Страница 163: ...390 Multipurpose tray 5 1 Jam occurs immediately after the power is turned on Multipurpose tray Check item Check work Action to be taken at NG 5 1 1 Check condition of the paper running path Paper run...

Страница 164: ...heck if any foreign materials such as paper dust on the surface of the feed roller or of the pickup roller or not Remove the foreign material Check if the feed roller has worn out or not Replace the f...

Страница 165: ...onnection cable 6 2 Jam occurs immediately after a paper is taken into printer Check item Check work Action to be taken at NG 6 2 1 Check condition of the paper running path Paper running path on the...

Страница 166: ...ion condition Paper feed motor belt motor ID Up motor Remove the respective connectors from the board and confirm that the following resistance exists between the corresponding pins at the cable side...

Страница 167: ...om most point Install the fuser unit correctly in a printer 7 5 2 7 Paper unloading jam error code 382 7 1 Paper unloading jam occurs immediately after the power is turned on Check item Check work Act...

Страница 168: ...ampers smooth movement of a paper in the paper running path or not Remove the rear panel and re install it Paper running path of unloading unit Check that any mechanical load does not exist that hampe...

Страница 169: ...emains in the Duplex feeder or not Open the rear cover and check if any paper remains in the paper reversing path or not Remove the Duplex unit Check if any paper exists in the Duplex insertion slot o...

Страница 170: ...ansport path Check that any foreign materials such as paper chip or blue do not exist that hampers the smooth movement of paper in the paper inverting transport path Remove the foreign material Check...

Страница 171: ...ive sensor or connection cable 8 5 Paper is not supplied from the Duplex unit to the regist roller Check item Check work Action to be taken at NG 8 5 1 Clutch operation check Duplex clutch Confirm tha...

Страница 172: ...tion that enables the specified engagement of gears Check if the link lever is set in the wrong position that results in the wrong engagement of gears by several teeth Assemble them correctly Check it...

Страница 173: ...spectively Refer to section 8 1 Resistance value fuser unit Replace the fuser unit If any attempt of using new fuser unit as a trial is going to be made be sure to use the System Maintenance Menu FUSE...

Страница 174: ...g condition Cable connection condition and wiring condition of the Duplex fan Check if the connectors are connected normally or not Check if extra length of the cables does not touch the fan blade or...

Страница 175: ...Y PCB Check that the cable between the PU board option connector to the Duplex board is normally connected Correct the connections Square connector connecting the Duplex unit to the printer Check if a...

Страница 176: ...trol signal that is output from the PU board to the option tray board V7Y PCB Check the control signal that is output from the PU board option connector Pin 5 TXD PU 2nd Pin 3 RXD 2nd PU Replace the P...

Страница 177: ...away from the sensor window The white paper should be placed in the manner of opposing the toner sensor 4 When light is reflected by a white paper so that incident light falls on the toner sensor the...

Страница 178: ...the self diagnostic mode Check if any extra load exists or not Replace the PU board or the ID motor 7 5 2 17 Fuse cut error error codes 150 to 155 17 1 Fuse cut error Check item Check work Action to...

Страница 179: ...en circuit with VOM Check that peeling off of sheath does not occur in any cables by visual inspection Replace the FFC with the normal FFC Check item Check work Action to be taken at NG 18 1 2 Environ...

Страница 180: ...r DUPLEX clutch Separator solenoid DUPLEX motor 3rd TRAY 2nd paper end sensor Hopping sensor 2nd IN sensor 2nd paper size seitch Feed clutch Hopping motor 2nd Tray HSOL OPTION HOPSIZE POWFAN IDFAN STK...

Страница 181: ...181 1 1 Color are faded out and blurred 181 2 Stain on white print Refer to Figure 7 2B 182 2 1 Stain on white print Partial stain 182 2 2 Stain on white print overall stain 182 3 White print Refer t...

Страница 182: ...left tension springs are normally installed Correct for normal condition 1 1 3 Print media Media type Check to see that the print media which is used for printing is not a specially thick media Use th...

Страница 183: ...he fuser unit Check if the offset toner of the previous printing is left adhered on the fuser unit or not by visual inspection Repeat blind printing using unwanted media until offset toner is created...

Страница 184: ...the LED head Connecting condition of the LED head Check that the LED head is normally connected Replace the LED head Drum shaft Check that the drum shaft keeps contacting with the right and left side...

Страница 185: ...D head Remove the foreign material 4 2 2 Condition of paper running path Paper running path Check that any burr that may scatter the un fused toner on the paper running path does not exist Remove the...

Страница 186: ...g path Check if any obstacle exists in the paper feeding path that hampers smooth paper run Remove the obstacle 7 5 3 7 Entirely black print 7 1 All black print over entire page Check item Check work...

Страница 187: ...43856301TH Rev 3 186 Oki Data CONFIDENTIAL 7 Troubleshooting and repair procedure Ground Charge roller Developer roller Toner feed roller Figure 7 3...

Страница 188: ...net mask and gateway address normally 5 Check the Utilities Check setting of the OKI LPR Utilities Check the setting items of the OKI LPR Utilities Set the OKI LPR Utilities setting items correctly 6...

Страница 189: ...created yet The same screen is displayed when failed to create certificate Solution Create certificate by referring to the User s Manual Advanced edition 7 5 4 1 2 Is the SSL TLS setting set to ON Log...

Страница 190: ...can become possible sometimes when the encryption strength is set to Weak If the encryption strength is set to Weak security level lowers To change the encryption strength refer to section 7 5 4 1 4 C...

Страница 191: ...wser cannot establish communication with the printer in which the encryption strength is not set to Standard Either upgrade the browser until it supports 128 bits high encryption or set the printer en...

Страница 192: ...gth 6 Set the Encryption Strength to Weak and press the Apply button 7 Check the setup contents and press OK 9 If the printer is displayed in the printer list the setup is complete with success 8 A me...

Страница 193: ...it remains in the default setting To change the encryption strength Telnet must be set to Enable Select the command prompt DOS prompt and enter Telnet printer IP address and press Return Establish con...

Страница 194: ...nge system of a printer is not supported by the browser Compatibility problem The OS does not support the IPP encrypted printing Refer to section 7 5 4 2 1 Check OS Operating System IPP encrypted prin...

Страница 195: ...ms User has changed the IP address of a printer to other IP address than the IP address during creation of CSR Refer to section 7 5 4 4 1 IP address of the printer has been changed Network card is ini...

Страница 196: ...rtification authorities use the procedure of installing the SSL server Certificate printer Certificate and the intermediate Certificate into printer as the same time However printer of this model supp...

Страница 197: ...it is If SSL TLS is turned ON again the Certificate becomes usable 7 5 4 5 5 Want to change the port number Answer The port number during the SSL TLS communication is fixed to 443 It cannot be changed...

Страница 198: ...the certificate store based on the types of certificate Then the Certificate will be installed automatically 7 5 4 5 7 The error message Name of security certificate is invalid or does not match the s...

Страница 199: ...ertificate When SSL is made valid by self sign certificate the following picture is obtained when web page is accessed and page will not be displayed Web display when SSL is made valid by self sign ce...

Страница 200: ...ess than 1 ohm F2 Power supply shut down PU board 5V F3 ID UP DOWN error Service call 142 Belt motor ID UP DOWN motor 24V F4 Cover open High voltage power supply board ID cooling fan fuser fan 24V F5...

Страница 201: ...able Dial display size Bit No TRAY1 3 1 2 3 4 Cassette none H H H H Legal 14 H L H L Legal 13 5 H L H H Legal 13 L L L H Letter L L L L Executive L L H L Blank L L L L Blank H H L L A4 L H L L B5 L H...

Страница 202: ...is stolen Method The conversion board in which encryption chip is installed is inserted in between the CU board and HDD Connected chart 7 8 Data protection kit A1 Assembled state of Data protection ki...

Страница 203: ...ction kit A1 that user is using became faulty the system can be recovered by using Step 3 if user s data protection kit A1 is completely faulty because there is no restriction on combination in this c...

Страница 204: ...protection kit A1 after replacing should be collected by either of the following methods 1 Disassemble the kit and deliver only HDD storing user secret data to a user 2 Take any measures to prevent in...

Страница 205: ...emble the kit and deliver only HDD storing user secret data to a user 2 Take any measures to prevent information leak Note4 When the CU board is replaced the printer cannot be used without the specifi...

Страница 206: ...Oki Data CONFIDENTIAL 8 Connection diagrams 8 1 Resistance value check 206 8 2 Parts location 210 8 3 F W version number 221...

Страница 207: ...tion diagrams 8 1 Resistance value check Unit Electrical circuit diagram connection Part outside view Resistance value Transport belt motor M 1 2 3 4 Between pin 1 and pin 2 3 4 Between pin 3 and pin...

Страница 208: ...AL 8 Connection diagrams Unit Electrical circuit diagram connection Part outside view Resistance value ID up down motor M 1 2 3 4 Between pin 1 and pin 2 6 1 Between pin 3 and pin 4 6 1 Fuser unit mot...

Страница 209: ...nnection Part outside view Resistance value Feed motor M 1 2 3 4 Between pin 1 and pin 2 3 4 Between pin 3 and pin 4 3 4 Both sided print motor M 1 2 3 4 Between pin 1 and pin 2 2 4 Between pin 3 and...

Страница 210: ...mostat Upper thermistor B 4 B 5 Lower thermistor A 2 A 3 Frame thermistor B 2 B 3 A 4 A 5 Fuse 2 1 6 3 4 5 2 1 6 3 4 5 A B Between pins 1 and 6 Several ohms to several ten ohms Between pins 1 and 6 Se...

Страница 211: ...RM1 OPAMP1 Q9 R4 R5 R6 Q10 R11 RM4 C40 C41 R28 IDFAN ARMORED FM1 Q4 Q6 Q3 Q5 D3 DCHEAT RELAY HVOLT POWER C1 F2 IC1 IC2 BEL TIDUP OPTION F1 R10 Q2 D2 D1 POWFAN Q1 Q7 Q8 D6 D4 D5 FET4 D7 Q11 1 1 13 F4...

Страница 212: ...9 C502 C503 FET501 R527 R524 D502 C504 D501 C507 R529 R528 R533 R537 Q505 R506 Q501 R532 D503 C514 C513 C512 R535 Q504 R568 R562 R561 R560 R559 R558 R572 R576 R575 C536 R574 R571 R570 C535 C529 R557 R...

Страница 213: ...154 C9 C59 C60 C61 C62 C63 C161 C160 LED4 LED7 LED9 R129 C58 RM47 RM33 RM23 RM22 RM21 RM20 RM19 DIMMBS 1 40 2 C65 C66 CP8 C76 C67 C68 C69 C70 C71 R130 34 20 10 1 34 20 10 1 A A AP AP AA K CC1 CP9 25 2...

Страница 214: ...1 C657 F502 R574 R573 R572 C845 C848 RM592 C866 C584 C875 C569 R555 C595 C612 C890 C603 C594 C876 C575 C570 C590 C556 C566 C597 C889 C621 C622 C877 C549 C550 C602 C608 C557 C562 C593 C589 C567 C585 C8...

Страница 215: ...6 R21 R22 R23 R24 R25 R17 R18 R19 R20 C8 R2 C3 CP7 CP3 CP4 C2 BF2 C7 IC2 GND2 R1 BF1 IC1 R14 R13 R11 R9 R6 C1 60 61 3 1 4 2 67 65 68 66 90 91 120 1 CN2 C516 C540 4 1 4 1 4 1 4 1 C531 C530 BF510 R513 C...

Страница 216: ...D506 D504 J506 R518 R526 C503 R514 R515 J502 R507 J518 R520 R508 R509 R510 J504 IC501 C535 J524 R580 C534 R577 C533 R579 J523 J516 R575 R559 C532 R576 R558 R574 R573 R572 R517 J522 R571 R519 R516 J521...

Страница 217: ...J506 R518 R526 C503 R514 R515 J502 R507 D502 D503 J518 R520 R508 R509 R510 J504 IC501 C535 J524 R580 C534 R577 C533 R579 J523 J516 R575 R559 C532 R576 R558 R574 R573 R572 R517 J522 R571 R519 R516 J521...

Страница 218: ...6 J561 C506 J535 J528 C509 C508 R519 J541 J542 J546 J553 J555 R529 R527 R533 R525 R524 R523 R521 C519 C518 C517 C516 C515 C514 C513 C512 J545 J544 J543 J547 J551 J552 R534 R531 J556 TR501 TR502 TR503...

Страница 219: ...18 Oki Data CONFIDENTIAL 8 Connection diagrams 10 Entrance Sensor PCB WR IN2 I N 1 CN R1 R2 5 1 11 Color Adjustment Sensor PCB 12 High Voltage Power Supply PCB C710dn SNS CN C E A K CN4 CN2 CN3 CN1 TR...

Страница 220: ...rting plug is mounted 230V system shorting plug is not mounted Shorting plug for CN6 To the fuser unit I F connector CN3 CN6 CN2 CN1 8 Connection diagrams 13 Low Voltage Power Supply PCB 14 ID unit Fu...

Страница 221: ...43856301TH Rev 3 220 Oki Data CONFIDENTIAL 8 Connection diagrams 15 Transfer belt unit Fuse Transfer belt unit for consumable parts Transfer belt unit Relay PCB Contactor point Contactor point Fuse...

Страница 222: ...plate version number fill out version Date CU F W 43965201FY01 NIC F W 43965201FY02 Loader 43436808FY01 Remarks Rev File Rev NIC F W Web Page File Rev Rev File Rev 1 2007 11 12 A0 14 1 b0 61 0 07 1 1...

Страница 223: ...R114 R113 R86 R71 LED9 LED8 LED7 LED6 LED5 LED4 IC_VREF GND1 DLMODE MMB CP12 CP11 CN101 C C 1 C161 C160 C154 C73 C72 C71 C70 C69 C68 C67 C66 C63 C62 C61 C58 C9 2 5V_2 3 4 2 0 A K A A 42 40 41 39 2 1...

Отзывы: