


Media related actions
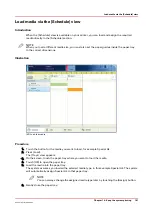
Load the media
Introduction
This section describes how to load the media into a paper tray.
When you load the media via the [Load] button in the [Schedule], the paper tray is automatically
assigned to the correct media.
When you load and assign the media via the [Assign] button in the [Trays] view, you must assign
the paper tray to the loaded media manually.
When no external finisher is connected to the machine, you must put all the media types face up
and header up into the paper trays. The tabs of tab sheets must be at the right-hand side. When
an external finisher is connected to the machine, it is possible that you must put the media into
the paper trays in a different way. Refer to the documentation of the external finisher for more
information about how to place the media.
When to do
• The [Schedule] displays a red bar next to a required media. The red bar indicates that a
scheduled job now requires a media that is not available in the paper trays.
• The [Schedule] displays an orange bar next to a required media. The orange bar indicates that
a scheduled job requires media which is either not available in the paper trays or which is
available, but not in sufficient quantity to finish the job.
• The current job requires more of the same media than is currently loaded in the paper trays.
You can add more of the required media into another paper tray.
• You already want to load and assign media that are required for the next job (work ahead).
IMPORTANT
Always put the stack of media at the left-hand side of the paper guides inside the paper trays, as
indicated on the sticker inside the paper trays.
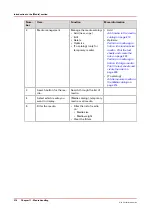
Procedure
1.
Put a small stack of the media into the paper tray.
2.
Pinch the green handle of the right-hand guide and push the guide against the edge of the media.
3.
Turn the green knob to adjust the front guide and the rear guide.
4.
Put the rest of the media on top of the small stack.
NOTE
When you want to assign the media later you must press the [Not assigned] button.
Media related actions
Chapter 11 - Media handling
211
Océ VarioPrint 6000 line
Содержание VarioPrint 6180
Страница 1: ...User guide Océ VarioPrint 6000 line VarioPrint 6180 6220 6270 6330 ...
Страница 8: ...Contents 8 Océ VarioPrint 6000 line ...
Страница 9: ...Chapter 1 Introduction ...
Страница 15: ...Chapter 2 Explore the print system ...
Страница 31: ...Chapter 3 Explore the ease of operation ...
Страница 43: ...Chapter 4 Start the print system ...
Страница 49: ...Chapter 5 Prepare the print system ...
Страница 80: ...Learn about user authentication 80 Chapter 5 Prepare the print system Océ VarioPrint 6000 line ...
Страница 81: ...Chapter 6 Prepare the print jobs ...
Страница 89: ...Chapter 7 Plan the workload remotely ...
Страница 93: ...Chapter 8 Plan the jobs ...
Страница 129: ...Chapter 9 Carry out print jobs ...
Страница 193: ...Chapter 10 Keep the system printing ...
Страница 202: ...The operator attention light 202 Chapter 10 Keep the system printing Océ VarioPrint 6000 line ...
Страница 203: ...Chapter 11 Media handling ...
Страница 245: ...Chapter 12 Maintain the print system ...
Страница 275: ...Chapter 13 PRISMAlytics Dashboard ...
Страница 277: ...Chapter 14 Troubleshooting ...
Страница 286: ...Store the logging in case of software errors 286 Chapter 14 Troubleshooting Océ VarioPrint 6000 line ...
Страница 287: ...Chapter 15 Specifications ...
Страница 305: ......


