gas leakage. Seal all leaks before placing the
humidifier in operation.
WARNING:
Never use an open flame to check for
gas leaks. If a leak does exist, a fire or explosion
could occur, resulting in damage, injury or death.
The appliance must be isolated from the gas
supply piping system by closing its individual manual
shut-off valve during any pressure testing of the gas
supply piping system at test pressures equal to or
greater than 14” w.c. (3.5 kPa).
Dissipate test pressure from the gas supply line
before re-opening the manual shut off valve to the
appliance.
NOTES:
1.
Failure to follow this procedure may damage
the gas valve. Over pressured gas valves are
not covered by warranty.
2.
DO NOT use Teflon tape on gas line pipe
threads. A flexible sealant suitable for use
with Natural Gas and Propane Gas is
recommended.
3.
Plan gas supply piping so it will not interfere
with removal of gas valves or blower
assemblies and front or side service doors.
The gas valve is provided with pressure taps to
measure gas pressure upstream and downstream,
(manifold pressure). The minimum gas pressure
shown is for the purpose of input adjustment.
A 1/8" NPT plugged tapping, accessible for test
gage connection, must be installed immediately
upstream of the gas supply connection to the
appliance.
NOTE FOR OUTDOOR ENCLOSURE:
Gas lines
should be routed through the bottom of the enclosure.
NOTE FOR DIRECT VENT UNITS:
The
combustion supply air opening is not required to the
room where the appliance is installed since the
combustion air will be provided through the inlet air
duct (see installation notes below). Ventilation is
required for cooling of the electronic components
AIR MANIFOLD/CONNECTOR HOSE
INSTALLATION FOR DIRECT VENT
All direct vent units are shipped with the air
manifold and connector hoses packaged separately.
The connector hoses and air manifold must be
installed by a qualified installer prior to commissioning
the unit.
Procedure:
1.
Apply a ring of silicone around the outside of
each of the blower adapter connector.
2.
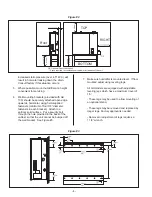
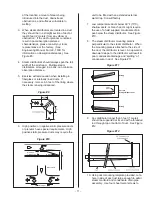
Mount a flexible connector hose over the hose
connection on each blower adapter and
secure using a gear clamp provided with the
unit. Care should be taken not to kink or
damage the flexible hose. Refer to Figure #5.
3.
Carefully bend the flexible hose(s) to give the
“S” shape as shown in the diagram.
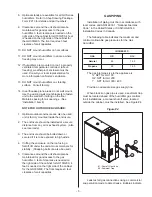
4.
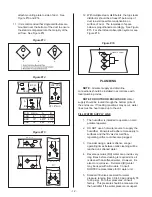
Mount the air intake manifold to the cabinet
base using the mounting bracket located on
the bottom of the air manifold (refer to Figure
6). DO NOT PUNCTURE OR ADD ANY
HOLES TO THE AIR MANIFOLD.
5.
Apply a ring of silicone to the outside of each
hose connection on the air manifold.
6.
Mount the corresponding flexible connector
hose over each hose connection on the air
manifold and secure using a gear clamp
provided with the unit.
- 6 -
Figure #5
Figure #6
Содержание GH 100
Страница 43: ... 39 ...

