EN
3
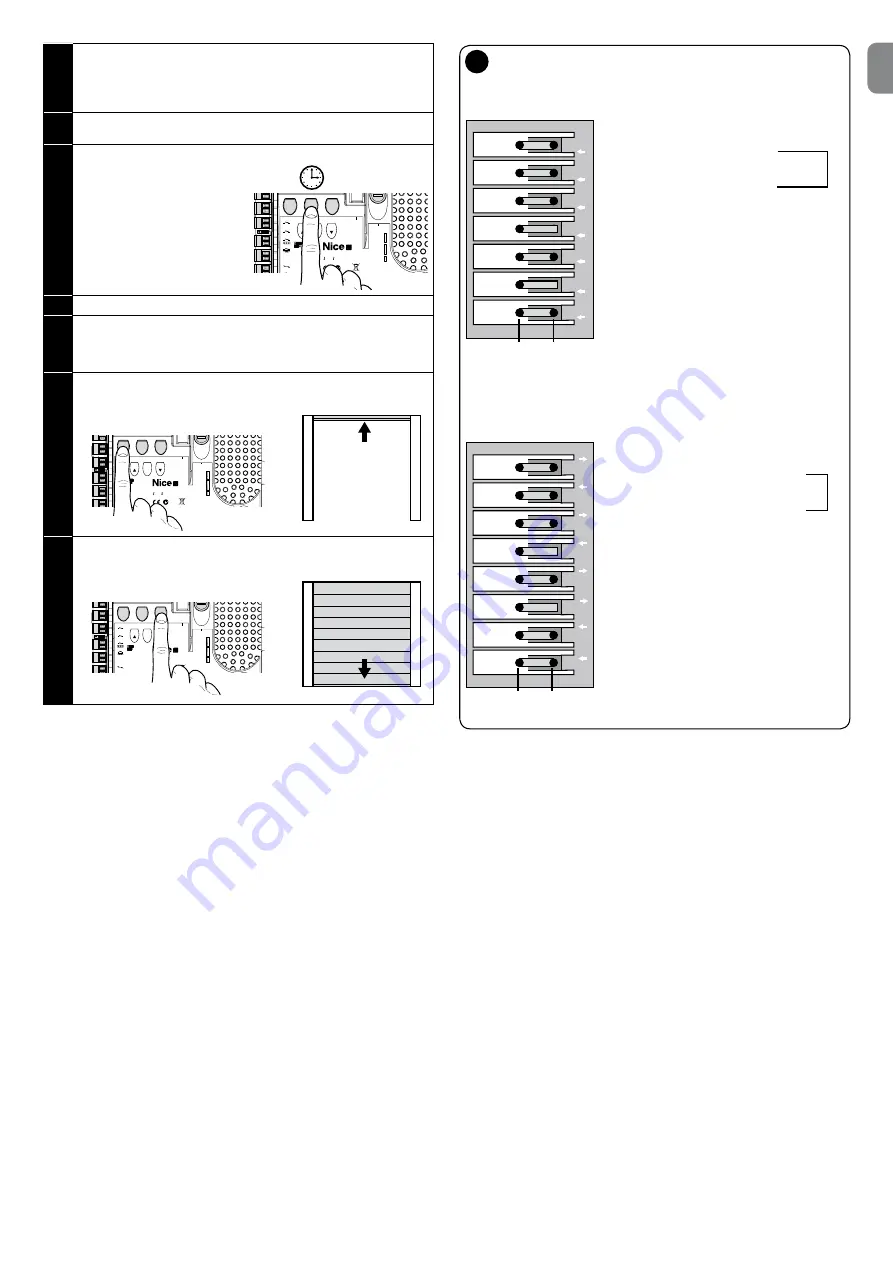
04.
a)
Set the contact cam
1 E
↑
(green,
fig. 1
) to activate the limit
switch
b)
Tighten down the fixing screw “
A
” (
fig. 1
)
c)
For precision adjustment, use screw “
B
” (
fig. 1
).
LED L8 flashes: programming position A0
05.
Use the
[Open]
or
[Close]
key to move the door to the maximum
closing position.
06.
Press the
[Set]
key for 3 sec-
onds to confirm position A0.
LED L8 stays on.
Open
Stop
Set
Close
L1 L2 L3 L4 L5 L6 L7 L8
BusT4
Fuse 3.15AF
Stop
OSE
8K2
PP
Open
Close
Flash
2
Bluebus
to push
buttons
to internal
control
to internal
brake
-20° C +55° C
DIC1
N19771
3”
07.
When the
[Set]
key is released, all LEDs are switched off.
08.
a)
Set the contact cam
3 E
↑
(white,
fig. 1
) to activate the limit
switch
b)
Tighten down the fixing screw “
A
” (
fig. 1
)
c)
For precision adjustment, use screw “
B
” (
fig. 1
).
09.
Send an opening command by pressing the
[Open]
key to perform
a complete opening manoeuvre.
Open
Stop
Set
Close
L1 L2 L3 L4 L5 L6 L7 L8
BusT4
Fuse 3.15AF
Stop
OSE
8K2
PP
Open
Close
Flash
2
Bluebus
to push
buttons
to internal
control
to internal
brake
-20° C +55° C
DIC1
N19771
10.
Send a closing command by pressing the
[Close]
key to perform a
complete closing manoeuvre.
Open
Stop
Set
Close
L1 L2 L3 L4 L5 L6 L7 L8
BusT4
Fuse 3.15AF
Stop
OSE
8K2
PP
Open
Close
Flash
2
Bluebus
to push
buttons
to internal
control
to internal
brake
-20° C +55° C
DIC1
N19771
The safety limit switches
2 SE
↑
and
4 SE
↑
(red,
fig. 1
) must be set to intervene
as soon as the control limit switch is exceeded.
The safety limit switches
2 SE
↑
and
4 SE
↑
(red,
fig. 1
) must be set at the factory
to follow the operating limit switch from a short distance.
After the operation test, check that the fixing screws are positioned correctly.
The additional limit switches
8 P2
↑
and
7 P2
↑
are zero potential closing contacts
and the additional limit switches
6 P1
↑
and
5 P1
↑
are zero potential switching
contacts.
The additional limit switch 1 CLOSING (6 P1
↓
or
5 P1
↓
) is used as pre-
liminary limit switch; therefore, it must be set to be triggered when the
door reaches a distance of 5 cm from the ground. The activation of this
limit switch avoids the execution of the “brief inversion” manoeuvre. If the
sensitive edge is activated, it only runs the STOP. This limit switch must
always be connected to the PRE-CLOSE input of the control unit. If it is
not connected, in the control unit it is necessary to bridge the limit switch
3 input with the common 1 input
.
1
7 WHITE
Additional limit switch 2 CLOSING
6 GREEN
Additional limit switch 2 OPENING
5 WHITE
Additional limit switch 1 CLOSING
4 RED
Limit switch CLOSING
3 WHITE
Safety limit switch OPENING
2 RED
Finecorsa di sicurezza APERTURA
1 GREEN
Limit switch OPENING
optional
8 WHITE
Additional limit switch 2 CLOSING
7 GREEN
Additional limit switch 2 OPENING
6 WHITE
Additional limit switch 1 CLOSING
5 GREEN
Additional limit switch 1 OPENING
4 RED
Safety limit switch CLOSING
3 WHITE
Limit switch CLOSING
2 RED
Safety limit switch OPENING
1 GREEN
Limit switch OPENING
optional
P2
P2
P1
SE
E
SE
E
P2
P2
P1
P1
SE
SE
E
E
B A
P2
P2
P1
SE
E
SE
E
P2
P2
P1
P1
SE
SE
E
E
B A
Setting mechanical limit switches for large-sized motors:
7 contact cams
Setting mechanical limit switches for small-sized motors:
8 contact cams
7 - Use with MEIN series inverter
The NDCC2301 control unit can pilot gearmotors with a MEIN series inverter on
board.
Having completed the connections as described in the motor’s instruction manual,
the inverter is ready to be installed:
1
Memory deletion for sectional or High-speed doors (paragraph 10);
2
Activate inverter function (L7, level 1);
3
Recognition of the connected devices (see paragraph 2);
4
Recognition of limit positions on opening and closing with the use of MEIN
family inverter (paragraph 5).
The standard values are set in the factory. These may be changed via the Oview
programmer or by programing with the keys of the board.
The parameters which may be shown / changed are:
• Speed when opening
• Speed in opening deceleration
• Speed when closing
• Speed in closing deceleration
• Minimum frequency
• Acceleration
• Deceleration
• Emergency deceleration
• Start-up
• Motor warm up
• Alarm and protection management
• Inverter status
For the specifications of the values of each parameter, please consult the function


