Installing and Using Utilities 5-19
5.
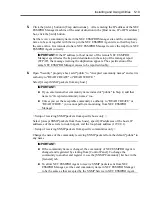
Click the [Add...] button in [Trap destinations]. After entering the IP address of the NEC
ESMPRO Manager machine of the send destination in the [Host name, IP or IPX address]
box, click the [Add] button.
Set the receive community name in the NEC ESMPRO Manager site and the community
name to be sent together with the trap in the NEC ESMPRO Agent site so that they have
the same value. It is intended to have NEC ESMPRO Manager receive the trap from NEC
ESMPRO Agent correctly.
IMPORTANT:
If the IP address (or host name) of the remote NEC ESMPRO
Manager specified as the trap send destination in the setup of the manager report
(TCP/IP), the message warning the duplication appears. The specification of the
same NEC ESMPRO Manager causes to be reported doubly.
6.
Open "Security" property sheet; add "public" to "Accepted community names" and set its
authority to "READ CREATE" or "READ WRITE. "
Select [Accept SNMP packets from any host.]
IMPORTANT:
If you entered another community name instead of "public" in Step 4, add that
name to “Accepted community names” too.
Unless you set the acceptable community’s authority to “READ CREATE” or
“READ WRITE,” you cannot perform monitoring from NEC ESMPRO
Manager.
< Setup of receiving SNMP packets from specific hosts only >
Select [Accept SNMP packets from these hosts], specify IP addresses of the hosts, IP
addresses of the servers to install Agent, and the loop-back address (127.0.0.1).
< Setup of receiving SNMP packets from specific communities only >
Change the name of the community receiving SNMP packets from the default "public" to
any name.
IMPORTANT:
If the community name is changed, the community of NEC ESMPRO Agent is
changed and registered by starting from [Control Panel]. To change the
community to another and register it, use the [SNMP Community] list box in the
[General] tab.
To allow NEC ESMPRO Agent to receive SNMP packets sent from NEC
ESMPRO Manager, set the send community name in NEC ESMPRO Manager
to be the same as that accepted by the SNMP Service in NEC ESMPRO Agent.
Содержание Express5800/320Lb FT Linux
Страница 1: ...N8800 027F 028F NEC Express5800 320Lb 320Lb R User s Guide 1st Edition 02 2003 856 122693 901 A ...
Страница 10: ...iv This page is intentionally left blank ...
Страница 16: ...x This page is intentionally left blank ...
Страница 19: ...Precautions for Use 1 3 Label A Label B Label C Label E Label D ...
Страница 20: ...1 4 Precautions for Use Rack mount model Label B Label A Label C Label D ...
Страница 21: ...Precautions for Use 1 5 Label D Label C Label B Label A ...
Страница 22: ...1 6 Precautions for Use PCI CPU Modules PCI Module CPU Module Label A Label A Label A ...
Страница 36: ...1 20 Precautions for Use This page is intentionally left blank ...
Страница 44: ...2 8 General Description Front View inside Tower model Rack mount model ...
Страница 70: ...2 34 General Description This page is intentionally left blank ...
Страница 71: ...Chapter 3 Setup This chapter describes setup procedures to make NEC Express5800 ft series ready for use ...
Страница 118: ...3 48 Setup This page is intentionally left blank ...
Страница 162: ...4 44 System Configuration This page is intentionally left blank ...
Страница 217: ...Installing and Using Utilities 5 55 Also at this time the state of the mirrored disks change to Normal Mirror Disk ...
Страница 294: ...6 14 Maintenance This page is intentionally left blank ...
Страница 295: ...Chapter 7 Troubleshooting If the product does not work properly see this chapter before deciding that it is a breakdown ...
Страница 336: ...7 42 Troubleshooting This page is intentionally left blank ...
Страница 355: ...System Upgrade 8 19 15 Check the disk you selected and click Next 16 Click Complete ...
Страница 399: ...System Upgrade 8 63 Cable ties included with cabinet ...
Страница 410: ...8 74 System Upgrade This page is intentionally left blank ...
Страница 412: ...A 2 Specifications This page is intentionally left blank ...

