


Installation Guide
|
Comfort Pack T Series
with up to
95% Gas Heat
26
a soft, non-metallic bristle brush prior to rinsing of the coil to
prevent debris from being forced between the fins. Care should be
taken not to use the brush horizontally across the fins as they are
easily damaged.
DO NOT USE CHEMICALS, HOUSEHOLD BLEACH, OR ACID
CLEANERS AS THEY WILL ACCELERATE CORROSION ON THE
COIL. AVOID USING PRESSURE WASHERS, HIGH PRESSURE
HOSES, OR HIGHLY COMPRESSED AIR TO CLEAN THE COIL.
DOING SO CAN PERMANENTLY DAMAGE THE COIL, REDUCE
UNIT PERFORMANCE, AND VOID THE WARRANTY.
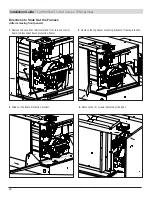
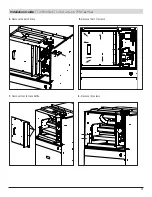
Power to the unit should always be turned off before performing
service or removing the cooling chassis from the unit.
One
power connector and one control circuit connector are provided
for easy disconnecting and re-connecting of the wires between the
cooling chassis and cabinet.
The controls enclosure cover must be
removed to allow access to the screws holding the cooling chassis
to the cabinet.
After reinstalling the cooling chassis the controls
enclosure cover must be reinstalled.
IF YOU TURN OFF POWER SUPPLY, TURN OFF
THE GAS. SEE HAZARD LEVELS, PAGE 5. THE
MATERIAL CONTAINED IN THE MAINTENANCE
AND SERVICE SECTION OF THIS MANUAL
IS DESIGNED TO AID A QUALIFIED SERVICE
PERSON IN MAINTAINING AND SERVICING THIS
EQUIPMENT. THIS UNIT WILL OPERATE WITH
MINIMUM MAINTENANCE. TO ENSURE LONG
LIFE AND SATISFACTORY PERFORMANCE, A
HEATER THAT IS OPERATED UNDER NORMAL
CONDITIONS SHOULD BE INSPECTED AND
CLEANED AT THE START OF EACH HEATING
SEASON. IF THE HEATER IS OPERATING IN AN
AREA WHERE AN UNUSUAL AMOUNT OF DUST,
SOOT OR OTHER IMPURITIES ARE PRESENT
IN THE AIR, MORE FREQUENT MAINTENANCE
IS RECOMMENDED. WHEN ANY SERVICE IS
COMPLETE, BE CAREFUL TO REASSEMBLE
CORRECTLY TO ENSURE THAT NO UNSAFE
CONDITIONS ARE CREATED. WHEN RE-
LIGHTING, ALWAYS FOLLOW THE LIGHTING
INSTRUCTIONS ON THE HEATER.
!
WARNING
Maintenance Schedule
At least every six weeks check the filter. Clean or replace as
necessary. A clean filter in addition to providing a comfortable
environment ensures fuel-efficient operation and long heat
exchanger life. Do the following procedures at least annually.
• Clean all dirt, lint, and grease from the combustion air openings
and venter motor.
• Inspect the heat exchanger. Clean if needed
.
• Check the burner for scale, dust, or lint accumulation. Clean if
needed.
• Check the vent system for soundness. Replace any parts that
do not appear sound.
• Check the wiring for any damaged wire. Replace damaged
wiring.
NOTE: USE ONLY FACTORY-AUTHORIZED
REPLACEMENT PARTS.
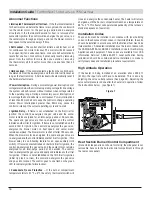
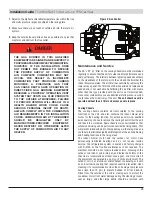
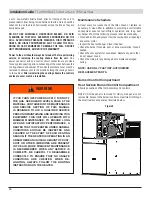
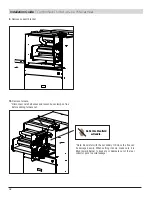
Burner/Control Compartment
Heat Section Burner/Control Compartmen
t
Showing Locations of Burner Assembly and Controls
NOTE: Unit side panel is removed for clarity; side panel is not
removable. Access to the burner/control compartment is through
the small rear access panel as illustrated below.
Figure 4
Содержание Comfort Pack CP9 T Series
Страница 2: ...2...