background image

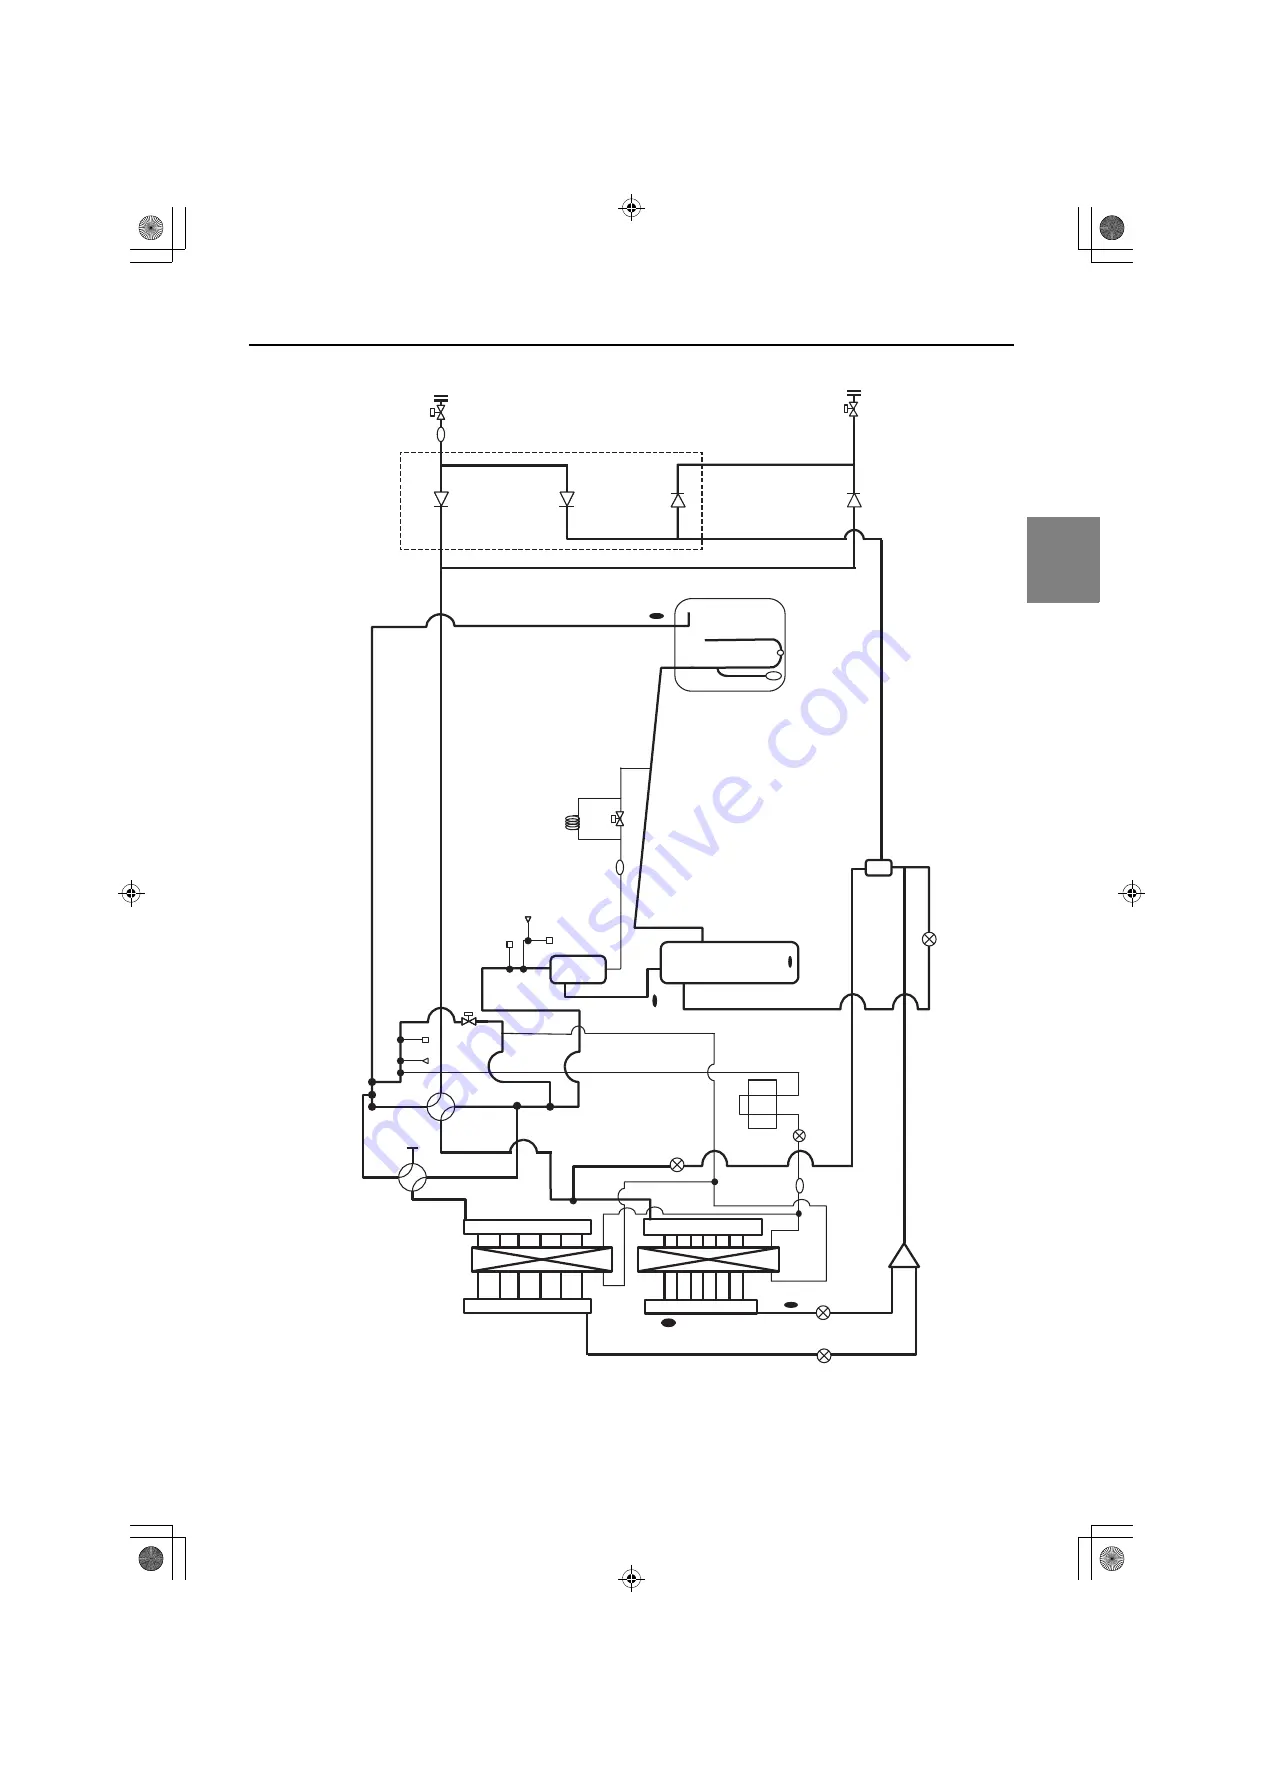
[3-2 Outdoor Unit Refrigerant Circuit Diagrams ]

BS_03_L

chapter 3 - 

9

3  Major Compon

ent

s

, Their Fun

ct

io

ns

 a

n

d

 Re

frig

e

ra

n

Circ

ui

ts

(2) PURY-EM200 - EM300YNW-A1

SV

1

a

Gas-liquid separator

63H

1

ST

3

ST

6

TH

4

21S

4

b

CP

1

CJ

1

63L

S

ST

1

BV2

BV1

AC

C

Co

m

p

O/

S

21S

4

a

LE

V2

a

LE

V2

b

LE

V4

SV

2

HE

X

LE

V2

d

CV

2

a

CV

3

a

CV

5

a

CV

6

a

TH

5

LE

V9

Hex for INV 

cooling

ST

1

8

CJ

2

63H

S

1

TH

15

ST

7

TH

3

TH

7

CH

E

C

K

 V

A

L

V

E

 B

L

O

C

K

0000006412.BOOK  9 ページ  2021年10月12日 火曜日 午後4時33分

Содержание City Multi PURY-EM200YNW-A1

Страница 1: ......

Страница 2: ...ec tric shock malfunction smoke or fire Do not change the settings of the safety or protection devices Forcing the unit to operate by disabling the safety de vices such as the pressure switch or the thermal switch may result in bursting fire or explosion Operating the unit with a safety device whose settings have been changed may result in bursting fire or ex plosion Using safety devices other tha...

Страница 3: ...all be properly stored to prevent mechanical damage 0 10 20 30 40 50 60 70 80 0 50 100 150 200 250 300 350 400 450 500 550 600 650 At least two safety measures are required Room volume m3 System refrigerant amount kg NG ISO 5149 At least one safety measure is required Construction guidance Children should be supervised to ensure that they do not play with the appliance Do not operate the unit with...

Страница 4: ... minimize the risk of damage from earthquakes and strong winds Improper installation will cause the unit to topple re sulting in serious injury The unit must be securely installed on a structure that can sustain its weight Failure to do so will cause the unit to fall resulting in se rious injury Do not open the control box cover when charging refrigerant Doing so may cause sparks resulting in fire...

Страница 5: ... may break overheat or cause smoke or fire Tighten all terminal screws to the specified torque Loose screws and contact failure may result in smoke or fire Electrical work must be performed by quali fied personnel in accordance with local reg ulations and the instructions provided in this manual Only use the specified cables and dedicated circuits Inadequate power source capacity or improper elect...

Страница 6: ...or art objects in a room Such items could be damaged or deteriorated Collect the refrigerant and properly dispose of it in accordance with local regulations Do not install the unit on or over items that are subject to water damage When the room humidity exceeds 80 or if the drain pipe is clogged condensation may collect and drip from the indoor unit onto the ceiling or floor Drain piping must be i...

Страница 7: ...g Store elbows and other joints in plastic bags If dust dirt or water enters the refrigerant lines the re frigerant oil will deteriorate and the compressor will malfunction Braze the pipes with a nitrogen purge to avoid oxidation Oxidized flux inside the refrigerant pipes will cause the refrigerant oil to deteriorate and cause the compressor to malfunction Do not use existing refrigerant piping Th...

Страница 8: ... Components of Outdoor Unit 1 3 2 Outdoor Unit Refrigerant Circuit Diagrams 8 3 3 Functions of the Major Components of Outdoor Unit 14 3 4 Functions of the Major Components of Indoor Unit 16 3 5 External Appearance and Refrigerant Circuit Components of HBC 17 3 6 HBC Refrigerant Circuit Diagrams 22 3 7 Functions of the Major Components of HBC 24 Chapter 4 Electrical Components and Wiring Diagrams ...

Страница 9: ...5 Pressure Sensor Circuit Configuration and Troubleshooting Pressure Sensor Problems 18 8 6 Troubleshooting Solenoid Valve Problems 22 8 7 Troubleshooting Outdoor Unit Fan Problems 23 8 8 Troubleshooting LEV FCV Problems 24 8 9 Troubleshooting Problems with Major Components on HBC 34 8 10 Troubleshooting Inverter Problems 40 8 11 Control Circuit 57 8 12 Measures for Refrigerant Leakage 66 8 13 Par...

Страница 10: ...ge of Piping Materials 4 1 2 3 Pipe Processing 4 1 2 4 Differences in Refrigerant Properties 5 1 2 5 Precautions for handling equipment using R32 6 1 2 6 Refrigerant Oil 13 1 3 Working with Refrigerant Piping 14 1 3 1 Pipe Brazing 14 1 3 2 Air Tightness Test 15 1 3 3 Vacuum Drying 16 1 3 4 Refrigerant Charging 18 1 4 Precautions for Wiring 19 1 5 Cautionary notes on installation environment and ma...

Страница 11: ...GB_BS_01_L 0000006448 BOOK 2 ページ 2021年10月6日 水曜日 午後1時57分 ...

Страница 12: ...ollowing page s 1 1 2 Tool Preparation 5 Verification of the connecting pipes Verify the type of refrigerant used for the unit to be moved or replaced Use refrigerant pipes made of phosphorus deoxidized copper Keep the inner and outer surfaces of the pipes clean and free of such contaminants as sulfur oxides dust dirt shaving particles oil and water These types of contaminants inside the refrigera...

Страница 13: ...inder Refrigerant recovery Refrigerant Cylinder Refrigerant charging The refrigerant type is indicated The cylinder is light blue Charging Port on the Refrigerant Cylinder Refrigerant charging The charge port diameter is larger than that of the current port Tools Materials Use Notes Gas Leak Detector Gas leak detection The ones for use with HFC refrigerant may be used Vacuum Pump Vacuum drying May...

Страница 14: ...φ19 05 3 4 For a system that uses R410A or R32 use pipes that are made with 1 2H material Drawn Annealed pipes may be used for pipes with a di ameter of φ19 05 3 4 and a radial thickness of 1 2 t The figures in the radial thickness column are based on the Japanese standards and provided only as a reference Use pipes that meet the local standards 4 Thickness and refrigerant type indicated on the pi...

Страница 15: ...gement 1 2 3 Pipe Processing Use a small amount of ester oil ether oil or alkylbenzene to coat flares and flanges Prevent the particles that are generated during pipe cutting or cut edge treatment from entering the pipes If abrasive materials contained in sandpaper or cutting tools enter the refrigerant circuit they may cause the compressor valves or other refrigerant circuit components to fail Us...

Страница 16: ...e Refrigerant Pseudo azeotropic Refrigerant Non azeotropic Refrigerant Single Refrigerant Chloride Not included Not included Not included Included Safety Class A2L A1 A1 A1 A1 A1 Molecular Weight 52 0 72 6 86 2 86 5 Boiling Point C F 51 7 61 0 51 4 60 5 43 6 46 4 40 8 41 4 Steam Pressure 25 C MPa 77 F psi gauge 1 588 230 1 557 226 0 9177 133 0 94 136 Saturated Steam Density 25 C kg m3 77 F psi 47 ...

Страница 17: ...ormed 3 General work area All maintenance staff and others working in the local area shall be instructed on the nature of work being carried out Work in confined spaces shall be avoided The area around the workspace shall be sectioned off Ensure that the conditions within the area have been made safe by control of flammable material 4 Checking for presence of refrigerant The area shall be checked ...

Страница 18: ...discharged this shall be done in a safe manner to avoid possibility of sparking that no live electrical components and wiring are exposed while charging recovering or purging the system that there is continuity of earth bonding 5 Repairing sealed components 1 During repairs to sealed components all electrical supplies shall be disconnected from the equipment being worked upon prior to any removal ...

Страница 19: ... It is recommended good practice that all refrigerants are recovered safely Prior to the task being carried out an oil and re frigerant sample shall be taken in case analysis is required prior to re use of reclaimed refrigerant It is essential that electrical power is available before the task is commenced 2 Become familiar with the equipment and its operation 3 Isolate system electrically 4 Befor...

Страница 20: ...covery units and especially not in cylinders 5 If compressors or compressor oils are to be removed ensure that they have been evacuated to an acceptable level to make certain that slightly flammable refrigerant does not remain within the lubricant The evacuation process shall be carried out prior to returning the compressor to the suppliers Only electric heating to the compressor body shall be emp...

Страница 21: ...tting into operation Decommissioning 1 If the safety is affected when the equipment is putted out of service the charged refrigerant shall be removed before decom missioning 2 Ensure sufficient ventilation at the equipment location 3 Be aware that malfunction of the equipment may be caused by refrigerant loss and a refrigerant leak is possible 4 Discharge capacitors in a way that won t cause any s...

Страница 22: ...lates around the base it may reach a flammable concentration in case the room is small To avoid ignition maintain a safe work environment by ensuring appropriate ventilation If the refrigerant leaks in a room or an area that has insufficient ventilation refrain from using flames until the work environment is improved by ensuring appropriate ventilation Do not install the outdoor unit in a basement...

Страница 23: ... Figure 2 shows the minimum floor areas required for given amounts of refrigerant in various refrigerant systems Make sure the installation conditions meet the requirements shown in the figure Take appropriate safety measures in accordance with the instructions provided in Figure 2 All of the above mentioned restrictions apply not only to new installations but also to relocations and layout change...

Страница 24: ... cycle Refrigerant Refrigerating machine oil R22 Mineral oil R407C Ester oil R410A Ester oil R32 Ester oil 1 Contaminants is defined as moisture air processing oil dust dirt wrong types of refrigerant and refrigerating machine oil Cause Symptoms Effects on the refrigerant cycle Water infiltration Frozen expansion valve and capillary tubes Clogged expansion valve and capillary tubes Poor cooling pe...

Страница 25: ...uP 3 that requires no flux when brazing between copper pipes or between a copper pipe and copper coupling If installed refrigerant pipes are not immediately connected to the equipment then braze and seal both ends 2 Reasons Refrigerant oil is highly hygroscopic and is likely to cause unit failure if moisture infiltrates into the system Residual flux in the refrigerant circuit will cause sludge to ...

Страница 26: ...ment with nitrogen up to the design pressure 4 15MPa 601psi and then judge the equipment s air tight ness taking temperature variations into account 2 Reasons Oxygen if used for an air tightness test poses a risk of explosion Only use nitrogen to check air tightness 3 Notes Procure a leak detector that is specifically designed to detect an HFC leak A leak detector for R22 will not detect an HFC R3...

Страница 27: ...e saturation pressure drops below 656 Pa continue vacuum drying for another 1 hour after the vacuum degree has reached the saturated vapor pressure of the water ice at the outside temperature When performing vacuum drying at a low outside temperature use a vacuum gauge appropriate for the temperature range Verify that the vacuum degree has not risen by more than 1Torr 130Pa 1hour after evacuation ...

Страница 28: ...to attain the desired vacuum pressure Be sure to apply a vacuum through the check joints at the refrigerant service valve on the high and low pressure sides BV1 and 2 and also through the check joints on the high and low pressure sides CJ1 and 2 To evacuate air only from the outdoor units Apply a vacuum through the check joints on the high and low pressure sides CJ1 and 2 To evacuate air from the ...

Страница 29: ...he liquid state without the need for turning it upside down Check the type of the cylinder on the label before use If the refrigerant leaks out it may be replenished The entire refrigerant does not need to be replaced Charge refrigerant in the liquid state Refer to the following page s 8 12 Measures for Refrigerant Leakage Cylinder with a siphon Cylinder color R32 is light blue Refrigerant chargin...

Страница 30: ...age has dropped below 20 VDC When a system controller is connected to the centralized control transmission cable to which power is supplied from the out door unit power jumper on the outdoor unit is connected to CN40 be aware that power can be supplied to the centralized control transmission and the system controller may detect an error and send an error notice if the outdoor unit fan is rotated b...

Страница 31: ... mark a line through the screw head washer and terminals with a permanent marker Example Poor contact caused by loose screws may result in overheating and fire Continued use of the damaged circuit board may cause overheating and fire Daisy chain Power supply terminal block indoor outdoor transmission line terminal block and centralized controller transmission line Mark a line Place the round termi...

Страница 32: ...ure to salt water mist 2 Avoid installing a sun shade over the outdoor unit so that rain will wash away salt deposits off the unit 3 Install the unit horizontally to ensure proper water drainage from the base of the unit Accumulation of water in the base of the outdoor unit will significantly accelerate corrosion 4 Periodically wash salt deposits off the unit especially when the unit is installed ...

Страница 33: ... 1 5 Cautionary notes on installation environment and maintenance 22 chapter 1 BS_01_L 1 Check Before Servicing 0000006448 BOOK 22 ページ 2021年10月6日 水曜日 午後1時57分 ...

Страница 34: ...Outdoor Address Startup 11 2 7 2 Single Refrigerant System 13 2 7 3 Grouped Operation of Units in Separate Refrigerant Circuits 15 2 7 4 System with a Connection of System Controller to Centralized Control Transmission Line 17 2 7 5 System with a Connection of System Controller to Indoor Outdoor Transmission Line 19 2 7 6 System with Multiple HBCs 21 2 8 Example System with an ME Remote Controller...

Страница 35: ...GB_BS_02_L 0000006407 BOOK 2 ページ 2021年10月12日 火曜日 午後4時22分 ...

Страница 36: ...nits will not be able to perform at the rated capacity when they are operated simultaneously Select a combination of units so that the total capacity of the connected indoor units is at or below the capacity of the outdoor unit whenever possible 3 Only either P Y W model indoor units equipped with a flow control valve or P Y WP WL model indoor units without a flow control valve can be connected to...

Страница 37: ...ission line and remote controller line Use the appropriate type of cables and observe the maximum allowable length specified for a given system If a given system has a long transmission line or if a noise source is located near the unit place the unit away from the noise source to reduce noise interference 1 M NET transmission line Cable type Facility type All facility types Type Shielded cable CV...

Страница 38: ...owered those changes will not take effect and the unit will not function properly 1 Applicable when LOSSNAY units are connected to the indoor outdoor transmission line 2 When setting the switch SW4 of the control board set it with the outdoor unit power on Refer to the following page s 5 1 1 Outdoor Unit Switch Functions and Factory Settings MA remote controller 1 ME remote controller 2 Cable type...

Страница 39: ...g order i Indoor unit to be connected to the main HBC ii Indoor unit to be connected to the sub HBC 1 iii Indoor unit to be connected to the sub HBC 2 iv Indoor unit to be connected to the sub HBC 3 Make the settings for the indoor units in the way that the for mula i ii iii iv is true 00 M NET adapter M NET con trol interface Free Plan adapter LOSSNAY LC 0 01 to 50 1 4 5 Assign an arbitrary but u...

Страница 40: ...e address within the range listed on the left to each unit 202 Central controller AE 200 AG 150A GB 50ADA G B 50A TR SC 0 201 to 250 Assign an arbitrary but unique address within the range listed on the left to each unit The address must be set to 0 to con trol the K control unit 000 LM adapter SC 201 to 250 Assign an arbitrary but unique address within the range listed on the left to each unit 24...

Страница 41: ...tored after a power failure 2 Not applicable to units with a built in drain pump or humidifier 3 Models with a built in drain pump cannot be turned on off by the plug individually All the units in the same refrigerant cir cuits will be turned on or off by the plug 4 Requires that the dipswitch settings for all the units in the group be made 5 To control the external input to and output from the ai...

Страница 42: ...r error output will not be available Type Usage Function Terminal to be used 1 Option Input Prohibiting cooling heating operation thermo OFF by an external input to the outdoor unit It can be used as the DEMAND control device for each system DEMAND level CN3D 2 Adapter for external input PAC SC36NA E Performs a low level noise operation of the outdoor unit by an ex ternal input to the outdoor unit...

Страница 43: ... voltage DC15V Contact rating current 0 1A Minimum applicable load 1mA at DC Relay circuit 2 External input adapter 3 CN3D 2 Optional part PAC SC36NA E or field supply X Low noise mode X Low noise mode Y Compressor ON OFF X Y Relay Contact rating voltage DC15V Contact rating current 0 1A Minimum applicable load 1mA at DC Y X CN3D Preparations in the field Maximum cable length is 10m External input...

Страница 44: ...100 0 50 The units may go into the Thermo OFF mode Correct 100 75 50 4 The percentage of the demand listed in the table above is an approximate value based on the compressor volume and does not necessarily correspond with the actual capacity 5 Notes on using demand control in combination with the low noise mode To enable the low noise mode it is necessary to short circuit 1 2 pin of CN3D on the ou...

Страница 45: ...igerant systems NO Manual address setup 4 Single refrigerant system With connection to transmission line for centralized control Manual address setup 5 Single refrigerant system With connection to indoor outdoor transmission line Manual address setup 6 Single refrigerant system With connection to transmission line for centralized control Manual address setup System configuration Connection to the ...

Страница 46: ...igerant System 3 Maximum allowable length 1 Indoor outdoor transmission line Maximum distance 1 25mm2 AWG16 or larger L1 L2 L3 L4 200m 656ft L1 L2 L11 L12 L13 200m 656ft L1 150m 492ft 2 Transmission line for centralized control No connection is required 3 MA remote controller wiring Maximum overall line length 0 3 to 1 25mm2 AWG22 to 16 m1 200m 656ft m2 m3 200m 656ft m4 m5 200m 656ft When connecti...

Страница 47: ... the Instruction Manual for the MA remote con troller for the setting method Group operation of indoor units To perform a group operation of indoor units IC daisy chain terminals 1 and 2 on the terminal block TB15 on all indoor units IC in the same group and then connect terminals 1 and 2 on the terminal block TB15 on the in door unit on one end to the terminal block on the MA re mote controller N...

Страница 48: ...1 Indoor outdoor transmission line Same as 2 7 1 2 Transmission line for centralized control No connection is required 3 MA remote controller wiring Same as 2 7 1 L2 HB 52 OC 51 TB7 S TB3 TB3 S IC TB5 S TB15 1 2 01 IC TB5 S TB15 1 2 02 A1 B2 MA A1 B2 MA LC TB5 S 05 IC TB5 S 1 2 TB15 IC TB5 S TB15 1 2 04 03 LC TB5 S 06 A1 B2 MA If the HB address overlaps any of the addresses that are assigned to ei...

Страница 49: ...he fol lowing order i Indoor unit to be connected to the main HBC ii Indoor unit to be connected to the sub HBC 1 iii Indoor unit to be connected to the sub HBC 2 iv Indoor unit to be connected to the sub HBC 3 Make the settings for the indoor units in the way that the formula i ii iii iv is true Port number setting is required To perform a group op eration of indoor units that feature different f...

Страница 50: ...mission line Maximum distance 1 25mm2 AWG16 or larger L12 200m 656ft L22 200m 656ft The maximum piping length between OC and HB is 150 m 2 Transmission line for centralized control L31 200m 656ft 3 MA remote controller wiring Same as 2 7 1 4 Maximum line distance via outdoor unit 1 25mm2 AWG16 or larger L12 L31 L22 1000 m 3280ft 500 m 1640ft 1 1 If a given system includes one or more unit or remot...

Страница 51: ...n a system with two or more HBCs make the settings for the indoor units in the following order i Indoor unit to be connected to the main HBC ii Indoor unit to be connected to the sub HBC 1 iii Indoor unit to be connected to the sub HBC 2 iv Indoor unit to be connected to the sub HBC 3 Make the settings for the indoor units in the way that the formula i ii iii iv is true Port number setting is requ...

Страница 52: ... a power supply unit is connected to the transmission line for centralized control leave the power jumper connector on CN41 as it is factory setting 3 Maximum allowable length 1 Indoor outdoor transmission line Same as 2 7 3 2 Transmission line for centralized control L31 L32 200m 656ft 3 MA remote controller wiring Same as 2 7 1 4 Maximum line distance via outdoor unit 1 25mm2 AWG16 or larger L32...

Страница 53: ...in unit IC 01 to 50 Assign the smallest address to the main unit in the group In a system with two or more HBCs make the settings for the indoor units in the fol lowing order i Indoor unit to be connected to the main HBC ii Indoor unit to be connected to the sub HBC 1 iii Indoor unit to be connected to the sub HBC 2 iv Indoor unit to be connected to the sub HBC 3 Make the settings for the indoor u...

Страница 54: ...on about how many booster units are required for a given system 3 Maximum allowable length 1 Indoor outdoor transmission line Maximum distance 1 25mm2 AWG16 or larger L12 200m 656ft L22 200m 656ft L25 200m 656ft The maximum piping length between OC and HB is 150 m 2 Transmission line for centralized control L31 200m 656ft 3 MA remote controller wiring Same as 2 7 1 4 Maximum line distance via outd...

Страница 55: ... 1 Group operation of indoor units Same as 2 7 1 4 Switch setting Address setting is required as follows 5 Address setting method Proce dures Unit or controller Address setting range Setting method Notes Facto ry set ting 1 Indoor unit Main unit IC 01 to 50 Assign the smallest address to the main unit in the group In a system with two or more HBCs make the settings for the indoor units in the fol ...

Страница 56: ...1 25mm2 AWG22 to 16 m1 200m 656ft m2 m3 200m 656ft 4 Maximum line distance via outdoor unit 1 25mm2 AWG16 or larger L32 L31 L12 1000 m 3280ft 500 m 1640ft 1 L32 L22 1000 m 3280ft 500 m 1640ft 1 L12 L31 L22 1000 m 3280ft 500 m 1640ft 1 1 If a given system includes one or more unit or remote controller that does not support the maximum allow able cable distance of 1000 m 3280 ft the maximum allowabl...

Страница 57: ...erent refrigerant systems and M1 and M2 ter minals of TB7 terminal block for centralized control sys tem connection on the outdoor unit OC in the same refrigerant circuit If a power supply unit is not connected to the transmis sion line for centralized control replace the power jump er connector on the control board from CN41 to CN40 on only one of the outdoor units When connecting a system contro...

Страница 58: ...ess of the main unit in the same group 1 Main unit address 1 main unit address 2 main unit address 3 etc 2 MA remote control ler Main re mote controller MA No set tings re quired Make the same indoor unit group settings with the system controller as the ones that were made with the MA remote controller Mai n Sub re mote con troller MA Sub re mote controller Settings to be made with the Sub Main sw...

Страница 59: ... outdoor transmission line Same as 2 7 3 2 Transmission line for centralized control Same as 2 7 4 3 ME remote controller wiring Maximum overall line length 0 3 to 1 25mm2 AWG22 to 16 m1 10m 32ft m2 m3 10m 32ft If the standard supplied cable must be extended use a cable with a diameter of 1 25mm2 AWG16 The section of the cable that exceeds 10m 32ft must be included in the maximum indoor outdoor tr...

Страница 60: ... settings for the indoor units in the way that the formula i ii iii iv is true Port number setting is required To perform a group op eration of indoor units that have different func tions set the indoor unit in the group with the greatest number of functions as the main unit 00 Sub unit Assign sequential numbers starting with the address of the main unit in the same group 1 Main unit address 1 mai...

Страница 61: ...the maximum number of connectable indoor units that are listed in the specifications for each outdoor unit The above table shows the number of transmission boosters that is required by the system with four HBCs For each HBC added or subtracted subtract or add two indoor units Refer to the DATABOOK for further information about how many booster units are required for a given system 10 When a power ...

Страница 62: ...er Same as 2 7 4 4 Wiring method 1 Indoor outdoor transmission line Same as 2 7 2 Shielded cable connection Same as 2 7 2 2 Transmission line for centralized control Same as 2 7 4 Shielded cable connection Same as 2 7 4 3 MA remote controller wiring When 2 remote controllers are connected to the system Group operation of indoor units Same as 2 7 1 4 ME remote controller wiring When 2 remote contro...

Страница 63: ...n door unit Main unit IC 01 to 50 Assign the smallest address to the main unit in the group Assign an address higher than those of the indoor units that are connected to the MA remote controller Make the initial settings for the indoor unit group settings via the system con troller To perform a group operation of indoor units that have different functions des ignate the indoor unit in the group wi...

Страница 64: ...n outdoor unit and HBC refrigerant pipework A Piping portion Water pipework between indoor units and HBC f g h k H 50 or less 1 110 or less Allowable value 60 or less 40 or less 2 Between HBC and outdoor units Outdoor unit above HBC Outdoor unit below HBC H Between indoor units and HBC h2 h1 Between indoor units Pipe Lengths Height difference 15 10 or less 3 15 10 or less 3 1 90 m is available dep...

Страница 65: ...pe size between Sub HBC and indoor unit 1 1 When connecting CMB WM108 1016V AA and CMB WM108 1016V BB refer to the installation manual for CMB WM108 1016V AA about pipe size Max 20 m 2 2 Piping length from Main HBC to the farthest indoor unit Max 40 m 2 Max 60 m 2 W WP WL10 I D 12 mm I D 12 mm I D 12 mm W WP WL11 W WP WL15 I D 12 mm I D 12 mm I D 15 5 mm W WP WL16 W WP WL25 I D 15 5 mm I D 15 5 mm...

Страница 66: ...n HBC the pipes that connect the unit to the same set of HBC ports cannot be branched out to connect additional units Selection of water piping Select the size according to the total capacity of indoor units to be installed downstream Do not connect multiple indoor units to the same port when operating each of them in different modes cooling heating stop and thermo OFF The indoor units connected t...

Страница 67: ...nnected to the ports 4 and 5 8 and 9 or 12 and 13 at the same time See Fig 2 When the junction pipes are connected to 8 Sub HBC ports the branched sides of the junction pipes cannot be connected to the ports 4 and 5 at the same time See Fig 3 When a W WP WL100 or a 125 model indoor unit is connected to an HBC the pipes that connect the unit to the same set of HBC ports cannot be branched out to co...

Страница 68: ...Refrigerant Circuits 4 3 2 Outdoor Unit Refrigerant Circuit Diagrams 8 3 3 Functions of the Major Components of Outdoor Unit 14 3 4 Functions of the Major Components of Indoor Unit 16 3 5 External Appearance and Refrigerant Circuit Components of HBC 17 3 5 1 Main HBC 17 3 5 2 Sub HBC 20 3 6 HBC Refrigerant Circuit Diagrams 22 3 7 Functions of the Major Components of HBC 24 0000006412 BOOK 1 ページ 20...

Страница 69: ...GB_BS_03_L 0000006412 BOOK 2 ページ 2021年10月12日 火曜日 午後4時33分 ...

Страница 70: ... 1 External Appearance of Outdoor Unit 1 PURY M200 M250 M300YNW A1 PURY EM200 EM250 EM300YNW A1 Fan guard Fan guard Fan Fan Fin guard Fin guard Control box INV BOX Control box INV BOX Control box MAIN BOX Control box MAIN BOX Drain pan Drain pan Front panel Front panel Heat exchanger Heat exchanger Front panel Front panel Rear panel Rear panel Side panel Side panel Internal panel Internal panel In...

Страница 71: ...0YNW A1 PURY EM350 EM400 EM450YNW A1 Fan guard Fan guard Fan Fan Fin guard Fin guard Control box Control box Drain pan Drain pan Front panel Front panel Heat exchanger Heat exchanger Front panel Front panel Rear panel Rear panel Side panel Side panel Internal panel Internal panel Internal panel Internal panel Side panel Side panel 0000006412 BOOK 2 ページ 2021年10月12日 火曜日 午後4時33分 ...

Страница 72: ...RY EM500YNW A1 Fan guard Fan guard Fan Fan Fin guard Fin guard Control box Control box Drain pan Drain pan Front panel Front panel Heat exchanger Heat exchanger Front panel Front panel Rear panel Rear panel Side panel Side panel Internal panel Internal panel Internal panel Internal panel Side panel Side panel Side panel Side panel 0000006412 BOOK 3 ページ 2021年10月12日 火曜日 午後4時33分 ...

Страница 73: ...valve CV3a Check valve CV6a Check valve CV5a Linear expansion valve LEV2d Solenoid valve SV1a Linear expansion valve LEV9 Linear expansion valve LEV4 Linear expansion valve LEV2a Linear expansion valve LEV2b Solenoid valve SV2 High pressure side valve BV2 Low pressure side valve BV1 Oil separator Compressor Compressor cover Low pressure sensor 63LS High pressure sensor 63HS1 High pressure switch 6...

Страница 74: ...a Check valve CV5a Linear expansion valve LEV2d Solenoid valve SV1a Linear expansion valve LEV9 Linear expansion valve LEV4 Linear expansion valve LEV2a Linear expansion valve LEV2b Solenoid valve SV2 Oil separator Compressor Compressor cover Low pressure sensor 63LS High pressure sensor 63HS1 High pressure switch 63H1 Accumulator Low pressure check joint CJ2 High pressure check joint CJ1 High pre...

Страница 75: ...near expansion valve LEV2d Solenoid valve SV1a Gas liquid separator Linear expansion valve LEV9 Linear expansion valve LEV4 Linear expansion valve LEV2a Linear expansion valve LEV2b Solenoid valve SV2 Oil separator Compressor Compressor cover Low pressure sensor 63LS High pressure sensor 63HS1 High pressure switch 63H1 Accumulator Low pressure check joint CJ2 High pressure check joint CJ1 High pre...

Страница 76: ... valve CV6a Check valve CV5a Linear expansion valve LEV2c Linear expansion valve LEV2d Solenoid valve SV1a Solenoid valve SV2 Linear expansion valve LEV9 Linear expansion valve LEV4 Linear expansion valve LEV2a Linear expansion valve LEV2b High pressure side valve BV2 Low pressure side valve BV1 Oil separator Compressor Compressor cover Low pressure sensor 63LS High pressure sensor 63HS1 High pres...

Страница 77: ...Outdoor Unit Refrigerant Circuit Diagrams 1 PURY M200 M300YNW A1 SV1a Gas liquid separator 63H1 ST3 ST6 TH4 21S4b CP1 CJ1 63LS ST1 BV2 BV1 ACC Comp O S 21S4a LEV2a LEV2b LEV4 SV2 HEX LEV2d CV2a CV3a CV5a CV6a TH5 LEV9 Hex for INV cooling ST18 CJ2 63HS1 TH15 ST7 TH3 TH7 CHECK VALVE BLOCK 0000006412 BOOK 8 ページ 2021年10月12日 火曜日 午後4時33分 ...

Страница 78: ...rigerant Circuits 2 PURY EM200 EM300YNW A1 SV1a Gas liquid separator 63H1 ST3 ST6 TH4 21S4b CP1 CJ1 63LS ST1 BV2 BV1 ACC Comp O S 21S4a LEV2a LEV2b LEV4 SV2 HEX LEV2d CV2a CV3a CV5a CV6a TH5 LEV9 Hex for INV cooling ST18 CJ2 63HS1 TH15 ST7 TH3 TH7 CHECK VALVE BLOCK 0000006412 BOOK 9 ページ 2021年10月12日 火曜日 午後4時33分 ...

Страница 79: ...frigerant Circuits 3 PURY M350 M450YNW A1 SV1a Gas liquid separator 63H1 ST3 ST6 TH4 21S4b CP1 CJ1 63LS ST1 BV2 BV1 ACC Comp O S 21S4a LEV2a LEV2b SV2 HEX LEV2d CV2a CV3a CV5a CV6a TH5 LEV9 ST18 CJ2 63HS1 TH15 ST7 TH3 TH7 CHECK VALVE BLOCK LEV4 Refrigerant cooling 0000006412 BOOK 10 ページ 2021年10月12日 火曜日 午後4時33分 ...

Страница 80: ...rigerant Circuits 4 PURY EM350 EM450YNW A1 SV1a Gas liquid separator 63H1 ST3 ST6 TH4 21S4b CP1 CJ1 63LS ST1 BV2 BV1 ACC Comp O S 21S4a LEV2a LEV2b SV2 HEX LEV2d CV2a CV3a CV5a CV6a TH5 LEV9 ST18 CJ2 63HS1 TH15 ST7 TH3 TH7 CHECK VALVE BLOCK LEV4 Refrigerant cooling 0000006412 BOOK 11 ページ 2021年10月12日 火曜日 午後4時33分 ...

Страница 81: ...S4a 63HS1 TH4 21S4c TH5 63LS Comp O S CJ2 ST3 CP1 SV1a LEV2b SV2a CJ1 LEV2d CV2a ST6 LEV9 LEV2a LEV2c ST18 TH15 ST7 TH3 TH7 Orifice ST1 BV2 BV1 CV2b CV3a CV5a CV6a Gas liquid separator Hex for INV cooling 21S4b 21S4b 21S4a CV1b 21S4b 21S4b Products manufactured in August 2020 and earlier are equipped with Cv1b 0000006412 BOOK 12 ページ 2021年10月12日 火曜日 午後4時33分 ...

Страница 82: ...1S4a 63HS1 TH4 21S4c TH5 63LS Comp O S CJ2 ST3 CP1 SV1a LEV2b SV2a CJ1 LEV2d CV2a ST6 LEV9 LEV2a LEV2c ST18 TH15 ST7 TH3 TH7 Orifice ST1 BV2 BV1 CV2b CV3a CV5a CV6a Gas liquid separator Hex for INV cooling 21S4b 21S4b 21S4a CV1b 21S4b 21S4b Products manufactured in August 2020 and earlier are equipped with Cv1b 0000006412 BOOK 13 ページ 2021年10月12日 火曜日 午後4時33分 ...

Страница 83: ... pro tection Pres sure switch 63H1 1 Detects high pressure 2 Provides high pressure pro tection 4 15MPa 601psi OFF set ting Thermis tor TH4 Discharge temperature 1 Detects discharge air tem perature 2 Provides high pressure pro tection Degrees Celsius Resistance check 0 C 32 F 698 kΩ 10 C 50 F 413 kΩ 20 C 68 F 250 kΩ 30 C 86 F 160 kΩ 40 C 104 F 104 kΩ 50 C 122 F 70 kΩ 60 C 140 F 48 kΩ 70 C 158 F 3...

Страница 84: ...V Open while being powered closed while not being pow ered LEV LEV2a 2b 2c LEV2c is only on the E M500 models During cooling Heat exchanger capacity control During heating Refrigerant equalization control DC12V Opening of stepping motor driving valve 0 3000 pulses LEV2a 2b 0 3000 pulses LEV2d E M200 300 0 6000 pulses LEV2d E M350 500 Continuity Test with a Tester Continuity be tween white and oran...

Страница 85: ...it control Thermo Temperature sensor Indoor air temperature Indoor unit control Thermo Pressure sensor inner wa ter PS1 1 Detects inner water pres sure 2 Check flow rate Pressure sensor outlet water PS2 1 Detects outlet water pres sure 2 Check flow rate 1 273 t R0 15k R0 80 3460 Rt 15exp 3460 1 273 Pressure 0 1 0 MPa 145psi Vout 0 5 4 5V 0 392V 0 098 MPa 14psi Pressure MPa 0 25 x Vout V 0 125 Pres...

Страница 86: ...nt Circuits 3 5 External Appearance and Refrigerant Circuit Components of HBC 3 5 1 Main HBC 1 External view 1 CMB WM350 500F AA Expansion Vessel Water inlet Drain High pressure pipe To Sub HBC Hot water To Sub HBC Cold water From Sub HBC Hot water From Sub HBC Cold water Low pressure pipe 0000006412 BOOK 17 ページ 2021年10月12日 火曜日 午後4時33分 ...

Страница 87: ... side 3 Rear side Water pressure protection valve CPV1 Strainer LEV1 4 way valve 21S4Mb Cooling main heat exchanger 3 way valve MV1 Pressure sensor Pw3 Heating main heat exchanger 4 way valve 21S4Ma LEV3 Pressure sensor PS3 LEV2 Pressure sensor Pw1 Solenoid valve SV1 Pump 2 Strainer Pressure sensor PS1 Pump 1 0000006412 BOOK 18 ページ 2021年10月12日 火曜日 午後4時33分 ...

Страница 88: ...rcuit Components of HBC BS_03_L chapter 3 19 3 Major Components Their Functions and Refrigerant Circuits 4 Front side bottom 5 Front side top Pressure sensor Pw2 Pressure sensor Pw4 Valve block VB3a 0000006412 BOOK 19 ページ 2021年10月12日 火曜日 午後4時33分 ...

Страница 89: ...rcuits 3 5 2 Sub HBC 1 Front 1 CMB WM1016V BB 2 CMB WM108V BB 2 Rear right side From Main HBC Hot water From Main HBC Cold water To Main HBC Cold water To Main HBC Hot water Drain From Main HBC Hot water From Main HBC Cold water To Main HBC Cold water To Main HBC Hot water Drain Air purge valve 0000006412 BOOK 20 ページ 2021年10月12日 火曜日 午後4時33分 ...

Страница 90: ...erant Circuit Components of HBC BS_03_L chapter 3 21 3 Major Components Their Functions and Refrigerant Circuits 3 Top side 1 CMB WM1016V BB 2 CMB WM108V BB Valve block VB3f Valve block VB3e 0000006412 BOOK 21 ページ 2021年10月12日 火曜日 午後4時33分 ...

Страница 91: ...H31f M M M M M M VB3b VB3c VB3d VB3e VB3f Valve block VB3a Port No 1 No 3 Port No 4 No 6 M MV1 Strainer S S Pw2 Pw1 PS PS Pw4 Pw3 Strainer Pump2 Pump1 PS PS M TH33 TH32 TH35 Refrigerant Refrigerant Refrigerant TH34 Refrigerant Heating main heat exchanger Cooling main heat exchanger Heating main heat exchanger Cooling main heat exchanger CPV1 S Strainer TH13 PS1 PS 21S4Ma LEV1 Water Water LEV2 LEV3...

Страница 92: ...ir purge valve M M M M M M Air purge valve VB3a VB3b VB3d VB3e VB3f VB3h To Main HBC TH33 TH32 Port No 1 No 4 Port No 5 No 8 Sub HBC water system Valve block TH31a TH31b TH31h TH31i TH31j TH31p Air purge valve M M M M M M Air purge valve VB3a VB3b VB3h VB3i VB3j VB3p To Main HBC TH33 TH32 Port No 1 No 8 Port No 9 No 16 Sub HBC water system Valve block 0000006412 BOOK 23 ページ 2021年10月12日 火曜日 午後4時33分...

Страница 93: ...ing main heat exchanger DC12V Opening of a valve driven by a stepping motor 0 3000 pulses Continuity check with a tester Continuity be tween white red and orange Continuity be tween yellow brown and blue LEV2 Refriger ant side Supplies refrigerant to Cooling main heat exchanger LEV3 Refriger ant side Subcool control Thermistor TH11 12 T13 14 Refriger ant side Compressor frequency control LEV openi...

Страница 94: ... stepping motor 2 Pump PUMP1 2 Water side Temperature difference control Water flow to each indoor unit is controlled Rated voltage DC268V Specified voltage DC0 6V Water pressure protection valve CPV1 Water side Trips when the internal pressure in the water circuit rises Operating pressure 560 kPa 3 way valve MV1 Water side Supplies water to the Pump 1 side or the Pump 2 side DC12V Opening of a va...

Страница 95: ...trol Same as the table above Valve block VB3a p 1 Water side 1 Switches the water flow path depending on the operation mode 2 Temperature difference con trol Water flow to each indoor unit is controlled DC12V Opening of a valve driven by a stepping motor 2 1 The names of port a through p are corresponding to port 1 through 16 2 For the degree of valve opening 0 or 1600 indicates fully open and 800...

Страница 96: ... 4 Fan Board 12 4 2 5 Noise Filter 13 4 2 6 Filter Board 15 4 2 7 Capacitor Board CAP Board 16 4 3 Outdoor Unit Electrical Wiring Diagrams 17 4 4 Transmission Booster Electrical Wiring Diagrams 20 4 5 HBC Circuit Board Arrangement 21 4 5 1 HBC and Sub HBC Control Box 21 4 6 HBC Circuit Board Components 22 4 6 1 HBC and Sub HBC Circuit Board 22 4 7 HBC Electrical Wiring Diagrams 27 4 7 1 HBC and Su...

Страница 97: ...GB_BS_04_L 0000006414 BOOK 2 ページ 2021年10月12日 火曜日 午後4時43分 ...

Страница 98: ... servicing reconnect the relay connector RYFAN1 in the INV box as it was 7 When opening or closing the front panel of the control box do not touch any of the internal components Before inspecting inside the control box turn off the power to the unit leave it turned off for at least 10 minutes and check that the voltage across Pin 1 and Pin 5 of connector RYPN in the INV box is 20 VDC or less It ta...

Страница 99: ...nd Wiring Diagrams MAIN BOX 1 Leave the grounding connected during maintenance Control board PS board Ground screw Note 1 Ground screw Note 1 Transmission cable terminal block TB3 TB7 Connector RYPS1 white 3pin RYPS2 white 5pin RY63H white 2pin 0000006414 BOOK 2 ページ 2021年10月12日 火曜日 午後4時43分 ...

Страница 100: ... Check that the terminal is securely locked in place Press the tab in the middle of the terminal to remove it 3 Leave the grounding connected during maintenance 4 Connecting the RYRS2 cable to the RYPN terminal will damage the FAN board RYFAN1 In rush current resistor R1 R5 Note 2 Noise filter Power supply terminal block PYPN 1 pin 5 pin Fan board INV board The figure at left shows the unit seen f...

Страница 101: ...nector RYFAN1 and RYFAN2 in the INV box as it was 8 When opening or closing the front panel of the control box do not touch any of the internal components Before inspecting inside the control box turn off the power to the unit leave it turned off for at least 10 minutes and check that the voltage across Pin 1 and Pin 5 of connector RYPN in the INV box is 20 VDC or less It takes about 10 minutes to...

Страница 102: ... relay connector RYFAN1 and RYFAN2 in the INV box as it was 8 When opening or closing the front panel of the control box do not touch any of the internal components Before inspecting inside the control box turn off the power to the unit leave it turned off for at least 10 minutes and check that the voltage across Pin 1 and Pin 5 of connector RYPN in the INV box is 20 VDC or less It takes about 10 ...

Страница 103: ...ply ON TP1 Indoor outdoor transmission check pin TP2 Indoor outdoor transmission check pin Sensor input F001 AC250V 3 15A T CNUSB USB memory connector Actuator drive output SW4 6 Dip switch CN991 Battery box CNRYA 72C drive signal Abbreviated name of connector color Example BU above CN601 indicates that the connector is blue CN600 9 VDC input GND 12 VDC input GND CN603 Cooling fan control signal o...

Страница 104: ... Indoor outdoor transmission signal input output Centralized control system power supply output CNINT GND 5 VDC input Indoor unit system power supply ON OFF signal input CN101 Cooling fan ON OFF signal input Inverter reset signal input Locked cooling fan sensor output Locked cooling fan sensor output CN304 63H error detection output 3 3 VDC output GND CNINV COMPINV power supply output 17 VDC outpu...

Страница 105: ...r input CN202 Indoor outdoor transmission signal input output Centralized control system power supply output CNINT GND 5 VDC input Indoor unit system power supply ON OFF signal input CN101 Cooling fan ON OFF signal input Inverter reset signal input Locked cooling fan sensor output Locked cooling fan sensor output CN304 63H error detection output 3 3 VDC output GND CNINV COMPINV power supply output...

Страница 106: ...d cause an electric shock when the outdoor unit fan rotates in windy conditions Refer to the wiring nameplate for details 5 After servicing reconnect the relay connector RYFAN1 of the fan as it was 6 When the power is turned on the compressor is energized even while it is not operating Before turning on the power discon nect all power supply wires from the compressor terminal block and measure the...

Страница 107: ...YPN is 20 VDC or less The capacitor may collect a charge and cause an electric shock when the outdoor unit fan rotates in windy conditions Refer to the wiring nameplate for details 5 After servicing reconnect the relay connector RYFAN1 RYFAN2 of the fan as it was 6 When the power is on the compressor or heater is energized even while the compressor is stopped Before turning on the power disconnect...

Страница 108: ...he relay connector RYFAN1 RYFAN2 of the fan as it was 6 When the power is turned on the compressor is energized even while it is not operating Before turning on the power discon nect all power supply wires from the compressor terminal block and measure the insulation resistance of the compressor Check the compressor for a ground fault If the insulation resistance is 1 0 MΩ or below connect all pow...

Страница 109: ...r unit fan is not rotating and that the voltage across pins 1 and 5 of connector RYPN is 20 VDC or less The capacitor may collect a charge and cause an electric shock when the outdoor unit fan rotates in windy conditions Refer to the wiring nameplate for details 4 To connect wiring to TB7 check that the voltage is 20 VDC or below 5 After servicing reconnect the relay connector RYFAN1 RYFAN2 of the...

Страница 110: ...Input N TB13 Input L3 TB12 Input L2 TB11 Input L1 Ground TB22 Output L2 TB23 Output L3 TB21 Output L1 CN5 Output L1 N CN1 Output L2 N Ground Ground Ground F1 F2 F3 F4 Fuse 250 VAC 6 3 A CN2 Surge absorber circuit Surge absorber circuit Open phase detection circuit Open phase detection circuit CN3 Open phase detection circuit Open phase detection circuit 0000006414 BOOK 13 ページ 2021年10月12日 火曜日 午後4時4...

Страница 111: ...t N TB13 Input L3 TB33 L3 TB12 Input L2 TB11 Input L1 Ground CN5 Output L1 N CN1 Output L2 N Ground Ground Ground F1 F2 F3 F4 Fuse 250 VAC 6 3 A CN2 Surge absorber circuit Surge absorber circuit Open phase detection circuit Open phase detection circuit CN3 Open phase detection circuit Open phase detection circuit 0000006414 BOOK 14 ページ 2021年10月12日 火曜日 午後4時43分 ...

Страница 112: ...oor Unit Circuit Board Components BS_04_L chapter 4 15 4 Electrical Components and Wiring Diagrams 4 2 6 Filter Board 1 PURY E M500YNW A1 CN1A L1 N CN1B Input L3 L2 0000006414 BOOK 15 ページ 2021年10月12日 火曜日 午後4時43分 ...

Страница 113: ...r has a locking function Make sure the cable heads are securely locked in place Press the tab on the terminals to remove them 3 Control box houses high temperature parts Be well careful even after turning off the power source 4 Perform the service after disconnecting the relay connector RYFAN1 RYFAN2 Before plugging in or unplugging connectors check that the outdoor unit fan is not rotating and th...

Страница 114: ...ector Magnetic relay inverter main circuit Model name Appliance PUHY PURY LEV2d Compressor shell bottom temperature OA temperature TH15 TH7 TH6 8 Subcooled liquid refrigerant temperature IPM temperature THHS LEV9 9 10 Heat exchanger for inverter MAIN BOX PS Board CN303 CN202 DB2 DB1 63H1 RYPS1 Z2 U Z1 U CN100 red IPM power supply circuit M NET power supply circuit CPU power supply circuit 2 1 2 1 ...

Страница 115: ...ol Explanation RYFAN1 L3 N 1 L 2 L L L3 N 1 L 2 L CN2 CN3 black 2 1 6 3 1 IPM CNINV 3 1 CNDCN black F001 DC 400V 10AT RSH01 02 03 1 4 CN80 LED4 CPU in operation LED1 Normal operation Lit Error Blink 2 1 CN81 green 3 2 IPM CNDCP red CNINV 1 3 CNDCN black F001 DC 400V 10AT RSH01 02 03 1 4 CN80 LED4 CPU in operation LED1 Normal operation Lit Error Blink 2 1 CN81 green 1 4 7 1 2 3 2 SWU2 DC12V CN51 1 ...

Страница 116: ...63H1 2 1 RY63H 4 3 2 1 CN202 IPM power supply circuit M NET power supply circuit CPU power supply circuit PS Board 1 3 1 2 1 2 CNDC 4 5 1 2 4 blue CN101 1 2 2 4 red CNINT 3 yellow CNINV yellow CNFAN1 IPM CNDCP red CNINV 3 1 CNDCN black F001 DC 400V 10AT RSH01 02 03 1 4 CN80 LED4 CPU in operation LED1 Normal operation Lit Error Blink 2 1 CN81 green 1 4 7 1 2 3 2 THHS SW001 ON 1 4 FAN Board ON IPM C...

Страница 117: ... White White White White Blue Red Red DSA White White Blue Red Red Red Red Varistor Varistor Noise filter Stabilized power supply 4 3 2 1 1 2 3 CN2 CN1 Black Black Black Black Green Yellow 1 2 3 E 4 Choke coil 1 2 CN3 1 2 1 2 CN4 CN2 1 2 CN1 Electronic control board Black White Red Red Black S B A S B A Terminal block 2 for transmission line TB3 Expanded indoor unit side Terminal block 1 for trans...

Страница 118: ... Sub HBC Control Box 1 CMB WM350 500F AA 2 CMB WM108V 1016V BB PS board INV board Terminal block for power supply Terminal block for transmission line VB valve block board Control board AC reactor ACL SUB PS board Terminal block for power supply VB valve block board Control board VB valve block board 0000006414 BOOK 21 ページ 2021年10月12日 火曜日 午後4時43分 ...

Страница 119: ...oard Components 4 6 1 HBC and Sub HBC Circuit Board 1 Control board SWP 01 03 Push switch SWU 01 02 Address SW 001 002 011 Dip switch LD 001 Maintenance LED CN991 Battery box CN703 Portable charger CNUSB USB memory connector TB3 Indoor Outdoor transmission terminal block 0000006414 BOOK 22 ページ 2021年10月12日 火曜日 午後4時43分 ...

Страница 120: ...ed Unlit Microcomputer is not energized LED 02 Lit Converter operation Blinking Converter error CN409 Battery box CNDCN1 2 Bus voltage output N CNDCP1 2 Bus voltage output P F120 6 3A T FTP FTN Bus voltage measurement point F121 3 15A T CNAC L N Voltage input F110 6 3A T F111 15A T Ground FT 001 002 ACL terminal 0000006414 BOOK 23 ページ 2021年10月12日 火曜日 午後4時43分 ...

Страница 121: ... Wiring Diagrams 3 INV board CNDCP Bus voltage input P CNINV Inverter output F001 15A T DIP IPM rear SW001 Address switch LED01 Lit Inverter operation Blinking Inverter error LED04 Lit Microcomputer in operation CNDCN Bus voltage input N 0000006414 BOOK 24 ページ 2021年10月12日 火曜日 午後4時43分 ...

Страница 122: ... 4 6 HBC Circuit Board Components BS_04_L chapter 4 25 4 Electrical Components and Wiring Diagrams 4 VB board CN991 Battery box 0000006414 BOOK 25 ページ 2021年10月12日 火曜日 午後4時43分 ...

Страница 123: ...d Components 26 chapter 4 BS_04_L 4 Electrical Components and Wiring Diagrams 5 SUB PS board CNFG Ground FT01 02 Bus voltage measurement point F01 6 3A T CNAC L N Voltage input 0000006414 BOOK 26 ページ 2021年10月12日 火曜日 午後4時43分 ...

Страница 124: ...h on Control Board are as follows SWU01 0 SWU02 0 3 The wirings to TB1 and TB3 shown in dotted line are field work CNINV White CN81 Green CN80 White CNDCN Black 2 1 CNDCP Red SWU01 10 SWU02 10 LD001 LED02 Normal operation lit Error blink LED01 CPU in operation LED01 Normal operation lit Error blink LED04 CPU in operation LED01 Normal operation lit Error blink LED04 CPU in operation PW4 PW3 PS3 PS1...

Страница 125: ...3 SWU02 SWU01 FS TO NEXT INDOOR UNIT PULL BOX FUSE 16A BREAKER 16A POWER SUPPLY 220V 240V 50Hz 60Hz LD001 SW002 SW011 SW001 SW901 Switching Power Supply Indoor outdoor Transmission Line F01 250VAC 6 3A F NR01 NR02 SA01 SA02 SA03 FT02 FT01 CN306 Green CN410 Yellow CN404 Red CNV1 White CN303 White CN305 Green CN405 Black CN409 Green CNTH1 Green CNTH2 Black CNTH3 Green CNVS1 White CNDC1 Black CN701 W...

Страница 126: ...1 2 3 4 5 1 2 3 1 2 3 4 5 1 2 3 1 2 3 4 5 1 2 3 M M Detail of X section Name Symbol FS Float switch Function setting connector Z1 Z2 Fuse AC250V 6 3A F F01 TB Terminal block for power source for Transmission Terminal block TB3 TH31a h TH32 33 Thermister sensor VB3a h Valve block VB3a VB3f VB3b VB3c VB3d VB3e VB3g VB3h CNLS6 Red CNVB6 Red CNVB5 Green CNVB7 Blue CNLS7 Blue CNVB8 Yellow CNLS8 Yellow ...

Страница 127: ...SWU01 3 3 5 4 1 6 3 2 TB 6 4 1 4 2 5 2 CN701 White CN702 Black 1 3 4 3 1 2 1 2 4 5 1 2 4 3 4 6 2 1 2 3 4 3 1 2 1 2 2 1 3 2 1 2 2 3 4 1 5 4 1 2 5 3 4 6 1 3 2 4 1 2 2 2 3 4 1 4 2 1 2 3 1 3 2 1 4 3 2 1 A M1 3 1 1 S 2 2 1 1 5 B M2 FUSE 16A BREAKER 16A TO NEXT INDOOR UNIT PULL BOX POWER SUPPLY 220V 240V 50Hz 60Hz TB3 FS Control Board VB Board VB Board 2 3 4 5 6 7 8 9 1 ON OFF SW011 2 3 4 5 6 7 8 1 ON O...

Страница 128: ...Red CNVB6 Red CNVB5 Green 1 2 3 4 5 1 2 3 CNVB7 Blue CNLS7 Blue 1 2 3 4 5 1 2 3 CNVB8 Yellow CNLS8 Yellow M VB3o M VB3p LDV05 CPU in operation CNVB4 Blue LDV04 CPU in operation CNVB3 Black LDV03 CPU in operation CNVB2 Yellow LDV02 CPU in operation CNVB1 Red LDV01 CPU in operation LDV06 CPU in operation LDV07 CPU in operation LDV08 CPU in operation Detail of X section Name Symbol FS Float switch Fu...

Страница 129: ... 4 7 HBC Electrical Wiring Diagrams 32 chapter 4 BS_04_L 4 Electrical Components and Wiring Diagrams 0000006414 BOOK 32 ページ 2021年10月12日 火曜日 午後4時43分 ...

Страница 130: ...alve control LEV2a LEV2b LEV2c and LEV2d 19 5 2 10 Control of Controller Cooling Function Electronic Expansion Valve LEV9 19 5 2 11 Injection Control Linear Expansion Valve LEV4 19 5 2 12 Control at Initial Startup 19 5 2 13 Operation Mode 20 5 2 14 Demand Control 21 5 2 15 Control of IH energization without the compressor in operation 21 5 3 HBC Control 22 5 3 1 Water Pump Control 22 5 3 2 4 Way ...

Страница 131: ...GB_BS_05_M 0000006450 BOOK 2 ページ 2021年10月26日 火曜日 午後7時2分 ...

Страница 132: ...ller Before power on 2 Deletion of connection in formation Normal control Deletion Before power on 3 Preset before shipment 4 5 6 7 8 9 10 SW6 1 2 3 4 Model setting outdoor unit high static pressure setting High static pressure Note 4 Before power on 5 Model setting outdoor unit high static pressure setting Before power on 7 Performance priority low noise mode setting Performance priori ty mode No...

Страница 133: ...ese switches to ON will disable the error detection function and can lead to equipment damage 6 Shaded areas indicate factory settings SW7 1 Enables or disables the de tection of the following types of inverter compres sor errors ACCT DCCT sensor er ror 5301 Detail code 115 116 ACCT DCCT sensor circuit error 5301 Detail code 117 118 IPM open phase CNCT2 connection error 5301 De tail code 119 Wirin...

Страница 134: ...n the combined setting with No 897 Note 7 Anytime after power on OFF ON No 912 0000100111 Pump down function Normal control Pump down opera tion After being energized and while the compres sor is stopped No 913 1000100111 Forced defrost Note 2 Normal control Forced defrost starts 10 minutes after the completion of defrost op eration OFF ON or 10 minutes after com pressor start up OFF ON No 915 110...

Страница 135: ...w function The stored settings will automatically be restored when the outdoor unit control board is replaced Not applicable to SW4 982 If none of the connected indoor units supports the new function no configuration information will be saved If this is the case manually record the settings configuration on the control box panel The new function is supported on most units that are manufactured in ...

Страница 136: ... the left fan board to ON address 6 Leave SW1 1 to OFF during normal operation Setting this switch to ON will disable the error detection function and may result in equipment damage Switch Function Function according to switch setting Switch setting timing OFF ON SW1 1 Enabling Disabling no load opera tion No load operation will continue for approximately 30 seconds and then the unit will come to ...

Страница 137: ...ting 4 C 7 2 F up Indoor unit inlet 100h Disabled Fan output 2500h Enabled Thermo ON signal Built in sensor on the remote controller Available During heating operation According to the SW1 7 setting Heat pump Always on while in the heating mode Fan speed setting for Heating Thermo OFF Very Low Low Preset speed Cooling only Enabled Depends on SW3 5 Third setting 2 Disabled Disabled Enabled Enabled ...

Страница 138: ...N 1 2 3 4 5 6 7 8 9 10 The figure at left shows that the switches 1 through 5 are set to ON and 6 through 10 are set to OFF W WP WL20 4 W WP WL15 3 W WP WL10 2 W WP WL25 5 W WP WL32 6 W WP WL40 8 W WP WL50 10 W WP WL63 13 Model Capacity model code SW2 setting W WP WL80 16 W WP WL100 20 W WP WL125 25 ON 1 2 3 4 5 6 ON 1 2 3 4 5 6 ON 1 2 3 4 5 6 ON 1 2 3 4 5 6 ON 1 2 3 4 5 6 ON 1 2 3 4 5 6 ON 1 2 3 ...

Страница 139: ... right Remote controller unit Rotary switch Example In case of address 108 Address setting range Setting method Main remote controller 101 150 Add 100 to the smallest address of all the indoor units in the same group Sub remote controller 151 200 Add 150 to the smallest address of all the indoor units in the same group Setting of rotary switch Address No 01 99 1 101 199 with the 100 s digit automa...

Страница 140: ...lable Any time after be ing energized 4 Forced termination of a test run Not available Available Any time after be ing energized 5 Water tightness check Not available When the switch is set from ON to OFF set the VB3 to the specified opening for stop page Available Two water pumps ON output 30 one minute after setting VB3 to 0 or 1600 Any time after be ing energized only when the control mode is s...

Страница 141: ...e switch to OFF where indicated by which may be set to OFF for a reason Set SW1 3 to ON to set the address to 5 left pump INV board Set SW1 4 to ON to set the address to 6 right pump INV board Switch Function Function according to switch setting Switch setting tim ing OFF ON SW1 1 2 3 Address setting See the notes be low 0 5 Before power on 4 0 6 Before power on 0000006450 BOOK 10 ページ 2021年10月26日 ...

Страница 142: ...g in the microcomputer and initial setting of each of the LEV opening This process will take up to 5 minutes During the initial processing the LED monitor on the outdoor unit s control board displays S W version refrigerant type Model and capacity and communication address in turn every second 5 2 3 Startup Control The upper limit of frequency during the first 3 minutes of the operation is 50 Hz W...

Страница 143: ...in operation When the low pressure 63LS drops below 0 38 Mpa 55 psi during cooling only or cooling main operation When high pressure 63HS1 rises When 63HS1 exceeds 3 62MPa 525psi When 63HS1 is 3 43MPa 497 psi or below in 30 seconds Operation SV2 ON OFF When high pressure 63HS1 rises during heating operation While the compressor is operating at the minimum frequency and when 63HS1 exceeds 3 43 MPa ...

Страница 144: ...erating temperature is 110 C 230 F 3 Periodic frequency control Frequency control other than the ones performed at start up upon status change and for protection is called periodic frequen cy control convergent control and is performed in the following manner Periodic control cycle Periodic control is performed after the following time has passed 30 seconds after either compressor start up or the ...

Страница 145: ...tes Condition 1 Condition 2 Condition 3 Outside temperature TH7 5ºC 23ºF or above 5ºC 23ºF or below Cumulative compressor operation time 50 minutes or more 90 minutes or more if the defrost prohibit timer is set to 90 250 minutes or more Pipe temperature TH3 The pipe temperature has stayed below the temperatures in the table below Note1 for three minutes E M200 E M500 The pipe temperature has stay...

Страница 146: ... Stopped SV1a ON open LEV2a 2b 2c 3000 LEV2d E M200 E M300 41 E M350 E M500 20 LEV4 0 LEV9 480 21S4a 21S4b 21S4c OFF SV2 ON open Heat recovery defrost Bypass defrost HBC Dip switch setting SW1 9 OFF SW1 9 ON LEV1 3000 41 LEV2 3000 41 41 41 LEV3 3000 3000 SV1 OFF close ON open 21S4Ma OFF OFF 21S4Mb ON ON Pump1 Command value 100 Scheduled control Pump2 Command value 100 Scheduled control Scheduled c...

Страница 147: ... is detected during defrost operation the operation will be stopped and the defrost prohibition time based on the integrated compressor operation time will be set to 20 minutes The unit will stop after the defrost operation when the total time of compressor bottom SH TH15 Te 10ºC 18ºF reaches 3 minutes 5 Change in the number of operating indoor units during defrost operation Even when there is a c...

Страница 148: ...ling main Heating only or Heating main mode The refrigerant recovery mode starts when all of the following conditions are met 1 When 5 minutes have passed in the Heating only or Heating main mode or 30 seconds have passed in the Cooling only or Cooling main mode since the completion of the previous refrigerant recovery cycle AND the when following conditions are met Outdoor unit TH4 105 C 221 F 2 ...

Страница 149: ... the evaporation temperature control See 5 2 9 Expansion valve control LEV2a LEV2b LEV2c and LEV2d 4 Evaporation temperature control Expansion valves LEV2a LEV2b LEV2c and LEV2d LEV is controlled every 30 seconds so that the minimum temperature of the liquid refrigerant TH12 of the Cooling main heat exchanger and of the bypass inlet TH15 of the HBC are in a constant range during Heating only or He...

Страница 150: ...the controller heatsink temperature THHS below the threshold value which is determined by the setting of the outside temperature TH7 5 2 11 Injection Control Linear Expansion Valve LEV4 LEV4 opening is adjusted every 30 seconds to keep the discharge temperature TH4 within the predetermined range 5 2 12 Control at Initial Startup When started up for the first time before 12 hours have elapsed after...

Страница 151: ... in heating mode 3 Cooling main mode Coexistence of units in cooling and heating modes 4 Heating main mode Coexistence of units in cooling and heating modes 5 Stopping mode All indoor units are in fan mode or stopping mode 1 5ºC 0 5ºC 0 5ºC 1 5ºC Set temp 1ºC 1ºC Cooling 3 minutes 3 minutes Switches to cooling mode Switches to heating mode Cooling Cooling Cooling Cooling Heating Heating Heating Fa...

Страница 152: ...pressor in operation IH is used to heat the compressor motor on the stopped outdoor unit to make liquid refrigerant in the compressor evaporate or to keep liquid refrigerant from flooding the compressor Initial power on after power is turned on Stays on for 12 hours and then transitions to the operation that is performed while the compressor is stopped When the compressor is stopped Stays on for 3...

Страница 153: ... changes with the load on the indoor unit side A sample is shown in the graph above 1 Periodic specified voltage control 1 Periodic control cycle Specified voltage control is performed after the following times have elapsed Thirty seconds after either compressor startup or the completion of the defrost cycle 2 The amount of frequency change The amount of specified voltage change is controlled to a...

Страница 154: ... used to reduce the switching frequency of the control modes between No 1 or No 6 AND No 3 or No 4 3 Capacity control is determined depending on the opening of VB3 that adjusts the water flow rate No Operation mode 4 way valve control mode 4 way valve 21S4Ma 21S4Mb 1 Cooling only Cooling ON OFF 2 Mild cooling OFF OFF 3 Cooling main Cooling main OFF OFF 4 Heating main Heating main OFF OFF 5 Heating...

Страница 155: ... When the P Y W models of indoor units 1 are connected to the HBC the flow is controlled by the flow control valve FCV on the indoor units not by the valve block 1 Only either P Y W model indoor units equipped with a flow control valve or P Y WP WL model indoor units without a flow control valve can be connected to the HBC Combining different models of indoor units will cause a connection error 2 ...

Страница 156: ...600 pulses Outdoor unit operation mode Connected indoor unit operation mode VB3 command value for opening Cooling only Thermo ON Heating only Thermo ON Stop 1 Fan 1 Thermo ON 2 or 3 Thermo OFF 1 Cooling only Thermo OFF Heating only Thermo OFF Stop 1 Fan 1 Thermo OFF 1 Cooling only test run Stop 1 Fan 1 Thermo ON 2 or 3 Thermo OFF 1 Outdoor unit operation mode Connected indoor unit operation mode V...

Страница 157: ... minute to keep the amount of subcool before and after the plate heat exchanger constant 3 Cooling main Heating main Thermo ON and Cooling main Heating main refrigerant recovery 1 Periodic control for LEV1 The LEV opening is adjusted the same way as described in 2 Heating only Thermo ON and Heating only refrigerant recov ery 2 Periodic control for LEV2 To be fully open 3000 Operation mode SV1 Cool...

Страница 158: ...thod LEV1 and LEV2 are closed and the heat is not exchanged between the refrigerant and water The basic defrost method is the heat recovery defrost with the dip switch 001 9 on the HBC turned OFF default The bypass defrost may be performed depending on the water temperature Setting the dip switch 001 9 to ON performs the bypass de frost Main HBC water system Main HBC refrigerant system TH31a TH31b...

Страница 159: ...e is 50 minutes if the last defrost cycle took 12 minutes Condition 1 Condition 2 Condition 3 Outside temperature TH7 5ºC 23ºF or above 5ºC 23ºF or below Cumulative compressor operation time 50 minutes or more 90 minutes or more if the defrost prohibit timer is set to 90 250 minutes or more Pipe temperature TH6 The pipe temperature has stayed below the temperatures in the table below Note1 for thr...

Страница 160: ...480 21S4a 21S4b OFF SV2 OFF close Heat recovery defrost Bypass defrost HBC Dip switch setting SW1 9 OFF SW1 9 ON LEV1 3000 41 LEV2 3000 41 41 41 LEV3 3000 3000 SV1 OFF close ON open 21S4Ma OFF OFF 21S4Mb ON ON Pump1 Command value 100 Scheduled control Pump2 Command value 100 Scheduled control Scheduled control Scheduled control HBC or Sub HBC VB3 Heating Thermo ON C800 or H800 Scheduled control He...

Страница 161: ... the operation status Heating only or Heating main Receiving Defrost signal from OC No Yes Bypass defrost ON OFF HBC Dip switch SW001 9 High pressure heat recovery defrost LEV1 2 3000 LEV3 3000 Pump Always in operation Indoor unit VB3 during Thermo ON Fully open No No No No Lower the frequency count the No of freezing Freezing is suspected No of freezing 3 times Yes Yes Yes Receiving Defrost signa...

Страница 162: ...eeze up pro tection Cooling main Heating main operation 1 Outdoor unit Cooling main operation Continued Heating main operation Continued 2 HBC 2 Heating water temperature backup mode When the heating operation can be continued without receiving heat from the refrigerant due to water temperature rise during heating operation the outlet pipe temperature of the plate heat exchanger is 70ºC or above t...

Страница 163: ...s of the water pump is above a certain level The value changes depending on the specified voltage the water pump is stopped to reduce the risk of air infiltration and water leaks 3 When the water pressure on the discharge or suction side of the pump dropped and when the differential between the discharge and the suction sides of the pump dropped When the discharge or suction pressure drops below a...

Страница 164: ... 3 Evaluating and Adjusting Refrigerant Charge 2 6 3 1 Refrigerant Overcharge and undercharge 2 6 3 2 Checking the Refrigerant Charge during Operation 2 6 3 3 Maximum refrigerant charge 3 6 3 4 Refrigerant Charge Adjustment Mode 3 6 4 The Following Symptoms Are Normal 4 0000006532 BOOK 1 ページ 2021年10月8日 金曜日 午前11時51分 ...

Страница 165: ...GB_BS_06_F2 0000006532 BOOK 2 ページ 2021年10月8日 金曜日 午前11時51分 ...

Страница 166: ...ion of refrigerant in the compressor If insulation resistance reads at least 1 MΩ by turning on the main power and keeping it on for at least 12 hours the refrigerant in the compressor will evaporate and the insulation resistance will go up Do not measure the insulation resistance of the terminal block for transmission line for the unit remote controller 4 When the power is turned on the compresso...

Страница 167: ...the following symptoms Before attempting to adjust the amount of refrigerant in the system thoroughly check the operating conditions of the system Then adjust the refrigerant amount by running the unit in the refrigerant amount adjust mode 6 3 2 Checking the Refrigerant Charge during Operation Operate all indoor units in either cooling only or heating only mode and check such items as discharge te...

Страница 168: ...not be adjusted Total index of the outdoor units M200 M250 M300 M350 M400 M450 M500 Factory charge kg 5 2 5 2 5 2 8 0 8 0 10 8 10 8 Maximum additional refrigerant charge on site kg 13 5 13 5 15 5 15 5 19 5 19 5 19 5 Maximum refrigerant charge kg 18 7 18 7 20 7 23 5 27 5 30 3 30 3 Total index of the outdoor units EM200 EM250 EM300 EM350 EM400 EM450 EM500 Factory charge kg 5 2 5 2 5 2 8 0 8 0 10 8 1...

Страница 169: ...s at the set speed Pre heating stand by When the main power is turned on the display shown on the right appears on the in door unit remote controller for 5 minutes HO or PLEASE WAIT icons blink on the display The system is starting up Wait until the blinking display of HO or PLEASE WAIT go off The drain pump keeps run ning after the unit has stopped Unlit The drain pump stays in operation for thre...

Страница 170: ...ode 2519 22 7 4 10 Error Code 2520 22 7 4 11 Error Code 2600 23 7 4 12 Error Code 2601 23 7 5 Error Code Definitions and Solutions Codes 3000 3999 24 7 5 1 Error Code 3121 24 7 5 2 Error Code 3511 25 7 6 Error Code Definitions and Solutions Codes 4000 4999 26 7 6 1 Error Code 4102 26 7 6 2 Error Code 4106 27 7 6 3 Error Code 4109 27 7 6 4 Error Code 4114 28 7 6 5 Error Code 4115 Detail Code 101 10...

Страница 171: ...tail Code 115 55 7 7 12 Error Code 5301 Detail Code 117 56 7 7 13 Error Code 5301 5305 5306 Detail Code 119 57 7 7 14 Error Code 5301 5305 5306 Detail Code 120 58 7 7 15 Error Code 5305 5306 Detail Code 135 59 7 7 16 Error Code 5305 5306 Detail Code 136 60 7 7 17 Error Code 5701 60 7 8 Error Code Definitions and Solutions Codes 6000 6999 61 7 8 1 Error Code 6201 61 7 8 2 Error Code 6202 61 7 8 3 E...

Страница 172: ... Codes 7000 7999 81 7 9 1 Error Code 7100 81 7 9 2 Error Code 7101 82 7 9 3 Error Code 7102 83 7 9 4 Error Code 7107 84 7 9 5 Error Code 7110 86 7 9 6 Error Code 7111 86 7 9 7 Error Code 7113 87 7 9 8 Error Code 7117 88 7 9 9 Error Code 7130 89 7 10 Unit Error Code Definitions and Solutions Codes Er91 Er99 90 7 10 1 Error Code Er91 90 0000006452 BOOK 3 ページ 2021年10月27日 水曜日 午前9時38分 ...

Страница 173: ...GB_BS_07_M 0000006452 BOOK 4 ページ 2021年10月27日 水曜日 午前9時38分 ...

Страница 174: ...e O page 15 2501 Water pump fault O page 17 2502 Drain pump fault O O page 18 2503 Drain sensor Thd fault O O page 20 2512 01 02 100 Control valve failure O O page 21 2519 2619 201 204 Abnormal water pressure drop O page 22 2520 2620 Abnormal water pressure rise O page 22 2600 Water leakage O page 23 2601 Water supply cutoff O page 23 3121 Out of range outside air temperature O page 24 3511 3611 R...

Страница 175: ...ion O 101 IPM error O O page 42 104 Short circuited IPM Ground fault O O page 43 105 Overcurrent error due to short circuited motor O O page 44 106 Instantaneous overcurrent S W detection O O page 45 107 Overcurrent effective value S W detection O O page 45 4250 4350 121 DCL overcurrent error H W O page 46 128 DCL overcurrent error H W O page 46 122 DCL overcurrent error S W O page 46 4255 4256 43...

Страница 176: ...t ex changer TH14 O page 52 5115 Bypass inlet temperature TH15 O page 52 5116 Bypass outlet temperature TH16 O page 52 5120 1248 0 Backup operation O 5132 Temperature sensor fault HBC Water side outlet temp of Heating main heat ex changer TH32 O page 52 5133 Water side outlet temp of Cooling main heat ex changer TH33 O page 52 5134 Water pump WP2 outlet temperature TH34 O page 52 5135 Water pump W...

Страница 177: ...d water temp TH31m O page 52 5174 14th port returned water temp TH31n O page 52 5175 15th port returned water temp TH31o O page 52 5176 16th port returned water temp TH31p O page 52 5177 Water side outlet temp of Heating main heat ex changer TH32 O page 52 5178 Water side outlet temp of Cooling main heat ex changer TH33 O page 52 5201 1402 High pressure sensor fault 63HS1 O page 53 5201 High press...

Страница 178: ...ing error in indoor unit sys tem O O page 62 6602 001 Transmission processor hardware error in central ized control system O O O O O page 63 002 Transmission processor hardware error in indoor unit system O O O O O page 63 6603 001 Transmission Bus Busy error in centralized control system O O O O O page 64 002 Transmission Bus Busy error in indoor unit system O O O O O page 64 6606 003 Communicati...

Страница 179: ... connected units O O page 83 7107 Port setting error O page 84 7110 Connection information signal transmission recep tion error O page 86 7111 Remote controller sensor fault O O page 86 7113 Function setting error improper connection of CN TYP O O page 87 7117 Model setting error O O page 88 7130 Incompatible unit combination O O page 89 Er91 Firmware update error O page 90 The last digit Inverter...

Страница 180: ...ror Power supply board Serial communication error Valve block board Pump inverter INV board Outdoor units Overload protec tion Imax Arms Current effective value error Arms Current peak value error Apeak Temperature pro tection TOL C INVS 19Y E M200 3 9 Off 7 0 Off E M250 E M300 E M350 4 5 8 5 E M400 E M450 E M500 3 9 7 0 The last digit Inverter system 0 or 1 or 4 Valve block board 5 or 6 Pump inve...

Страница 181: ...tail code X1 X2 X4 Between the control board and the valve block board X 0 2 3 4 5 3 Cause check method and remedy Outdoor unit 1 Faulty wiring Check the following wiring connections 1 Between Control board and Fan board 2 Between control board and INV board 3 Between power supply board and INV board 4 Between power supply board and Fan board 2 PS board failure Replace the PS board if the LED on t...

Страница 182: ... control board power supply board or valve block board 3 Inverter board fault control board fault and valve block board fault If the problem persists after a power reset replace the INV board FAN board control board or valve block board 4 Incorrect DIPSW setting on the pump INV board Make sure the DIPSW on the pump INV board are set as follows DIPSW 1 3 on the left pump INV board ON All other swit...

Страница 183: ...r definition and error detection method Indoor controller board Abnormal if data cannot be read normally from the nonvolatile memory of the indoor controller board 3 Cause check method and remedy Note Refer also to the Service Handbook for the indoor units Cause Check method and remedy Defective indoor controller board Replace indoor controller board 0000006452 BOOK 10 ページ 2021年10月27日 水曜日 午前9時38分 ...

Страница 184: ... Adjusting Refrigerant Charge 2 Overload operation Check operating conditions and operation status of indoor outdoor units 3 HBC LEV malfunction Cooling only LEV1 2 and 3 Cooling main LEV1 2 and 3 Heating only or heating main LEV1 2 and 3 Defrost LEV1 2 and 3 Perform a heating operation and check the operation Cooling HBC LEV1 2 and 3 SV1 21S4Ma and 21S4Mb Heating HBC LEV1 2 and 3 SV1 21S4Ma and 2...

Страница 185: ...ly stops 3 Cause check method and remedy When a shut off valve is installed as a safety measure closing of the valve may cause this error Cause Check method and remedy 1 Inner pressure drop due to a leakage Refer to the following page s 8 5 3 Comparing the Low Pressure Sensor Measurement and Gauge Pressure 2 Low pressure sensor failure 3 Short circuited pressure sensor cable due to torn outer rubb...

Страница 186: ...21S4Mb Refer to the following page s 8 8 Troubleshooting LEV FCV Problems 2 HBC SV1 21S4Ma and 21S4Mb malfunction Cooling only or defrost 3 HBC SV1 21S4Ma and 21S4Mb malfunction Cooling only or cooling main 4 HBC SV1 21S4Ma and 21S4Mb malfunction Heating only or heat ing main HBC SV1 21S4Ma and 21S4Mb malfunction Cooling only or cool ing main 5 Actuation failure in the four way valve 21S4a 21S4b o...

Страница 187: ...or 40 minutes after the stop of the outdoor unit preliminary errors will be displayed on the LED display 5 If the formula compressor bottom SH TH15 Te 10ºC 18ºF is satisfied during the defrost operation and if the formula compressor bottom SH TH15 Te 10ºC 18ºF is also satisfied after the defrost operation the same sequence as Item 1 above first detection is followed 3 Cause check method and remedy...

Страница 188: ...lso performed while the unit is stopped 4 Preliminary water leakage is cancelled when the following conditions are met One hour after the preliminary water leakage was detected it is not detected that the drain pump goes from OFF to ON The operation mode is changed to Cool Dry The liquid pipe temperature minus the inlet temperature is 10 C 18 F or less 3 Cause check method and remedy Cause Check m...

Страница 189: ...t One hour after the preliminary water leakage was detected it is not detected that the drain pump goes from OFF to ON The operation mode is changed to Cool Dry The liquid pipe temperature minus the inlet temperature is 10 C 18 F or less 3 Cause check method and remedy Reference Cause Check method and remedy 1 Drain water drainage problem Clogged drain pump Clogged drain piping Backflow of drain w...

Страница 190: ...taken before and after Pump 2 Pw4 Pw3 was detected three times in a row while Pump 2 is in operation 3 Pump 1 outlet water temperature TH35 of 70 C or above was detected three times in a row 4 Pump 2 outlet water temperature TH34 of 70 C or above was detected three times in a row 3 Cause check method and remedy Cause Check method and remedy 1 Pump operation failure Refer to 8 9 4 Water Pump Contro...

Страница 191: ... an error stop 2502 appears on the monitor of the units that came to an error stop 6 Forced stoppage of the outdoor unit Detection timing The error is detected whether the unit is in operation or stopped 7 Ending criteria for the forced stoppage of outdoor unit Power reset the indoor unit that was identified as the error source and the outdoor unit that is connected to the same refrig erant circui...

Страница 192: ...er than Fan or Stop to an error stop 2502 appears on the mon itor of the units that came to an error stop 6 Forced stoppage of the outdoor unit Detection timing The error is detected whether the unit is in operation or stopped 7 Ending criteria for the forced stoppage of outdoor unit Power reset the indoor unit and the HBC that was identified as the error source and the outdoor unit that is connec...

Страница 193: ...cycle When the liquid temperature thermistor or suction temperature thermistor or short or open circuited Drain pump is in operation One hour has elapsed since the drain sensor went off Short 90 C 194 F or above Open 20 C 4 F or below 3 Cause check method and remedy Cause Check method and remedy 1 Faulty connector CN31 insertion 1 Check for connector connection failure Reinsert the connector resta...

Страница 194: ... properly connect ed to CN8A and check the connectors for loose contact If these are not the cause of the problem replace the flow control valve 2 Flow control valve fault 3 Control board fault If no problems are found with the above items replace the control board Cause Check method and remedy 1 Loose connectors wiring fault When the LEDs on the control board LD501 or VB board LDV01 LDV08 are lit...

Страница 195: ...nits and the pumps will stop go into the 3 minute restart delay mode and then restart 2 If the pressure reading exceeds 900 kPa again within 10 minutes of the stoppage of the pump and within 2 minutes after the pump restarted second detection the outdoor units and the pumps will stop again go into the 3 minute restart delay mode and then restart 3 If the pressure reading exceeds 900 kPa again with...

Страница 196: ...er supply cutoff 2 Cause check method and remedy Cause Check method and remedy 1 The water tank of the humidifier is empty Check the amount of supply water Check for the solenoid valve and for the connection 2 The solenoid valve for humidification is OFF Check the connector 3 Disconnected float switch Check the connecting part 4 Poor operation of float switch Check for the float switch 5 Frozen wa...

Страница 197: ...celed by setting the remote controller Outdoor temperature error is canceled if the units stop during error stop The error display needs to be canceled by setting the remote controller 3 Cause check method and remedy Check the following factors if an error is detected without drop in the outdoor temperature Reference Cause Check method and remedy 1 Thermistor failure Check thermistor resistance 2 ...

Страница 198: ...and this error will be indicated as 3511 4 If the condition THHS A 1 C remains true for continuous 6 minutes and 30 seconds is met regardless of the first or second time after 30 minutes of the first occurrence or after the condition THHS A 1 C remains true for continuous 2 minutes has been met it is considered as the first occurrence and the unit will follow the same behavior as the one described...

Страница 199: ...the power supply Power supply voltage drop Check the input voltage to the power supply terminal block TB1 Possible open phase in the power supply due to improper pow er supply wiring Refer to item 6 in section 6 1 Read before Test Run 2 Noise filter problem Coil problem Circuit board failure Check the coil connections Check for coil burnout 3 Wiring failure Check the wiring between CN5 on the nois...

Страница 200: ...r problems 8 11 2 Trouble shooting Problems with Outdoor Unit Transmission Power Supply Circuit 7 6 3 Error Code 4109 1 Error code definition Indoor unit fan operation error 2 Error definition and error detection method 1 Connector CN28 has remained open circuited for 100 consecutive secondsduring operation 3 Cause check method and remedy Cause Check method and remedy 1 Auxiliary relay fault The c...

Страница 201: ...CNMF5 and CNMF4 Replace the indoor unit circuit board if the voltage is abnormal If the 4114 error persists after the indoor unit circuit board is replaced replace the fan motor as well 3 Fan motor fault Replace the fan motor if the voltage is normal in step 2 above If the 4114 error persists after the fan motor is replaced replace the in door unit circuit board as well Cause Check method and reme...

Страница 202: ...se check method and remedy 7 6 7 Error Code 4121 1 Error code definition Function setting error 2 Error source cause check method and remedy Cause Check method and remedy 1 Board failure Replace the board 2 Motor malfunction Check for the motor and the solenoid switch 3 Solenoid switch malfunction Error source Cause Check method and remedy Outdoor unit 1 Dip switch setting error on the control boa...

Страница 203: ...nd Replace the damper limit switch open There is not 5V DC between CN1X1 and Replace the damper limit switch close 4 If damper opens or closes and voltages in 3 are normal measure the voltage between CN1X1 and and the voltage between CN1Y1 and during the damper close by pressing VANE CONTROL button There is not 5V DC between CN1X1 and Replace the damper limit switch open There is not 0V DC between...

Страница 204: ...r dis tortion 2 Wiring problem Between FT001 FT002 Terminal mounted on PS board and AC reactor ACL 3 Power supply board failure If none of the items described above is applicable and if the trouble reappears even after the power is switched on again replace the PS board Cause Check method and remedy 1 Power supply error Check for an occurrence of a n instantaneous power failure at the time of erro...

Страница 205: ...ply signal not detected by control board 3 Cause check method and remedy Cause Check method and remedy 1 Wiring fault Check the wiring between the following Between CN901 MAIN board and CN001 PS board Between CN902 MAIN board and CN002 PS board 2 PS board failure If none of the items described above is applicable and if the trouble reappears even after the power is switched on again replace the PS...

Страница 206: ...st 10 minutes Measure the voltage across TBP and TBN on the PS board 20 VDC or lower Turn off the power supply and leave it turned off for at least 10 minutes Measure the voltage across TBP and TBN on the PS board 1 Check the wiring Check that the short circuit pin of CN003 power supply board has not come off Wiring between FT001 FT002 PS board and ACL Wiring between CN301 power supply board and C...

Страница 207: ...e TH2 continuously for 5 minutes during cooling operation the error code 4131 will be displayed and the system will come to an abnormal stop The detail code indicates the address of the indoor unit in error Detail code Indoor unit address 100 3 Cause check method and remedy Cause Check method and remedy 1 Slightly open indoor unit flow control valve due to pow er cut Turn on the power supply 2 The...

Страница 208: ... the problem persists after reboot replace the INV board If the voltage is below 420 V check the following items 1 Check the coil L connections and for broken wiring 2 Check the wiring connections between noise filter board and INV board and between INV board and R1 through R5 3 Check the in rush current resistor Refer to the following page s 8 10 18 Simple Check on Inverter Circuit Compo nents 4 ...

Страница 209: ...d for proper connection 2 Check that F001 on the pump inverter board is not blown 3 Turn the power back on and if the problem persists replace the pump inverter board For inverter related error codes refer to the following page s 8 10 Troubleshooting Inverter Problems 7 6 15 Error Code 4220 4225 4226 Detail Code 109 1 Error code definition Abnormal bus voltage rise Detail code 109 2 Error definiti...

Страница 210: ...dentifiable error is detected 3 Cause Check method and remedy Outdoor unit In the case of 4220 In the case of 4225 and 4226 HBC For inverter related error codes refer to the following page s 8 10 Troubleshooting Inverter Problems Cause Check method and remedy 1 External noise Refer to the following page s 8 10 2 Checking the Inverter Board Error Detection Circuit 2 INV board failure Cause Check me...

Страница 211: ... Cause Check method and remedy 1 Inverter output related items Refer to the following page s 8 10 2 Checking the Inverter Board Error Detection Circuit Refer to the following page s 8 10 3 Checking the Compressor for Ground Fault and Coil Resistance Problems Refer to the following page s 8 10 4 Checking the Inverter for Damage at No Load Refer to the following page s 8 10 5 Checking the Inverter f...

Страница 212: ...the wiring between FT001 FT002 power supply board and ACL for proper connection Make sure the short circuit pin of CN003 power supply board is properly connected 2 Turn the power back on and if the problem persists replace the power supply board Measure the voltage across TBP and TBN on the power supply board while the inverter is stopped Check the following if the voltage is 239 V or above 1 Turn...

Страница 213: ...ck the outdoor unit fan for proper operation Check the fan motor if problems are found with the operation of the fan Refer to the following page s 8 10 7 Checking the Fan Motor for Ground Fault and Coil Resistance Problems 3 Air passage blockage 1 Check the heatsink and the duct for blockage Refer to the following page s 8 10 20 Checking the Fan Inverter Heatsink for Clogging 4 THHS failure 1 Chec...

Страница 214: ...erheated during operation Check the refrigerant circuit oil return section Refer to the following page s 8 10 3 Checking the Compressor for Ground Fault and Coil Resistance Problems 6 The model selection switches SW5 3 5 8 on the outdoor unit are set incorrectly Check the setting for the model selection switch on the outdoor unit Dipswitches SW5 3 5 8 on the outdoor unit control board For switch s...

Страница 215: ...board if no problems are found 8 10 19 Troubleshooting Problems with IGBT Module 2 The model selection switches SW5 3 5 8 on the outdoor unit are set incorrectly Check the setting for the model selection switch on the outdoor unit Dipswitches SW5 3 5 8 on the outdoor unit control board For switch settings refer to the following page s 7 9 2 Error Code 7101 3 Open phase in the power supply due to i...

Страница 216: ...4 Checking the Inverter for Damage at No Load 8 10 5 Checking the Inverter for Damage during Compressor Opera tion 8 10 15 Checking the Installation Conditions 3 Open phase in the power supply due to improper power supply wir ing Refer to item 6 in section 6 1 Read before Test Run Cause Check method and remedy 1 Grounding fault of fan motor Refer to the following page s 8 10 7 Checking the Fan Mot...

Страница 217: ...e following page s 8 10 Troubleshooting Inverter Problems Cause Check method and remedy 1 Short circuited compressor Refer to the following page s 8 10 3 Checking the Compressor for Ground Fault and Coil Resistance Problems 2 Output wiring Check for a short circuit Cause Check method and remedy 1 Short circuited fan motor Refer to the following page s 8 10 7 Checking the Fan Motor for Ground Fault...

Страница 218: ...are found 8 10 19 Troubleshooting Problems with IGBT Module 2 The model selection switches SW5 3 5 8 on the outdoor unit are set in correctly Check the setting for the model selection switch on the outdoor unit Dipswitches SW5 3 5 8 on the outdoor unit control board For switch settings refer to the following page s 7 9 2 Error Code 7101 Cause Check method and remedy 1 Fan board failure Refer to th...

Страница 219: ...n the Pump INV Board Without load 8 10 13 Checking the Pump INV Board for Damage Without load 8 10 14 Checking the Pump INV Board for Damage During pump operation 2 Pump failure Check the outdoor unit pump for proper operation Check the pump motor if problems are found with the operation of the pump Refer to the following page s 8 9 4 Water Pump Control 8 10 11 Checking the Pump Motor for Ground F...

Страница 220: ...eck method and remedy 1 Fan motor locking Check the fan blades for objects obstructing fan rotation 2 Fan motor failure Refer to the following page s 8 10 7 Checking the Fan Motor for Ground Fault and Coil Resistance Problems 3 Fan board failure Refer to the following page s 8 10 8 Checking the Fan Board Error Detection Circuit at No Load 8 10 9 Checking the Fan Board for Damage at No Load 8 10 10...

Страница 221: ...mperature TH22 Water outlet pipe temperature TH23 4 C is met after at least 15 min utes have passed after the operation mode was changed from Heating to Cooling Dry during commissioning 4 The formula Water inlet pipe temperature TH22 Water outlet pipe temperature TH23 4 C is met after at least 10 min utes have passed after the operation mode was changed from the mode other than Heating to Cooling ...

Страница 222: ... unit makes an error stop Short detectable at 90 C 194 F or higher Open detectable at 40 C 40 F or lower Sensor error at gas side cannot be detected under the following conditions During heating operation During cooling operation for 3 minutes after the compressor turns on 3 Cause check method and remedy Cause Check method and remedy 1 Thermistor failure Check the thermistor resistor 0 C 32 F 15 k...

Страница 223: ...of the thermistor is detected just before the restart of the outdoor unit the outdoor unit makes an error stop and the error code 5102 5103 5104 5105 or 5107 5115 will appear During 3 minute antirestart mode preliminary errors will be displayed on the LED display A short or an open described above is not detected for 10 minutes after the compressor start during defrost mode or for 3 minutes after ...

Страница 224: ...inition and error detection method When a short or an open of THHS is detected just before or during the inverter operation 3 Cause check method and remedy For inverter related error codes refer to the following page s 8 10 Troubleshooting Inverter Problems Cause Check method and remedy 1 INV board failure If the problem recurs when the unit is put into operation replace the INV board 0000006452 B...

Страница 225: ...or wire coating 4 A pin on the male connector is missing or contact failure Check connector 5 Disconnected wire Check for wire 6 Thermistor input circuit failure on the control board When an error is found with TH11 TH16 or TH32 TH35 Check the intake temperature of the sensor with the LED monitor When the temperature is far different from the actual tem perature replace the control board 7 Thermis...

Страница 226: ...Cause check method and remedy 7 7 7 Error Code 5201 1 Error code definition 5201 Water pressure sensor fault indoor unit 2 Error definition and error detection method When a pressure sensor reading of 1 05 MPa 153 psi or above OR 0 05 MPa 7 3 psi or below is detected error code 5201 will appear 3 Cause check method and remedy Cause Check method and remedy 1 High pressure sensor failure Refer to th...

Страница 227: ...r 3 Cause check method and remedy Cause Check method and remedy 1 High pressure sensor failure Refer to the following page s 8 5 1 Com paring the High Pressure Sensor Measure ment and Gauge Pressure 2 Torn wire coating Check for damaged wire coating 3 A pin on the male connector is missing or contact failure Check whether a connector pin is missing 4 Disconnected wire Check for disconnected or bro...

Страница 228: ...inition ACCT sensor fault Detail code 115 2 Error definition and error detection method When the formula output current 1 8 Arms remains satisfied for 10 seconds while the inverter is in operation 3 Cause check method and remedy For inverter related error codes refer to the following page s 8 10 Troubleshooting Inverter Problems Cause Check method and remedy 1 Pressure sensor fault Refer to 8 9 1 ...

Страница 229: ... Cause check method and remedy For inverter related error codes refer to the following page s 8 10 Troubleshooting Inverter Problems Cause Check method and remedy 1 INV board failure Refer to the following page s 8 10 2 Checking the Inverter Board Error Detection Circuit 8 10 4 Checking the Inverter for Damage at No Load 8 10 5 Checking the Inverter for Damage during Compressor Operation 2 Compres...

Страница 230: ...r connection 2 ACCT sensor failure Refer to the following page s 8 10 18 Simple Check on Inverter Circuit Components 3 Inverter failure Refer to the following page s 8 10 4 Checking the Inverter for Damage at No Load 8 10 5 Checking the Inverter for Damage during Compressor Oper ation 4 Compressor failure Refer to the following page s 8 10 3 Checking the Compressor for Ground Fault and Coil Resis ...

Страница 231: ...ponents 2 ACCT sensor failure Refer to the following page s 8 10 18 Simple Check on Inverter Circuit Components 3 Inverter failure Refer to the following page s 8 10 4 Checking the Inverter for Damage at No Load 8 10 5 Checking the Inverter for Damage during Compressor Oper ation 4 Compressor failure Refer to the following page s 8 10 3 Checking the Compressor for Ground Fault and Coil Resis tance...

Страница 232: ...owing page s 8 10 7 Checking the Fan Motor for Ground Fault and Coil Resistance Problems 3 Fan board failure Refer to the following page s 8 10 8 Checking the Fan Board Error Detection Circuit at No Load 8 10 9 Checking the Fan Board for Damage at No Load 8 10 10 Checking the Fan Board for Damage with Load Cause Check method and remedy 1 Open output phase of pump INV board Check the output wiring ...

Страница 233: ...sconnected float switch open phase condition during operation 3 Cause check method and remedy 1 CN4F CN303 disconnection or contact failure Check for disconnection of the connector CN4F on the indoor unit control board Check the HBC controller box connector CN303 for proper connection Main HBC does not have a float switch Check the short circuit connector CN303 for proper connection Cause Check me...

Страница 234: ...e data cannot be read out from the built in nonvolatile memory on the remote controller 3 Cause check method and remedy 1 Remote controller failure Replace the remote controller 7 8 2 Error Code 6202 1 Error code definition Remote controller board fault clock IC error 2 Error definition and error detection method This error is detected when the built in clock on the remote controller is not proper...

Страница 235: ...rollers Example 6600 01 appears on the remote controller Unit 01 detected the error Two or more units in the system have 01 as their ad dress Find the unit that has the same address as that of the error source Once the unit is found correct the address Then turn off the outdoor units indoor units HBCs and LOSSNAY units keep them all turned off for at least five minutes and turn them back on When a...

Страница 236: ...ission line 7 Voltage is not applied on the transmission line for centralized control in case of grouped indoor units connected to different outdoor units or in case of the system connected with MELANS 4 Check method and remedy NO Tightly reconnect the male power supply connector to the female power supply switch connector CN40 YES YES YES YES YES YES NO NO NO NO Is the transmission line work perf...

Страница 237: ... or M NET processor Detail code 003 Communication error between device processor on circuit board and M NET processor The address attribute appeared on the display on the remote controller indicates the controller where an error oc curred 3 Cause check method and remedy Cause Check method and remedy 1 The transmission processor cannot be transmit ted as the short wavelength voltage like noise ex i...

Страница 238: ... not provide the response ACK 3 Cause check method and remedy Cause Check method and remedy 1 Incidental cause 1 Check whether Error Code Er91 is displayed on the service LED on the outdoor unit 2 Contact failure of transmission line of OC or IC 2 If the code is not displayed turn off the power to the outdoor unit and then turn it back on 3 Decrease of transmission line voltage signal by exceed in...

Страница 239: ...rouped operation of multi ple refrigerant systems Types of indoor units experiencing problems Part of the indoor units IC are experiencing problems All indoor units IC in the same system are experiencing problems All indoor units IC are experiencing problems Troubleshooting prob lems for indoor units A Troubleshooting problems for indoor units A Troubleshooting prob lems for indoor units A Trouble...

Страница 240: ...le power supply switch connector CN40 for the transmission line for centralized control 1 Check voltage of the transmission line for central ized control 20 V or more Check 1 on the left Less than 20 V Check 2 on the left 2 Disconnection or shutdown of the power source of the power supply unit for transmission line 3 System controller MELANS malfunction 2 Check the causes of the error indicated by...

Страница 241: ...em Grouped operation of mul tiple refrigerant systems Types of indoor units experiencing problems Part of the indoor units IC are experiencing problems All indoor units IC in the same system are experi encing problems All indoor units IC are experiencing problems Troubleshooting problems for ME remote controllers Troubleshooting prob lems for ME remote con trollers Troubleshooting prob lems for ME...

Страница 242: ... system controllers Error display ME remote controller RC MA remote controller MA Type of unit controller in error Part of the ME remote con trollers RC are experi encing problems All indoor units IC in the same system are experi encing problems All ME remote controllers RC are experiencing problems Troubleshooting problems for system controllers Troubleshooting prob lems for all units B Troublesh...

Страница 243: ...no errors are present Indoor unit circuit board failure 4 The male power supply connectors on 2 or more outdoor units are connected to the female power supply switch connector CN40 for centralized control If an error occurs after the unit runs normally once the following causes may be considered Total capacity error 7100 Capacity code error 7101 Error in the number of connected units 7102 Address ...

Страница 244: ...ndoor units have Use either of the following two methods for dele tion 2 Although the address of LOSSNAY has been changed af ter the interlock registration of LOSSNAY is made using ME remote controller the indoor unit is keeping the mem ory of the previous address 1 Address deletion by ME remote controller Delete unnecessary address information using the manual setting function of ME remote contro...

Страница 245: ...line voltage signal by exceeding acceptable range of transmission wiring Farthest 200m 656ft or less Remote controller wiring 12m 39ft or less 4 The transmission line voltage signal is decreased due to erroneous sizing of transmission line Wire diameter 1 25mm2 AWG16 or more 4 Check method and remedy 1 When an error occurs during commissioning turn off the power sources for the outdoor unit indoor...

Страница 246: ...gnals from the remote controller 4 Check method and remedy 1 Check for disconnected or loose transmission lines for the indoor units or MA remote controllers 2 Confirm that the power is supplied to the main power source and the remote controller line 3 Confirm that MA remote controller s capacity limit is not exceeded 4 Check the sub main setting of the MA remote controllers One of them must be se...

Страница 247: ...for disconnected or loose transmission lines for the indoor units or MA remote controllers 2 Confirm that the power is supplied to the main power source and the remote controller line 3 Confirm that MA remote controller s capacity limit is not exceeded 4 Check the sub main setting of the MA remote controllers One of them must be set to MAIN 5 Diagnose the remote controller described in the remote ...

Страница 248: ...onnected or loose transmission lines for the indoor units or MA remote controllers 2 Confirm that the power is supplied to the main power source and the remote controller line 3 Confirm that MA remote controller s capacity limit is not exceeded 4 Check the sub main setting of the MA remote controllers One of them must be set to MAIN 5 Diagnose the remote controller described in the remote controll...

Страница 249: ... signals from the remote controller 4 Check method and remedy 1 Check for disconnected or loose transmission lines for the indoor units or MA remote controllers 2 Confirm that the power is supplied to the main power source and the remote controller line 3 Confirm that MA remote controller s capacity limit is not exceeded 4 Check the sub main setting of the MA remote controllers One of them must be...

Страница 250: ...Check method and remedy 1 Contact failure short circuit or miswiring converse wiring of in door outdoor unit connecting wire Check disconnecting or looseness of indoor outdoor unit connecting wire of indoor unit or outdoor unit Check all the units in case of twin triple quadruple indoor unit system 2 Defective transmitting receiving circuit of outdoor controller cir cuit board Turn the power off a...

Страница 251: ...if 1 receiving is detected 30 times continuously though indoor controller board has transmitted 0 3 Cause check method and remedy Note Refer also to the Service Handbook for the indoor units Cause Check method and remedy 1 Defective transmitting receiving circuit of indoor controller board Turn the power off and on again to check If abnormality generates again replace indoor controller board 2 Noi...

Страница 252: ...ing wire Check disconnecting or looseness of indoor outdoor unit connecting wire of all indoor units or outdoor units 2 Defective transmitting receiving circuit of outdoor control circuit board Turn the power off and on again to check If abnormality generates again replace indoor control board or outdoor control circuit board Note other indoor control board may have defect 3 Defective transmitting...

Страница 253: ... and outdoor units 2 Diameter or length of indoor outdoor unit connecting wire is out of specified capacity Check the following Diameter of the cables used for indoor outdoor lines maximum line distance between indoor and outdoor units max 50 m maximum line distance be tween indoor units daisy changed cables max 30 m and if flat cables such as VVF is used make sure they are connected in the order ...

Страница 254: ...at of the unit connected turn off the power source of the outdoor and the indoor units and change the setting of the Qj capacity code 3 Indoor unit Qj table 2 The model selection switches SW5 3 5 8 on the outdoor unit are set incorrectly Check the setting for the model selection switch on the outdoor unit Dipswitches SW5 3 5 8 on the outdoor unit control board Qj Total Model E M200 model E M250 mo...

Страница 255: ...y the self diagnosis function SW1 operation of the outdoor unit Outdoor unit 2 The model selection switches SW5 3 5 8 on the outdoor unit are set incorrectly Check the setting for the model selection switch on the outdoor unit Dipswitches SW5 3 5 8 on the outdoor unit control board HBC 3 The model name capacity code setting is wrong Correct combinations of outdoor units and HBCs Check the model se...

Страница 256: ...terminal block for the indoor outdoor transmission line TB3 4 Check the setting for the model selection switch on the outdoor unit Dipswitches SW5 7 on the outdoor unit control board 2 Disconnected transmission line from the outdoor unit or HBC 3 Short circuited transmission line When 2 and 3 apply the following display will appear ME remote controller Nothing appears on the remote controller be c...

Страница 257: ... port 3 When two ports are used the port with the smaller number is not connected to the indoor unit 4 For the address of the HBC Sub 1 3 50 is not added to the smallest indoor unit address which is connected to the HBC Sub 1 3 5 In the system to which multiple HBCs are con nected the indoor unit address connected to the HBC is not set as shown below i The indoor unit address which is connected to...

Страница 258: ... of the indoor unit which is connected to the the HBC Main smaller than that of the indoor which is connected to the HBC Sub 1 YES YES YES NO NO NO NO NO Change the port No NO Change the HBC Sub address NO NO Change the indoor unit address or change the HBC address YES Change the port No YES Change the set indoor unit model capacity code Port No setting error Port No setting error The wrong model ...

Страница 259: ...nd remedies shown below turn the power back on Error source Cause Check method and remedy Outdoor unit 1 Power to the transmission booster is cut off 1 Confirm that the power to the transmission booster is not cut off by the booster being connected to the switch on the indoor unit The unit will not function properly unless the transmission booster is turned on 2 Power resetting of the transmission...

Страница 260: ...d for proper con nection 3 Check the settings of SW5 3 through SW5 6 on the control board Detail code 16 1 Check the connector CNTYP on the INV board for proper connec tion 2 Check the connector CNTYP5 on the control board for proper con nection 3 Check the settings of SW5 3 through SW5 6 on the control board 4 Check the wiring between the control board and INV board Refer to the following page s ...

Страница 261: ...ion Detail code 16 1 Check the connector CNTYP on the INV board for proper connection 2 Check the connector CNTYP5 on the control board for proper connection 3 Check the wiring between the control board and INV board Refer to the following page s 7 2 1 Error Code 0403 Detail code 0 1 5 1 Check the wiring between the control board and INV board Refer to the following page s 7 2 1 Error Code 0403 2 ...

Страница 262: ...or units are connected The M NET connection adapter is connected to the indoor unit system in a system in which the Slim Model A control of units are con nected to the M NET Check the connected indoor unit model Check whether the connecting adapter for M NET is not connected to the indoor unit Connect the connecting adapter for M NET to the outdoor unit HBC Indoor units with flow control valves an...

Страница 263: ... Firmware update error outdoor unit 2 Error definition and error detection method The error code will be displayed when the outdoor unit fails to write the firmware update program 3 Error source cause check method and remedy Error source Cause Check method and remedy Outdoor unit 1 Failure of the microcomputer or the flash memory on the control board Replacement of the control board 0000006452 BOO...

Страница 264: ...or Configuration 63LS 21 8 5 5 Pressure Sensor Inner Water Outlet Water Configuration Pw1 Pw2 Pw3 Pw4 21 8 6 Troubleshooting Solenoid Valve Problems 22 8 7 Troubleshooting Outdoor Unit Fan Problems 23 8 8 Troubleshooting LEV FCV Problems 24 8 8 1 General Overview on LEV Operation Outdoor unit 24 8 8 2 General Overview on LEV Operation HBC 27 8 8 3 Possible Problems and Solutions 29 8 8 4 General O...

Страница 265: ...t Exchanger 107 8 13 9 Accumulator Replacement Procedure 123 8 14 HBC Maintenance Instructions Applicable to main and sub HBCs 127 8 14 1 Valve Block 127 8 14 2 Instructions for Debris Removal Operation 128 8 14 3 Instructions for the Air Vent Operation 131 8 14 4 Preparation for servicing 134 8 15 Main HBC Maintenance Instructions 138 8 15 1 Solenoid Valve Coil SV1 Replacement Procedure HBC 138 8...

Страница 266: ...ssembly Replacement Procedur Sub HBC 177 8 16 2 Thermistor TH31 Replacement Procedur Sub HBC 179 8 16 3 Thermistor TH32 TH33 Replacement Procedur Sub HBC 180 8 16 4 Air Vent Valve Replacement Procedure Sub HBC 181 8 17 Troubleshooting Problems Using the LED Status Indicators on the Outdoor Unit 182 0000006416 BOOK 3 ページ 2021年10月26日 火曜日 午後5時30分 ...

Страница 267: ...GB_BS_08_L 0000006416 BOOK 4 ページ 2021年10月26日 火曜日 午後5時30分 ...

Страница 268: ...ble Reversed connection of the wire for the MA remote controller and the M NET transmission line on the indoor unit 3 The number of the MA remote controllers that are connected to an indoor unit exceeds the allowable range 2 units 4 The length or the diameter of the wire for the MA remote controller are out of specification 5 Short circuit of the wire for the remote display output of the outdoor u...

Страница 269: ...rs on the multiple outdoor units are connected to the female power supply switch connector CN40 In the system to which the power supply unit for transmission lines is connected the male power supply connector is connect ed to the female power supply switch connector CN40 on the outdoor unit 4 Disconnected M NET transmission line on the indoor unit side 5 Disconnected wire between the terminal bloc...

Страница 270: ...indoor unit board CN2M or disconnected connector 6 Incorrect wiring for the MA remote controller Short circuited wire for the MA remote controller Disconnected wire for the MA remote controller No 2 and disconnected line to the terminal block Reversed daisy chain connection between groups Incorrect wiring for the MA remote controller to the terminal block for transmission line connection TB5 on th...

Страница 271: ...ccur when the power is reset Check that no error occurs in other indoor units Check the indoor unit on which LED2 is lit All the indoor unit power failure All the indoor unit power failure Error display Error display Thermo is OFF Is operation possible Short circuit of the remote controller After turning the power on check whether HO PLEASE WAIT is displayed on the remote controller After more tha...

Страница 272: ...al block The indoor transmission line is connected incorrectly to the transmission terminal block for centralized controller TB7 4 Disconnected transmission line on the remote controller 5 Remote controller failure 6 Outdoor unit failure For details refer to the following page s 8 17 Troubleshooting Problems Using the LED Status Indica tors on the Outdoor Unit 3 Check method and remedy 1 Check vol...

Страница 273: ...1 1 Check LED1 on the indoor unit control board Is it lit When it is lit When it is off or cannot be checked Check for the change of LED display by operating dip switch for self diagnosis Check voltage of the power supply terminal on the indoor unit AC220V Check the fuse on the circuit board Melted Check 200V circuit for short circuit and ground fault Check the connection of the connector Check th...

Страница 274: ...e connection TB5 of the indoor unit and the male connector CN2M 7 The male power supply connectors on 2 or more outdoor units are connected to the female power supply switch connector CN40 for the transmission line for centralized control 8 Outdoor unit control board failure 9 Indoor unit control board failure 10 Remote controller failure Interlocking control with MELANS 1 No group registration is...

Страница 275: ...the outdoor unit Wrong switch setting Change it from ON to OFF A wrong address is set to the ME remote controller A wrong address is set to the indoor unit Wrong wiring of the M NET transmission line of the indoor unit Disconnected connector CN2M Correct the error Disconnected 17 30V ME remote controller 100 Check the address of the indoor unit to be coupled Indoor unit 100 Check the address of th...

Страница 276: ...ferent outdoor units are grouped 6 The power of the outdoor unit to be confirmed has been cut off 5 Check the power supply of the outdoor unit which is coupled with the unit to be confirmed 7 Transmission line is disconnected from the terminal block for central control system connection TB7 on the outdoor unit 6 Check that the transmission line for centralized control TB7 of the outdoor unit is no...

Страница 277: ...ressure causes insufficient capacity SW4 setting SW6 10 OFF 2 Check temperature difference between the evaporating tem perature Te and the target evaporating temperature Tem with self diagnosis LED Note Higher Te than Tem causes insufficient capacity SW4 setting SW6 10 OFF Note Protection works and compressor frequency does not rise even at higher Te than Tem due to high discharge tempera ture and...

Страница 278: ... of and behind the place where the foreign object is clogging the pipe upstream side and downstream side When the tem perature drops significantly the foreign object may clog the pipe Remove the foreign object inside the pipe 8 The indoor unit inlet temperature is excessively low Less than 15 C 59 F WB Check the inlet air temperature and for short cycling Change the environment where the indoor un...

Страница 279: ...ure Sensor Measurement and Gauge Pressure Note Higher inlet pressure by the high pressure sensor than the actual pressure causes insufficient capac ity SW4 setting SW6 10 OFF 2 Check the difference between the condensing tem perature Tc and the target condensing tempera ture Tcm with self diagnosis LED Note Higher Tc than Tcm causes insufficient capacity SW4 setting SW6 10 OFF Note Protection work...

Страница 280: ...e unit in the cooling cycle and follow the same procedures that are used to locate the blockage of pipe during cooling operation Remove the blockage in the pipe 9 The indoor unit inlet temperature is excessively high exceeding 28 C 82 F Check the inlet air temperature and for short cy cling Change the environment where the indoor unit is used 10 Insufficient refrigerant amount Protection works and...

Страница 281: ...inary error history on LED display with SW4 Refer to the reference page for each error mode 1 Abnormal high pressure 2 Abnormal discharge air temperature 3 Heatsink thermistor failure Display the indoor piping temperature with SW4 to check whether the freeze proof operation runs properly and check the temperature 4 Thermistor failure 5 Pressure sensor failure 6 Over current break 7 Refrigerant ove...

Страница 282: ...ld of the transmission line is grounded 2 The sectional voltage level of transmission signal should be as follows Cause Erroneous operation Error code Error code definition Noise interference on the transmission line Signal is transformed and will be misjudged as the signal of another address 6600 Address overlap Transmission wave pattern is transformed due to the noise creating a new signal 6602 ...

Страница 283: ...ovided the noise on the transmission line can not escape leading to change of the transmission signal 6 Check the treatment meth od of the shield of the transmission line for cen tralized control The transmission cable for centralized control is less subject to noise interference if it is grounded to the outdoor unit whose power jumper cable was moved from CN41 to CN40 or to the power sup ply unit...

Страница 284: ...on line and the communication between the MA remote controller and the indoor unit is interrupted for 3 minutes in a row MA transmission error 6831 will occur 2 Confirmation of transmission specifications and wave pattern A B No polarity Across terminal No 1 2 Power supply 9V to 12VDC Satisfies the formula 12 msec bit 5 Voltage among terminals must be between DC9 and 12 V TB15 A B 1 2 MA remote co...

Страница 285: ...unning Compare them by MPa psi unit 1 When the difference between both pressures is within 0 098MPa 14psi both the high pressure sensor and the control board are normal 2 When the difference between both pressures exceeds 0 098MPa 14psi the high pressure sensor has a problem perfor mance deterioration 3 When the pressure displayed on the self diagnosis service LED does not change the high pressure...

Страница 286: ...ue of this voltage will be converted by the microcomputer The output voltage is 0 071V per 0 098MPa 14psi The pressure sensor on the body side is designed to connect to the connector The connector pin number on the body side is different from that on the control board side Body side Control board side Vcc Pin 1 Pin 3 Vout Pin 2 Pin 2 GND Pin 3 Pin 1 0 0 5 73 1 0 145 1 5 218 2 0 290 2 5 363 3 0 435...

Страница 287: ...ation 3 When the pressure displayed on the self diagnosis service LED does not change the low pressure sensor has a problem 3 Remove the low pressure sensor from the control board to check the pressure with the self diagnosis service LED display 1 When the pressure displayed on the self diagnosis service LED is between 0 and 0 098MPa 14psi the low pressure sensor has a problem 2 When the pressure ...

Страница 288: ...l board side 8 5 5 Pressure Sensor Inner Water Outlet Water Configuration Pw1 Pw2 Pw3 Pw4 The pressure sensor inner water outlet water consists of the circuit shown in the figure below If DC 5V is applied between the red and the black wires voltage corresponding to the pressure sensor between the white and the black wires will be output and the values of the voltage will be converted by the microc...

Страница 289: ...EV2b and LEV2c are open Refer to 8 8 Troubleshooting LEV FCV Problems Do not give an impact from outside as the outer hull will be deformed leading to the malfunction of the inner valve 2 In case of SV1a Bypass valve This solenoid valve opens when powered Relay ON 1 At compressor start up the SV1a turns on for 4 minutes and the operation can be checked by the self diagnosis LED display and the clo...

Страница 290: ...fan motor problem is suspected When checking the fan motor for problems by shutting down the power be sure to disconnect the motor wire from the fan board If a short circuited fan board malfunctions it will keep the fan motor from rotating smoothly For details refer to the following page s 8 10 7 Checking the Fan Motor for Ground Fault and Coil Resistance Problems 8 10 8 Checking the Fan Board Err...

Страница 291: ... outdoor unit LEV2a 2b 2c and 2d 2 Pulse signal output and valve operation ø4 ø3 ø2 ø1 ø4 ø3 ø2 ø1 Control board Drive circuit LEV M 5 2 1 3 4 6 DC12V Red Blue Orange Yellow White Orange White Blue Yellow Red 6 5 4 3 2 1 Output state Output phase number 1 2 3 4 1 ON OFF OFF ON 2 ON ON OFF OFF 3 OFF ON ON OFF 4 OFF OFF ON ON Output pulses change in the following orders when the Valve is closed 1 2 ...

Страница 292: ...ion It must be fixed at point A When the valve operates smoothly no sound from LEV or no vibration occurs however when the pulses change from E to A in the chart or the valve is locked a big sound occurs Whether a sound is generated or not can be determined by holding a screwdriver against it then placing your ear against the handle Valve opening refrigerant flow rate Valve closed Valve open E B 8...

Страница 293: ...When the LEV opening angle does not change all the output phases will be off 2 When the output is open phase or remains ON the motor cannot run smoothly and rattles and vibrates Output phase number Output state Upon power on the outdoor unit circuit board sends a 520 pulse signal to the outdoor unit LEV to determine the valve position and always brings the valve to the position as indicated by A i...

Страница 294: ...signal output and valve operation ø4 ø3 ø2 ø1 ø4 ø3 ø2 ø1 Control board Drive circuit LEV M 5 2 1 3 4 6 DC12V Brown Blue Orange Yellow White Orange White Blue Yellow Red 6 5 4 3 2 1 Output state Output phase number 1 2 3 4 1 ON OFF OFF ON 2 ON ON OFF OFF 3 OFF ON ON OFF 4 OFF OFF ON ON Output pulses change in the following orders when the Valve is closed 1 2 3 4 1 Valve is open 4 3 2 1 4 1 When th...

Страница 295: ...ail ure Disconnect the control board connector and connect the check LED as shown in the figure below resistance 0 25W 1k LED DC15V 20mA or more When the main power is turned on the indoor unit cir cuit board outputs pulse signals to the indoor unit LEV for 10 seconds If any of the LED remains lit or unlit the drive circuit is faulty When the drive circuit has a problem replace the control board L...

Страница 296: ...kes a closing and opening sound the valve has a problem Replace the LEV Indoor unit Outdoor unit and HBC con troller Disconnected or short circuit ed LEV motor coil Measure resistance between the coils red white red or ange red yellow red blue using a tester They are nor mal if resistance is 100Ω 10 Replace the LEV coils Outdoor unit LEV2a 2b and 2d and HBC controller LEV3 Measure resistance betwe...

Страница 297: ...nd valve operation A Yellow G Orange B White H Purple C Black I Control board D Brown J Connection CN60 E Green K Drive circuit F Blue L Flow control valve Output phase number Output status The output pulse changes in the following order When the valve closes 1 2 3 4 1 When the valve opens 4 3 2 1 4 1 2 3 4 4 ON ON OFF OFF 5 OFF ON ON OFF 7 OFF OFF ON ON 8 ON OFF OFF ON M L I A B C D E F G H J K 5...

Страница 298: ...n mode Judgment method Remedy 1 Loose connector Check for connector connection failure Reinsert the connector restart the operation and check for proper operation 2 Wiring fault flow control valve fault Check for a broken wiring and check the resistance of the flow control valve Replace the flow control valve 3 Control board fault If no problems are found with the above items replace the control b...

Страница 299: ... coils toward the top If the coils are pulled out without the body gripped undue force will be applied and the pipe will be bent 3 Installing the coils Fix the body tightly at the bottom Part A in the figure so that the body will not move then insert the coils from the top and insert the coil stopper securely in the pipe on the body If the coils are pushed without the body gripped undue force will...

Страница 300: ...stopper is re moved pull up and out the coil When removing the coil hold the LEV body securely to prevent undue force from being placed on the pipe and bending the pipe 3 Installing the coil Securely hold the bottom of the LEV Part A in the figure insert the coil from above and turn the coil until the coil stopper is properly installed on the LEV body When removing the coil hold the LEV body secur...

Страница 301: ...failure Check whether the contact of the pressure sensor connector in trouble is not faulty OK OK Check that the difference between each detected pressure is 0 098MPa 14psi or less OK Both the board and the pressure sensor are normal OK Is Pd PS1 PS3 Ps V 3Z 3Z 3Z 3Z 6XSSO ZDWHU SUHVVXUH Remove the pressure sensor connector from the board and check the pressure OK OK Check whether the refrigerant ...

Страница 302: ...ons 3 Check the pressure value on the self diagnosis switch same as note 2 with the connector of the applied pressure sensor is disconnected from the board Measurement data SW4 setting value Outdoor high pressure Outdoor low pressure Symbol 63HS1 63LS ON 1 2 3 4 5 6 7 8 9 10 ON 1 2 3 4 5 6 7 8 9 10 ON 1 2 3 4 5 6 7 8 9 10 The figure at left shows that the switches 1 through 5 are set to ON and 6 t...

Страница 303: ...31d TH31e TH31f VB board 1 CNTH2 TH31g TH31h VB board 1 CNTH3 TH31i TH31j TH31k VB board 2 CNTH1 TH31l TH31m TH31n VB board 2 CNTH2 TH31o TH31p VB board 2 CNTH3 TH32 TH35 Control board CN404 TH33 TH34 Control board CN405 Pull out the thermistor connector in trouble from the board Measure the temperature of the thermistor in trouble actual measurement value Check the thermistor resistor Compare the...

Страница 304: ...at VB3 is in the standard position Check that VB3 is controlling the water temperature difference VB3 standard position Water temperature control OK YES YES YES YES NO NO Check that SV1 is ON Check SV1 SV1 ON Check that SV1 is OFF SV1 OFF YES NO YES NO NO NO NO Check whether the electric expansion valve and the solenoid valve connector are not disconnected or not loose Run the cooling operation or...

Страница 305: ... and check the colors of the lead wires visually Intermediate connector Control board Check that no refrigerant leaks from LEV Pull out the connector from the board and check that the electricity runs with a tester The wiring side of CN05 and 07 Among 1 3 and 5 and among 2 4 and 6 Check the resistance between each coil with a tester between red and white red and orange brown and yellow and brown a...

Страница 306: ...agnet degradation This will require pump replacement Before replacement the causes must be investigated and resolved The pump shaft bearings and magnets can be easily dam aged by overheating due to dry running or water system blockage Check the strainer for blockage investigate the water circuit for blockage and or foreign material and that there is no air in the system or an uncontrolled leak Pum...

Страница 307: ...lay connectors of the outdoor unit fan RYFAN1 and RYFAN2 Before plugging in or unplugging connectors check that the outdoor unit fan is not rotating and that the voltage across Pin 1 and Pin 5 of connector RYPN is 20 VDC or less The capacitor may collect a charge and cause an electric shock when the outdoor unit fan rotates in windy conditions Refer to the wiring nameplate for details 3 Reconnect ...

Страница 308: ...r Detection Circuit at No Load 8 10 9 Checking the Fan Board for Damage at No Load 8 10 10 Checking the Fan Board for Damage with Load 9 Only the pump of the HBC does not operate Refer to the following pages if the HBC is operating 8 10 12 Checking the Error Detection Circuit on the Pump INV Board Without load 8 10 13 Checking the Pump INV Board for Damage Without load 8 10 14 Checking the Pump IN...

Страница 309: ...hecked Phenomena Remedy 1 Stop the unit Remove power supply 1 Overcurrent error Error code 4250 Detail code No 101 104 105 106 and 107 Replace the INV board 2 Disconnect the inverter output wires from the compressor terminals U V W 1 2 Logic error Error code 4220 Detail code No 111 Replace the INV board 3 Apply power supply 3 ACCT sensor circuit failure Error code 5301 Detail code No 117 Replace t...

Страница 310: ... Circuit Parts for how to move the MAIN BOX Items to be checked Phenomena Remedy 1 Stop the unit Remove power supply 1 Inverter related problems are detected Set SW7 1 on the MAIN board to ON and go to 8 10 2 Checking the Invert er Board Error Detection Circuit 2 Disconnect the inverter output wires from the compressor terminals U V W 1 2 Inverter voltage is not output at the termi nals U V and W ...

Страница 311: ...e Inverter for Damage at No Load for problems b Check that high and low pressures are balanced c Check that no liquid refrigerant is present in the compressor and that there is no liquid backflow Go to d when the problem per sists after compressor startup was repeated several times d Check that there is a pressure dif ference between high and low pressures after compressor start up Check the high ...

Страница 312: ... 5 An overvoltage error occurs during oper ation Error code 4220 Detail code 109 110 112 8 10 6 Checking the Converter for Damage during Compressor Oper ation 6 No problems were found with items 1 through 5 Normal 8 10 6 Checking the Con verter for Damage during Com pressor Operation Items to be checked Phenomena Remedy Items to be checked Phenomena Remedy 1 Operate the outdoor unit 1 BUS voltage ...

Страница 313: ...t sensor fault Error code 5305 Detail code 135 Normal When done checking reconnect all connectors as they were Unless they are properly reconnected cur rent sensor fault will not be resolved 3 Turn on the breaker 4 Operate the unit Items to be checked Phenomena Remedy 1 Stop the unit Turn off the breaker Be sure to turn off the power 1 An error other than the current sen sor error 5305 Detail code...

Страница 314: ...nit 3 Sensor error during operation Check code 5305 Detail code 135 136 a Check for disconnection of fan in verter output wiring and for broken wiring b If the error is not associated with any of the items above replace the fan board c Change fan motor if Fan board change doesn t resolve issue 4 Voltage overload error Check code 4225 Detail code 109 a Check for gusts or windy conditions b Change F...

Страница 315: ...CNINV 2 Logic error occurs Check code 4225 4226 Detail code 111 Replace the INV board 2 Operate the outdoor unit and the HBC 3 Sensor related circuit error occurs Check code 5305 5306 Detail code 117 127 Replace the INV board 4 Open circuited IPM error occurs Check code 5305 5306 Detail code 119 Normal Items to be checked Phenomena Remedy INV S20 1 Inverter related error is detected Set SW 1 1 on ...

Страница 316: ...verter output voltage is stabilized line voltage imbalance of at least 5 or 5 V occurs If line voltage imbalance exists INV S20 Replace the INV board Items to be checked Phenomena Remedy 1 Check refrigerant charge Overcharge of refrigerant Return to correct refrigerant charge 2 Check outdoor unit branch in stallation The branch approach 500 mm Make branch approach 500mm Is the branch angle 15 to h...

Страница 317: ...r rent Use of a non specified earth leakage breaker Replace with a regulation earth leakage breaker 2 Check the resistance at the power supply terminal block TB1 with a megger Failure resistance value Check each part and wiring Refer to the following page s 8 10 18 Simple Check on Inverter Circuit Compo nents IGBT module Rush current protection resistor Electromagnetic relay DC reactor 3 Disconnec...

Страница 318: ...e between terminals M200 M450 M500 DC reactor DCL Measure the resistance between terminals 1Ω or lower almost 0 Ω Measure the resistance between terminals and the chassis Current sensor ACCT Disconnect the wiring connector from CNCT2 and measure the inter teminal resistance 280Ω 30Ω Between pins 1 and 2 U phase pins 3 and 4 W phase 4 3 2 1 Coil Contact INV board X901 X902 Across pins 1 2 INV board...

Страница 319: ...open Ω or not shorted to 0 Ω The values are for reference and the margin of errors is allowed The result that is more than double or half of the result that is measured at the same measurement point is not allowed Disconnect all the wiring connected the INV board and make the measurement 2 Tester restriction Use the tester whose internal electrical power source is 1 5V or greater Use the dry batte...

Страница 320: ...nce resistance value Black SC PL CN N SC L1 SC L2 SC L3 Red SC PL 5 200 Ω 5 200 Ω 5 200 Ω CN N SC L1 5 200 Ω SC L2 5 200 Ω SC L3 5 200 Ω Black SC P1L CN N SC U SC V SC W Red SC P1L 5 200 Ω 5 200 Ω 5 200 Ω CN N SC U 5 200 Ω SC V 5 200 Ω SC W 5 200 Ω CN N SC L3 SC L2 SC L1 SC P1L SC U SC V SC W SC PL 0000006416 BOOK 53 ページ 2021年10月26日 火曜日 午後5時30分 ...

Страница 321: ...erence resistance value Black SC P CN N SC L1 SC L2 SC L3L Red SC P 5 200 Ω 5 200 Ω 5 200 Ω CN N SC L1 5 200 Ω SC L2 5 200 Ω SC L3 5 200 Ω Black SC P1 CN N SC U SC V SC W Red SC P1 5 200 Ω 5 200 Ω 5 200 Ω CN N SC U 5 200 Ω SC V 5 200 Ω SC W 5 200 Ω SC L1 SC L2 SC L3 SC U CN N SC P SC P1 SC V SC W 0000006416 BOOK 54 ページ 2021年10月26日 火曜日 午後5時30分 ...

Страница 322: ... value Black SC L1 SC L2 SC L3 SC B SC L FT100 CN N Red SC L1 5 200 Ω SC L2 5 200 Ω SC L3 5 200 Ω SC B SC L 5 200 Ω 5 200 Ω 5 200 Ω FT100 5 200 Ω CN N Black FT100 CN N SC U SC V SC W Red FT100 5 200 Ω 5 200 Ω 5 200 Ω CN N SC U 5 200 Ω SC V 5 200 Ω SC W 5 200 Ω SC W SC V SC U SC L FT100 CN N SC B SC L3 SC L2 SC L1 0000006416 BOOK 55 ページ 2021年10月26日 火曜日 午後5時30分 ...

Страница 323: ...00 E M350 550 Service panel Main control box Inverter box 3 Remove the upper section of the duct by unscrewing the screws on the control box on the inverter box on the E M200 300 models shown in the figure below Check inside the duct for clogging and remove any foreign objects found 2 Remove the main control box applicable to the E M200 300 models only On the E M350 550 models it is not necessary ...

Страница 324: ...line for centralized control 24 30 VDC TB7 Indoor outdoor transmission block 24 30 VDC TB3 CN40 TB1 AC Power source 380 V 415 V Power supply terminal block Inverter board Rectifier Rectifier 72C DCL 5 V power supply Smoothing capacitor Inverter Microcomputer Inverter drive circuit Compressor Noise filter Fuse Fuse Surge protector Solenoid valve Four way valve Control board Fuse Microcomputer FAN b...

Страница 325: ...ission line Non polar 2 wire TB1 AC Power source 380 415 V Power supply terminal block Outdoor unit CN40 Inverter board Rectifier Rectifier 72C DCL 5 V power supply Smoothing capacitor Inverter Microcomputer Inverter drive circuit Compressor Noise filter Fuse Fuse Surge protector Solenoid valve Four way valve Control board Fuse Microcomputer FAN board Fuse Heat exchanger fan Microcomputer 5Vpowers...

Страница 326: ... Power source 380 415 V Power supply terminal block Outdoor unit CN40 Inverter board Rectifier Rectifier 72C DCL 5 V power supply Smoothing capacitor Inverter Microcomputer Inverter drive circuit Compressor Noise filter Fuse Fuse Fuse Surge protector Solenoid valve Four way valve Control board Fuse Microcomputer FAN board Fuse Heat exchanger fan Microcomputer 5 V power supply FAN board Fuse Heat e...

Страница 327: ...egulator 5 Vpower supply 5 V power supply X513 Relay coil Microcomputer VB Regulator 5 V power supply 12 V power supply Diode Valve Block drive circuit Valve Block PS board Control board Inverter board Inverter board VB board Power supply detection circuit Fuse Regulator 3 3 V power supply USB circuit Surge protector Fuse TB1 AC Power source 220 240 VAC Terminal block for power source Rectifier di...

Страница 328: ...ower supply detection circuit Valve Block drive circuit DC DC converter TB3 Indoor outdoor transmission block 24 30 VDC Microcomputer MAIN Power reception switching 13 V power supply Regulator Relay drive circuit 12 V power supply Diode X513 Relay coil Microcomputer VB Regulator 5 V power supply 12 V power supply Diode Valve Block drive circuit Valve Block SUB PS board Control board VB board Regul...

Страница 329: ...ssion line from TB3 Check whether the male connector is connected to the female power supply connector CN40 Connected Check voltage of terminal block for centralized control TB7 Check voltage of TB7 by removing transmission line from TB7 Check the voltage across pins 3 and 4 of CNPW on the control board Check the voltage across pins 1 and 2 of CNPW on the control board Check the voltage across pin...

Страница 330: ...board YES NO Any problems with wiring or loose connectors Correct wiring problems and tighten loose connectors Replace the power supply board Check the wiring between the noise filter board and TB1 of power supply board and also check connectors L2 N of TB1 TB12 and TB14 for proper connections Check for conductivity between TB12 and pin 1 of CN1 and between TB14 and pin 3 of CN1 Check the voltage ...

Страница 331: ...nector is connected to the female power supply connector CN40 Connected Check voltage of terminal block for centralized control TB7 Check voltage of TB7 by removing transmission line from TB7 Check the voltage across pins 3 and 4 of CNPW on the control board Check the voltage across pins 1 and 2 of CNPW on the control board Check the voltage across pins 1 and 2 of CN600 on the control board Check ...

Страница 332: ...he noise filter Check the power supply wiring and the main power supply and correct any problems found Turn the power supply back on Check the wiring between the noise filter board and TB1 of power supply board and also check connectors L2 N of TB1 TB12 and TB14 for proper connections Check the voltage across L2 and N of power supply terminal block TB1 Check for conductivity between TB12 and pin 1...

Страница 333: ...or 20 minutes pass after the pump down operation is started 6 Close the service ball valve BV1 on the low pressure pipe and the service ball valve BV2 on the high pressure pipe on the outdoor unit 7 Collect the refrigerant that remains in the extended pipe for the indoor unit Do not discharge refrigerant into the atmosphere when it is collected 8 Repair the leak 9 After repairing the leak vacuum t...

Страница 334: ... 4 Extract any residual refrigerant in the extension pipes and HBC Do not discharge refrigerant into air when it is collected 5 Repair the leak 6 After repairing the leak evacuate the air from the extension pipes and HBC 1 Then open the ball valves BV1 and BV2 and operate the unit in the refrigerant charge adjust mode 4 Leak spot In the case of outdoor unit Heating season 1 Extract the refrigerant...

Страница 335: ...the cable ties to be cut 3 Remove the drain pan by unscrewing the two screws See Figure 2 Be sure to remove the two rod holders holding the check joints to the drain pan See Figure 3 4 Remove the top attachment connecting the main control box and the inverter control box by unscrewing the two screws See Figure 4 5 Remove the bottom attachment connecting the main control box and the inverter contro...

Страница 336: ...sure that no undue force is applied to the wires from which cable straps were removed in steps 8 through 13 Position the bottom attachment that was removed in step 5 above on the fin guard as shown in Figure 13 and then hook the main control box on the attachment as shown in Figure 12 16 Place the excess weak and strong electrical wirings in the space at the base legs as shown in Figure 14 to keep...

Страница 337: ...See Figure 2 Be sure to remove the two rod holders holding the check joints to the drain pan Figures 2 and 3 show the cable ties to be cut 7 Remove the two cable straps holding the weak electrical wiring and the two cable straps holding the strong electrical wiring from the control box See Figure 4 8 Place the excess weak and strong electrical wirings in the space at the base legs as shown in Figu...

Страница 338: ...ee Figure 5 5 Remove the three cable straps from the center pillar See Figure 6 6 Remove the right and left fin guards and the center pillar by unscrewing the 18 screws See Figure 7 Figure 6 Front panel Drain pan left Drain pan right Cable tie Two screws Pipe cover Outside temperature sensor wiring Drain pan left Figure 2 Figure 1 Figure 4 Figure 3 Two screws Figure 5 Drain pan left Drain pan righ...

Страница 339: ...e to leave no space between the rubber bushes and the wires Fix the wires in place to leave no space between the notches on the rubber bushes and the wires Fix the wires in place with cable straps HIGH VOLTAGE WIRE MAIN INV CONNECTION WIRING HIGH VOLTAGE Fix the wires in place with cable straps SENSOR WIRE TH2 TH4 TH5 TH7 TH15 63LS 63HS Fix the wires in place with cable straps SENSOR WIRE LEV WIRE...

Страница 340: ...the edge saddle MAIN INV CONNECTION WIRING LOW VOLTAGE Thread the wires through the edge saddle MAIN INV CONNECTION WIRING HIGH VOLTAGE Thread the wires through the edge saddle FAN MOTOR WIRE HIGH VOLTAGE Bundle excess wiring and fix it in place with a cable tie Wrap the cable tie two turns HIGH VOLTAGE WIRE Thread the wire through the rubber bush COMP WIRE HIGH VOLTAGE Thread the wire through the...

Страница 341: ...bushes and the wires Fix the wires in place to leave no space between the notches on the rubber bushes and the wires Fix the wires in place with cable straps HIGH VOLTAGE WIRE Fix the wires in place with cable straps SENSOR WIRE LEV WIRE Cable strap UNUSED LEFT VIEW TOP LEFT VIEW BOTTOM CONTROL BOX CONTROL BOX BOTTOM VIEW CONTROL BOX Fix the wires in place with cable straps FAN MOTOR WIRE HIGH VOL...

Страница 342: ...IRE 21S4a 21S4c SV1a SV2 Fix the wires in place with cable straps SENSOR WIRE TH4 5 7 15 Fix the wires in place with cable straps COMP WIRE HIGH VOLTAGE Fix the wires in place to leave no space between the rubber bushes and the wires Fix the wires in place to leave no space between the notches on the rubber bushes and the wires BOTTOM VIEW CONTROL BOX CONTROL BOX LEFT VIEW Clamp the wires in place...

Страница 343: ...spacer band Compressor cover top Compressor cover front Figure 2 Figure 1 Cable tie TH4 TH15 Figure 3 Compressor cover left Rubber bush Figure 4 Explained below is the procedure for replacing four way valve 21S4a on the left when seen from the front of the unit and four way valve 21S4b on the right when seen from the front of the unit Secure sufficient work space before starting maintenance work S...

Страница 344: ...4a and 21S4b Use the parts included with the four way valve After being removed leave the pipes at the bottom inside the unit Once removed from the unit it will be difficult to re place the pipes Notes on replacing refrigerant circuit components four way valve solenoid valve and LEV Be sure to perform non oxidized brazing Before heating the pipes wrap the refrigerant circuit components with a wet ...

Страница 345: ... way valve 21S4a to the same length as the pipe that was removed from the on site pipe See Figure 11 12A Mount four way valve 21S4a to the pipe below four way valve 21S4a and on the back A total of four areas require brazing including the area indicated in 11A and the areas indicated in Figure 12 Figure 9 Figure 10 Figure 11 Figure 12 When seen from above four way valves 21S4a and 21S4b are tilted...

Страница 346: ...1S4a and in the middle by brazing at the three areas shown in Figure 13 14A Install the pipe below four way valve 21S4a and on the front by brazing at the three areas shown in Figure 14 This step completes the replacement procedure for four way valve 21S4a Re place the components that were removed as they were Figure 13 Figure 14 Use the parts included with four way valve 21S4a Reinstall these pip...

Страница 347: ...ttom inside the unit Once removed from the unit it will be difficult to re place the pipes A cap for sealing the refrigerant pipe is included with the replacement kit that contains four way valve 21S4b Replace the cap with the one included with the four way valve Replacement procedure for the four way valve 21S4b 15B Cut the pipe below four way valve 21S4b and in the middle with a pipe cutter as s...

Страница 348: ... 10A 20B Install the pipe below four way valve 21S4b and on the front by brazing at the two areas shown in Figure 20 This step completes the replacement procedure for four way valve 21S4b Re place the components that were removed as they were Severed pipe Area to be brazed Area to be brazed Area to be brazed Area to be brazed S module Pipe diameter φ12 7 ID of the pipe with an extended end φ12 7 L...

Страница 349: ...he right when seen from the front of the unit See Figure 1 1 Remove the pipe covers wirings and sheet metals See Figure 2 2 Remove the coils from four way valves 21S4a 21A4b and 21S4c solenoid valve SV2 coil cover and wiring See Figure 3 3 Remove the pipe cover adjacent to four way valves See Figure 4 Wiring Sheet metal Solenoid valve coils SV2 and coil cover Two pipe covers Save the pipe covers f...

Страница 350: ...mperature of the components from rising above 120 C After brazing is done check that the brazing is done properly and check for leaks before vacuum drying the pipes Direct the brazing torch flame away from the wiring and sheet metals inside the unit not to damage them Wet felt sheets listed below or its equivalent and place them around the areas to be brazed to protect the heat exchanger pipes and...

Страница 351: ...ure 9 12C Remove the braze from the two areas below four way valve 21S4c as shown in Figure 10 13C Mount a new four way valve 21S4c Figure 11 shows how to position a new four way valve A cap for sealing the refrigerant pipe is included with the replace ment kit that contains four way valve 21S4c Use the parts included with the four way valve When installing four way valve 21S4c first braze the pip...

Страница 352: ...e two tie bands holding TH4 and TH15 and remove the wiring from the rubber bush on the left compressor cover See Figure 3 4 Remove the left compressor cover by unscrewing the two screws See Figure 4 5 Remove the saddle and the rubber spacers on the compressor by unscrewing the screw See Figure 5 6 Remove the coils coil covers pipe covers and adjacent wirings of the four way valves solenoid valves ...

Страница 353: ... the refrigerant circuit components with a wet towel to keep the temperature of the components from rising above 120 C After brazing is done check that the brazing is done properly and check for leaks before vacuum drying the pipes Direct the brazing torch flame away from the wiring and sheet metals inside the unit not to damage them Wet felt sheets listed below or its equivalent and place them ar...

Страница 354: ...with a pipe cutter at the area shown in Figure 11 Remove the braze at the area circled in Figure 11 to remove LEV4 assembly See Figure 11 Figure 11 Injection pipe Injection pipe LEV4 Rubber spacer LEV4 Remove the braze here Remove the braze here Cut the pipe here The replacement parts for this part is included with the replacement kit that contains check valve block assembly Use the pipe included ...

Страница 355: ...12 13 There are two types A and B of gas liquid separators that connect to the check valve block as shown below The removal procedure depends on the type of gas liquid separator Follow the appropriate procedure that corresponds to the gas liquid separator type Removal procedures for gas liquid separators A and B are explained separately below Remove the braze here Remove the braze here Remove the ...

Страница 356: ... here Applicable only to gas liquid separator A Remove the braze here Applicable only to gas liquid separator B Cut the pipe here Cut the pipe here Remove the braze here Remove the braze here Remove the braze here Remove the braze here Remove the braze here Remove the braze here Cut the pipe here Cut the pipe here Four way valve 21S4b Four way valve 21S4b The replacement parts for this part is inc...

Страница 357: ... brazed See Figure 16 1 Gas liquid separator B 3 screws See Figure 16 2 Gas liquid separator B 1 area to be cut 2 areas to remove braze from 3 screws to be removed See Figure 15 2 Remove the braze here Remove the braze here Remove the braze here Rear view Rear view Gas liquid separator A Remove the braze here Replacement parts Area to be brazed Remove the braze here Check valve Check valve block S...

Страница 358: ... Area to be brazed Screw position Cut the pipe here Cut the pipe here 15 When seen from above four way valves 21S4a and 21S4b are tilted by 15 Replace the pipe that was cut in step 14 with the pipe included with the check valve block assembly Severed pipe S module Pipe diameter φ19 05 ID of the pipe with an extended end φ19 05 L module Pipe diameter φ19 05 ID of the pipe with an extended end φ22 2...

Страница 359: ...e brazed Area to be brazed Area to be brazed Applicable only to gas liquid separator B Area to be brazed Applicable only to gas liquid separator A Area to be brazed Area to be brazed Area to be brazed Area to be brazed Area to be brazed Area to be brazed Area to be brazed Area to be brazed LEV2d Replace the pipe that was cut in step 14 with the pipe included with the check valve block assembly Rep...

Страница 360: ...rocedure 21 Re place the LEV4 assembly that was removed in step 11 as it was 3 areas to be brazed See Figure 21 Figure 21 Rubber spacer A A Area to be brazed Area to be brazed Area to be brazed Area to be brazed 45 LEV4 LEV4 Injection pipe Injection pipe Braze with the rubber spacer attached Replace the pipe that was cut in step 12 with the pipe included with the check valve block assembly 0000006...

Страница 361: ... components with a wet towel to keep the temperature of the components from rising above 120 C After brazing is done check that the brazing is done properly and check for leaks before vacuum drying the pipes Direct the brazing torch flame away from the wiring and sheet metals inside the unit not to damage them Wet felt sheets listed below or its equivalent and place them around the areas to be bra...

Страница 362: ...he pipe where circled in the figure See Figure 5 5 Remove the check valve assembly CV2a b from the area indicated in Figure 6 6 Braze the replacement parts at four areas See Figure 7 This step completes the check valve replacement procedure Re place the components that were removed as they were Remove the assembly through this space Replace the check valve with the one included with the replacemen...

Страница 363: ...nd left compressor covers by unscrewing the four screws See Figure 4 5 Remove the saddle and the rubber spacers on the compressor by unscrewing the screw See Figure 5 6 Remove the cover of the compressor terminal block box mounting support metal and the mounting plate by unscrewing the two screws See Figure 6 7 Remove thermal insulation 1 and thermal insulation 2 See Figure 7 8 Remove the inverter...

Страница 364: ... in 8 13 4 15 The recommended tightening torque for the compressor fixing bolts is 3 0 N m Fasten the bolts using a torque wrench or other tool that can apply the specified torque 16 Re place the compressor covers in the reverse order as they were removed Hold the TH15 wiring in place with the bands to keep the wiring from coming in contact with insulation 2 See Figures 3 and 7 Figure 12 Control b...

Страница 365: ...oise Filter board Unscrew the four screws indicated with arrows in Figure 4 a Pull the right panel and the top panel forward Lift the back end of the top panel and pull the terminal board and the top panel Noise Filter board together to remove them See Figure 4 b Figure 1 Figure 2 Figure 2 a Figure 3 a Figure 4 a Figure 4 b Figure 3 b Figure 3 c Figure 5 b Figure 5 Figure 5 a CNINV FT P1 FT P2 R1 ...

Страница 366: ...eaks before vacuum drying the pipes Direct the brazing torch flame away from the wiring and sheet metals inside the unit not to damage them Wet felt sheets listed below or its equivalent and place them around the areas to be brazed to protect the heat exchanger pipes and pipe covers from being damaged from the brazing torch flame Recommended felt sheets Spatter felt 50CF 11 5t x 1 m x 1 m by TRUSC...

Страница 367: ... the unit Notes on replacing the control box when replacing the refrigerant cooling pipes Be sure to perform non oxidized brazing Before heating the pipes wrap the refrigerant circuit components with a wet towel to keep the temperature of the components from rising above 120 C After brazing is done check that the brazing is done properly and check for leaks before vacuum drying the pipes Direct th...

Страница 368: ...ve the two rod holders holding the check joints in place using a wrench See Figure 4 4 Remove the drain pan by unscrewing the two screws See Figure 5 5 Clean the drain pan and the drain pan cover See Figure 6 Remove dust and dirt from the drain groove Drain pan cover Drain pan Cable tie Screw Screw Screw Pull out toward the right Check joint Rod holders Figure 1 Figure 2 Figure 3 Figure 4 Figure 5...

Страница 369: ...ipe and fit it to the drain pan See Figures 9 and 10 4 Thread a cable tie through the rectangle hole on the screwed down drain cover and hold the silicon tube and the defrost pipe together in place See Figure 11 5 Screw down the front panel with eight screws See Figure 12 Drain pan Check joint Rod holders Silicon tube Defrost pipe Defrost pipe Cable tie Figure 7 Figure 8 Figure 9 Figure 10 Figure ...

Страница 370: ...e screw and pull the drain cover out to the right See Figure 3 4 Remove the two rod holders holding the check joints in place using a wrench See Figure 4 5 Remove the drain pan by unscrewing the two screws See Figure 5 6 Clean the drain pan and the drain pan cover See Figure 6 Remove dust and dirt from the drain groove Front panel Fin guard left Fin guard right Cable tie Screw Pull out toward the ...

Страница 371: ... and 10 4 Thread a cable tie through the rectangle hole on the screwed down drain cover and hold the silicon tube and the defrost pipe together in place See Figure 11 5 Screw down the fin guards center pillar and front panel with 14 screws See Figure 12 Drain pan Silicon tube Defrost pipe Defrost pipe Cable tie Check joint Rod holders Fin guard left Fin guard right Center pillar Figure 7 Figure 8 ...

Страница 372: ...unscrewing the two screws See Figure 4 4 Remove the right drain pan by unscrewing the two screws See Figure 5 5 Clean inside the right and left drain pans See Figure 6 Remove dust and dirt from the drain groove Drain pan left Drain pan right Cable tie Two screws Pipe cover Outside temperature sensor wiring Drain pan left Figure 2 Figure 1 Figure 4 Figure 3 Two screws Figure 5 Figure 6 Drain pan le...

Страница 373: ...the left drain pan See Figure 9 4 Hold the external temperature sensor wiring to the left drain pan with two cable ties See Figure 10 5 Screw down the front panel See Figure 11 Figure 7 Figure 8 Figure 9 Two screws Two screws Drain pan right Drain pan left Cable tie Outside temperature sensor wiring Drain pan left Front panel Pipe cover Figure 10 Figure 11 Insert the tab on the drain pan into the ...

Страница 374: ... with a cable tie 4 Remove the drain pan by unscrewing the 2 screws See Figure 2 Be sure to remove the two rod holders holding the check joints to the drain pan See Figure 4 5 Remove the top attachment that connects the main control box to the inverter control box by unscrewing the 2 screws See Figure 5 6 Remove the cover from the inverter control box by unscrewing the 3 screws See Figure 5 7 Remo...

Страница 375: ... Figure 9 12 Disconnect the TH7 sensor holder from the front pillar See Figure 9 Rear 13 Remove the TH7 wiring from the front heat exchanger by cutting the cable tie See Figure 10 Motor ASSY Fan Figure 8 Rear Front pillar TH7 Connector Front pillar Front heat exchanger Main control box Front heat exchanger Fan guard Figure 7 Spacer Spacer Spacer Figure 9 Figure 10 TH7 Cable tie Use the supplied sp...

Страница 376: ...ont pillar by unscrewing the 9 screws on a standard model or 10 screws on a high efficiency model See Figure 12 Front and Left 17 Remove the right front pillar by unscrewing the 5 screws See Figure 12 Front and Right Use the supplied spacers Use the spacers 60 D X 250 W X 60 H when replacing the heat exchangers for the maintenance of the accumulator and the pipes Right frame Front frame Left frame...

Страница 377: ...om four areas See Figures 13 and 14 To remove the rear heat exchanger remove the braze from four areas See Figures 15 and 16 Removal of the front heat exchanger on a high efficiency model Figure 13 Removal of the rear heat exchanger on a high efficiency model Figure 15 Removal of the rear heat exchanger on a standard model Figure 16 Removal of the front heat exchanger on a standard model Figure 14...

Страница 378: ...at exchanger Figure 17 Removing the rear heat exchanger Figure 18 20 Remove the heat exchanger by diagonally lifting it up using caution not to damage the fins or the pipes Removing the front heat exchanger Figure 19 Removing the rear heat exchanger Figure 20 Notes for replacing refrigerant circuit components heat exchanger Be sure to perform non oxidized brazing After brazing is done check that t...

Страница 379: ... tube is properly placed on the defrost pipe and then fix the drain pan cover in place with a cable tie 6 Remove the drain pan by unscrewing the 2 screws See Figure 3 Be sure to remove the two rod holders holding the check joints to the drain pan See Figure 4 7 Remove the cover from the control box by unscrewing the 5 screws See Figure 5 8 Remove the cable straps holding motor wiring See Figure 6 ...

Страница 380: ...s See Figure 9 13 Disconnect the TH7 sensor holder from the front pillar See Figure 9 Rear 14 Remove the TH7 wiring from the heat exchanger by cutting the cable tie See Figure 10 Use the supplied spacers Use the spacers 60 D x 250 W x 60 H when replacing the heat exchangers for the maintenance of the accumulator and the pipes Motor ASSY Fan Figure 8 Rear Front pillar TH7 Connector Front pillar Con...

Страница 381: ...t pillar by unscrewing the 9 screws on a standard model or 10 screws on a high efficiency model See Figure 12 Front and Left 18 Remove the right front pillar by unscrewing the 5 screws See Figure 12 Front and Right Use the supplied spacers Use the spacers 60 D X 250 W X 60 H when replacing the heat exchangers for the maintenance of the accumulator and the pipes Right frame Front frame Left frame L...

Страница 382: ...om four areas See Figures 13 and 14 To remove the rear heat exchanger remove the braze from four areas See Figures 15 and 16 Removal of the front heat exchanger on a high efficiency model Figure 13 Removal of the rear heat exchanger on a high efficiency model Figure 15 Removal of the rear heat exchanger on a standard model Figure 16 Removal of the front heat exchanger on a standard model Figure 14...

Страница 383: ...ws on a standard model or 3 screws on a high efficiency model See Figure 17 To remove the rear heat exchanger loosen the screws on the back of the right rear pillar 4 screws on a standard model or 3 screws on a high efficiency model See Figure 18 Remove the screw holding the pillar to the rear heat exchanger support Loosen the screws Unscrew the screws Removing the front heat exchanger Figure 17 R...

Страница 384: ...ports do not need to be installed The front and the rear heat exchanger supports are for suppressing vibration during transportation 23 Re place the front and the rear heat exchangers in the reverse order as they were removed Re place the components that were removed as they were Figure 21 Figure 22 Front heat exchanger Front heat exchanger support Unscrew the screws Rear heat exchanger support Ce...

Страница 385: ...ding motor wiring from the control box See Figure 5 8 Remove the fan guard by unscrewing the 12 screws See Figure 6 9 Remove the wire from the center frame See Figure 7 10 Remove the motor ASSY by unscrewing the 16 screws using caution not to damage the motor wiring or the fan See Figure 7 Fin guard Center pillar Front panel Figure 2 Figure 3 Pipe cover Drain pan left Drain pan right Center frame ...

Страница 386: ...raze from four areas See Figures 10 13 Brazed area Brazed area Brazed area Brazed area Brazed area Brazed area Removal of the front heat exchanger on a high efficiency model Figure 8 Removal of the front heat exchanger on a standard model Figure 9 Removal of the left rear heat exchanger on a high efficiency model Figure 10 Removal of the right rear heat exchanger on a high efficiency model Figure ...

Страница 387: ...nter frames by unscrewing the 16 screws See Figure 15 To remove the right and left rear heat exchangers remove the top and the rear frames in addition to the front left right and center frames by unscrewing the 21 screws See Figure 15 15 Remove the center front pillar by unscrewing the 4 screws See Figure 16 Front pillar Front heat exchanger Rear Front pillar TH7 Connector Figure 14 Center frame F...

Страница 388: ...tandard model or 6 screws on a high efficiency model See Figures 19 and 20 Front heat exchanger Unscrew the screws Unscrew the screws Left front pillar Right front pillar Connection of the pillar to the left rear heat exchanger 4 screws on a standard model or 5 screws on a high efficiency model Removing the left rear heat exchanger Figure 18 Removing the right rear heat exchanger Figure 20 Removin...

Страница 389: ...pipes 18 Re place the front and the rear heat exchangers in the reverse order as they were removed Re place the components except the rear heat exchanger support that were removed as they were Front heat exchanger Left rear heat exchanger Right rear heat exchanger Removing the front heat exchanger Figure 21 Removing the right rear and left rear heat exchangers Figure 22 0000006416 BOOK 122 ページ 202...

Страница 390: ...ove the right and inside right compressor panels by unscrewing the four screws Applicable only to the S module See Figures 1 and 2 5 Unscrew the two screws from the right accumulator fixing plate See Figures 3 and 5 6 Unscrew the two screws from the rear accumulator fixing plate See Figures 3 and 4 7 Remove the four screws from the accumulator fixing base legs See Figure 6 Figure 1 Figure 2 Figure...

Страница 391: ...wet towel to keep the temperature of the components from rising above 120 C After brazing is done check that the brazing is done properly and check for leaks before vacuum drying the pipes Direct the brazing torch flame away from the wiring and sheet metals inside the unit not to damage them Wet felt sheets listed below or its equivalent and place them around the areas to be brazed to protect the ...

Страница 392: ...er spacer by unscrewing the three screws shown in Figure 8 Either remove or protect the wiring pipe cover and plastic components to keep them from being damaged by the torch flame 4 Remove the sheet metal cable ties and rubber spacers from the accumulator mounting plate by unscrewing the screw See Figure 9 5 Remove the braze at the three areas on the accumulator outlet suction pipe See Figure 10 6...

Страница 393: ...ur pipes on the back of the accumulator See Figure 13 8 For the five pipe piping on the back of the accumulator follow the procedures below Remove the braze at the five areas on the five pipes on the back of the accumulator See Figure 14 Remove the braze at the seven areas that are located on the right side of the five pipes on the back of the accumulator See Figure 15 9 Re place the accumulator i...

Страница 394: ...e properly controlling the refrigerant flow If the LED is unlit check all valve blocks for proper operation If the problem persists after taking the above measures replace the circuit board 3 Opening and closing of the valve M 4 6 7 8 5 6 Limit signal Opening 0 signal LED Microcomputer 12V 1 2 3 4 5 6 7 8 1 2 3 Circuit board Valve block 12V GND Output phase number Output status 1 2 3 4 4 ON ON OFF...

Страница 395: ...valves may leave air in the water circuit and damage the pump 2 Debris removal operation can be performed before completing the refrigerant piping work evacuation of refrigerant circuits and refrigerant charging 1 Preparation for debris removal operation 1 DIP SW settings Main HBC Turn on DIP SW001 1 Water circuit valve setting valve open when stopped 2 Turn on the breaker for each unit and then o...

Страница 396: ...ssign M NET addresses to the HBC and the indoor units While the debris removal operation is being performed no other functions of the Maintenance Tool are available for use 1 Follow the procedures below after connecting the MN converter and starting up the Maintenance Tool Manuals are accessible from the Maintenance Tool Debris removal operation procedure without connection to an outdoor unit 1 2 ...

Страница 397: ...inside the HBC Remove it in the same way as the other strainer and clean its inside 7 Make sure the strainers are re installed properly Flowchart for debris removal operation Turn on DIP SW002 1 Air 1 Intermittent operation of water pump 20 min The operation is performed to discharge air from the water circuits Air1 Air 2 Water supply to all indoor units 20 min Debris in the pipe will accumulate i...

Страница 398: ... and damage the pump 3 Air vent operation can be performed before completing the refrigerant piping work air tightness test of refrigerant piping evacuation of refrigerant circuits and refrigerant charging In this case perform an air vent operation again after refrigerant piping work air tightness test of refrigerant piping evacuation of refrigerant circuits and refrigerant charging have been comp...

Страница 399: ...Manuals are accessible from the Maintenance Tool Air vent operation procedure without connection to an outdoor unit 1 commissioning 2 Next to proceed 3 After the units are searched for a sign that indicates the completion of preparation will appear Turn on DIP SW002 3 of the Main HBC to start the operation Maintenance Tool window Air vent operation without connection to an outdoor unit 2 The LED o...

Страница 400: ...oves the air from the indoor units more thoroughly Air3 Air 4 Operation of all indoor units in the Heating mode 20 min Heating operation of all indoor units extracts and releases saturated air from the water 1 The operation can be forced to stop by turning on DIP SW002 4 2 If it is found during any step that air has not been discharged to the desired degree repeat the air discharge operation from ...

Страница 401: ...ing screws on the lower service panel lift up the panel to unhook it from the hooks and pull forward to remove it To open the control box 1 Remove the lower service panel 2 Disconnect all connectors except the power supply wire connector and then pull the wires out of the control box 3 Unscrew the four screws on the control box and loosen one screw 4 While lifting up the control box open the contr...

Страница 402: ...in water out of the unit 1 Open the lower service panel 2 Loosen the nut on the pump that is indicated in the figure below to drain water same with Pump 1 Loosen the nut slowly Loosening the nut too quickly will cause the water to blast out Drain water through the nut on the pump Pump 1 Pump 2 0000006416 BOOK 135 ページ 2021年10月26日 火曜日 午後5時30分 ...

Страница 403: ...h one clip and two edge saddles 21s4 SV1 coil wires Clamp down Power supply wire Inside the control box Clamp down Motor wire of the block Thermistor wire of the block Fix in place with cable ties Three way valve wire LEV1 3 wires Pressure sensor wire Thermistor wire Clamp down and put through two edge saddles M NET wire Fix in place with cable ties SV1 coil wire Pump 1 2 wires Fix in place with c...

Страница 404: ...tor 13 14 16 32 33 wires Pressure sensor PS1 wire Fix in place with cable ties Thermistor 13 16 32 wires Fix in place with cable ties Pressure sensor PW3 wire Clamp down Pump 1 2 wires Clamp down Pump 1 wire Clamp down Pump 1 wire Clamp down Pump 2 wire Clamp down Pump 1 2 wires Fix in place with cable ties Thermistor 12 34 wires Fix in place with cable ties Pressure sensor PW1 2 4 wires Fix in pl...

Страница 405: ...board 6 Hold the wires in place with the clamps and the cable ties removed in step 3 above Installation location Service panel front lower Solenoid valve coil Solenoid valve coil SV1 Operation procedures Illustrations Operation location 1 Remove the eight fixing screws from the service panel front lower 2 Disconnect the corresponding 4 way valve coil connector from the control board 3 Remove the t...

Страница 406: ...and the cable ties removed in step 3 above Take care not to mix up the three LEV coils when installing them Rotate the LEV coils until you hear them snap into place to attach them properly Installation location LEV1 coil LEV3 coil LEV2 coil Operation procedures Illustrations Operation location 1 Perform the operation to drain the water from the system if necessary in accor dance with the following...

Страница 407: ...ip the clips holding the indoor unit pipes on the back C After unclipping the first clip move the unclipped branch pipe at the upper part of the block to the side and unclip other clips by placing your hand from above the block 7 Unscrew the fixing screws on both sides of the block two screws each on the left and the right If it is difficult to reach the screws move the pipes to the side to create...

Страница 408: ...lve Coil SV1 Replacement Proce dure HBC 3 Debraze the corresponding valve to re move them 4 Reinstall the LEV coil Protect the insulation materials from heat damage before brazing Installation location LEV1 coil LEV3 coil LEV2 coil Service panel front lower Operation procedures Illustrations Operation location 1 Remove the service panel lower panel 2 Drain water through the pump Installation locat...

Страница 409: ...on location Start with Pump 2 3 Remove the pump terminal block cover fixed with two screws The Victaulic joint will not come out un less the cover is removed 4 Remove the two Victaulic joints Un screw the two nuts on each joint 5 Slide the gasket in the Victaulic joint to the pump side 6 Remove the relay connector from Pump 2 See the figure at right for its location 7 Unscrew the screws at the bas...

Страница 410: ... procedure for replacing Pump 2 remove the terminal block cov er of Pump 1 and remove the two Victaulic joints 10 Remove the relay connector The location of the relay connector of Pump 1 is shown in the figure at right 11 Unscrew the screws at the base of the pump x4 12 Pull the pump forward and out from the unit using caution not to let it come in contact with the base sheet metal Re place Pump 1...

Страница 411: ...attention when replacing gaskets 1 Before installing the gasket make sure that the seal face is clean free of burr rust and smooth 2 The gasket shall not be pulled and twisted shall not be damaged and shall not be contaminated with stains impurities dust or dirt 3 Make sure the gasket is flattened to avoid wrinkling when fastening 4 Points for attention when replacing nylon lock nuts 1 Do not clea...

Страница 412: ...ure Name Specifications Photo Inner hexagonal wrench S3 Wrench S14 Inner hexagonal sleeve S13 Fixed piece Included in the service kit Operation procedures Illustrations 1 Unscrew the plug assembly part 2 from the water drain valve and the air discharge valve using wrench S14 Air discharge valve 0000006416 BOOK 145 ページ 2021年10月26日 火曜日 午後5時30分 ...

Страница 413: ...4 3 Remove the water inlet body part 1 4 Remove four pull rods part 11 Not all four rods do not need to be removed unless necessary to re place the parts 5 Remove the rotation sign Note Save the label for reuse in the way its adhesive quality is maintained Operation procedures Illustrations Spring washer Hexagonal nut Water inlet Rod Rotation sign label 0000006416 BOOK 146 ページ 2021年10月26日 火曜日 午後5時...

Страница 414: ... the motor shaft while using the Inner hexagonal sleeve S13 to unscrew the nylon lock nut part 20 Note Rotate the nylon lock nut counterclockwise when seen from the nylon lock nut side 7 Remove the nylon lock nut part 20 flat washer part 31 shaft end sleeve part 19 and impeller part 4 Operation procedures Illustrations Nylon lock nut Flat washer Shaft end sleeve Impeller 0000006416 BOOK 147 ページ 20...

Страница 415: ...g Based on Observed Symptoms 8 Remove the sealing gasket part 17 guide vane part 12 long spac er sleeve of impeller part 14 and impeller part 4 Operation procedures Illustrations Sealing gasket Guide vane Long spacer sleeve Impeller 0000006416 BOOK 148 ページ 2021年10月26日 火曜日 午後5時30分 ...

Страница 416: ... procedure 9 Remove the sealing sleeve part 15 and sealing gasket part 17 Operation procedures Illustrations Sealing sleeve Sealing gasket Please keep the motor and parts completely dry during installation to prevent the contami nated media from entering the motor shell or rotor Operation procedures Illustrations 1 Loosen the hexagonal socket screw of the mechanical seal part 8 with an inner hexag...

Страница 417: ...he mechanical seal part 8 3 Remove the water outlet body part 7 and remove the static ring of the mechanical seal part 8 Have a new mechanical seal ready Operation procedures Illustrations Mechanical seal spring seat Mechanical seal spring Mechanical seal rotation ring Water outlet body Mechanical seal static ring 0000006416 BOOK 150 ページ 2021年10月26日 火曜日 午後5時30分 ...

Страница 418: ...ged parts 2 Assembly tool Please keep the motor and parts completely dry during installation to prevent the contami nated media from entering the motor shell or rotor Name Specifications Photo Plastic hammer Hexagonal torque wrench Range 3 5 N m S3 Wrench S14 Inner hexagonal sleeve S13 Fixed piece Included in the service kit Horizontal ruler 0000006416 BOOK 151 ページ 2021年10月26日 火曜日 午後5時30分 ...

Страница 419: ... Illustrations 1 Note to keep the work bench at the level state Important Make sure bubbles are located between the two lines of the level 2 Remove the stationary ring of the mechanical seal part 8 and coat it with methyl silicone oil evenly soaked 3 Install the stationary ring of the mechanical seal part 8 into the water outlet body part 7 with the smooth surface facing upwards Note When loading ...

Страница 420: ... outlet faces one side of the motor junction box 7 Load the rotation ring spring and spring seat of the mechanical seal part 8 adjust the position of the set screw in the spring seat so that it is facing the arc surface of the motor shaft Note Loosen the hexagonal socket screw of the spring seat beforehand Operation procedures Illustrations Mechanical seal static ring Mechanical seal Sponge pad St...

Страница 421: ... Note 1 The fastening torque of the inner hexagon bolt is 3 5 N m Note 2 Check that the distance between the end of the mechanical seal and the tip of the shaft is 51 mm 9 Install the sealing sleeve part 15 and install the sealing gasket part 17 in the slot of the water outlet body part 7 and note that the smooth surface of the sealing gasket faces downwards Note The smooth surface of the sealing ...

Страница 422: ... part 12 and install the motor part 32 shaft Note Align the impeller mounting hole and the guide vane mounting hole and fit the impeller using caution not to let the tip of the impeller come in con tact with the port ring part 12b Operation procedures Illustrations Guide vane Impeller Mounting hole Guide vane 0000006416 BOOK 155 ページ 2021年10月26日 火曜日 午後5時30分 ...

Страница 423: ...tall the long spacer sleeve part 14 impeller part 4 Shaft end sleeve part 19 and flat washer part 31 in turn 12 Tighten the nylon lock nut part 20 Operation procedures Illustrations Long spacer sleeve Impeller Impeller tip Shaft end sleeve Flat washer Nylon lock nut 0000006416 BOOK 156 ページ 2021年10月26日 火曜日 午後5時30分 ...

Страница 424: ...ct the motor and mount the sealing gasket part 17 on the guide vane part 12 stop Note Gasket light face down 15 Install them into the water inlet body part 1 Note The plug hole on the side alings with the water outlet hole on the water out let body part 7 16 Install four pull rods part 11 screw the pull rod into the threaded hole of the motor part 32 Install the spring washer part 24 and tighten t...

Страница 425: ...e level 19 Tighten the hexagonal nut part 25 with torque wrench Note 1 The rod screw should protrude by two to three threads after being tight ened Note 2 Tightening torque 11 13 N m 20 Tighten the plug assembly part 2 with wrench S14 21 Use the horizontal ruler to place the horizontal ruler on the outlet of the water body and make sure that the horizontal ruler bubble is in the two grid line Impo...

Страница 426: ...long with the mechanical seal 22 Check Turn the nylon lock nut part 20 of the water inlet with inner hexagonal sleeve S13 counterclockwise seen from the motor impel ler end to check for free rotation without blockage 23 Paste the rotation sign on the center of the motor fan cover Operation procedures Illustrations Rotation sign label 0000006416 BOOK 159 ページ 2021年10月26日 火曜日 午後5時30分 ...

Страница 427: ...d a The water inlet pipe is blocked by impurities a Check and remove dirty b The bottom valve or check valve is at the Closed position b Check the bottom valve and check valve c The water inlet pipe leaks c Check and repair the water inlet pipe d Air in the water inlet pipe or pump d Re fill water and discharge air After power off the pump is rotat ing in the reverse direction a Water inlet pipe i...

Страница 428: ...OINT OUT 3 Tape the thread of the JOINT not to damage the O RING 4 Attach the O RING Make sure the O RING is free of dust and dirt Make sure the O RING is not twisted 5 Reinstall the JOINT Tighten the JOINT to a torque of 60 N m The figure at right shows JOINT IN The same procedure applies to JOINT OUT 6 Remove the tape from the thread of the JOINT screw Make sure the thread is clean JOINT OUT JOI...

Страница 429: ...ower and then re move the service panel front lower 3 Disconnect all TH31 connectors from the control board 4 Unclamp the wires 5 Pull all TH31 thermistors out of the hold ers 6 Pull the wires out of the service panel front upper 7 Insert the new thermistors route the wire connectors from the service panel front upper side and into the control box and reconnect the thermistors 8 Hold the new therm...

Страница 430: ... wires Two thermistors are connected to the same connector Disconnect both thermistors when one is replaced Table below shows which thermistors are paired It also shows the holder and wire label colors See the figures at right for the locations of the thermistors 4 Replace the thermistors with the new ones reconnect all connectors Reconnect the wires and close the con trol box Lift the bottom of t...

Страница 431: ...isconnect all connectors from the con trol box except the connectors of the on site wiring and open the control box 4 Remove the pipe covers shown in the figure at right 5 Remove LEV3 SV1 and four way valve coils See sections 8 15 1 Solenoid Valve Coil SV1 Replacement Procedure HBC through 8 15 3 LEV Coils LEV1 LEV2 LEV3 Replacement Pro cedure HBC for details about the re moval procedure 6 Remove ...

Страница 432: ...he pipes of the old four way valve ASSY were cut out See the figure at right for how to adjust the pipe length and braze the pipes 11 Hold the new four way ASSY in place with the clamps and the packing to the sheet metal and braze the pipes 12 Re place the pipe ASSY and the pipe covers as they were Remove the braze Cut the pipes 110 mm Braze the supplied pipe expanded on one end to the pipe on the...

Страница 433: ...nstallation location 1 Remove the service panel lower panel 2 Collect the refrigerant and drain water through the pump 3 Disconnect all connectors from the con trol box including the connector of the power supply wire Completely unmount the control box from the unit 4 Remove all pipe covers from the pipes between the plate heat exchangers to prevent them from being damaged by heat 5 Remove the thr...

Страница 434: ...ouble tube pipe 10 Remove the water pressure sensor Pw2 shown in the figure at right See section 8 15 17 Water Pressure Sensor PW1 2 4 Replacement Proce dure HBC 11 Remove the water pipe located behind the four way valve fixing plate Held in place with a clip 12 Remove the four way valve fixing plate screwed down with two screws 13 Remove the water pressure sensors Pw2 and Pw4 See section for deta...

Страница 435: ...ing main side plate heat exchanger as explained below Remove the plate heat exchanger on the Cooling main side first before replacing the one on the Heating main side even when the one on the Cooling main side needs no replacement 17 Cut the pipe and remove the braze from the areas where indicated in the figure at right and then remove the elbow 18 Remove the Victaulic joint Removing the Victaulic...

Страница 436: ... not overlap 22 Remove the braze at the connection of the pipe and pull out the lower section of the pipe 23 Slide the plate heat exchanger forward on the base plate to remove it When replacing only the Cooling main side plate heat exchanger replace the plate heat exchanger and connect the pipes by brazing them in the reverse order as they were re moved Explained below are the procedures for re pl...

Страница 437: ...ump side 27 Remove the plate supporting the water pipe ASSY screwed down with two screws next to the pump 28 Remove the braze and the clips where indicated in the figure at right and pull the water pipe ASSY out of the unit 29 Remove the six clips from the pipe at the upper part of the unit and remove the pipe ASSY and the single pipe shown in the figure at right 30 Remove the braze where indicate...

Страница 438: ... from the plate heat exchanger fixing plate x3 33 Remove the Victaulic joint See step 18 for how to remove the joint 34 Remove the nut from the sheet metal on the plate heat exchanger pipe side and remove the sheet metal 35 As with the Cooling main side slide the plate heat exchanger forward so that the pipe on the plate heat exchanger and the pump port do not overlap Then remove the braze and pul...

Страница 439: ...pe 2 Timing of re placing the terminal block cover Re place the terminal block cover of the pump after installing the Victaulic joint 3 Brazing the pipe explained in step 30 Before brazing the pipe hold the pipe in place with clips to determine the angle of the pipe to be brazed 4 Brazing the double tube pipe and the pipe with a sensor that were ex plained in step 24 Braze the double tube pipe at ...

Страница 440: ...plate heat exchanger on the Cooling main side and replace it with the one that is supplied with the new Heating main plate heat exchanger Installation location 6 The pipe that was removed in step 9 Braze the pipe so that the straight sec tion of the pipe will be parallel to the plate heat exchanger as shown in the figure at right 7 Four way valve ASSY that was re moved in step 8 Refer to the figur...

Страница 441: ...ze from the pressure sensor and replace the sensor Protect the insulation materials of the plate heat exchanger from heat damage before brazing Installation location Service panel front lower PS1 Control box Operation procedures Illustrations Operation location 1 Collect the refrigerant 2 Remove the service panel front lower 3 Disconnect the connectors from the control box of the pressure sensor t...

Страница 442: ...anners and remove the sensor 5 When installing a new sensor tighten the nut using two spanners to a torque of 16 N m 6 Reconnect the connectors Installation location Service panel front lower PW2 PW1 PW4 Operation procedures Illustrations Operation location 1 Remove the service panel front lower 2 Drain water through the pump 3 Disconnect all connectors except the connectors of the on site wiring ...

Страница 443: ... pipe and replace the strainer inside 5 Re braze the pipes Protect the resin part on the valve block from damage from the brazing torch flame Installation location Service panel front upper Remove the braze Remove the pipe cover Valve block Strainer Operation procedures Illustrations Operation location 1 Remove the service panel front lower 2 Drain water through the pump 3 Remove the cover plate f...

Страница 444: ... panel front lower 4 Service panel front middle top 5 Service panel front middle bottom 5 Service panel side left 4 3 Unscrew the control box fixing screws x4 and remove the control box Disconnect all wire connectors from the control box 4 Unscrew the float switch mounting screws x2 and remove the float switch 5 Unscrew the screws x14 on the right and left panels lift the valve block by holding th...

Страница 445: ...ip shown below from the valve block ASSY and disconnect all pipes 9 Unscrew the fixing screws x8 on the metal plate that is holding the valve block 10 Replace the valve block ASSY with a new one service parts It is recommended to replace all nipples with new ones after replacing the valve block because the nipples may have been damaged by the O rings resulting in water leakage Hanging brackets Lef...

Страница 446: ... top left 3 Disconnect all TH31 connectors from the control board 4 Unscrew the fixing screws x4 on the control box and remove the control box Disconnect all wiring connectors from the control box 5 Unscrew the fixing screws x6 on the service panel left and remove the ser vice panel left 6 Release the thermistor wires from the clamps 7 Pull TH31 out of the top of the unit and replace it with a new...

Страница 447: ...nel top right and remove the service panel top right 3 Unscrew the fixing screws x2 on the service panel top left and remove the service panel top left 4 Disconnect the connectors of the therm istors to be replaced from the control board 5 Release the thermistor wires from the clamps 6 Cut the cable ties shown in the figure to release the thermistor wires 7 Remove the thermistors from the top of t...

Страница 448: ...t the cable tie that is holding the PVC tube 3 Release the clamp that is holding the pipes with the air vent valve from the metal plate 4 Loosen the flare nut using a spanner and replace the air vent valves with new ones service parts 5 Hold the PVC tube with a cable tie as it was To prevent the PVC tube from moving when the valve is opened 6 Perform air vent operation Abovethe ceiling Cable tie A...

Страница 449: ...LED error display becomes lit when the power is turned on with all the connectors on the control board except CN600 disconnected there is a problem with the wiring to those connec tors or with the connectors themselves 3 If nothing appears on the display under item 2 above AND the voltage between pins 1 and 2 of CN600 is within the range between 8 VDC and 12 VDC control board failure is suspected ...

Страница 450: ...1 Preparation 4 9 2 2 Storing Data on a USB Memory Stick 4 9 2 3 Collecting Operation Data 6 9 2 4 Precautions 7 9 3 Software Rewrite Function on the USB Outdoor unit HBC 8 9 3 1 Preparation 8 9 3 2 Rewriting Software 8 9 3 3 Precautions 9 9 4 Maintenance LED Display and Troubleshooting 10 9 4 1 Maintenance LED Display Content List 10 9 4 2 Troubleshooting 13 0000006418 BOOK 1 ページ 2021年10月13日 水曜日 ...

Страница 451: ...GB_BS_09_F 0000006418 BOOK 2 ページ 2021年10月13日 水曜日 午前10時38分 ...

Страница 452: ...ory stick Operation data in the multiple outdoor unit system will be saved on the OC unit Attempting to collect the operation data from the OS unit will result in an error 2 Software rewrite function Outdoor unit HBC The software on outdoor units and HBC can be rewritten using a USB memory stick For detailed information about each function refer to Section 9 2 Operation Data Collection and Storage...

Страница 453: ..._F 9 USB Function 9 1 2 System Structure 1 Control board on the outdoor unit CN601 SWP3 Push switch Function setting LED301 Maintenance LED CNUSB USB memory connector SW4 Dip switch SW6 10 SW7 9 0000006418 BOOK 2 ページ 2021年10月13日 水曜日 午前10時38分 ...

Страница 454: ...atible Voltage and amperage rating of 5 V and 2 1 A MAX Supports the energy saving mode A battery charger not compatible with the energy saving mode may turn off while the data are being collected or while the S W is being re written and these actions may not be completed successfully A LEAD WIRE ASSY USB is required to connect the control board and the portable charger Use a cable that meets the ...

Страница 455: ...he saved file is named MNTXXX MT XXX represents a serial number from 000 to 100 Since files named MNT101 MT or more cannot be created unnecessary folders and files should be deleted 2 Storing data on a USB memory stick Data can be stored to a USB memory stick either with the main power to the outdoor unit OC turned on Method 2 or off Method 1 For safety reasons it is recommended to store the data ...

Страница 456: ...SB has appeared on the LED lift the finger off SWP3 ENTER The unit is now in the data storage mode Storing data Press SWP3 ENTER If the data storage process has properly started the progress 0 99 will be shown on the monitoring LED 301 End on the LED indicates successful completion of the data storage process It takes approximately five minutes for the data storage process to be completed Ending t...

Страница 457: ...t the switches on the control board by following the table shown above Switch setting SW6 10 ON SW4 817 2 Press SWP3 ENTER With each switch operation the setting can be alternately switched ON and OFF 3 After conducting step 1 check that the operating condition is stable Data collection start OFF Enabled Data collection end ON Disabled Setting procedure is now complete 3 Settings for error data co...

Страница 458: ...ration If an error occurs refer to 9 4 2 Troubleshooting After normal startup set the operation status of the air conditioning units to the original status USB memory sticks may become unusable due to unexpected damage or memory shortage It is recommended to take extra USB memory sticks to the site If only the OS is operated due to problems with the OC collect data also from the OS by following th...

Страница 459: ... of the outdoor unit 4 Connect the portable battery charger to CN601 on the control board of the outdoor unit The power of the control board of the outdoor unit will turn on Wait for five seconds until the USB memory stick is recognized 5 Make sure the display Pro is shown on the maintenance LED LED301 This shows that Software Rewrite Mode has been started HBC 1 Shut down the power for the outdoor...

Страница 460: ...ection 9 4 Maintenance LED Display and Troubleshooting Take care to choose the correct countermeasure program for the intended model and version Store only one software rewrite program on the USB memory stick If this requirement is not met software rewrite may not start Be cautious of electric shock when connecting an USB memory stick or a portable battery charger to the control board Connect the ...

Страница 461: ...orage is en abled See Section 9 4 2 Troubleshooting 1 1 and 1 2 2 Storage in progress 0 to 99 is displayed Status of the data storage to the USB memory stick is shown by the progress rate 3 Storage completed END The storage process has been completed successfully 4 Error USB memory side Er01 The storage process cannot be started due to failure of the USB memory stick See Section 9 4 2 Troubleshoot...

Страница 462: ...F SW4 No 28 Collection in progress ON OC is collecting operation da ta A blinking display indicates that data collection is temporarily sus pended No switch setting is neces sary Data collection will be resumed automatically See Sec tion 9 4 2 Troubleshooting 2 1 7 Collection suspended OFF Collection of operation data is suspended 8 Flash memory error F Er Collection of operation data is suspended...

Страница 463: ...ed END Software rewrite has been completed successfully 13 Error USB memory side Er01 Software rewrite process cannot be started due to failure of the USB memory stick See Section 9 4 2 Troubleshooting 3 4 Er02 Software rewrite was stopped due to failure of the USB memory stick during the software rewrite process See Section 9 4 2 Troubleshooting 3 5 14 Error control board side Er10 Software rewri...

Страница 464: ... the USB memory before the start of data storage data storage has not been com pleted Error Er01 occurs when SWP3 on the control board is pressed to rewrite the software immediately after power is supplied to the USB connected control board When the software rewriting is started before the control board recognizes the USB memory stick Solution Check the connection of the USB memory stick If no pro...

Страница 465: ...owing either of the two methods 1 or 2 the control board may be malfunctioning 2 Collecting operation data outdoor unit 1 Maintenance LED displays blinking ON Meaning or Cause Despite data collection function being enabled it is not started yet There may be two causes Firstly the initialization process immediately after the system startup may have inhibited the start of data collection Secondly M ...

Страница 466: ...es turn on the system again If the switches are in the OFF position it means the software rewrite process has failed Try rewriting the software again by following the procedure detailed in Section 9 3 2 Rewriting Software If the problem per sists rewrite the software using a ROM writer 4 Maintenance LED displays Er01 Meaning or Cause Because an error occurred in the USB memory stick before the sta...

Страница 467: ...ecause there was a problem in the control board during the software rewrite process software rewrite has not been com pleted Solution Try rewriting the software again by following the procedure detailed in 1 Operation procedure 1 Starting software rewrite mode under Section 9 3 2 Rewriting Software If the problem persists rewrite the software using a ROM writer 7 Service monitor LED lights off whi...

Страница 468: ...door unit 1 10 1 1 How to Read the LED 1 10 1 2 Initial LED Display 2 10 1 3 Clock Memory Function 3 10 2 LED Status Indicators HBC 4 10 2 1 How to Read the LED 4 10 2 2 Initial LED Display HBC 5 10 3 LED Status Indicators Table 6 0000006456 BOOK 1 ページ 2021年10月26日 火曜日 午後7時49分 ...

Страница 469: ...GB_BS_10_M 0000006456 BOOK 2 ページ 2021年10月26日 火曜日 午後7時49分 ...

Страница 470: ...ature are examples of numerical values and operating conditions and the on off status of solenoid valve are examples of flag display In the example above 1 through 9 are set to ON and 10 is set to OFF 1 Display of numerical values Example When the pressure data sensor reads 18 8kg cm2 Item No 58 The unit of pressure is in kg cm2 Use the following conversion formula to convert the displayed value i...

Страница 471: ...esponds to No 517 in the LED display table Only item No 1 Software Version appears on the display if there is a wiring failure between the control board and the trans mission line power supply board or if the circuit board has failed LED may not light up at all No Item Display Remarks 1 Software version 0103 Version 1 03 2 Refrigerant type 32 R32 3 Model and capacity H 20 Cooling Heating 20 HP For...

Страница 472: ...ower is turned off and then on again the count will resume from the time before the power was turned off Thus the time that differs the actual time will be displayed This also applies when a power failure occurs The system controller such as AG 150A adjusts the time once a day When the system controller is connected the time will be automatically updated to the correct current time after the time ...

Страница 473: ...f the unit can be monitored on the service monitor The service monitor uses 4 digit 7 segment LED to display flags There are no check items using dipswitch settings LD1 Pump in operation LD2 DIP SW 002 7 ON LD3 DIP SW 002 8 ON LD5 52C LD7 HB LD8 Microcomputer in operation 7SEG LED LD1 LD2 LD3 LD4 LD5 LD6 LD7 LD8 0000006456 BOOK 4 ページ 2021年10月26日 火曜日 午後7時49分 ...

Страница 474: ... if there is a wiring failure between the control board and the trans mission line power supply board or if the circuit board has failed If nothing appears on the display after the power is turned on 4130 error may be occurring Take the procedure described in section 7 6 12 Error Code 4130 No Item Display Remarks 1 Software version 1100 Version 11 00 2 Refrigerant type 32 R32 3 Model and capacity ...

Страница 475: ...eration Emergency op eration Communication error 3 minute restart delay mode B 9 1001000000 Communication demand ca pacity 0000 to 9999 B If not demanded controlled appears on the display 10 0101000000 Contact point demand capac ity 0000 to 9999 B If not demanded controlled appears on the display 11 1101000000 External signal Open input contact point Contact point de mand Low noise mode Capacity p...

Страница 476: ...nit No 11 Unit No 12 Unit No 13 Unit No 14 Unit No 15 Unit No 16 25 1001100000 Top Unit No 17 Unit No 18 Unit No 19 Unit No 20 Unit No 21 Unit No 22 Unit No 23 Unit No 24 Bottom Unit No 25 Unit No 26 Unit No 27 Unit No 28 Unit No 29 Unit No 30 Unit No 31 Unit No 32 26 0101100000 Top Unit No 33 Unit No 34 Unit No 35 Unit No 36 Unit No 37 Unit No 38 Unit No 39 Unit No 40 Bottom Unit No 41 Unit No 42...

Страница 477: ...A Fan output 98 0100011000 Fan inverter output rpm FAN2 A rpm 104 0001011000 LEV2 0000 to 9999 A 105 1001011000 LEV4 0000 to 480 A 108 0011011000 COMP operating current DC 00 0 to 999 9 A Peak value A 109 1011011000 LEV2b 0000 to 9999 A 110 0111011000 LEV2c 0000 to 9999 A 111 1111011000 COMP bus voltage 00 0 to 999 9 A The unit is V 112 0000111000 LEV2d 0000 to 9999 A 113 1000111000 LEV9 0000 to 9...

Страница 478: ...01110100 Error history 5 0000 to 9999 B 187 1101110100 Error details of inverter Error details of inverter 0001 0120 A 188 0011110100 Error history 6 0000 to 9999 B 189 1011110100 Error details of inverter Error details of inverter 0001 0120 A 190 0111110100 Error history 7 0000 to 9999 B 191 1111110100 Error details of inverter Error details of inverter 0001 0120 A 192 0000001100 Error history 8 ...

Страница 479: ...he indoor units is being supplied A Bottom 216 0001101100 TH4 99 9 to 999 9 A The unit is C 217 1001101100 TH3 99 9 to 999 9 A 218 0101101100 TH7 99 9 to 999 9 A 221 1011101100 TH5 99 9 to 999 9 A 227 1100011100 THHS1 99 9 to 999 9 A The unit is C 229 1010011100 High pressure sensor data 99 9 to 999 9 A The unit is kgf cm 2 230 0110011100 Low pressure sensor data 99 9 to 999 9 A 233 0101011100 TH1...

Страница 480: ...me Lower 4 digits 0000 to 9999 A 294 0110010010 COMP number of start stop events Upper 4 digits 0000 to 9999 A Count up at start up The unit is Time 295 1110010010 COMP number of start stop events Lower 4 digits 0000 to 9999 A 300 0011010010 Integrated operation time of compressor for rotation pur pose 0000 to 9999 B The unit is h 301 1011010010 Power supply unit OC OS Address B Data before error ...

Страница 481: ...0 to 9999 371 1100111010 IC21 Address capacity code 0000 to 9999 0000 to 9999 372 0010111010 IC22 Address capacity code 0000 to 9999 0000 to 9999 373 1010111010 IC23 Address capacity code 0000 to 9999 0000 to 9999 374 0110111010 IC24 Address capacity code 0000 to 9999 0000 to 9999 375 1110111010 IC25 Address capacity code 0000 to 9999 0000 to 9999 376 0001111010 IC26 Address capacity code 0000 to ...

Страница 482: ...Suction temperature 99 9 to 999 9 422 0110010110 IC15 Suction temperature 99 9 to 999 9 423 1110010110 IC16 Suction temperature 99 9 to 999 9 424 0001010110 IC17 Suction temperature 99 9 to 999 9 425 1001010110 IC18 Suction temperature 99 9 to 999 9 426 0101010110 IC19 Suction temperature 99 9 to 999 9 427 1101010110 IC20 Suction temperature 99 9 to 999 9 428 0011010110 IC21 Suction temperature 99...

Страница 483: ...t temperature 99 9 to 999 9 467 1100101110 IC10 Water pipe inlet temperature 99 9 to 999 9 468 0010101110 IC11 Water pipe inlet temperature 99 9 to 999 9 469 1010101110 IC12 Water pipe inlet temperature 99 9 to 999 9 470 0110101110 IC13 Water pipe inlet temperature 99 9 to 999 9 471 1110101110 IC14 Water pipe inlet temperature 99 9 to 999 9 472 0001101110 IC15 Water pipe inlet temperature 99 9 to ...

Страница 484: ...8 0100111110 IC41 Water pipe inlet temperature 99 9 to 999 9 499 1100111110 IC42 Water pipe inlet temperature 99 9 to 999 9 500 0010111110 IC43 Water pipe inlet temperature 99 9 to 999 9 501 1010111110 IC44 Water pipe inlet temperature 99 9 to 999 9 502 0110111110 IC45 Water pipe inlet temperature 99 9 to 999 9 503 1110111110 IC46 Water pipe inlet temperature 99 9 to 999 9 504 0001111110 IC47 Wate...

Страница 485: ...number of connected units B 515 1100000001 HBC address Count up display of number of connected units 516 0010000001 Count up display of number of connected units B 517 1010000001 Version Capacity S W version Refrigerant type Model and capacity Communication address A 518 0110000001 OC address OC address display 1 A The condition of either OC or OS is displayed individually B The condition of the e...

Страница 486: ...9 543 1111100001 IC21 Water pipe outlet temperature 99 9 to 999 9 544 0000010001 IC22 Water pipe outlet temperature 99 9 to 999 9 545 1000010001 IC23 Water pipe outlet temperature 99 9 to 999 9 546 0100010001 IC24 Water pipe outlet temperature 99 9 to 999 9 547 1100010001 IC25 Water pipe outlet temperature 99 9 to 999 9 548 0010010001 IC26 Water pipe outlet temperature 99 9 to 999 9 549 1010010001...

Страница 487: ... 1001001001 IC13SH 99 9 to 999 9 586 0101001001 IC14SH 99 9 to 999 9 587 1101001001 IC15SH 99 9 to 999 9 588 0011001001 IC16SH 99 9 to 999 9 589 1011001001 IC17SH 99 9 to 999 9 590 0111001001 IC18SH 99 9 to 999 9 591 1111001001 IC19SH 99 9 to 999 9 592 0000101001 IC20SH 99 9 to 999 9 593 1000101001 IC21SH 99 9 to 999 9 594 0100101001 IC22SH 99 9 to 999 9 595 1100101001 IC23SH 99 9 to 999 9 596 001...

Страница 488: ...10111001 IC9SC 99 9 to 999 9 632 0001111001 IC10SC 99 9 to 999 9 633 1001111001 IC11SC 99 9 to 999 9 634 0101111001 IC12SC 99 9 to 999 9 635 1101111001 IC13SC 99 9 to 999 9 636 0011111001 IC14SC 99 9 to 999 9 637 1011111001 IC15SC 99 9 to 999 9 638 0111111001 IC16SC 99 9 to 999 9 639 1111111001 IC17SC 99 9 to 999 9 640 0000000101 IC18SC 99 9 to 999 9 641 1000000101 IC19SC 99 9 to 999 9 642 0100000...

Страница 489: ... 999 9 664 0001100101 IC42SC 99 9 to 999 9 665 1001100101 IC43SC 99 9 to 999 9 666 0101100101 IC44SC 99 9 to 999 9 667 1101100101 IC45SC 99 9 to 999 9 668 0011100101 IC46SC 99 9 to 999 9 669 1011100101 IC47SC 99 9 to 999 9 670 0111100101 IC48SC 99 9 to 999 9 671 1111100101 IC49SC 99 9 to 999 9 672 0000010101 IC50SC 99 9 to 999 9 Data on indoor unit system No SW4 SW6 9 OFF SW6 10 OFF Item Display U...

Страница 490: ...r minute 699 1101110101 Time of error detection 5 2 00 00 to 99 12 1 to 31 Year and month and date alter nate display 700 0011110101 Time of error detection 6 00 00 to 23 59 Hour minute 701 1011110101 Time of error detection 6 2 00 00 to 99 12 1 to 31 Year and month and date alter nate display 702 0111110101 Time of error detection 7 00 00 to 23 59 A Hour minute 703 1111110101 Time of error detect...

Страница 491: ...e 778 0101000011 IC15 Operation mode 779 1101000011 IC16 Operation mode 780 0011000011 IC17 Operation mode 781 1011000011 IC18 Operation mode 782 0111000011 IC19 Operation mode 783 1111000011 IC20 Operation mode 784 0000100011 IC21 Operation mode 785 1000100011 IC22 Operation mode 786 0100100011 IC23 Operation mode 787 1100100011 IC24 Operation mode 788 0010100011 IC25 Operation mode 789 101010001...

Страница 492: ...110011 IC7 filter 0000 to 9999 821 1010110011 IC8 filter 0000 to 9999 822 0110110011 IC9 filter 0000 to 9999 823 1110110011 IC10 filter 0000 to 9999 824 0001110011 IC11 filter 0000 to 9999 825 1001110011 IC12 filter 0000 to 9999 826 0101110011 IC13 filter 0000 to 9999 827 1101110011 IC14 filter 0000 to 9999 828 0011110011 IC15 filter 0000 to 9999 829 1011110011 IC16 filter 0000 to 9999 830 0111110...

Страница 493: ...C40 filter 0000 to 9999 854 0110101011 IC41 filter 0000 to 9999 855 1110101011 IC42 filter 0000 to 9999 856 0001101011 IC43 filter 0000 to 9999 857 1001101011 IC44 filter 0000 to 9999 858 0101101011 IC45 filter 0000 to 9999 859 1101101011 IC46 filter 0000 to 9999 860 0011101011 IC47 filter 0000 to 9999 861 1011101011 IC48 filter 0000 to 9999 862 0111101011 IC49 filter 0000 to 9999 863 1111101011 I...

Страница 494: ...it is deg 880 0000111011 Control board Reset counter 0 to 254 A The unit is time 881 1000111011 INV board Reset counter 0 to 254 A 884 0010111011 Fan board address 5 reset counter 0 to 254 A The unit is time 885 1010111011 Fan board address 6 reset counter 0 to 254 A 980 0010101111 M NET processor S W version 0 00 to 99 99 A 1 A The condition of either OC or OS is displayed individually B The cond...

Страница 495: ...s 99 9 to 999 9 1351 1110001010 SC1 HBC Main HBC Main address 99 9 to 999 9 1352 0001001010 SC2 HBC Main HBC Main address 99 9 to 999 9 1353 1001001010 SH1 HBC Main HBC Main address 99 9 to 999 9 1354 0101001010 SH2 HBC Main HBC Main address 99 9 to 999 9 1355 1101001010 PT1 HBC Main HBC Main address 99 9 to 999 9 1356 0011001010 dPHM HBC Main HBC Main address 99 9 to 999 9 1357 1011001010 PS1 HBC...

Страница 496: ...C Sub HBC Sub address 0 or C1 to C999 or H1 to H999 or 1000 to 9999 2 1403 1101111010 VB3h HBC Sub HBC Sub address 0 or C1 to C999 or H1 to H999 or 1000 to 9999 2 1404 0011111010 VB3i HBC Sub HBC Sub address 0 or C1 to C999 or H1 to H999 or 1000 to 9999 2 1405 1011111010 VB3j HBC Sub HBC Sub address 0 or C1 to C999 or H1 to H999 or 1000 to 9999 2 1406 0111111010 VB3k HBC Sub HBC Sub address 0 or C...

Страница 497: ...110100110 Pump2 inverter Iw HBC Main HBC Main address 99 9 to 999 9 1432 0001100110 Valve block board1 S W version HBC Sub HBC Sub address 0 00 to 999 9 2 1433 1001100110 Valve block board2 S W version HBC Sub HBC Sub address 0 00 to 999 9 2 Current data No SW4 SW6 9 ON SW6 10 OFF Item Display Unit A B 1 3 Remarks 1234567890 LD1 LD2 LD3 LD4 LD5 LD6 LD7 LD8 OC 1 A The condition of either OC or OS i...

Страница 498: ...ess 99 9 to 999 9 1687 1110100101 SC1 HBC Main HBC Main address 99 9 to 999 9 1688 0001100101 SC2 HBC Main HBC Main address 99 9 to 999 9 1689 1001100101 SH1 HBC Main HBC Main address 99 9 to 999 9 1690 0101100101 SH2 HBC Main HBC Main address 99 9 to 999 9 1691 1101100101 PT1 HBC Main HBC Main address 99 9 to 999 9 1692 0011100101 dPHM HBC Main HBC Main address 99 9 to 999 9 1693 1011100101 PS1 H...

Страница 499: ...Sub HBC Sub address 0 or C1 to C999 or H1 to H999 or 1000 to 9999 2 1739 1101001101 VB3h HBC Sub HBC Sub address 0 or C1 to C999 or H1 to H999 or 1000 to 9999 2 1740 0011001101 VB3i HBC Sub HBC Sub address 0 or C1 to C999 or H1 to H999 or 1000 to 9999 2 1741 1011001101 VB3j HBC Sub HBC Sub address 0 or C1 to C999 or H1 to H999 or 1000 to 9999 2 1742 0111001101 VB3k HBC Sub HBC Sub address 0 or C1 ...

Страница 500: ...displayed individually B The condition of the entire refrigerant system is displayed 2 When multiple sub HBCs are connected to the outdoor unit the addresses and the values of these controllers will be displayed on the maintenance LED in the following cycle HBC Sub1 address HBC Sub1 value Blank HBC Sub2 address HBC Sub2 value Blank HBC Sub3 address HBC Sub3 value Blank HBC Sub1 address cycles back...

Страница 501: ... 10 3 LED Status Indicators Table 10 LED Status Indicators 32 chapter 10 BS_10_M 0000006456 BOOK 32 ページ 2021年10月26日 火曜日 午後7時49分 ...

Страница 502: ......

Страница 503: ...MB WM F V AA B _InstallationManual_WT09805X01 CMB WM F AA_PartsList_BWE021510 CMB WM F AA_ServiceHandbook_HWE21050 HVRF_Information_Pack_Ver1 0_ Vertical Horizontal HBC Databook MEES21K003 Vertical HBC Controller HVRF Product Information Sheet ...

Отзывы: