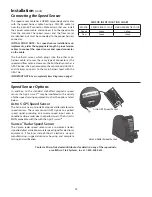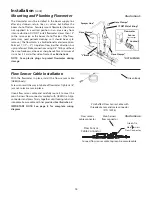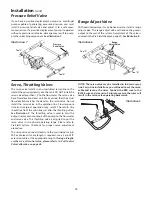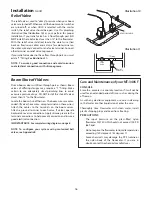
CONSOLE
The only way to field test a console is to con nect it to a
harness on a vehicle with a known working console or install
it on an E-POP (Elec tron ic Point of Purchase) dis play stand.
HARNESS
The harness can be checked using an ohm me ter or continuity
tester. The main wiring diagram shows the pin-out of all
connectors.
See page 31 for wiring diagram.
ELECTRICAL INTERFERENCE
Erratic operation of the system may be the result of electrical
interference from ignition wires or inductive loads (electrical
clutch, fan, solenoid, etc.). Always try to route wires as far
away from suspect areas as possible. If problems occur, you
may need to relocate the console and/or wiring harness, or
install a noise suppressor and/or spark plugs.
POWER
The power cable has a three-pin connector labeled A, B, C.
Check between A-C with a volt meter or test light. If there
is no pow er, trace cable toward battery look ing for breaks.
Also check any fuses or circuit break ers that supply pow er to
the console.
ACCESSORY POWER
The speed, flow and run/hold cables all have an ac ces so ry
power wire. Check for 12 volts between B (usu al ly white) and
C (usually black) of these con nec tors. If power is not present,
make sure the ac ces so ry pow er wire is not open or shorted
to ground or to another wire. If this wire has a prob lem, the
con sole may ex hib it erratic behavior or not function at all.
MAGNETIC HALL-EFFECT SPEED AND FLOW SENSORS
CAUTION: Improper connection or voltage could damage
the Hall-effect sensor. The Hall-effect sen sor works similar
to a reed switch, but re quires pow er in order to func tion.
Also, this par tic ular type of Hall-effect sen sor re quires al ter-
nat ing magnetic po lar i ties in or der to switch. This means
that the north pole of a mag net will “open” the Hall effect
and the south pole of a magnet will “close” the Hall effect.
Ground pin C (black) and connect clean 12 volts to pin B
(white) of the Hall-effect sensor cable. Con nect the positive
lead (red) of an ohmmeter or con ti nu ity tester to pin A (red)
and the negative lead (black) of the ohmmeter or continuity
tester to pin C of the Hall-effect sensor cable.
Holding the tip of the sensor up to the north pole of a magnet
should result in a very high re sis tance (in fi nite), while holding
the tip of the sensor up to the south pole of a magnet should
result in a very low resistance (near zero).
Troubleshooting
Checking Individual Components
TRAK-STAR ULTRASONIC SPEED SENSOR
Make certain that the Trak-Star is emitting a “crackling”
sound. If not, check for power between pins A (WHITE wire)
and B (BLUE wire) of the adapter cable’s 6-pin connector.
Also make certain that the BLUE wire is securely connected
to chassis (frame) ground. Check connection for good metal-
to-metal contact.
If the ground surface that you are traveling over is too
smooth (some blacktop and concrete surfaces, especially
wet, icy or snow covered), the speed reading may go to zero,
be erratic or be slow to respond. If the Trak-Star is making a
“crackling” sound and the ground doesn’t appear to be too
smooth, try mounting the Trak-Star pointing forward and as
far to the front of the vehicle as possible.
(Echo interference
problem: See Trak-Star Installation and Operator’s Manual
for details).
VANSCO RADAR SPEED SENSOR
Carefully check your installation and operating instructions.
The following are tips for troubleshooting;
1. Disconnect the radar adapter cable from the console
harness.
2. Check for 12 VDC between pins B and C of the main
harness connector (yellow tie). If not present, console or
harness may be defective.
3. Using a jumper wire (paper clip bent into a “U”), rapidly
short together positions A and C of the main harness
speed connector (yellow tie) several times. The console
should respond with some MPH reading. If not, the
console or harness may be defective.
4. Reconnect the radar adapter cable to the main harness
speed connection (yellow tie).
5. Disconnect the radar from the radar adapter cable.
6. Check for 12 VDC between pins 1 and 3 of the radar
adapter connector. If it is not present but was present in
step 2, the radar adapter cable may be defective.
7. Using a jumper wire (paper clip bent into a “U”), rapidly
short together positions 2 and 3 of the radar connector
(round 4-pin) several times. The console should respond
with some MPH reading. If not but had a reading in step
3, the radar adapter cable may be defective.
8. If system passes all above tests, the radar may be
defective.
27
Содержание MT-3405 LR F
Страница 1: ...MT 3405 F LR AUTOMATIC RATE CONTROLLER REFERENCE MANUAL TM ...
Страница 33: ...33 Appendices ...

