


23
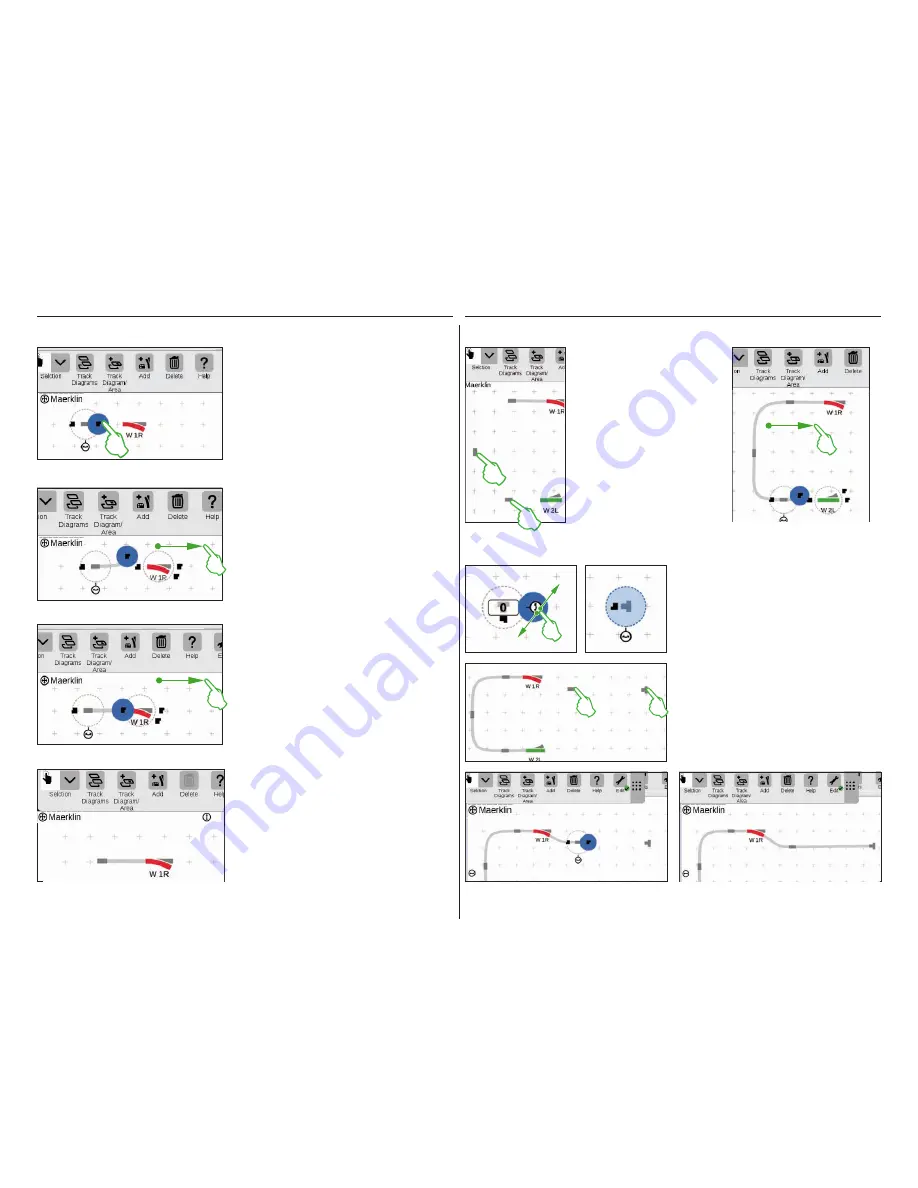
Now you have the opportunity to
practice more connections: Make
the connection to the turnout „W 2L“
that was already positioned on the
previous page. To do that place two
of the track path items already added
as shown (left image). You need to
do a rotation of 90 degrees once (see
„Rotation Mode“ on Page 22).
Finally, connect the items by first
switching a docking position in each
case to the Connection Mode (right
image) and then making the connec-
tion (see „Connection Mode“ at the
beginning of this page).
Now a storage siding will be connected
to the upper turnout. To do that, first ro-
tate the track bumper and a track path
item by 90 degrees (images to the left,
see „Rotation Mode“ on Page 22).
Connecting a Turnout and a Track Bumper
Pull the now horizontal track path item to the
left next to the turnout „W 1R”. You will see two
black symbols to the left and right on the edge of
the marked track path item. They are the docking
positions by which two items are connected with
each other. Now tap on the right symbol that is
marked in blue by the act of tapping on it: You
have activated the
Connection Mode
(left image).
Connecting Items: The Connection Mode
As soon as the two docking positions overlap,
lift your finger from the display. The Central Sta-
tion 3 automatically makes the track connection
between the connection positions (left image).
Tap next to the turnout and the track path item
on the board and all of the markings are thus re-
moved. You see only the items together with the
track connection (left image). Congratulations,
you have connected your first pair of items!
Tip:
You can also connect the items by placing
them close to each other.
Now both track-building items are posi-
tioned as shown in the diagram nearby.
After that, the turnout is connected to
the track path item (see „Connection
Mode“ at the beginning of this page).
Then make the connection between the
track path item and the track bumper
(lower image).
Pull this connection symbol marked in blue in the
direction of the turnout (left image).
Tip:
You can carry out the pull motion with your
finger at any spot on the display. You thus have a
perfect view of the items to be connected.
Содержание Central Station 3
Страница 2: ... 1 Central Station 3 ...
Страница 9: ... 8 Fahren Lokliste Funktionen schalten Loks bearbeiten ...
Страница 16: ... 15 Artikelliste bearbeiten Magnetartikel anlegen sortieren schalten ...
Страница 21: ... 20 Gleisstellbild bearbeiten Gleisartikel positionieren drehen verbinden ...
Страница 28: ... 27 Ereignisse erstellen und bearbeiten Fahrstraßen anlegen Abläufe programmieren und schalten ...
Страница 32: ... 31 Systemeinstellungen Anpassung des Systems Systeminformationen ...
Страница 41: ... 1 Central Station 3 ...
Страница 48: ... 8 Running Locomotives Locomotive List Switching Functions Editing Locomotives ...
Страница 55: ... 15 Editing the Item List Setting Up Sorting Switching Solenoid Items ...
Страница 60: ... 20 Editing the Track Diagram Control Screen Positioning Rotating Connecting Track Items ...
Страница 67: ... 27 Creating and Editing Events Creating Routes Programming and Switching Procedures ...
Страница 71: ... 31 System Settings Adjusting the System System Data ...
Страница 80: ... 1 Central Station 3 ...
Страница 87: ... 8 Conduite Liste des locomotives Activer des fonctions Modifier des locomotives ...
Страница 94: ... 15 Modifier la liste des articles Créer trier commuter des articles électromagnétiques ...
Страница 99: ... 20 Modifier le TCO Positionner faire pivoter relier des articles de voie ...
Страница 106: ... 27 Créer et modifier des évènements Créer des itinéraires Programmer et commander des déroulements ...
Страница 110: ... 31 Paramètres système Adaptation du système Informations système ...
Страница 119: ... 1 Central Station 3 ...
Страница 126: ... 8 Rijden Loclijst Functies schakelen Locs bewerken ...
Страница 133: ... 15 Artikelenlijst bewerken Magneetartikelen invoeren sorteren schakelen ...
Страница 138: ... 20 Seinpaneel bewerken Railartikelen positioneren draaien verbinden ...
Страница 145: ... 27 Gebeurtenissen maken en bewerken Rijwegen aanmaken Aflopen programmeren en schakelen ...
Страница 149: ... 31 Systeeminstellingen Aanpassing van het systeem Systeeminformatie ...
Страница 158: ... 1 Central Station 3 ...
Страница 165: ... 8 Viaggiare Elenco locomotive Commutare funzioni Elaborare locomotive ...
Страница 172: ... 15 Elaborare un elenco di apparati Aggiungere ordinare commutare apparati elettromagnetici ...
Страница 177: ... 20 Elaborare un quadro sinottico di comando binari Posizionare ruotare collegare apparati di binario ...
Страница 184: ... 27 Allestire ed elaborare avvenimenti Allocare itinerari di marcia Programmare e commutare avvenimenti ...
Страница 188: ... 31 Impostazioni di sistema Adattamento del sistema Informazioni sul sistema ...
Страница 197: ... 1 Central Station 3 ...
Страница 204: ... 8 Conducción Lista de locomotoras Conmutar funciones Editar locomotoras ...
Страница 211: ... 15 Editar lista de artículos Crear ordenar conmutar artículos magnéticos ...
Страница 216: ... 20 Editar el esquema de mando de agujas Posicionamiento giro conexión de artículos de vía ...
Страница 223: ... 27 Crear y editar eventos Crear itinerarios programar y conmutar secuencias ...
Страница 227: ... 31 Configuración del sistema Adaptación del sistema Informaciones del sistema ...


