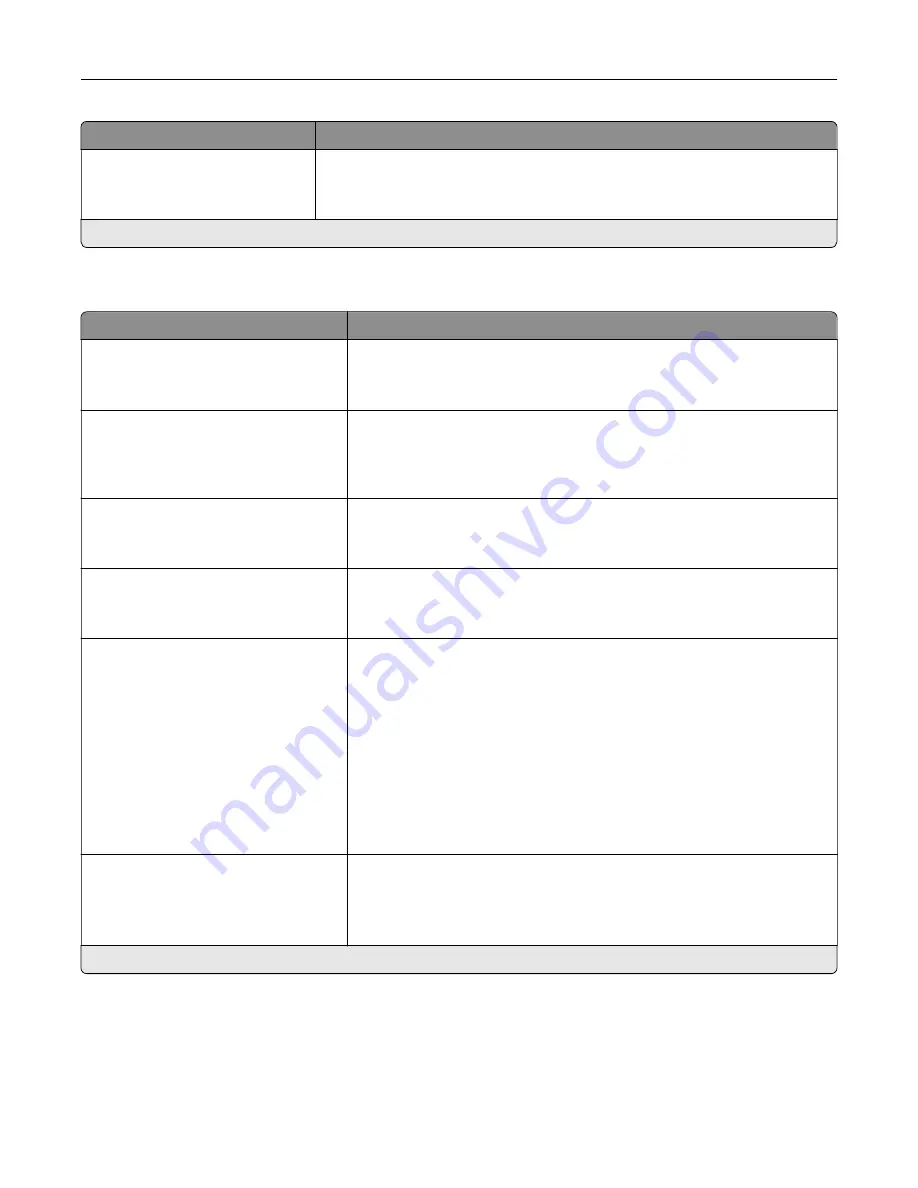
Menu item
Description
Print Area
Normal*
Whole Page
Set the printable area on a sheet of paper.
Note:
An asterisk (*) next to a value indicates the factory default setting.
Setup
Menu item
Description
Printer Language
PCL Emulation
PS Emulation*
Set the printer language.
Note:
Setting a printer language default does not prevent a software
program from sending print jobs that use another printer language.
Job Waiting
Off*
On
Preserve print jobs requiring supplies so that jobs not requiring the missing
supplies can print.
Note:
This menu item appears only when an intelligent storage drive
(ISD) is installed.
Job Hold Timeout
0–255 (30*)
Set the time in seconds that the printer waits for user intervention before
it holds jobs that require unavailable resources.
Note:
This menu item appears only when an ISD is installed.
Download Target
RAM*
Disk
Specify where to save all permanent resources that have been
downloaded to the printer.
Note:
This menu item appears only when an ISD is installed.
Resource Save
Off*
On
Determine what the printer does with downloaded resources when it
receives a job that requires more than the available memory.
Notes:
•
When set to Off, the printer retains downloaded resources only until
memory is needed. Resources associated with the inactive printer
language are deleted.
•
When set to On, the printer preserves all the permanent
downloaded resources across all language switches. When
necessary, the printer shows memory full messages instead of
deleting permanent resources.
Print All Order
Alphabetical*
Newest First
Oldest First
Specify the order when you choose to print all held and confidential jobs.
Note:
This menu item appears only when an ISD is installed.
Note:
An asterisk (*) next to a value indicates the factory default setting.
Use printer menus
96
Содержание XM3142
Страница 1: ...MX432 XM3142 MFPs User s Guide October 2022 www lexmark com Machine type 7019 Models 6w6 6w9...
Страница 54: ...4 Locate the ISD connector 5 Insert the card to the ISD connector Set up install and con gure 54...
Страница 154: ...Printing the Menu Settings Page From the home screen touch Settings Reports Menu Settings Page Use printer menus 154...
Страница 161: ...2 Remove the used imaging unit Maintain the printer 161...
Страница 164: ...3 Open the front door 4 Remove the imaging unit 5 Close the front door 6 Remove the tray Maintain the printer 164...
Страница 169: ...4 Insert the new separator pad until it clicks into place 5 Close the door Maintain the printer 169...
Страница 173: ...3 Open the front door 4 Remove the imaging unit 5 Close the front door 6 Remove the tray Maintain the printer 173...
Страница 219: ...9 Open the multipurpose feeder 10 Flex fan and align the paper edges before loading Troubleshoot a problem 219...


