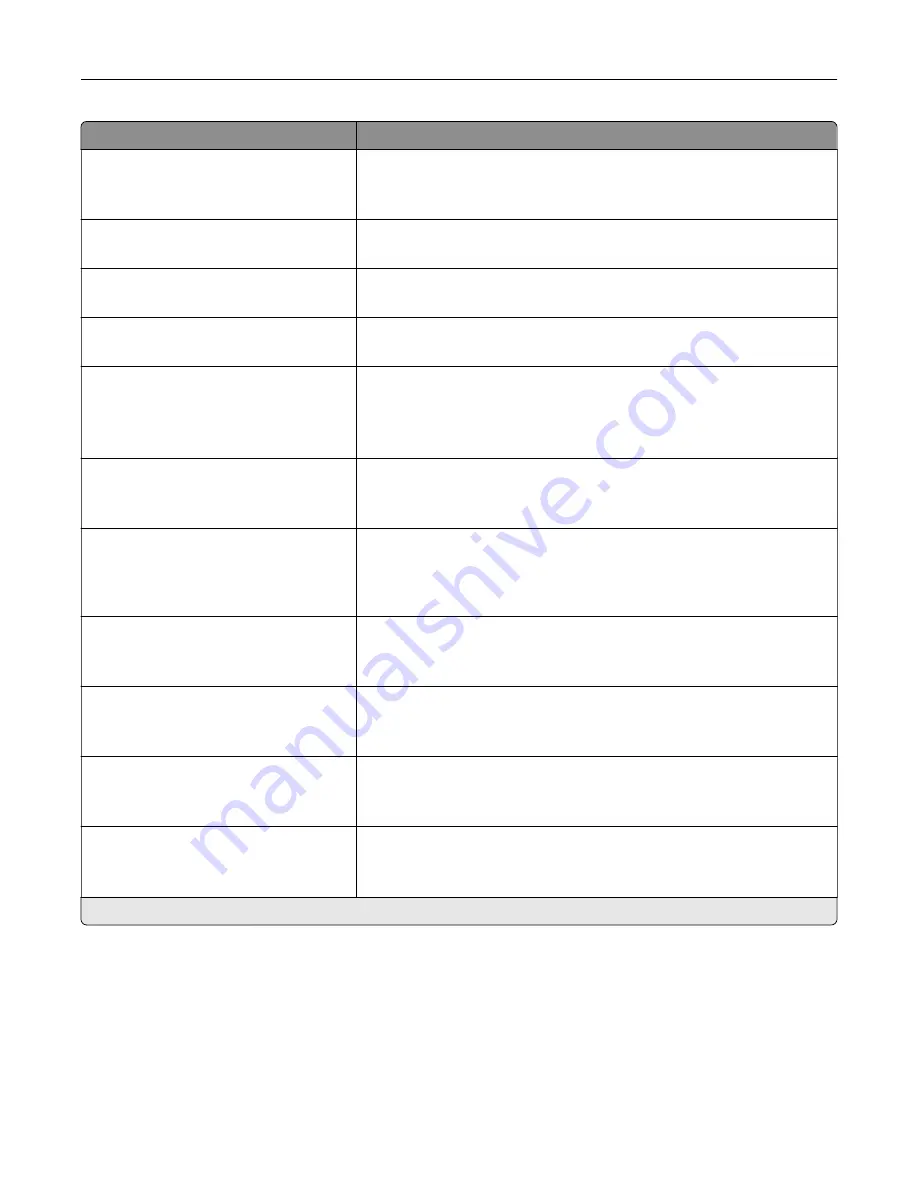
Menu item
Description
Use cc:/bcc:
Off*
On
Enable carbon copy and blind carbon copy in e
‑
mail.
Text Default
5–95 (75*)
Set the text quality in the content being scanned.
Text/Photo Default
5–95 (75*)
Set the text and photo quality in the content being scanned.
Photo Default
5–95 (50*)
Set the photo quality of the content being scanned.
Transmission Log
Print Log*
Do Not Print Log
Print Only For Error
Print a transmission log for e
‑
mail scans.
Log Paper Source
Tray [x] (1*)
Multipurpose Feeder
Specify the paper source for printing e
‑
mail logs.
Custom Job Scanning
Off*
On
Set the printer to scan the first set of original documents using the
specified settings, and then scan the next set with the same or different
settings.
Note:
This menu item appears only when an ISD is installed.
Scan Preview
Off*
On
Show a scan preview of the original document.
Note:
This menu item appears only when an ISD is installed.
Allow Save as Shortcut
Off
On*
Save an e
‑
mail address as a shortcut.
E
‑
mail Images Sent As
Attachment*
Web Link
Specify how to send the images that are included in the e
‑
mail.
Reset E-mail Information After Sending
Off
On*
Reset the To, Subject, Message, and Filename fields to their default
values after sending an e
‑
mail.
Note:
An asterisk (*) next to a value indicates the factory default setting.
Use printer menus
124
Содержание XM3142
Страница 1: ...MX432 XM3142 MFPs User s Guide October 2022 www lexmark com Machine type 7019 Models 6w6 6w9...
Страница 54: ...4 Locate the ISD connector 5 Insert the card to the ISD connector Set up install and con gure 54...
Страница 154: ...Printing the Menu Settings Page From the home screen touch Settings Reports Menu Settings Page Use printer menus 154...
Страница 161: ...2 Remove the used imaging unit Maintain the printer 161...
Страница 164: ...3 Open the front door 4 Remove the imaging unit 5 Close the front door 6 Remove the tray Maintain the printer 164...
Страница 169: ...4 Insert the new separator pad until it clicks into place 5 Close the door Maintain the printer 169...
Страница 173: ...3 Open the front door 4 Remove the imaging unit 5 Close the front door 6 Remove the tray Maintain the printer 173...
Страница 219: ...9 Open the multipurpose feeder 10 Flex fan and align the paper edges before loading Troubleshoot a problem 219...


