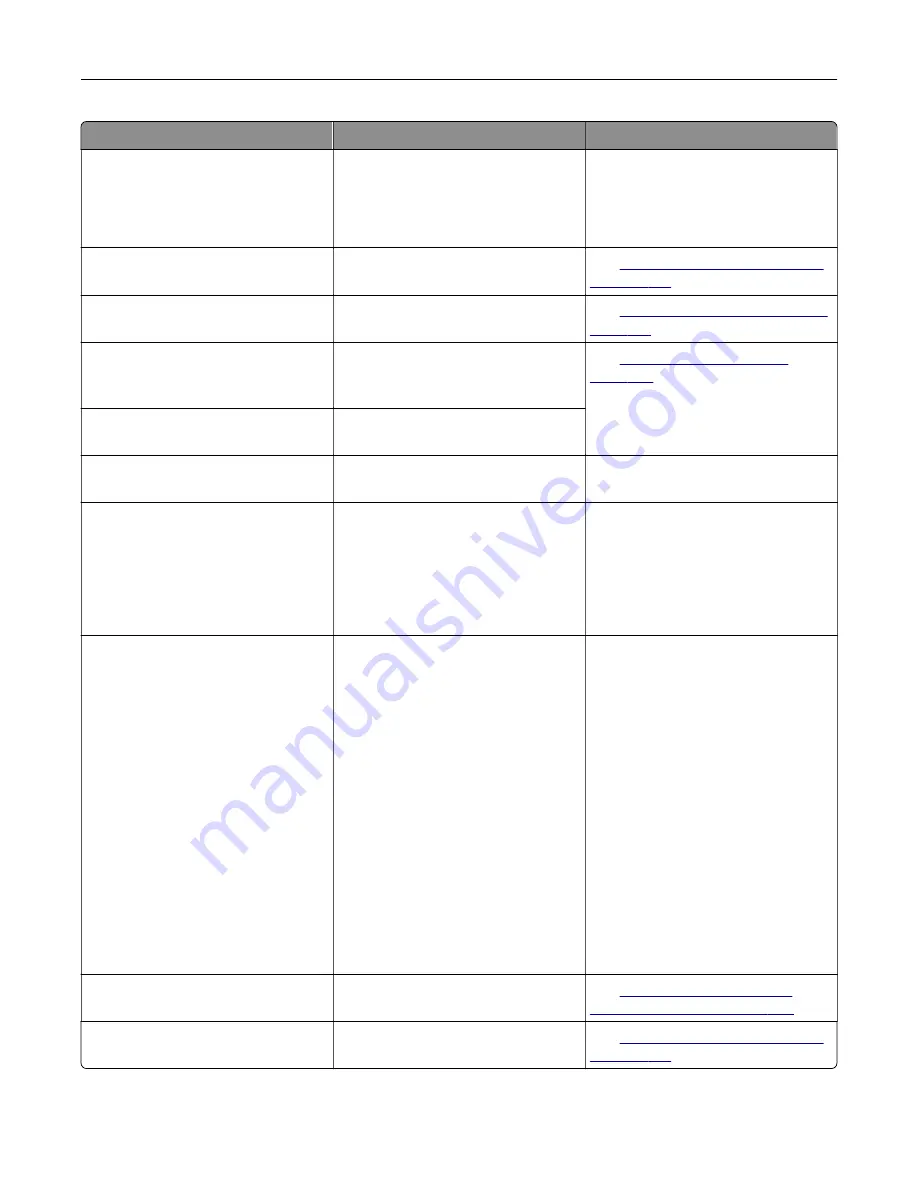
Error codes
Error message
Solution
31.60z
Reinstall missing or
unresponsive black imaging
unit.
1
Open door A.
2
Remove the imaging unit.
3
Insert the imaging unit.
4
Close the door.
32.40z
Replace unsupported black
cartridge.
See
“Replacing the toner cartridge”
.
32.60z
Replace unsupported black
imaging unit.
See
“Replacing the imaging unit” on
33.40
Non-Lexmark black
cartridge, see User's
Guide.
See
33.60
Non-Lexmark black imaging
unit, see User's Guide.
37.3
Insufficient memory, some
held jobs were deleted.
Touch
Continue
to clear the message
and continue printing.
38.1
Memory full.
Try one or more of the following:
•
Touch
Cancel job
to clear the
message.
•
Print the document in several
parts, or send it to another printer.
•
Install more printer memory.
39.1
Complex page, some data may
not have printed.
Try one or more of the following:
•
Touch
Continue
to clear the
message and continue printing.
•
Cancel the current print job.
•
Install more printer memory.
•
Reduce the complexity and size of
the print job before sending it to
print again.
–
Reduce the number of pages
in the print job.
–
Reduce the number and size
of any downloaded fonts.
–
Delete any unnecessary fonts
or macros from the print job.
–
Reduce the number of
graphics in the print job.
42.xyK
Replace black cartridge,
printer region mismatch.
See
43.40z
Replace defective black
cartridge.
See
“Replacing the toner cartridge”
.
Troubleshoot a problem
181
Содержание XM3142
Страница 1: ...MX432 XM3142 MFPs User s Guide October 2022 www lexmark com Machine type 7019 Models 6w6 6w9...
Страница 54: ...4 Locate the ISD connector 5 Insert the card to the ISD connector Set up install and con gure 54...
Страница 154: ...Printing the Menu Settings Page From the home screen touch Settings Reports Menu Settings Page Use printer menus 154...
Страница 161: ...2 Remove the used imaging unit Maintain the printer 161...
Страница 164: ...3 Open the front door 4 Remove the imaging unit 5 Close the front door 6 Remove the tray Maintain the printer 164...
Страница 169: ...4 Insert the new separator pad until it clicks into place 5 Close the door Maintain the printer 169...
Страница 173: ...3 Open the front door 4 Remove the imaging unit 5 Close the front door 6 Remove the tray Maintain the printer 173...
Страница 219: ...9 Open the multipurpose feeder 10 Flex fan and align the paper edges before loading Troubleshoot a problem 219...


