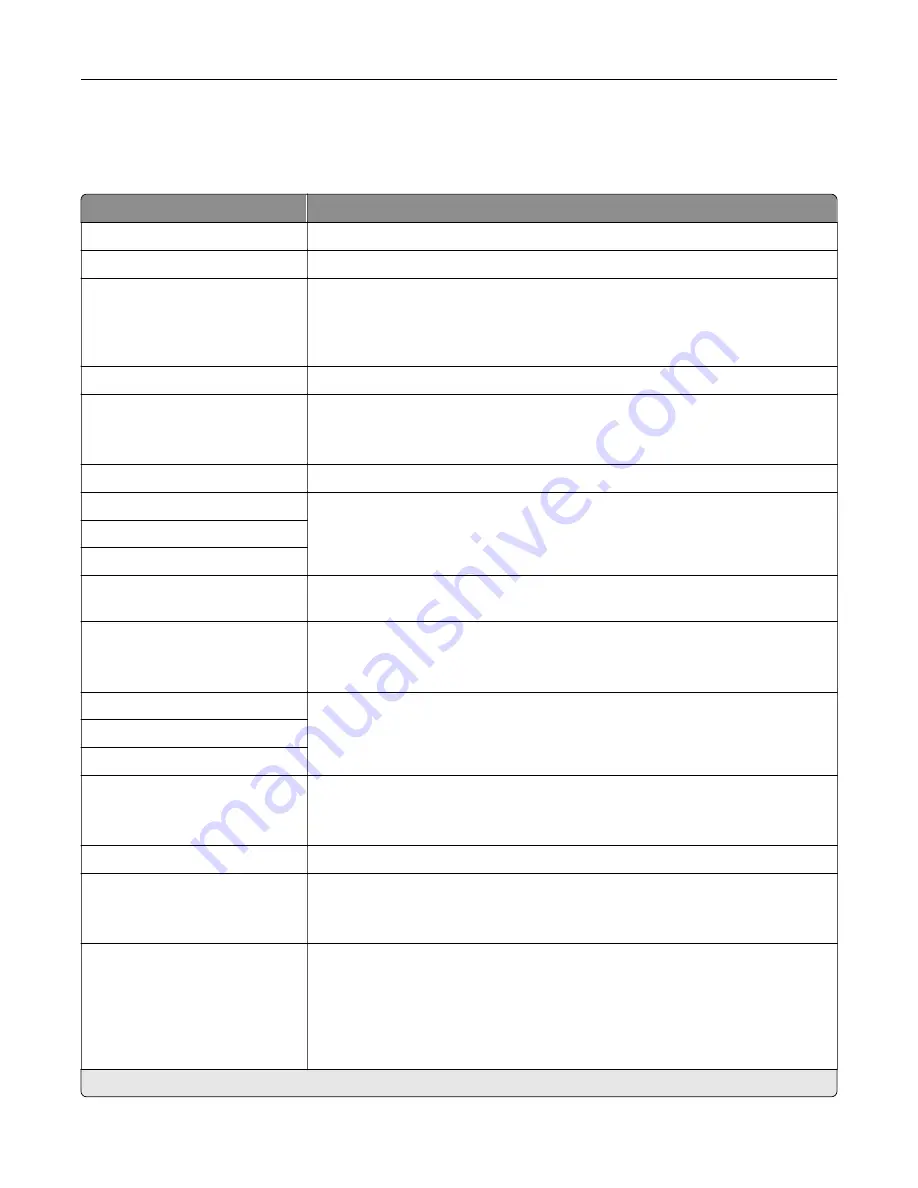
TCP/IP
Note:
This menu appears only in network printers or printers attached to print servers.
Menu item
Description
Set Hostname
Set the current TCP/IP host name.
Domain Name
Set the domain name.
Allow DHCP/BOOTP to update
NTP server
On*
Off
Allow the DHCP and BOOTP clients to update the NTP settings of the printer.
Zero Configuration Name
Specify a service name for the zero configuration network.
Enable Auto IP
Off
On*
Assign an IP address automatically.
DNS Server Address
Specify the current Domain Name System (DNS) server address.
Backup DNS Address
Specify the backup DNS server addresses.
Backup DNS Address 2
Backup DNS Address 3
Domain Search Order
Specify a list of domain names to locate the printer and its resources that reside
in different domains on the network.
Enable DDNS
Off*
On
Update the Dynamic DNS settings.
DDNS TTL
Specify the current DDNS settings.
Default TTL
DDNS Refresh Time
Enable mDNS
Off
On*
Update the multicast DNS settings.
WINS Server Address
Specify a server address for Windows Internet Name Service (WINS).
Enable BOOTP
Off*
On
Allow the BOOTP to assign a printer IP address.
Restricted Server List
Specify the IP addresses that are allowed to communicate with the printer over
TCP/IP.
Notes:
•
Use a comma to separate each IP address.
•
You can add up to 50 IP addresses.
Note:
An asterisk (*) next to a value indicates the factory default setting.
Use printer menus
138
Содержание XM3142
Страница 1: ...MX432 XM3142 MFPs User s Guide October 2022 www lexmark com Machine type 7019 Models 6w6 6w9...
Страница 54: ...4 Locate the ISD connector 5 Insert the card to the ISD connector Set up install and con gure 54...
Страница 154: ...Printing the Menu Settings Page From the home screen touch Settings Reports Menu Settings Page Use printer menus 154...
Страница 161: ...2 Remove the used imaging unit Maintain the printer 161...
Страница 164: ...3 Open the front door 4 Remove the imaging unit 5 Close the front door 6 Remove the tray Maintain the printer 164...
Страница 169: ...4 Insert the new separator pad until it clicks into place 5 Close the door Maintain the printer 169...
Страница 173: ...3 Open the front door 4 Remove the imaging unit 5 Close the front door 6 Remove the tray Maintain the printer 173...
Страница 219: ...9 Open the multipurpose feeder 10 Flex fan and align the paper edges before loading Troubleshoot a problem 219...


