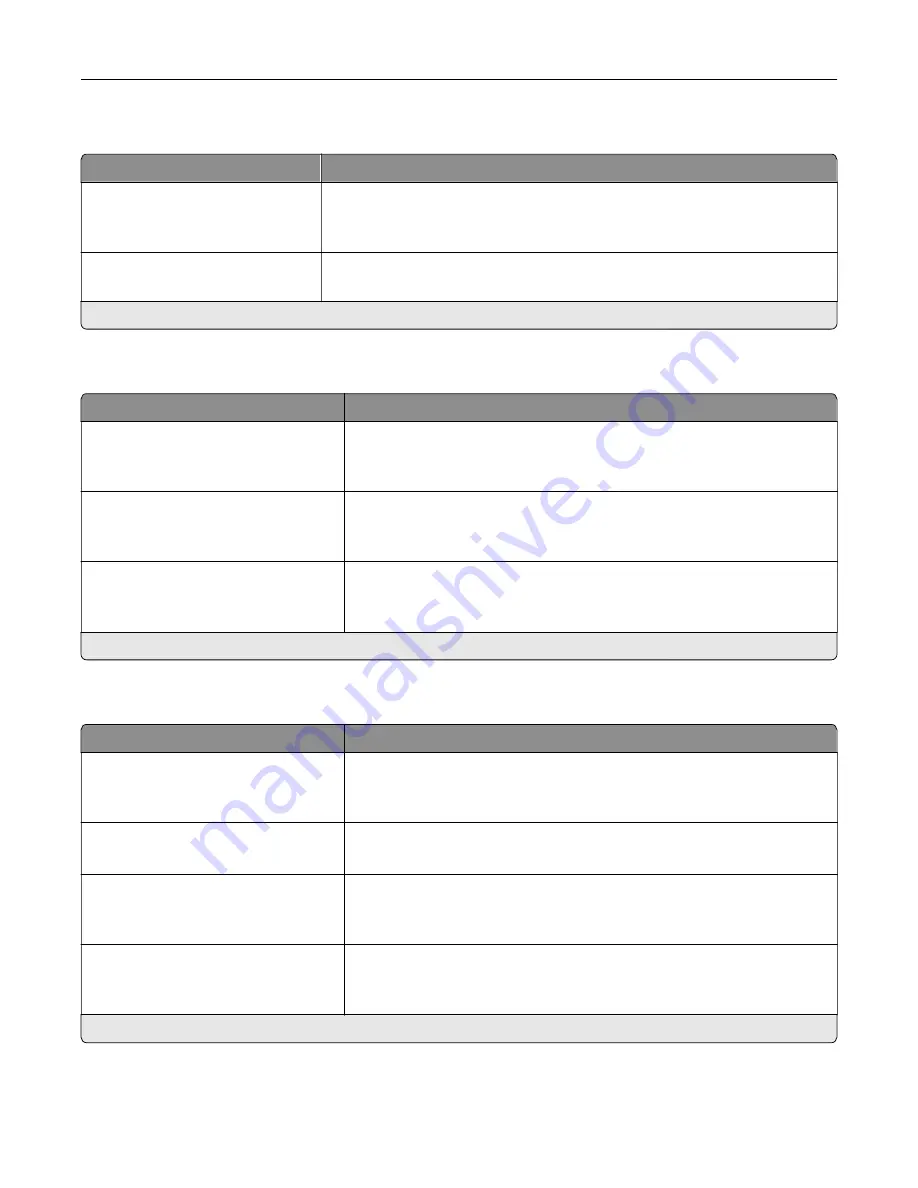
XPS
Menu item
Description
Print Error Pages
Off*
On
Print a test page that contains information on errors.
Minimum Line Width
1–30 (2*)
Set the minimum stroke width of any job printed in 1200 dpi.
Note:
An asterisk (*) next to a value indicates the factory default setting.
Menu item
Description
Scale To Fit
Off*
On
Scale the page content to fit the selected paper size.
Annotations
Do Not Print*
Specify whether to print annotations in the PDF.
Print PDF Error
Off
On*
Enable the printing of PDF error.
Note:
An asterisk (*) next to a value indicates the factory default setting.
PostScript
Menu item
Description
Print PS Error
Off*
On
Print a page that describes the PostScript® error.
Note:
When an error occurs, processing of the job stops, the printer
prints an error message, and the rest of the print job is flushed.
Minimum Line Width
1–30 (2*)
Set the minimum stroke width.
Note:
Jobs printed in 1200 dpi use the value directly.
Lock PS Startup Mode
Off
On*
Disable the SysStart file.
Image Smoothing
Off*
On
Enhance the contrast and sharpness of low
‑
resolution images.
Note:
This setting has no effect on images with a resolution of 300 dpi or
higher.
Note:
An asterisk (*) next to a value indicates the factory default setting.
Understanding the printer menus
64
Содержание C9235
Страница 1: ...C9235 Printer User s Guide May 2020 www lexmark com Machine type s 5059 Model s 190...
Страница 102: ...2 Remove and then empty the hole punch box 3 Insert the hole punch box 4 Close the door Maintaining the printer 102...
Страница 106: ...4 Shake the toner cartridge three times 5 Insert the new toner cartridge Maintaining the printer 106...
Страница 108: ...9 Insert the waste toner bottle and then close the door Maintaining the printer 108...
Страница 112: ...8 Insert the waste toner bottle and then close the door Maintaining the printer 112...
Страница 135: ...Below the fuser area Duplex area Clearing jams 135...
Страница 140: ...2 Open door J 3 Open door H Clearing jams 140...
Страница 145: ...Staple jam in the staple nisher 1 Slide the staple nisher 2 Remove the staple cartridge holder Clearing jams 145...
Страница 147: ...Staple jam in the staple hole punch nisher 1 Open door H 2 Remove the staple cartridge holder Clearing jams 147...
Страница 188: ...6 Remove the controller board shield Upgrading and migrating 188...
Страница 191: ...6 Remove the controller board shield 7 Unpack the printer hard disk Upgrading and migrating 191...
Страница 197: ...4 Remove the controller board shield Upgrading and migrating 197...
Страница 199: ...8 Attach the thumbscrews 9 Connect the wireless print server to the controller board Upgrading and migrating 199...
Страница 203: ...7 Connect the tray connector to the printer 8 Open trays 2 and 3 Upgrading and migrating 203...
Страница 208: ...9 Remove the stabilizing feet from the tray Upgrading and migrating 208...
Страница 212: ...17 Secure the tray cable with the clamp Upgrading and migrating 212...
Страница 213: ...18 Connect the tray cable to the printer 19 Attach the tray cable cover Upgrading and migrating 213...
Страница 214: ...20 Slide the tray until it clicks into place 21 Attach the stabilizing feet to the printer Upgrading and migrating 214...
Страница 219: ...7 Remove the paper guides 8 Attach the sensor cover Upgrading and migrating 219...
Страница 225: ...8 Attach the nisher to the printer Upgrading and migrating 225...


