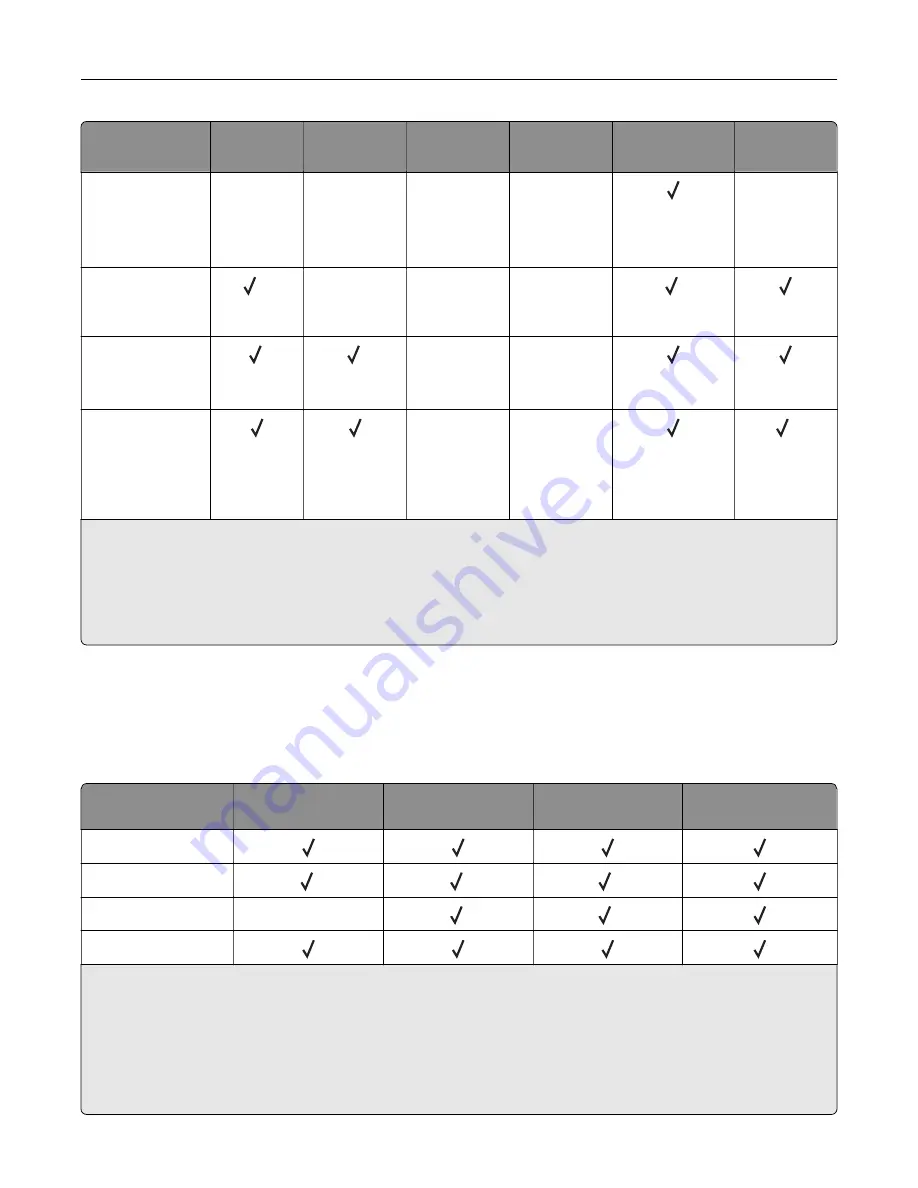
Paper size
and dimension
500
‑
sheet
tray
2 x 500
‑
sheet
tray
2500
‑
sheet
tray
3000
‑
sheet
tray
Multipurpose
feeder
3
Two
‑
sided
printing
Other Envelope
Max:
297 x 427.6 mm
(11.69 x 16.83 in.)
X
X
X
X
X
SRA3
320 x 450 mm
(12.6 x 17.7 in.)
1, 4
X
X
X
1
Statement
140 x 216 mm
(5.5 x 8.5 in.)
1
1
X
X
Universal
90 x 139.7 mm to
320 x 1200 mm
(3.5 x 5.5 in. to
12.6 x 47.24 in.)
X
X
5
1
Paper is loaded only in short
‑
edge orientation.
2
Paper is loaded only in long
‑
edge orientation.
3
Paper source supports paper size
without size sensing
.
4
Paper is not supported in tray 1.
5
Two
‑
sided printing supports Universal sizes between 139.7 x 148 mm to 320 x 458 mm (5.5 x 5.83 in. to 12.6 x 18 in.).
Paper sizes supported by the finisher
Note:
When a finisher is installed, the standard finisher bin becomes the default bin even for print jobs that
do not require finishing.
Supported paper sizes
Paper size
Staple finisher
Staple, hole punch
finisher bin 1
Staple, hole punch
finisher bin 2
Booklet finisher
11 x 17
12 x 18
1
1
5
A3
X
1
5
A4
1
Paper is supported but the finisher does not stack, staple, or punch holes in it.
2
Paper is supported only if the finisher stacks and punches holes in it but does not staple it.
3
Paper is supported only if the paper size is 210 x 279.4 mm to 320 x 457.2 mm (8.27 x 11 in. to 12.6 x 18 in.).
4
Paper is supported only if the finisher stacks and staples the paper but does not punch holes in it.
5
Paper is supported only if the finisher stacks the paper but does not staple or punch holes in it.
6
Paper is supported only for two
‑
hole punch.
Loading paper and specialty media
37
Содержание C9235
Страница 1: ...C9235 Printer User s Guide May 2020 www lexmark com Machine type s 5059 Model s 190...
Страница 102: ...2 Remove and then empty the hole punch box 3 Insert the hole punch box 4 Close the door Maintaining the printer 102...
Страница 106: ...4 Shake the toner cartridge three times 5 Insert the new toner cartridge Maintaining the printer 106...
Страница 108: ...9 Insert the waste toner bottle and then close the door Maintaining the printer 108...
Страница 112: ...8 Insert the waste toner bottle and then close the door Maintaining the printer 112...
Страница 135: ...Below the fuser area Duplex area Clearing jams 135...
Страница 140: ...2 Open door J 3 Open door H Clearing jams 140...
Страница 145: ...Staple jam in the staple nisher 1 Slide the staple nisher 2 Remove the staple cartridge holder Clearing jams 145...
Страница 147: ...Staple jam in the staple hole punch nisher 1 Open door H 2 Remove the staple cartridge holder Clearing jams 147...
Страница 188: ...6 Remove the controller board shield Upgrading and migrating 188...
Страница 191: ...6 Remove the controller board shield 7 Unpack the printer hard disk Upgrading and migrating 191...
Страница 197: ...4 Remove the controller board shield Upgrading and migrating 197...
Страница 199: ...8 Attach the thumbscrews 9 Connect the wireless print server to the controller board Upgrading and migrating 199...
Страница 203: ...7 Connect the tray connector to the printer 8 Open trays 2 and 3 Upgrading and migrating 203...
Страница 208: ...9 Remove the stabilizing feet from the tray Upgrading and migrating 208...
Страница 212: ...17 Secure the tray cable with the clamp Upgrading and migrating 212...
Страница 213: ...18 Connect the tray cable to the printer 19 Attach the tray cable cover Upgrading and migrating 213...
Страница 214: ...20 Slide the tray until it clicks into place 21 Attach the stabilizing feet to the printer Upgrading and migrating 214...
Страница 219: ...7 Remove the paper guides 8 Attach the sensor cover Upgrading and migrating 219...
Страница 225: ...8 Attach the nisher to the printer Upgrading and migrating 225...


