


0000000000000000
0000000000000000
0000000000000000
0000000000000000
0000000000000000
0000000000000000
0000000000000000
0000000000000000
0000000000000000
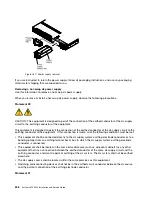
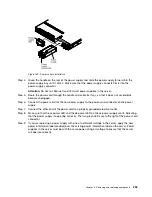
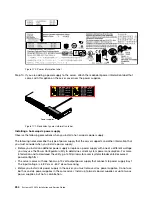
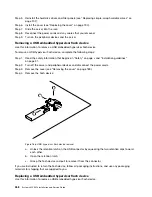
Figure 169. Power supply installation
Step 4.
Grasp the handle on the rear of the power supply and slide the power supply forward into the
power-supply bay until it clicks. Make sure that the power supply connects firmly into the
power-supply connector.
Attention:
Do not mix 550-watt and 750-watt power supplies in the server.
Step 5.
Route the power cord through the handle and cable tie if any, so that it does not accidentally
become unplugged.
Step 6.
Connect the power cord for the new power supply to the power-cord connector on the power
supply.
Step 7.
Connect the other end of the power cord to a properly grounded electrical outlet.
Step 8.
Make sure that the ac power LED and the dc power LED on the ac power supply are lit, indicating
that the power supply is operating correctly. The two green LEDs are to the right of the power-cord
connector.
Step 9.
If you are replacing a power supply with one of a different wattage in the server, apply the new
power information label provided over the existing power information label on the server. Power
supplies in the server must be with the same power rating or wattage to ensure that the server
will operate correctly.
Removing and replacing components
253
Содержание x3550 M4
Страница 1: ...System x3550 M4 Installation and Service Guide Machine Type 7914 ...
Страница 6: ...iv System x3550 M4 Installation and Service Guide ...
Страница 178: ...164 System x3550 M4 Installation and Service Guide ...
Страница 322: ...308 System x3550 M4 Installation and Service Guide ...
Страница 828: ...814 System x3550 M4 Installation and Service Guide ...
Страница 986: ...972 System x3550 M4 Installation and Service Guide ...
Страница 990: ...976 System x3550 M4 Installation and Service Guide ...
Страница 1005: ......
Страница 1006: ......


