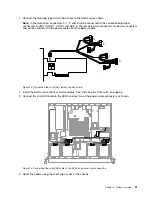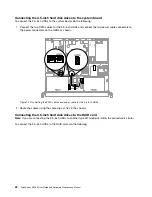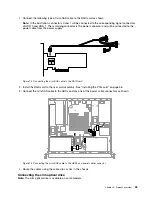
1. Connect the following type of mini-SAS cable to the RAID card as shown.
Note:
In the illustration, connectors 0 and 1 will be connected to the corresponding signal connectors
of HDD 0 and HDD 1. The remaining connector is the power connector and will be connected to the
power cable from the power supply.
0
1
Figure 15. Connecting the mini-SAS cable to the RAID card
2. Install the RAID card to the riser card assembly. See “Installing the PCIe card” on page 56.
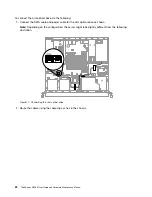
3. Connect the mini-SAS cable to the HDDs and any one of the power cable connectors as shown.
Figure 16. Connecting the mini-SAS cable to the HDDs and power cable connector
4. Route the cables using the cable clips or ties in the chassis.
Connecting the slim optical drive
Note:
The slim optical drive is available on some models.
23
Содержание ThinkServer RS160
Страница 1: ...ThinkServer RS160 User Guide and Hardware Maintenance Manual Machine Types 70TD 70TE 70TF and 70TG ...
Страница 14: ...xii ThinkServer RS160 User Guide and Hardware Maintenance Manual ...
Страница 18: ...4 ThinkServer RS160 User Guide and Hardware Maintenance Manual ...
Страница 42: ...28 ThinkServer RS160 User Guide and Hardware Maintenance Manual ...
Страница 58: ...44 ThinkServer RS160 User Guide and Hardware Maintenance Manual ...
Страница 118: ...104 ThinkServer RS160 User Guide and Hardware Maintenance Manual ...
Страница 129: ...Taiwan BSMI RoHS declaration Appendix C Restriction of Hazardous Substances RoHS Directive 115 ...
Страница 130: ...116 ThinkServer RS160 User Guide and Hardware Maintenance Manual ...
Страница 141: ......
Страница 142: ......


