95
SMPL
1.1
2.1
3.1
4.1
5.1
5.2
7.1
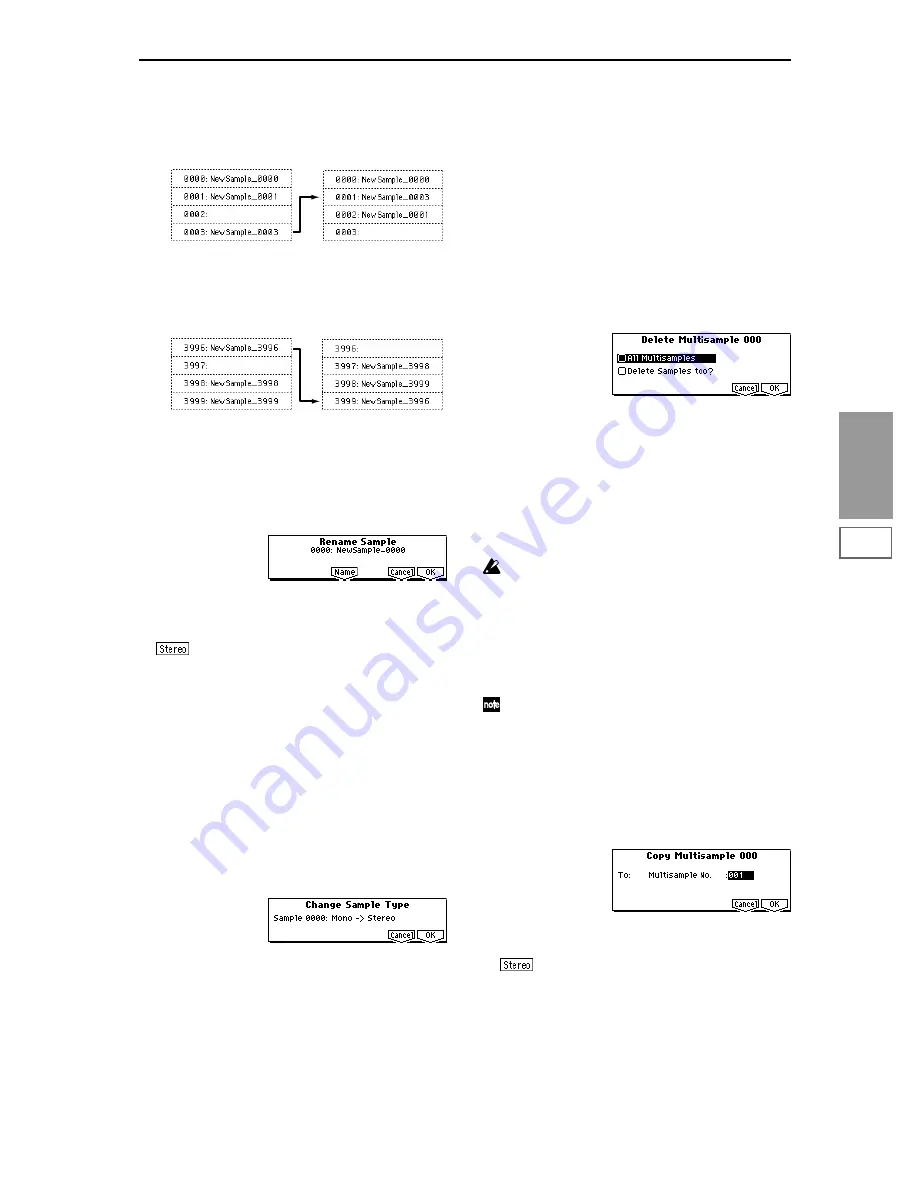
Example)
If data already exists at the move destination sample
number, the sample will not be overwritten; instead, all
subsequent samples will be renumbered upward.
Example)
If there is no empty sample number and forward move-
ment is not possible, samples will be renumbered down-
ward.
Rename SMPL (Rename Sample)
This command renames the currently selected sample.
1
Use “SMPL” (1.1–1b) to select the sample whose name
you wish to change.
2
Select “Rename SMPL” to open the following dialog box.
3
Press the [F5] (“Name”) key to move to the text dialog
box, and input the sample name (maximum of sixteen
characters).
If the multisample is stereo and a stereo sample is
selected, you can input up to fourteen characters for the
sample name. This is because the last two characters are
reserved for -L and -R. If you rename up to fourteen char-
acters of the sample of either the L or the R channel, the
other sample will automatically be renamed.
4
To execute the Rename Sample command, press the [F8]
(“OK”) key. To cancel, press the [F7] (“Cancel”) key.
SMPL To Stereo (Change Sample Type)
This command changes a mono sample into a stereo sample.
This can be executed only if the selected sample is mono.
1
Use “SMPL” (1.1–1b) to select the sample that you wish
to convert to stereo.
2
Select “SMPL To Stereo” to open the following dialog
box.
3
To execute the Change Sample Type command, press the
[F8] (“OK”) key. To cancel, press the [F7] (“Cancel”) key.
When you execute this command, the sample type will
change as follows.
• The selected sample will become a stereo sample. “–L”
will be overwritten into the last two characters of the
sample name.
• An identically named sample will be created with “–R”
as the last two characters of the sample name.
Also, if the selected multisample is mono, it will change
to stereo.
• The last two characters of the multisample name will be
overwritten as “–L”.
• A new multisample will be created with the same name,
but whose last two characters are “–R”.
• The stereo sample that was created will be assigned
automatically.
Delete MS (Delete Multisample)
This command deletes the currently selected multisample or
all multisamples.
1
Use “MS” (1.1–1a) to select the multisample that you
wish to delete.
2
Select “Delete MS” to open the following dialog box.
3
All Multisamples:
Check this if you wish to delete all
multisamples.
4
Delete Samples too?
: Check this if you wish to simulta-
neously delete the samples that are included in the multi-
sample being deleted. However, samples that are
mapped to (used by) other multisamples or drum kits
will not be deleted.
5
To execute the Delete Multisample command, press the
[F8] (“OK”) key. To cancel, press the [F7] (“Cancel”) key.
Even if you also choose to delete the samples that are
included in the deleted multisample(s), any sample
data (waveform data) used by these samples that is
shared with other samples will not be deleted. Only the
sample itself will be deleted.
Copy MS (Copy Multisample)
This command copies the selected multisample to another
multisample.
The copy destination multisample number will auto-
matically be included in the multisample name of the
copy destination. If necessary, use “Rename MS” (1.1–
3f) to rename it. When doing so, make sure that the
name is not identical to any other multisample name.
(The multisample name is used to distinguish stereo
multisamples.
☞
p.89)
1
Use “MS” (1.1–1a) to select the copy source multisample.
2
Select “Copy MS” to open the following dialog box.
3
Use “To: Multisample No.” to specify the copy destina-
tion multisample number.
When copying a stereo multisample, copy both
the L and R channels of the copy destination multisample
number.
Move 0003 to 0001
Move 3996 to 3999
Содержание TRITON Le
Страница 1: ...2 E ...
Страница 37: ...30 ...
Страница 127: ...120 ...
Страница 161: ...154 ...
Страница 217: ...210 ...
Страница 233: ...226 ...
Страница 259: ...252 ...


