MAINTENANCE
7-65
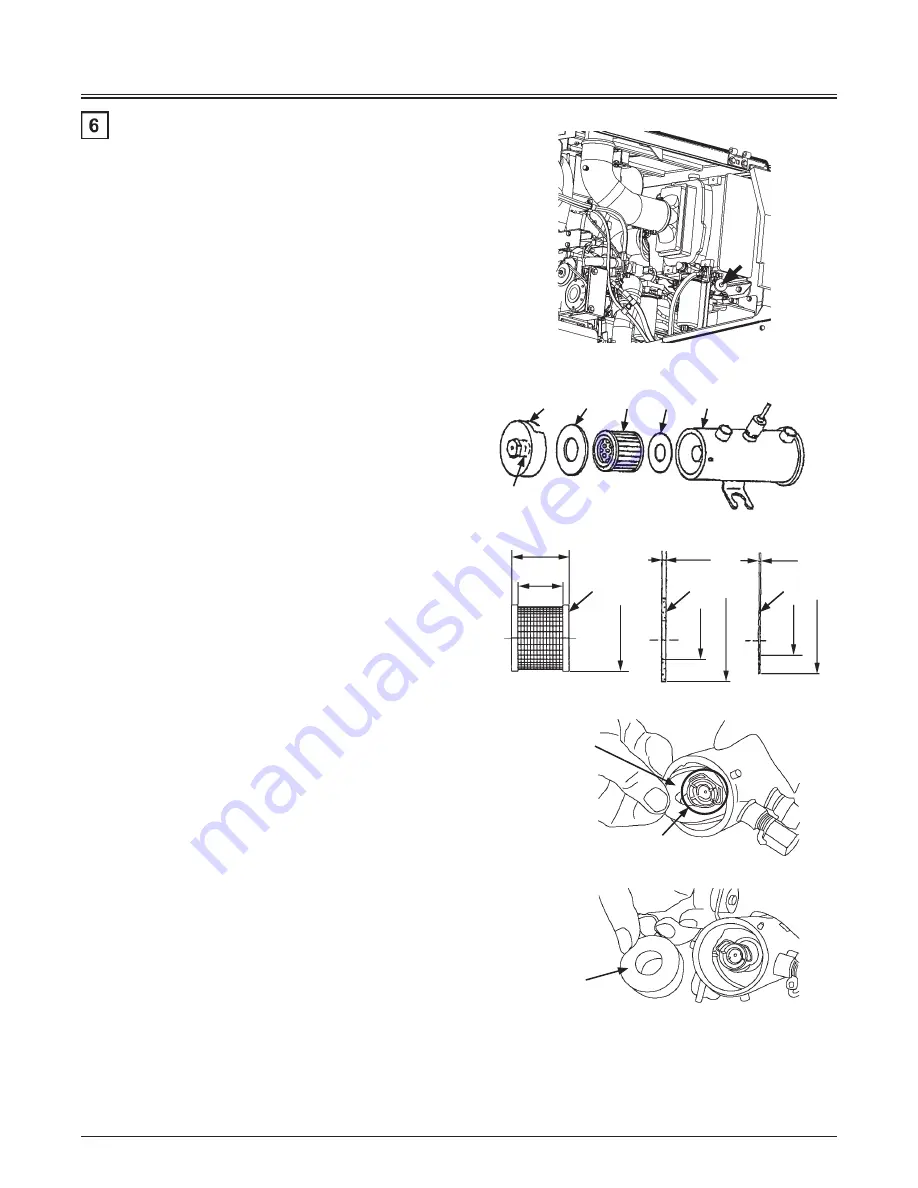
Clean Fuel Pump Strainer
--- every 1000 hours
Cleaning
When the strainer is disassembled, be sure to replace
the gasket. Install the cover and the magnet only after
thoroughly cleaning them. After being assembled, closely
check the air-tightness of the strainer.
Disassembling/ Assembling
To remove cover (1), loosen with a wrench. After cover (1)
is removed, gasket (2), strainer (3), and gasket (4) are easily
removed in order. Wash strainer (3) with solvent.
Install the strainer in the reverse order of disassembling. At
that time, install gasket (2) into cover (1) first. Then, securely
tighten cover (1) to pump (5) using a wrench.
NOTE: Wrench size: 17 mm (0.7 inch)
IMPORTANT:
y
Only clean and replace the strainer as well as gaskets
(2) and (4) while servicing the fuel pump. Never
attempt to disassemble other parts.
y
Gasket (4) can get caught in the bore of pump (5),
making it difficult to remove the gasket, but do not
disassemble the cylinder of pump (5). If the gasket is
difficult to remove, do not disassemble other parts
but stretch gasket (4) to remove it. Use a new gasket
(4) for assembling.
2
1
3
4
5
Magnet
M1GR-07-004
2
3
4
36 mm
28 mm
2.7 mm
1 mm
φ41
φ24
φ51
φ18
φ40
M1U1-07-006
MDAA-07-053
MDAA-07-054
Stretch gasket (4) to
remove.
Gasket (4) is easily
removed by pulling
and stretching it.
Do not disassemble this part.
MNDB-07-006
Содержание 70Z7
Страница 2: ...93108 00691 April 2015...
Страница 5: ......
Страница 11: ...MACHINE NUMBERS 2 MEMO...
Страница 51: ...SAFETY LABELS S 40 6 10 4 1 3 9 6 5 SS 3461...
Страница 171: ...OPERATOR S STATION 1 110 MEMO...
Страница 173: ...BREAK IN 2 2 MEMO...
Страница 187: ...OPERATING THE ENGINE 3 14 MEMO...
Страница 231: ...OPERATING THE MACHINE 5 24 MEMO...
Страница 359: ...MAINTENANCE 7 118 MEMO...
Страница 363: ...MAINTENANCE UNDER SPECIAL ENVIRONMENTAL CONDITIONS 9 4 MEMO...
Страница 367: ...STORAGE 10 4 MEMO...


