


JOHNSON CONTROLS
15
SECTION 2 - INSTALLATION
FORM 450.50-N1
ISSUE DATE: 08/19/2019
2
MOUNTING
Risk of Electric Shock. Disconnect or
isolate all power supplies before making
electrical connections. More than one
disconnect or isolation may be required to
completely de-energize equipment. Con-
tact with components carrying hazardous
voltage can cause electric shock and may
result in severe personal injury or death.
OPTIVIEW PANEL INSTALLATION
1. Attach the SC-EQ Comm Card board to the
studs provided inside the chiller enclosure (
or
),
using the four screws and washers provided in the
OptiView/Latitude installation kit.
2. Connect the appropriate communications ca-
ble (included with the kit) based on the SC-EQ
mounting location, from Port J7 (RS-232) on the
SC-EQ Comm Card to J2 on the OptiView Micro
Panel. Ensure that wires are connected according
.
3. Check for stray wire strands, which could cause
short circuits, and ensure all components are
secure.
4. Connect the BAS network to J12 (RS-485) on the
SC-EQ board.
For BAS systems with 2-wire RS-485 net-
work cables remember to install the 100
ohm resistor as shown in Figures 4 and 5.
5. Connect the appropriate length power harness (in-
cluded with the kit) from J9 on the SC-EQ Comm
Card to J21 on the Optiview Micro Panel (see
6. Set the desired BAS network address for the SC-
EQ using the SW-1 MAC Address Switches.
When the SC-EQ and the OptiView panel are pow-
ered up, the SC-EQ automatically sets itself to
the BAS protocol, baud rate and chiller model.
This may take up to 120 seconds.
TABLE 3 -
OPTIVIEW WIRING - SC-EQ PORT J7
SC-EQ PORT J7 OPTIVIEW PORT J2 WIRE COLOR
RX
GTX
Black
TX
GRX
Red
REF
N/A
Shield/Drain
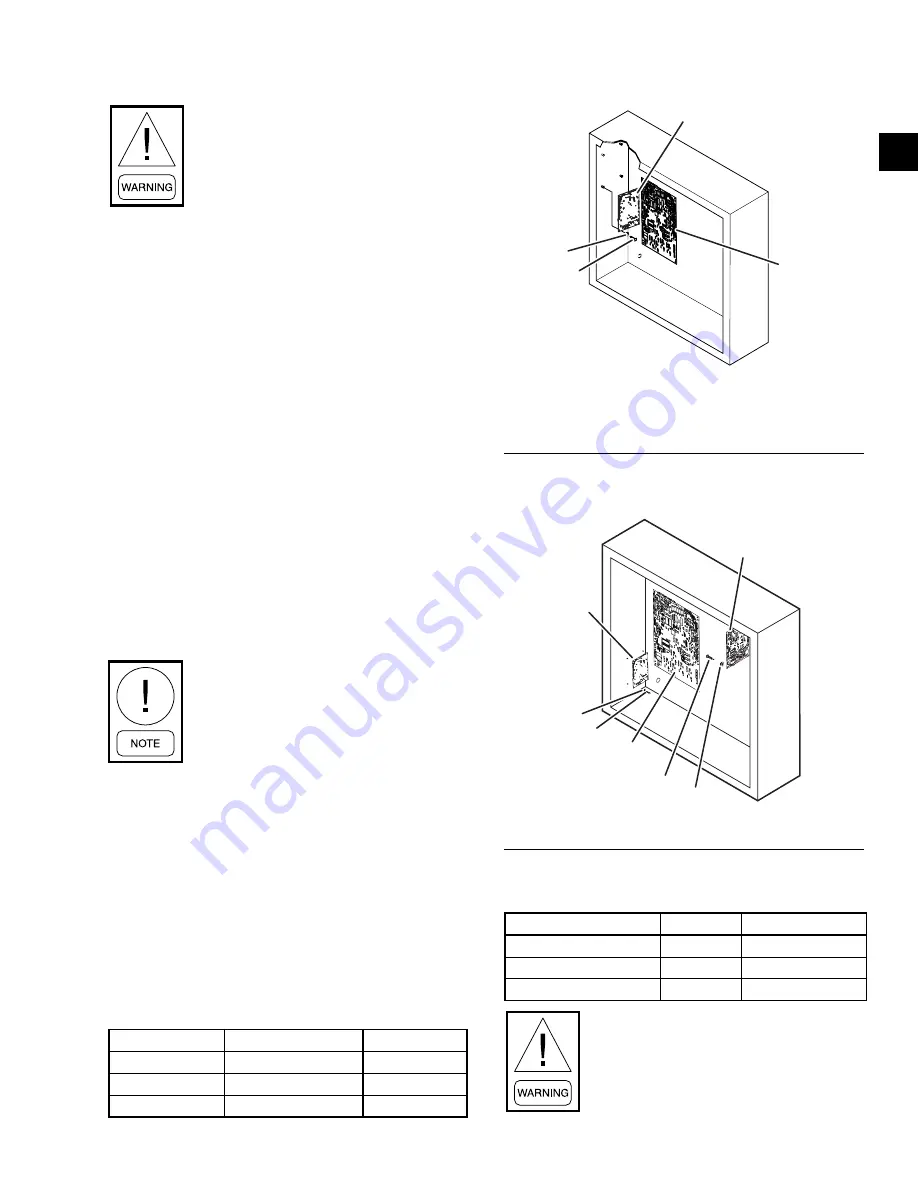
LD19583
U35
U38
OptiView
Micro
Panel
Screw
Washer
SC-EQ Comm Card
FIGURE 6 -
SC-EQ INSTALLED IN OPTIVIEW (ALL
CHILLERS EXCEPT YMC2)
LD19582a
U35
U38
U35
U38
SC-EQ Gateway
371-05568-xxx
371-06985-xxx
Panel
Washer
Screw
OptiView
Micro Panel
Screw
Washer
SC-EQ Gateway
371-05619-xxx
371-06698-xxx
371-06986-xxx
Panel
FIGURE 7 -
SC-EQ INSTALLED IN YMC2 OPTIVIEW
TABLE 4 -
BAS WIRING - SC-EQ PORT J12
SC-EQ PORT J12
BAS
WIRE COLOR
+
+
White
-
-
Blue
REF
REF
Black
When replacing an E-Link with a SC-
EQ, the BAS wiring MUST be changed
since the plug terminal locations are not
the same!
Содержание York Smart Equipment SC-EQ
Страница 4: ...JOHNSON CONTROLS 4 FORM 450 50 N1 ISSUE DATE 08 19 2019 THIS PAGE INTENTIONALLY LEFT BLANK...
Страница 8: ...JOHNSON CONTROLS 8 FORM 450 50 N1 ISSUE DATE 08 19 2019 THIS PAGE INTENTIONALLY LEFT BLANK...
Страница 42: ...JOHNSON CONTROLS 42 FORM 450 50 N1 ISSUE DATE 08 19 2019 THIS PAGE INTENTIONALLY LEFT BLANK...
Страница 44: ...JOHNSON CONTROLS 44 FORM 450 50 N1 ISSUE DATE 08 19 2019 THIS PAGE INTENTIONALLY LEFT BLANK...


