www.javad.com
www.javad.com
39
38
Base/Rover Setup
Base/Rover Setup
Return to main
Base/Rover Setup
screen by tapping
OK
twice. Press
To Base
to send modified parameters to the
Base. After doing this all the parameter values should be
yellow.
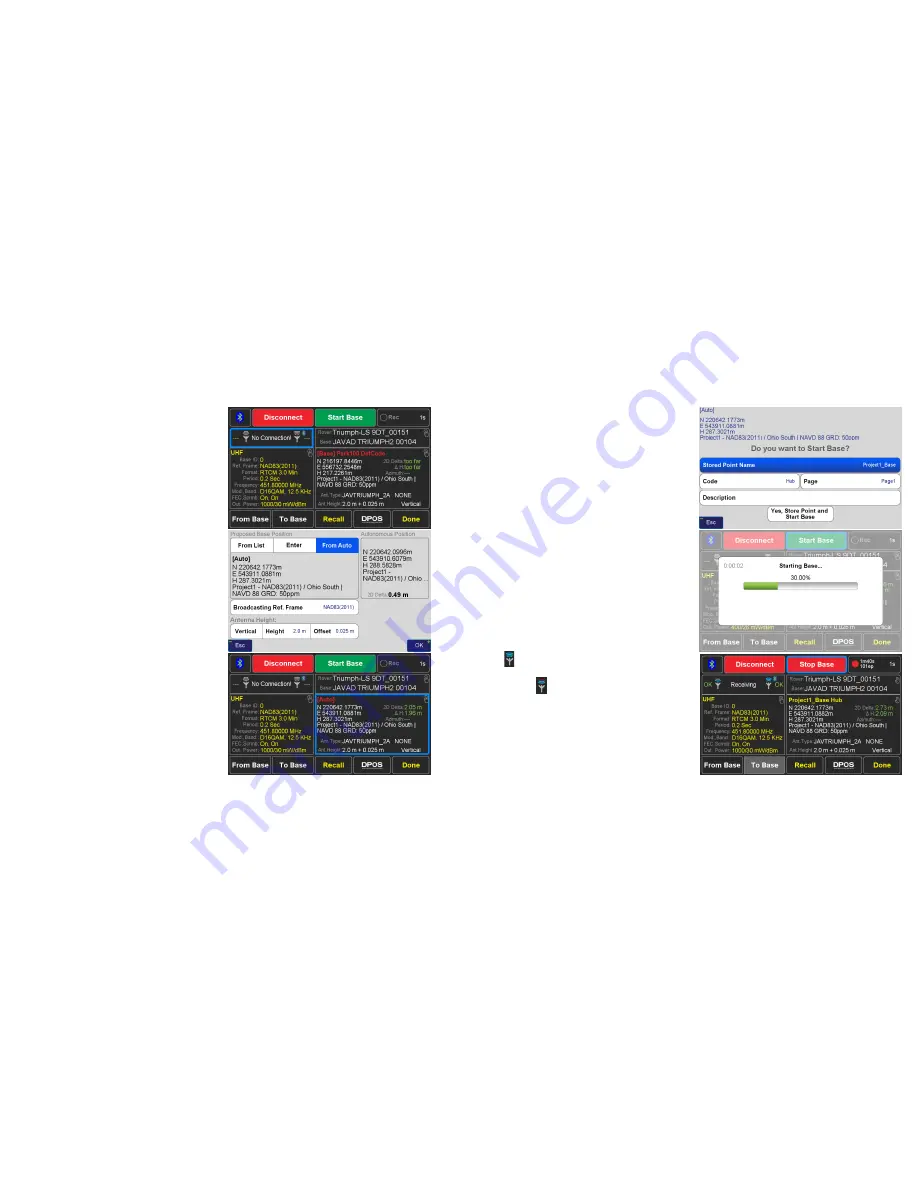
The Base broadcast coordinate should now be set. Tap on
the coordinate pane on the right side of the screen.
If the base is being started on a known point select that point
From List
or
Enter
the coordinates manually; otherwise use
an autonomous position by tapping
From Auto
.
The
2D Delta
indicates the horizontal distance between the
current autonomous position the base is reporting and the
proposed broadcast coordinate.
Enter the
Antenna Height
and
Offset
. In this case the Base
is on a 2 m pole with the thread adapter that adds an
additional 0.025 m. Tap
OK
once done.
The base station raw GNSS data is always recorded and then
transfered to J-Field when
Stop Base
is pressed at the end
of a survey session so that it can be sent to Javad’s
Data
Processing Online Service
, also known as
DPOS
. With the
DPOS
tool found in the
CoGo
menu and in the bottom of the
Base/Rover Setup screen, the raw data file can be submitted
to
DPOS
and all the survey points from that base station
session can be adjusted to their real coordinates so they are
no longer based off an autonomous position. The recording
interval can be specified along with some
DPOS
options
with the
Rec
box.
Once the coordinates for the Base have been selected/
entered along with
Antenna Height
and radio parameters
tap
Start Base
.
In this screen you can enter / change the name of the point
being used as the base; to do so, tap
Stored Point Name
and enter the desired name. It is recommended the Project
Name being included in the point name so that the file can
easily be identified in the
DPOS
tool.
Confirm sending the coordinates to the Base with a tap on
Yes, Store Point and Send to Base
.
The parameters will be sent to the Base and radio and the
Base should begin to broadcast, typically after about 80
seconds.
The
(transmitting) icon will indicate when the Base
is transmitting and OK will be displayed to the right of it.
Similarly, the (receiving) icon will indicate when the
Rover is receiving data. If the icon bars are red (as shown
with one red bar), this indicates that the radio transmission
is over powering the receiving radio and that the Rover
is too close for set
Output Power
. If the broadcast is too
overpowering, corrections will be lost and the link quality
will drop.


