m
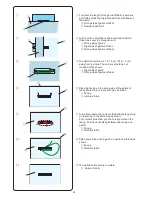
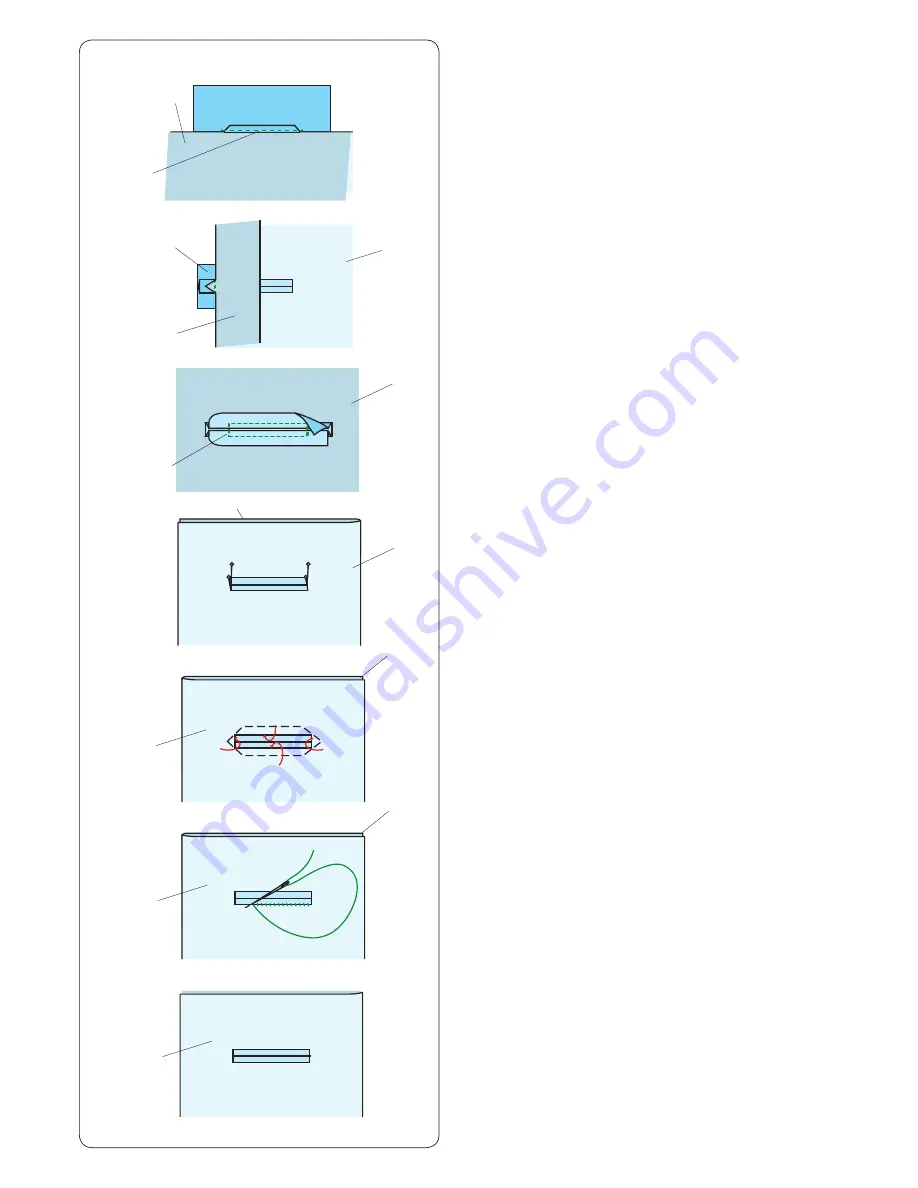
Fold over the length of the garment fabric, sew back
and forth beside the original seam to secure flaps of
the patch.
r
Wrong side of garment fabric
t
Sew back and forth
r
m
t
q
,
r
w
e
.
r
t
y
⁄0
t
⁄1
y
t
⁄2
y
y
⁄3
,
Fold over the end of fabric and sew back and forth
three times over the triangular end.
q
Wrong side of patch
w
Right side of garment fabric
r
Wrong side of garment fabric
.
The patch should be cut 1 to 1.5 cm (7/16˝ – 5/8˝)
away from the hole. The corners should be cut
rounded off as shown.
e
Right side of patch
r
Wrong side of garment fabric
⁄0
Place the facing on the wrong side of the garment
fabric. Mark the 4 corners with pins as shown.
t
Facing
y
Garment fabric
⁄1
Turn all the layers over and cut the buttonhole opening
on the facing in the same way as step
x
.
Four marker pins show you the corner points on the
facing. Fold back each flap between the facing and
patch.
t
Facing
y
Garment fabric
⁄2
Stitch around the opening with a needle and thread as
shown.
t
Facing
y
Garment fabric
⁄3
The welted buttonhole is complete.
y
Garment fabric
52
Содержание Horizon Memory Craft 15000
Страница 1: ...Memory Craft 15000 Instruction Manual ...
Страница 170: ...165 STITCH CHART Ordinary Sewing Block Script Symbol Broadway Block 9 mm ...
Страница 171: ...166 DESIGN CHART Embroidery World of Embroidery Designs SQ14 SQ23 GR Pattern images are not to scale ...
Страница 177: ...172 DESIGN CHART Embroidery Fringe Designs Calibration Pattern Pattern images are not to scale FA10 SQ23 SQ14 ...
Страница 178: ...173 DESIGN CHART Embroidery Gothic Script Cheltenham Bauhaus Galant Typist ...
Страница 179: ...174 DESIGN CHART Embroidery Brush First Grade 2 letters 3 letters Border Normal Sew Hollowblock Jupiter ...
Страница 180: ...175 DESIGN CHART Embroidery Micro Gothic ...
Страница 184: ...862 801 005 EN ...

