
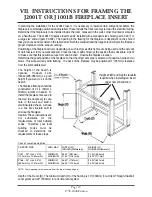


Page 34
1998-2006 Edition
The same issues are relevant when the fuel feed rate is set at maximum burn. At sea level, the air/fuel ratios
at the highest settings are quite different than at 11,000 feet (3353m) because there simply is more oxygen
in a cubic foot of air at sea level than at higher altitudes.
The draft setting for a particular fuel feed rate setting, therefore, can vary from one installation location to
another. Additionally, the amount of fuel consumed will depend on the elevation, vent system installation,
pellet size, and the amount of heat output desired. Therefore, the statement that the unit will burn less than
1-1/2 pounds (0.68kg) of fuel per hour is not absolute.
Once the fire is burning steadily and all the pellets in the firepot are ignited, follow these steps to adjust the
air to fuel ratio for an efficient burn:
1. Turn the Fuel Feed Control Knob to the desired position.
2. Turn (or on J2001T, slide) the Draft Control Knob to the "1" position. The flames will turn lazy and get
longer.
3. Slowly, increase the Draft Control Knob setting to a higher setting until the smaller pieces of ember in the
firepot start to roll around. This "rolling around" characteristic is called the "POPCORN" effect. Supply
enough air so that the pieces of pellet ember are rolling around inside the firepot. However, don't let the
ember fly out of the firepot.
4. After about 1 minute at this setting, check the flame height, flame color and flame tips color. When the
proper amount of combustion air is being supplied, the flame should be a bright yellow (almost white) with
blue and purple hues close to the center of the flame. The flame tips should never be black. At the highest
fuel feed setting, the flame tips may occasionally touch the heat exchanger tubes. However, the flame should
not be so tall as to completely engulf the heat exchanger tubes (which are located at the top of the firebox).
If the flame in your pellet stove is not as mentioned above, increase the Draft Control Knob position to a
higher draft setting.
VIII.3 Efficient Flame Characteristics
The flame should be crisp and brisk like a forge or a propane torch. Look for a very bright white or yellow
flame with blue tones close to the center of the flame. You should see a "popcorn" effect in the firepot. As
the fresh pellets falling into the firepot hit the fire, the partially burnt pellets in the firepot will break apart and
should begin jumping within the firepot.
After most of the heat is "extracted" from the pellets, the air forces small pieces of ember out of the firepot.
These embers will land on the steel surfaces and turn into ash. If it appears that these embers are too large
and if the embers smoke or flame after they land outside the firepot, reduce the draft air to minimize expelling
large embers out of the firepot. Occasionally, however, one or two whole pellets may fly out of the firepot.
This is normal. A positive sign of an efficient and clean burn is visible light brown or milky white ash on the
window glass and fine gray ash in the ash pan. No black soot deposits should be visible on the glass or the
brick pattern boards on the firebox walls.
Please take a day or two and experiment with the draft and fuel feed controls on the unit. You will quickly
find a few settings you can feel comfortable with.
If the control board in the stove is set to run in the Automatic Mode (see Section X: Electrical System
Information) and if you intend to leave the Fuel Feed Rate Control Knob in one position, the Draft Control
Knob only needs to be adjusted once for efficient burn.
Содержание J1000B
Страница 2: ......
Страница 8: ...Page vi 1998 2006 Edition ...
Страница 16: ...Page 8 1998 2006 Edition ...
Страница 20: ...Page 12 1998 2006 Edition ...
Страница 36: ...Page 28 1998 2006 Edition ...
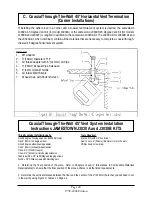
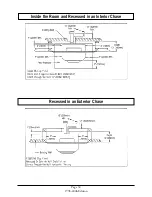
Страница 38: ...Inside the Room and Recessed in an Interior Chase Page 30 1998 2006 Edition Recessed in an Exterior Chase ...
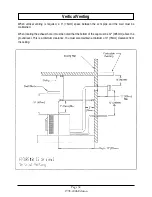
Страница 39: ...Corner Installation Page 31 1998 2006 Edition Installation requires standoffs to maintain clearances ...
Страница 44: ...Page 36 1998 2006 Edition ...
Страница 45: ...Page 37 1998 2006 Edition ...
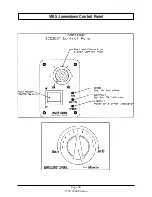
Страница 46: ...VIII 5 Jamestown Control Panel Page 38 1998 2006 Edition ...
Страница 61: ...Page 53 1998 2006 Edition ...
Страница 62: ...Page 54 1998 2006 Edition ...
Страница 63: ...Page 55 1998 2006 Edition ...
Страница 64: ...Page 56 1998 2006 Edition ...
Страница 69: ...Page 61 1998 2006 Edition ...
Страница 70: ...Page 62 1998 2006 Edition ...
Страница 79: ...Appendix A 3 1998 2006 Edition ...
Страница 80: ...Appendix A 4 1998 2006 Edition ...
Страница 81: ...Appendix A 5 1998 2006 Edition ...
Страница 82: ...Appendix A 6 1998 2006 Edition ...
Страница 84: ...Appendix B 2 1998 2006 Edition ...
Страница 86: ...APPENDIX D EXHAUST BLOWER ASSEMBLY MODEL J1000 Appendix D 1 1998 2006 Edition Complete Assembly is Part 07DAA ...
Страница 87: ...APPENDIX E AUGER MOTOR BRACKET INSTALLATION Appendix E 1 1998 2006 Edition ...
Страница 90: ...Appendix F 3 1998 2006 Edition ...
Страница 93: ...APPENDIX H J1000 CROSSFLOW FAN Part 07EEG Appendix H 1 1998 2006 Edition ...
Страница 94: ...APPENDIX I 1 EXHAUST BLOWER ASSEMBLY MODEL J1000 Appendix I 1 1998 2006 Edition ...
Страница 96: ...SERVICE RECORD DATE SERVICED BY DESCRIPTION ...


