background image

Intesis

Box

®


KNX 

– IR Universal AC 

User's manual r1.0 eng 


© Intesis Software S.L.U. - All rights reserved 

This information is subject to change without notice


IntesisBox

®


is a registered trademark of Intesis Software SLU


URL 
Email 
tel 

  http://www.intesisbox.com                                          

[email protected] 
+34 938047134 

23 / 48 


o

  If set to 

“no” 

the objects will not be shown. 


o

  If set to 

“yes”

 the 

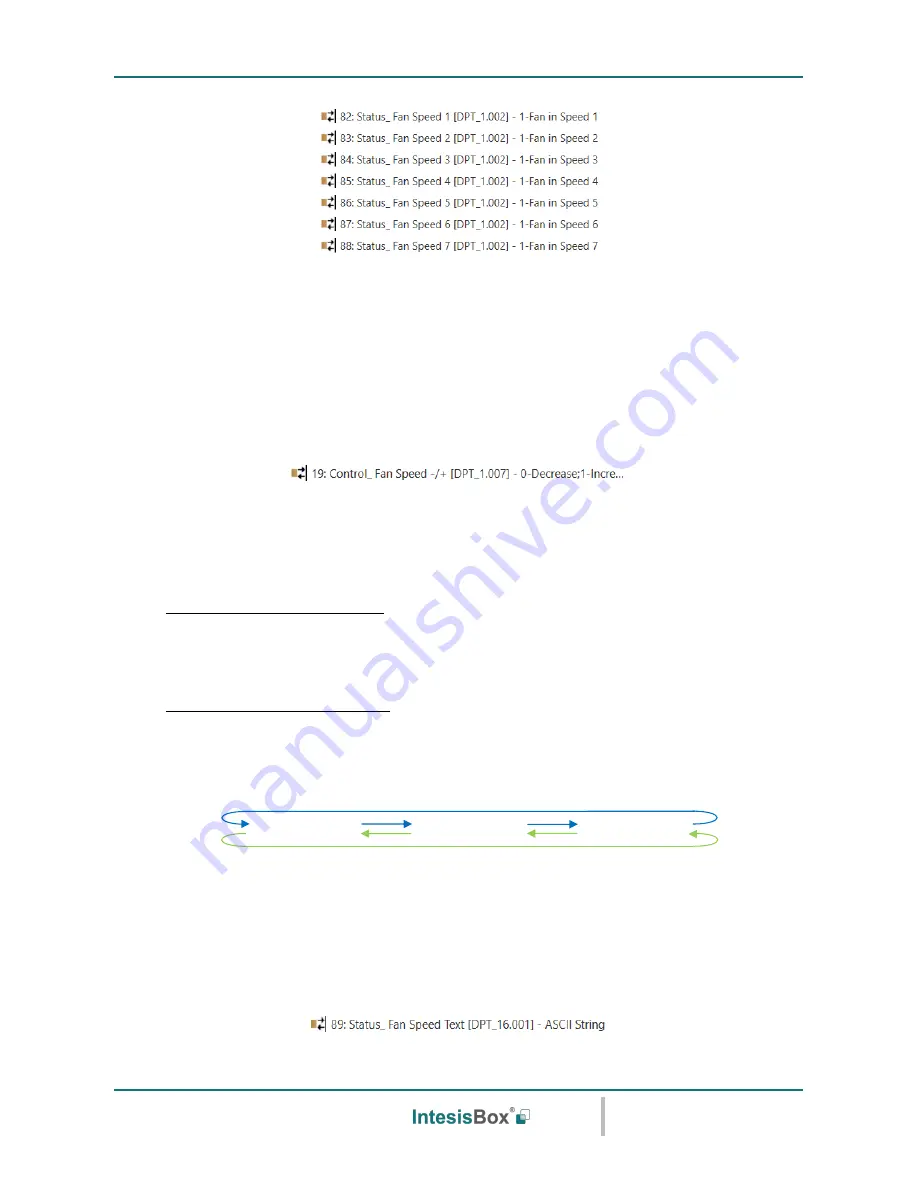
Status_ Fan Speed 

objects for Speed 1, Speed 2 and Speed 3 (if available) will appear. 

When a Fan Speed is enabled, a 

“1”

 value is returned through its bit-type object. 


5.4.4  Enable use of +/- object for Fan Speed 

 
This  parameter  shows/hides  the 

Control_  Fan  Speed  +/-

  communication  object  which  lets  you 

increase/decrease the indoor unit fan speed by using two different datapoint types. 


o

  If set to 

“no”

 the object will not be shown. 


o

  If set to 

“yes”

 the 

Control_ Fan Speed +/-

 object. 


  DPT type for +/- Fan Speed Object 

 
This parameter lets choose between the datapoints 

0-Up / 1-Down [DPT_1.008]

 and 

0-Decrease / 1-

Increase [DPT_1.007]

 for the 

Control_ Fan Speed +/- 

object. 


  Roll-over Speed at upper/lower limit 

 
This parameter lets choose if roll-over will be enabled (

“yes”

) or disabled (

“no”

) for the 

Control_ Fan 

Speed +/-

 object. 


5.4.5  Enable use of Text object for Fan Speed 

 
This parameter shows/hides the 

Status_ Fan Speed Text 

communication object. 


Up / Increase


Down / Decrease 

Fan Speed 3 

Fan Speed 1 

Fan Speed 2 

Only if Roll-over is enabled 

Only if Roll-over is enabled 

Содержание IS-IR-KNX-1i

Страница 1: ...IntesisBox IS IR KNX 1i v1 0 User s Manual Issue Date 06 2017 r1 0 eng...

Страница 2: ...ument is furnished under a license agreement or nondisclosure agreement The software may be used only in accordance with the terms of those agreements No part of this publication may be reproduced sto...

Страница 3: ...IntesisBox is a registered trademark of Intesis Software SLU URL Email tel http www intesisbox com info intesisbox com 34 938047134 3 48 Gateway for integration of IR air conditioners into KNX TP 1 E...

Страница 4: ...ontrol 22 5 4 3 Enable use of bit type Fan Speed objects for Status 22 5 4 4 Enable use of object for Fan Speed 23 5 4 5 Enable use of Text object for Fan Speed 23 Up Down vanes configuration dialog 2...

Страница 5: ...Intesis Software SLU URL Email tel http www intesisbox com info intesisbox com 34 938047134 5 48 Binary Input x configuration dialogs 38 5 11 1 Enable use of Input x 38 5 11 2 Contact type 39 5 11 3...

Страница 6: ...tatus bit byte characters with KNX standard datapoint types Status objects for every control available Special Modes available Power Economy Additional Heating and Additional Cooling Timeout for Open...

Страница 7: ...abase for this product import it and add it to the current ETS project 4 Access the parameter section of the IntesisBox device Notice that parameters for this interface are configured through a specif...

Страница 8: ...tant stage In order to determine the best location for your IntesisBox device use the Wireless Controller the one of your AC unit When selecting the installation location please keep in mind that the...

Страница 9: ...n section 5 IntesisBox IS IR KNX 1i can be installed in many different locations A Side by side with the AC unit B In front of the AC unit C Under the AC unit D Desktop position Figure 3 2 IR emitters...

Страница 10: ...AC unit In that case the signal will travel from the IntesisBox device to the AC unit tacking advantage of the rebounds on the wall in front of it or other furniture present in the room Case D If you...

Страница 11: ...com 34 938047134 11 48 Connection to KNX IntesisBox device needs to be connected directly through a KNX TP 1 bus To get access to the KNX connector remove the screw as seen in Figure 3 5 Figure 3 5 T...

Страница 12: ...ections will be as in the image below Figure 3 6 Binary Input connection IMPORTANT NOTE Please note that you can only connect a presence sensor or a window contact simultaneously Both sensors cannot w...

Страница 13: ...your sensor in the settings of the Binary Input function Go to Settings menu in the IntesisBox WEB Site IMPORTANT NOTE Please note that IS IR KNX 1i interface will only react if the contact of your se...

Страница 14: ...oceed with the configuration and set up it is recommended to follow instructions next 1 Download and install the latest version of the ETS data base section 5 2 Open the product s plugin and make sure...

Страница 15: ...can be downloaded from https www intesisbox com intesis product media IS IR KNX 1i_ETS_database zip Please consult the README txt file located inside the downloaded zip file to find instructions on ho...

Страница 16: ...information about the Model to select 5 1 2 Model Use the dropdown menu to select the AC brand of the AC unit you want to control In case your AC unit brand is not present in the AC brand list please...

Страница 17: ...e is enabled and it has as Value for Remote Lock unchanged or unlocked this would unlock the remote controller because the initial scene has priority over the Control_ Lock Remote Control communicatio...

Страница 18: ...the working mode of the interface LED o If set to Always off the LED will always be off o If set to Always on the LED will always be on o If set to Only on changes the LED will always change when the...

Страница 19: ...be enabled with a 0 value Heat mode with a 1 value Cool mode with a 3 value Fan mode with a 9 value and Dry mode with a 14 value Figure 5 6 AC mode additional communication objects 5 3 1 Enable use of...
Страница 20: ...r shows hides the Control_ Mode communication object which lets change the indoor unit mode by using two different datapoint types o If set to no the object will not be shown o If set to yes the Contr...

Страница 21: ...ed DPT 5 010 is selected Control_ Fan Speed and Status_ Fan Speed communication objects for this DPT will appear Also depending on the number of fan speeds selected these objects will be different The...

Страница 22: ...first fan speed will be selected When a value between 50 and 83 is sent to the Control_ object the second speed will be selected When a value between 84 and 100 is sent to the Control_ object the thir...

Страница 23: ...Control_ Fan Speed communication object which lets you increase decrease the indoor unit fan speed by using two different datapoint types o If set to no the object will not be shown o If set to yes th...

Страница 24: ...ond to the position i e Value 3 Position 3 The Status_ object will always return the value for the vane position selected Important If a 0 value is sent to the Control_ object the Position 1 will be s...

Страница 25: ...ne U D objects for Control This parameter shows hides the bit type Control_ Vane Up Down objects o If set to no the objects will not be shown o If set to yes the Control_ Vane Up Down objects for each...

Страница 26: ...ot be shown o If set to yes the Control_ Vane Up Down object DPT type for Vane Up Down obj This parameter lets choose between the datapoints 0 Up 1 Down DPT_1 008 and 0 Decrease 1 Increase DPT_1 007 f...

Страница 27: ...ition 1 will be selected If a value bigger than N is sent to the Control_ object then the Position N will be selected o When Scaling DPT 5 001 is selected Control_ Vane Up Down and Status_ Vane Up Dow...

Страница 28: ...hown o If set to yes the Control_ Vane Up Down objects for each Position 1 to N will appear To activate a Vane Position by using these objects a 1 value has to be sent 5 6 3 Enable use of bit type Van...

Страница 29: ...t be shown o If set to yes the Control_ Vane Left Right object DPT type for Vane Left Right obj This parameter lets choose between the datapoints 0 Up 1 Down DPT_1 008 and 0 Decrease 1 Increase DPT_1...

Страница 30: ...nication objects Figure 5 10 Tempeature settings 5 7 1 Set Point Enable use of obj for Setp Temp This parameter shows hides the Control_ Setpoint Temp communication object which lets you change the in...

Страница 31: ...per defined limit or below the lower defined limit is sent through the Control_ Setpoint Temperature object it will be ALWAYS applied the limit defined Important When limits are enabled any setpoint t...

Страница 32: ...ed Vane position and Setpoint Temperature Figure 5 11 Scene configuration settings 5 8 1 Enable use of scenes This parameter shows hides the scene configuration parameters and communication objects o...

Страница 33: ...the objects will not be shown If set to yes the Control_ Store Scene objects for storing scenes will appear To store a scene by using these objects a 1 value has to be sent to the scene s object we wa...

Страница 34: ...s Scene x Value for On Off This parameter lets you choose the power of the indoor unit when the scene is executed The following options are available ON OFF or unchanged Scene x Value for Mode This pa...

Страница 35: ...tion object which lets you Start Stop a timeout to switch off the indoor unit o If set to no the object will not be shown o If set to yes the Control_ Window Contact Input object will appear If a 1 va...

Страница 36: ...period will begin again If a 0 value is sent to the Control_ Switch Off Timeout object no action will be performed If set to yes On Off commands while the window is open will be saved but not applied...

Страница 37: ...applied inversely i e In a room with AC in cool mode and 25 C setpoint temperature a 2 C delta is applied after the occupancy timeout setting the setpoint at 27 C because there is no occupancy in the...

Страница 38: ...Occupancy after the timeout period no action will be performed Lock ON when occupied If set to no On Off commands while the room is occupied will be accepted If a 1 value is sent to the Control_ Swit...

Страница 39: ...ol_ Disable Input x communication object which will let disable enable the input x o If set to no any object will be shown o When DPT 1 003 0 Disable 1 Enable is selected the input can be disabled usi...

Страница 40: ...29V DC 17mA Supplied through KNX bus Mounting Wall and desktop LED indicators 1 x Device status and KNX programming Push buttons 1 x KNX programming Binary inputs 2 x binary inputs for potential free...

Страница 41: ...ntesisBox is a registered trademark of Intesis Software SLU URL Email tel http www intesisbox com info intesisbox com 34 938047134 41 48 7 List of compatible AC indoor units A list of indoor unit mode...

Страница 42: ...W T 1 Heat 6 Control_ Mode Cool 1 bit DPT_Bool 1 002 W T 1 Cool 7 Control_ Mode Fan 1 bit DPT_Bool 1 002 W T 1 Fan 8 Control_ Mode Dry 1 bit DPT_Bool 1 002 W T 1 Dry 9 Control_ Mode 1 bit DPT_Step 1...

Страница 43: ...1 002 W T 1 Position 3 25 Control_ Vane Up Down Pos4 1 bit DPT_Bool 1 002 W T 1 Position 4 26 Control_ Vane Up Down Pos5 1 bit DPT_Bool 1 002 W T 1 Position 5 27 Control_ Vane Up Down Pos6 1 bit DPT_...

Страница 44: ...ane Left Right 1 bit DPT_Step 1 007 W 0 Decrease 1 Increase Control_ Vane Left Right 1 bit DPT_UpDown 1 008 W 0 Up 1 Down 49 Control_ Vane Left Right Move Pos 1 bit DPT_Trigger 1 002 W T 0 1 Move Posi...

Страница 45: ...Scene4 1 bit DPT_Bool 1 002 W 1 Execute Scene 68 Control_ Execute Scene5 1 bit DPT_Bool 1 002 W 1 Execute Scene Disabling 69 Control_ Disable Input 1 1 bit DPT_Bool 1 002 W T 0 Enable 1 Disable Contro...

Страница 46: ...bit DPT_Bool 1 002 R T 1 Speed 5 87 Status_ Fan Speed 6 1 bit DPT_Bool 1 002 R T 1 Speed 6 88 Status_ Fan Speed 7 1 bit DPT_Bool 1 002 R T 1 Speed 7 89 Status_ Fan Speed Text 14 byte DPT_String_8859_1...

Страница 47: ...1 002 R T 1 Position 3 109 Status_ Vane Left Right Pos4 1 bit DPT_Bool 1 002 R T 1 Position 4 110 Status_ Vane Left Right Pos5 1 bit DPT_Bool 1 002 R T 1 Position 5 111 Status_ Vane Left Right Pos6 1...

Страница 48: ...ed off Occupancy 126 Status_ Occupancy Sensor 1 bit DPT_Occupancy 1 018 R T 0 Not Occupied 1 Occupied 127 Status_ Occupancy Mode 8 bit DPT_OCC_MODE 20 003 R T 0 Occupied 1 Stand by 2 Not Occupied 128...

Отзывы: