background image


52 


NOTE: 

 The following procedure is for operating systems listed in section 3.2.1 Server 

Requirements.  


Step 

Instruction 

1. 

Insert the DSX-L Operating system USB drive into your computer. 

2. 

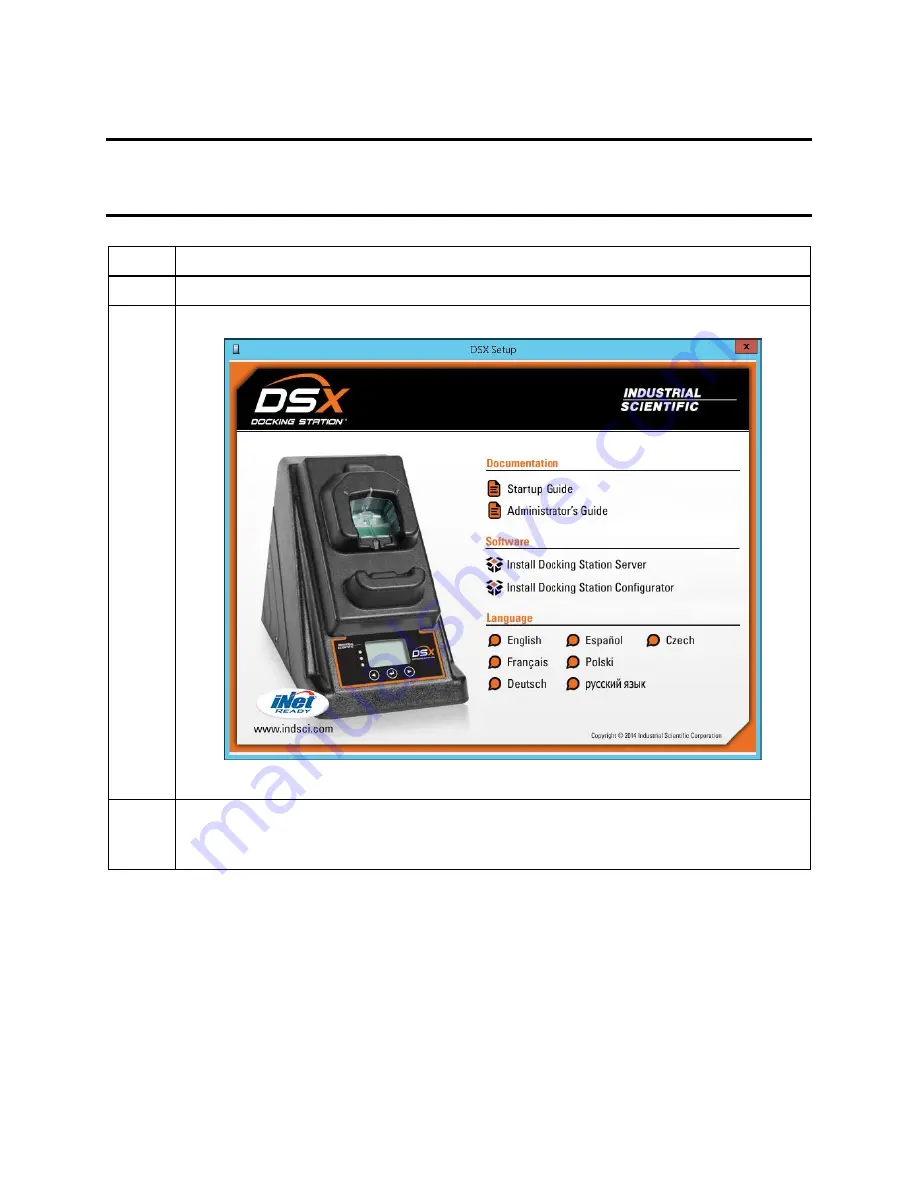
The USB drive will automatically launch the following window.


Figure 3-30.  Docking Station  Installation Window 

3. 

Click on “Install Docking Station Configurator.”  This will automatically launch the 
Configurator  installer.    The  configurator  software  can  be  installed  on  any  computer 
on the network as well as the server or PC running the DSS software. 


Содержание DSX-L

Страница 1: ...Start up Guide DSX L Local Server Mode Edition 9 January 24 2020 Part Number 17156008 ...

Страница 2: ... is a trademark of Industrial Scientific Corporation All other trademarks and registered trademarks are the property of their respective owners Industrial Scientific Corporation Phone 412 788 4353 1 Life Way Toll Free 1 800 DETECTS 338 3287 Pittsburgh PA 15205 7500 USA Fax 412 788 8353 Service 1 888 788 4353 Web www indsci com Although every effort is made to ensure accuracy the specifications of ...

Страница 3: ...Apparatus as well as FCC Part 15 Class A emissions levels when installed to the requirements outlined within this manual Mandatory compliance to these standards help to ensure controlled reliable operation of this device when exposed to typical levels of electromagnetic interference as well as ensuring that this device is not source of emissions that might interfere with other equipment installed ...

Страница 4: ...iv ...

Страница 5: ... 1 Overview 36 3 7 2a Install SQL Server SQL Server Express Instance and a New DSS Database on This Machine 39 3 7 2b Install New DSS Database to an Existing SQL Server SQL Server 2008 Express Instance on This Machine39 3 7 2c Attach to an Existing DSS Database Available on My Network 41 3 8 CONTINUING INSTALLATION OR INSTALLATION AFTER UNINSTALLING A PREVIOUS VERSION 42 3 8 1a Use SQL Server SQL ...

Страница 6: ...ibrations 95 5 5 2 O2 Sensor Failures 96 5 6 DOWNLOAD AND CLEARING DATALOG DATA 96 5 6 1 Forced Datalog Download 96 5 6 2 Clearing Datalog Data 97 5 7 IDS DIAGNOSTICS 98 5 8 INSTRUMENT DOCKING STATION OPERATING GUIDELINES 99 5 8 1 General 99 5 8 2 Cleaning 100 5 8 3 Explanation of Symbols Used on Unit 100 5 8 4 Specifications 101 5 8 5 Regulatory Notices 101 5 8 6 Wiring Requirements 102 EVENT SCH...

Страница 7: ...ftware An overview of the Broadcaster is also provided as well as how to enable and disable this feature Chapter 4 Configuring the Docking Station This section explains how to setup the docking station for operation It includes explanations of status properties setup and removal manifold instruction gas cylinder configuration and connections using iGas Chapter 5 Basic Operation This section explai...

Страница 8: ......

Страница 9: ...strument Docking Stations IDS with one docking station One fresh air input and two or five gas inputs Built in Smart charger on each IDS for rechargeable instruments Simplified feedback on the IDS via 3 LEDs red yellow and green and an audible alarm A graphical user interface tool DSSAC that allows an administrator to view operations on each IDS from a network computer Ability to schedule calibrat...

Страница 10: ... the DSS Refer to Figure 2 1 Figure 2 1 Sample Docking Station Network 2 3 2 Docking Station Server Admin Console DSSAC Overview The DSS is administered using the Docking Station Server Admin Console DSSAC web application DSSAC is used by the safety team to manage instrument data view IDS status and manage DSS configurations Before using the DSSAC for the first time read Chapter 3 Getting Started ...

Страница 11: ...n idle the IDS cycles through three screens of information as shown below Each screen is shown for 10 seconds Figure 2 2 Sample LCD Panel Idle Displays While and While Not Charging Additional details about how to use the features of an IDS are covered in the following sections Chapter 4 Configuring the Docking Station Chapter 5 Basic Operation 2 4 Required Network Connections Below is a summary of...

Страница 12: ...QL Server To verify that the server machine can reach the database try establishing an ODBC connection using the user password and server name from the web config file Each IDS must be able to reach the server and the server must be able to reach the IDS s To IDS s This communication is XML over http using TCP IP This takes place on port 80 The IDS posts XML to an ASP NET page running under IIS Th...

Страница 13: ... interface starting with v9 6 2 The DSSAC web interface does not need to be installed separately it is part of the DSS installation 3 DSSAC v9 5 windows client or earlier users can log in to the DSSAC web interface with their existing DSSAC credentials However on first login into DSSAC web DSSAC web forces users to update their password Once a user s password has been updated that user will no lon...

Страница 14: ......

Страница 15: ...r software Installation wizard for DSS Database preparation options for first time installations Selecting the database option Accessing the Docking Station Server Admin Console DSSAC Installing and running the Docking Station Configurator software Assigning a static IP address to a sever or PC Disabling the DS2 Broadcaster Configuring Windows firewall Specifying the DSS IP address Each of these t...

Страница 16: ...on type within the Windows Latin codepage of 1252 NOTE If the DSX L database has any other collation type it prevents the DSS software from functioning properly The SQL Server or SQL Server 2014 Express SP1 Edition will automatically default to collation type within the proper codepage of 1252 if installed under the Latin based languages listed above Installing SQL Server under a non Latin based o...

Страница 17: ...bove for it to successfully communicate data back and forth between docking stations necessitates that the English US regional settings for Number formatting remain in their default state That is even if the DSS is running under a non English US language it is necessary that the settings for English US remain at their defaults The default Number settings are shown below If any of these defaults ar...

Страница 18: ...e Chrome latest version Mozilla Firefox latest version Apple Safari latest version 3 2 3 SQL Server Requirements Installation Type 1 Install new SQL Express and a new DSS Database on this machine SQL server 2014 SP1 will be installed as a part of DSX L software installation No prior database is needed Installation Type 2 Install new DSS to an existing SQL Server SQL Express on this machine SQL ser...

Страница 19: ...y connecting a DSX L or any other network device such as a hub or router to the server or PC will be adequate If no devices are connected to the computer the DSS will not install NOTE Throughout this document Internet Information Services will be referred to as IIS and Message Queuing will be referred to as MSMQ Prior to installing the DSS software IIS must be installed to the Operating System if ...

Страница 20: ...stem that is used namely Windows Server 2016 Windows Server 2012 and Windows Server 2012 R2 Windows 7 Windows 8 and Windows 10 Windows Server 2008 and Windows Server 2008 R2 with Windows Hotfix KB980368 Separate sections are provided for explaining the IIS and MSMQ installation processes under each of these systems Refer to the appropriate section below 3 3 2 IIS and MSMQ on Windows Server 2016 Wi...

Страница 21: ...17 3 For Installation Type choose Role based or feature based installation and click Next ...

Страница 22: ...nd Features main window click on Server Roles and place a check mark on Web Server If the check mark already exists the service is currently installed If the check mark is added a new window will open click on Add Features ...

Страница 23: ...e check mark already exists the service is currently installed If the check mark is added a new window will open click on Add Features If required features are not selected a notification window will display the list of features that should be enabled before installation A confirmation window will then prompt for permission to continue or stop the installation process ...

Страница 24: ...20 ...

Страница 25: ...he MSMQ and IIS features noted above in step 4 and 5 other features are required e g Security In some cases such as when choosing ASP NET a second window will open similar to the second screen shown in Step 4 above requiring the user to confirm the choice to add the feature After all features are selected click OK ...

Страница 26: ...pen in a new window choose Install to confirm the selections 3 3 3 Installing IIS and MSMQ on Windows Server 2008 and Windows Server 2008 R2 Step Instruction 1 Navigate to Control Panel Start Settings Control 2 Click on Programs Features ...

Страница 27: ...23 Step Instruction 3 Click on Turn Windows Features On and Off this is located in the window pane to the left 4 Click on Features then choose Add Features ...

Страница 28: ...euing Message Queuing Services find and if needed place a check mark on HTTP Support If the check mark already exists the service is currently installed If the check mark is added a new window will open click on Add Required Role Services ...

Страница 29: ...ould be selected with a check mark are highlighted below In some cases such as when choosing ASP NET a second window will open similar to the second screen shown in Step 5 above requiring the user to confirm the choice to add the feature After selecting all required features see list below click on Next ...

Страница 30: ...or Tracing Custom Logging ODBC Logging Security Basic Authentication Windows Authentication Digest Authentication Client Certificate Mapping Authentication IIS Client Certificate Mapping Authentication URL Authorization Request Filtering IP and Domain Restrictions Performance Static Content Compression Dynamic Content Compression Management Tools IIS Management Console IIS Management Scripts and T...

Страница 31: ... to confirm the selections 3 3 4 Installing IIS and MSMQ on Windows 7 Windows 8 and Windows 10 To install IIS and MSMQ on these operating systems follow the instructions below NOTE You may need the Windows Operating System CD if the services were not previously installed ...

Страница 32: ...28 The following images define which settings should be enabled for MSMQ and IIS Installed Windows Components settings under Windows 7 Windows 8 and Windows 10 MSMQ IIS ...

Страница 33: ...29 Step Instruction 1 Navigate to Control Panel Start Settings Control 2 Click on Programs 3 Click on Turn Windows features on or off ...

Страница 34: ...Internet Information Services Web Management Tools The features shown below with a check mark should be turned on 6 In addition to the MSMQ and IIS features noted above in steps 4 and 5 other features are required e g Security Refer to the full list of features that should be selected as shown on page 24 After all features are selected click OK ...

Страница 35: ... installer software follow the instructions below Step Instruction 1 Insert the DSX Operating system USB drive into your computer 2 The USB drive will automatically launch the following window Figure 3 3 The Installer Software Start up Window The launcher displays seven language options on the screen Click a language to re display the Launcher in the chosen language 3 Click on Install Docking Stat...

Страница 36: ... license agreement choose I agree and then click Install Figure 3 4 The License Agreement Window 5 The Installer will automatically install the NET framework if it currently is not installed When this installation is complete the following window will appear Choose OK to continue the installation Figure 3 5 The NET Framework Installation Complete Message Box ...

Страница 37: ...33 Step Instruction 6 The DSS software is now ready to install Choose Next to continue Figure 3 6 The DSS Installation Wizard Window ...

Страница 38: ...tion 1 Click YES to accept the license agreement Figure 3 7 The Software License Agreement Window 2 At this point the installation will check to make sure all prerequisites are already installed Figure 3 8 The Prerequisite Check Window 3 Choose Next ...

Страница 39: ...nto Windows 7 Windows 8 or Windows 10 operating systems the following message will be displayed This message is a reminder that the maximum number of IDSs that can be connected to a PC is 20 Figure 3 9 The Max Docking Station Information Window 5 Click OK ...

Страница 40: ...are not found in the machine DSS installer will display the message below Figure 3 10 The Prerequisite Check Failed Window At this time the user can go back and install the IIS using the procedures outlined on the following pages 3 7 Database Preparation Options for First Time Installations 3 7 1 Overview This step in the installation is to select the database option that you are going to use The ...

Страница 41: ...y by default the change to a writable setting allows the application to use the database The following services are started through registry DS2 iNet Connector DS2 Printing and DS2 Broadcaster during uninstall these registry entries are removed In SQL Server the following steps are completed during DSS Install o DSSUSERROLE user role will be created o DS2 login will be created This is the login us...

Страница 42: ... DSS on local Select a DSS database option Existing SQL Existing DSS elsewhere Perform Upgrade Perform Upgrade The Docking Station Server installer has detected existing database files Do you want to perform an upgrade using those files Existing SQL Existing DSS Data Files Found Install MSDE New DSS DB Files Present Instance Name Instance Name DSS Instance Name SQL Server Location SQL Server Locat...

Страница 43: ...ccount User Password SA Password SA D 2u er D 2u er DS2 DB User Login DS2 D 2u er D 2u er DSSAC Default Admin User Login DSSUSER DS2user DSSAC Read only User Login GUEST guest 3 7 2b Install New DSS Database to an Existing SQL Server SQL Server 2008 Express Instance on This Machine Step Instruction 1 Select the database Instance name and choose Next Figure 3 13 Selecting the Database Instance Name...

Страница 44: ...40 Step Instruction Figure 3 14 Entering the System Administrator Password 3 Start installation ...

Страница 45: ...ase Available on My Network Step Instruction 1 Enter the name of the server that SQL Server is running Figure 3 15 Entering the SQL Server Name 2 Enter the database Instance name and choose Next Figure 3 16 Entering the Database Instance Name ...

Страница 46: ...SQL Server SQL Server Express installed on the current PC and it has the DSS database tables already attached Figure 3 18 Existing DSS BD Files Popup The installer will recognize the existence of the previous databases and give you the following option If you want to use the existing databases choose Yes If you want to start with fresh databases choose No If you do choose No the installer will inf...

Страница 47: ...se SQL Server SQL Server Express on this Machine and Connect to the Existing DSS Database Step Instruction 1 Enter a Login Name and Password and choose Next Figure 3 19 Selecting the System Administrator Password ...

Страница 48: ...ase Available on My Network Step Instruction 1 Enter the name of the server that SQL Server is running Figure 3 20 Entering the SQL Server Name 2 Enter the database Instance name and choose Next Figure 3 21 Entering the Database Instance Name ...

Страница 49: ... DSS database Attach to an existing DSS database available on my network If you want to use the database files on the current machine and install SQL Server Express select the first option If you want to attach to an existing DSS database somewhere else on the computer network select the third option The procedures for each of these options are listed in sections a and b below After you select you...

Страница 50: ...nd Use Existing DSS Database Step Instruction 1 Select a System Administrator Password and choose Next Figure 3 23 Selecting the System Administrator Password 2 Select a default user password and choose Next Figure 3 24 Selecting the Default User Password ...

Страница 51: ...ase Available on My Network Step Instruction 1 Enter the name of the server that SQL Server is running Figure 3 25 Entering the SQL Server Name 2 Enter the database Instance name and choose Next Figure 3 26 Entering the Database Instance Name ...

Страница 52: ...Instruction 3 Select a default user password and choose Next Figure 3 27 Entering the Default User Password 4 Before the installation is finished the settings will be reviewed Figure 3 28 Review Settings Window ...

Страница 53: ...ing off your DS2 Broadcaster unless you are running multiple DSSs on your network It is the policy of some IT professionals not to have the DS2 Broadcaster running on a network Therefore the Broadcaster can be turned off 7 If the DS2 Broadcaster is disabled the IDSs will need to know the IP address of the server running the DSS This is accomplished through using the DS2 Configurator Software See s...

Страница 54: ... name and password 3 If you forgot your password click Forgot password on the login screen this is only applicable to dssuser 4 Enter user name when prompted and click the Next button At this point the system will identify whether the user is authorized to change the password online If yes the user will be directed to answer security questions Otherwise the user will be directed to contact their a...

Страница 55: ...r it to gain access to the system 3 11 The Docking Station Configurator 3 11 1 Installing the Docking Station Configurator Software The Docking Station Configurator Software is a tool that can be used to send the IP address of the computer or server running the Docking Station Server Software DSS to a known IDS If the DS2 Broadcaster service is turned off or if an IDS is located on a different sub...

Страница 56: ...e into your computer 2 The USB drive will automatically launch the following window Figure 3 30 Docking Station Installation Window 3 Click on Install Docking Station Configurator This will automatically launch the Configurator installer The configurator software can be installed on any computer on the network as well as the server or PC running the DSS software ...

Страница 57: ...docking station will automatically reboot 3 12 Assigning a Static IP Address to a Sever or PC To assign a static IP address you will need the desired IP address and the values for Subnet mask and Gateway address If these values are unknown to you contact your IT administrator The following instructions tell you how to use PuTTy a free and open source terminal emulator to assign a static IP address...

Страница 58: ... are shown here Note your COM port may be something other than COM1 check the device manager on your PC to be sure 3 Click on Session in the left column In the dialog box ensure Serial is selected for Connection type and that the proper COM port is selected Click on Open Reconnect the power cable to the back of the docking station Tap the space bar on your keyboard ...

Страница 59: ...e task to enter the correct value In the same manner type in the number 2 to enter the Subnet mask Then type in the number 3 to enter the Gateway address The menu will refresh after you complete each entry and will show the new values Confirm that all values are correct and that the DHCP is still showing as Disabled If needed repeat any of the above tasks to correct a value 4 Once you have confirm...

Страница 60: ...ction install of a DSS This procedure is to accommodate users wishing to install DSS as a demo tool To disable the DS2 Broadcaster follow the instructions below Step Instruction 1 Navigate to Control Panel Start Settings Control Panel 2 Choose Administrative Tools 3 Choose Services The Services window is displayed Figure 3 32 Sample Services Window 4 Locate and right click on DS2 Broadcaster 5 Cho...

Страница 61: ...d click the Resolve button on the right hand side Mark Full Control and click Apply and OK It will give one warning message click OK 2 Enable Windows Firewall if it was disabled earlier 3 Go to All Programs Microsoft SQL Server Version Configuration Tools SQL Server Configuration Manager 4 Choose SQL Server Services and check that SQL Server instance name is running 5 Navigate to SQL Server Networ...

Страница 62: ...ols for MSSQLSERVER 9 Disable VIA protocol Name if it is enabled Note The VIA protocol only works with VIA hardware that has the VIA driver installed If you enable the VIA protocol on a computer that does not support the VIA protocol the SQL Server service will not start 10 Repeat steps 7 and 8 for Protocols for DSS if available ...

Страница 63: ...59 11 Go to Control Panel Windows Firewall Change Settings Exceptions Add Port 12 Make the following entries in the pop up Add a Port and click OK ...

Страница 64: ...60 13 Verify SQL has been added to the Exceptions list and click OK ...

Страница 65: ...ep 6 is given here 15 Verify SQLDSS has been added to the Exceptions list and click OK 16 Click Add Port again and make the following entries in the pop up and click OK Make sure that UDP Protocol is selected and Port number is 1434 Name it as you wish 17 Verify SQLBROWSER has been added to the Exceptions list and click OK ...

Страница 66: ... using SA log in or Windows Authentication Right click on the server node and choose Properties 19 Go to Left Tab of Connections and verify Allow remote connections to this server is enabled 20 Restart IIS where DSS is installed ...

Страница 67: ...us in the DSSAC Before you set up an IDS be sure that the Docking Station Server DSS is running on your network since the IDS requires the DSS in order to function Each IDS also requires an Ethernet connection to your network as well as a power outlet 4 2 Instrument Docking Station Hardware Overview Below is a diagram that shows all of the connections on the back of an IDS The details about how to...

Страница 68: ...a fresh air fitting not for calibration gas Network connection LAN PORT Air inlet ZERO AIR blue Zero air port set left and calibration gas port set right Calibration gas inlet CAL GAS white Cable port for iGas tubing and card reader assembly Cable port for iGas tubing and card reader assembly Figure 4 1 DSX L Back Panel 6 PORT UNIT SHOWN Note The port sets 1 2 and 3 are positioned in the same loca...

Страница 69: ...05 m 10 however for Chlorine Cl2 Ammonia NH3 and Hydrogen Chloride HCl gases the gas tube length should not exceed 91 m 3 The front of the IDS contains the cradle into which an instrument is docked It also contains an LCD screen a series of LED lights and a keypad The LCD screen contains information about the activity of the IDS The IDS contains three LED lights red yellow and green In general if ...

Страница 70: ... plug or dedicated power cord if ordered replaces the cover 4 Plug the power cord into a suitable outlet The IDS automatically turns on when you plug it in NOTE When the IDS is first plugged in the three LEDs simultaneously flash There is then a 40 second delay while the IDS boots During the boot up phase the yellow LED is illuminated When the IDS has completed booting the backlight on the LCD pan...

Страница 71: ...DSs and their current status It also displays the serial number of the instrument that is currently docked if any To view additional information such as date and time of last connection click on Choose Columns at the top right of the Docking Stations page Figure 4 3 Active Equipment Page Showing IDSs and Current Status NOTE This page will automatically update with the most recent information every...

Страница 72: ...GasBadge Pro MX6 iBrid SafeCore Module Tango TX1 Ventis Pro4 Ventis Pro5 Ventis MX4 or Ventis LS Gas In x Indicates the type of gas if any currently assigned to port x and its current status The status of a Gas In connection can be OK Low Empty Due to Expire Expired Disabled or N A Last Connected The Date Time stamp for the last time the docking station talked to the Docking Station Server Locatio...

Страница 73: ...er fields and Audible Alarm option See the table below for an explanation of each field under Management Settings Gas Inlets This option is used to configure the Gas In connections on the IDS See section 4 6 Configuring Gas Cylinders for information about using the Gas Inlets section Manage Events This option displays the journal events for the chosen Docking Station Actions The Print option is us...

Страница 74: ...isted in Step 5 click on the Edit button in the top right corner of the section to be modified If you make any changes click the Save button to save your changes Otherwise click the Cancel button to return to the list of IDSs without making any changes ...

Страница 75: ...DS menu cannot be used IDS Printer A non editable dropdown list of all printers configured on the DSS server machine A blank selection the default means none i e no printer selected Whenever a calibration takes place on the IDS a calibration certificate is printed automatically to the selected printer if a printer has been chosen Whenever a bump test takes place on the IDS a bump certificate will ...

Страница 76: ...n event code is selected removes the selected event from the Journal Entry listview and Event Name dropdown and then sets the currently selected Event Name to None If the user attempts to force an event under the condition below the corresponding error message will display and the forced event will not take place Docking Station unavailable due to leak detected Forced events also will not occur if...

Страница 77: ...Station The list is sorted alphabetically by journal type Clicking on any journal entry opens the Event Journal Details page same functionality as the original Journal node Figure 4 8 Event Journal Details Page NOTE DSX L will download bump test date for physical sensors only There will be no data logged or DSSAC displayed for a DualSense sensor or VIRTUAL ...

Страница 78: ...nders In order to perform calibrations and bump tests using DSX the IDS gas connections must be configured to use gas cylinders Configuring gas cylinders involves two steps 1 setting up the physical hardware i e the IDS and cylinders and 2 configuring the Gas In connection in the DSSAC Each IDS has three or six port sets Port set 1 is used to connect a fresh air fitting or a zero grade air cylinde...

Страница 79: ...s that gas tubing should be ester based polyurethane type 85A The maximum length for tubing is 3 05 m 10 however for Chlorine Cl2 Ammonia NH3 and Hydrogen Chloride HCl gases the gas tube length should not exceed 91 m 3 Step Instruction 3 Log in to the DSSAC application Click the Active Equipment or Docking Stations option in the navigation pane 4 Click on the serial number of the IDS for which you...

Страница 80: ...t using either a gas cylinder or fresh air Fresh Air Configures the Gas In connection to use fresh ambient air or for a Zero Air cylinder ISC Configures the Gas In connection to use an Industrial Scientific gas cylinder See the Using ISC gas section for specific procedures for adding ISC gas Non ISC Configures the Gas In connection to use a gas cylinder that was not purchased from Industrial Scien...

Страница 81: ...s Inlet section to save your changes 10 The gas cylinder is now ready to be used CAUTION When configuring Gas Inlet connections be careful that you have configured the correct gas type in the DSSAC that matches the gas type in the cylinder connected to the Gas In connection on the IDS If this setup is incorrect your calibrations may be run with the incorrect gas rendering the results inaccurate Ta...

Страница 82: ...ion appears 4 Select an Expiration Date for the gas NOTE You cannot enter an Expiration Date that is earlier than today s date 5 Click the radio button in the row matching the part number of the cylinder you are connecting to this gas inlet If the cylinder part number you need to select is not immediately visible you can search for it using the search box above 6 Optionally enter a cylinder serial...

Страница 83: ...79 Figure 4 11 Adding Gas from Industrial Scientific ...

Страница 84: ...cylinder configuration section appears 4 Select an Expiration Date for the gas NOTE You cannot enter an Expiration Date that is earlier than today s date 5 Select a Gas from the dropdown menu and enter a value for PPM VOL or LEL if applicable Figure 4 12 Adding Non ISC Gas NOTE When you enter a PPM value the VOL value will automatically compute Similarly if you enter a value for VOL the PPM value ...

Страница 85: ...t the new bottle Finally open the DSSAC application and configure the Gas In connection to use the new gas The order of operations is important to prevent any calibration errors For example if a Gas In connection is not disabled before disconnecting a gas cylinder there is a chance that the system might attempt a calibration while there is no gas connected Disabling the Gas In connection prevents ...

Страница 86: ...nnect the new gas bottle to the IDS See section 4 6 Configuring Gas Cylinders for detailed instructions on connecting gas cylinders 8 Return to the DSSAC application Click the Docking Stations option in the navigation pane 9 Click the serial number of the IDS for which you are changing gas cylinders 10 Click on the Gas Inlets option 11 Click on the Gas Inlet option on the Quick Links menu that cor...

Страница 87: ...ioxide IR CO2 Carbon Dioxide Hydrocarbons CO2 HC Carbon Dioxide Methane CO2 CH4 Carbon Monoxide CO Carbon Monoxide CO H2 Low Carbon Monoxide and Hydrogen Sulfide COSH Chlorine Cl2 Chlorine Dioxide ClO2 LEL Methane LEL Pentane Hydrocarbon IR Hydrogen H2 Hydrogen Chloride HCl Hydrogen Cyanide HCN Hydrogen Sulfide H2S Methane 5 vol Methane IR CH4 Nitrogen Dioxide NO2 Nitric Oxide NO Oxygen O2 Phosphi...

Страница 88: ...ion is standard when you use iGas with iNet To connect a cylinder using iGas follow the instructions listed below Step Instruction 1 Connect the demand flow regulator to the gas cylinder With the gauge facing away from you place the regulator on top of the cylinder and turn the cylinder until it is connected tightly 2 Connect one end of the polyurethane gas tubing bundled with the iGas reader cabl...

Страница 89: ...rect port is not used the system could use the wrong type of gas for a calibration or bump test rendering the results inaccurate Step Instruction 9 The system reads the information about the gas cylinder from the iGas Smart Card and automatically configures the Gas In connection in the DSSAC 10 The gas cylinder is ready to use NOTE If you are using iGas do not edit the cylinder configuration in DS...

Страница 90: ...s cylinder is replaced with a different type of gas and cylinder Update gas and cylinder type settings The Different gas cylinder is available for use Disconnected Update to Disabled Disabled Removed from service Remove from DSSAC system The manifold gas cylinder and primary docking station are not available Note Manifolded docking stations can be connected to one or more primary docking stations ...

Страница 91: ...ts on the manifold should be fitted with the Luer caps included with the kit to prevent leaking and contamination DSSAC Manifold settings The DSS server DSSAC software allows for the designation of the primary docking station and all of the docking stations in the manifold Finish the manifold assembly by completing the settings listed below Log in to the DSSAC web application and select Docking St...

Страница 92: ...m the Cylinder drop down menu Primary Docking Station Choose the primary docking station and enter its serial number Retrieve View the primary control docking stations Gas Inlet connections Gas End Points Select the gas inlet number connected to the manifold Save Save the settings ...

Страница 93: ... menu on the IDS LCD Screen LEDs Green top Amber middle Red bottom Left Arrow Key Enter Key Right Arrow Key Figure 5 1 Front Panel Components of the DSX L docking station 5 2 Menu Options The menu on an IDS is used to request actions from the IDS such as on demand calibrations or bump tests NOTE The menu cannot be used when the IDS is performing a task the yellow LED is illuminated except for when...

Страница 94: ...force the IDS to perform a bump test See the Forced Bump Tests section later in this chapter for more information about using the Bump Test menu option Calibrate Used to force the IDS to perform a calibration See the Forced Calibration section later in this chapter for more information about using the Calibrate menu option Download Data Used to download datalog data to the docking station server S...

Страница 95: ...t s battery is charging 5 3 LED and Alarm Signals The IDS contains LED lights and an alarm to provide you with feedback about the activities on the IDS The LEDs green yellow and red will light alone or in combination depending on the status of the IDS The status of lit LEDs is explained below Green LED only Indicates that the IDS is fully charged and available for use Yellow LED only Indicates tha...

Страница 96: ...LCD Display LED Alarm Description Calibrating Zeroing Yellow Off Zeroing the instrument Calibrating Purging Yellow Off Purging the docking station tubing Calibrating sensor symbols Yellow Off The instrument sensors are being calibrated Clear Manual Operations Yellow Off Clears all manual operations once downloaded to DSS Clearing Datalog Yellow Off Clearing datalog data from the instrument Current...

Страница 97: ...ent with a CO2 sensor Current Date and Time Battery Error Red Off There is a problem with the battery in the docked instrument Cylinder Expired gas symbol Red On The Non ISC gas cylinder has expired Cylinder is Expired 1810 XXXX Red On The ISC gas cylinder has expired Instrument Error Red On Instrument System Alarm Instrument Not Ready Red On Sensor is biasing not ready for gas application Replace...

Страница 98: ...ation and that it is correctly configured in the DSSAC See the Configuring Gas Cylinders section for more information about configuring gas cylinders 2 Dock the instrument in the IDS 3 Press any of the keys on the IDS keypad to access the main menu NOTE The menu cannot be used when the IDS is performing an instrument action NOTE The menu cannot be used if the Menu Locked setting for the IDS in DSS...

Страница 99: ...ion 5 5 1 Forced Calibrations You can force an IDS to calibrate an instrument by using the IDS menu You may wish to do this when you want to perform a calibration prior to the next calibration scheduled for the instrument To force a calibration follow the instructions listed below Step Instruction 1 Make sure that the IDS is on and that the proper gas cylinder is connected to the IDS and that it i...

Страница 100: ...lay the red light with a Bump Failure message and will beep O2 will be displayed underneath the failure message as shown below Figure 5 2 DSX L Error Screen after O2 Sensor Failure NOTE Forced events are usually not permitted and will result in a failure message This prevents the user from forcing a calibration clearing the error and thinking all is well 5 6 Download and Clearing Datalog Data You ...

Страница 101: ...mation for that sensor Step Instruction 4 Use the ARROW keys on the keypad until Instrument is highlighted 5 Press the ENTER key The Instrument menu appears 6 Use the ARROW keys on the keypad to select Download Datalog Press the ENTER key 7 The LCD displays a confirmation prompt Are you sure Use the ARROW keys on the keypad to highlight Yes and then press the ENTER key If you select No the LCD ret...

Страница 102: ...tion prompt Are you sure Use the ARROW keys on the keypad to highlight Yes and then press the ENTER key If you select No the LCD returns to the main menu 8 The IDS clears the datalog data from the instrument s memory The LCD displays Clearing Datalog The yellow LED is illuminated 9 When the datalog data has been cleared the LCD returns to the main menu and the green LED is illuminated 5 7 IDS Diag...

Страница 103: ... Data Sheet 5 8 1 General An Instrument Docking Station IDS is a sensitive piece of equipment that should be treated with care It should be handled in the same way you would handle a laptop computer General guidelines are listed below Install or locate this device only in accordance with the provided installation instructions found in Administrator s Guide DSX L Local Server Mode To reduce the ris...

Страница 104: ... so can cause fire or electric shock by shorting out interior components Keep IDSs away from radiators and heat sources Do not block cooling vents Avoid placing loose papers underneath an IDS do not place an IDS in a closed in wall unit or on a bed sofa or rug An IDS is equipped with a fixed voltage power supply The IDS will operate at only one voltage see the regulatory label on the outside of th...

Страница 105: ...d twisted pair cable USB port for data storage device or printer for use with DSX Calibration Station Mode only Display 128 x 64 dot matrix LCD Language options English French German Portuguese Brazil and Spanish Performance Specifications Operating temperature range 0 50 ºC 32 122 ºF Operating humidity range 0 80 relative humidity RH up to 30 ºC 86 ºF decreasing linearly to 50 RH at 50 ºC 122 ºF ...

Страница 106: ...n this device 100 240 VAC 12 VDC Using a higher voltage is dangerous and may result in a fire or other accident causing device damage Using a lower voltage will cause unexpected results Industrial Scientific is NOT responsible for damage resulting from improper use of an IDS ...

Страница 107: ...ach other Datalog Download Used to download datalog data from an instrument Diagnostics Used to run diagnostic tests on an instrument or IDS The results of these tests are sent to the iNet Network Operations Center for analysis Manual Operations Download Used to download manually performed operations results from an instrument NOTE There are also two events that occur automatically in the system T...

Страница 108: ...vent runs each day at a specified time or whenever the IDS or instrument is available that day Weekly The event runs on the specified day of the week at a specified time or whenever the IDS or instrument is available on the specified day or thereafter Monthly The event runs on the specified day of the month at a specified time or whenever the IDS or instrument is available on the specified day or ...

Страница 109: ... 1 Log in to the DSSAC application 2 Expand the Events option in the navigation pane if necessary 3 Expand the Docking Station option that is underneath Events if necessary 4 Click on Global The IDS global event appears in the contents page Figure 6 1 Docking Station Global Events List Page Step Instruction 5 Click on the Diagnostics event ...

Страница 110: ...wo sections Diagnostics Contains information about the event and when it is scheduled to run Last Journal Log Contains records of the last time that the event ran for various IDSs NOTE Only the dssuser can edit events but any user with the administrator role can view this page NOTE Global IDS events cannot be disabled ...

Страница 111: ... g 1st 2nd 3rd or 31st to indicate the day of the month on which the event should run and specify an Effective Date to indicate when the event should start running NOTE If you select the 30th or 31st as the Day the event runs on the last day of the month for months that do not have 30 or 31 days e g the event would run on February 28th Step Instruction 8 Click Save to save the changes to the Event...

Страница 112: ...pear in the contents page The contents page displays the Event Type whether or not it is disabled and the current scheduled Interval Figure 6 3 Instrument Global Events List Page Step Instruction 5 Click on the Event Type for which you would like to view or edit settings 6 The chosen Event Type page appears It contains two sections The chosen Event Type Contains information about the event and whe...

Страница 113: ...and a Run Time to indicate the time at which the event should run Weekly If you select Weekly you must also select a Day e g Sunday Monday etc to indicate the day of the week on which the event should run and specify an Effective Date to indicate when the event should start running and a Run Time to indicate the time at which the event should run Monthly If you select Monthly you must also select ...

Страница 114: ...erval Monthly Day 1st Effective Date 1 1 03 Run Time 12 00 AM Download Datalog Interval Upon Docking Effective Date 1 1 03 Alarms Interval Upon Docking Run Time After Download Datalog Effective Date 1 1 03 Download Manual Operations Interval Upon Docking Run Time 12 00 AM Effective Date 1 1 03 Setting is disabled by default 6 3 Special Events Special Events are custom events that you can assign to...

Страница 115: ... Events option in the navigation pane if necessary 3 Expand the Instrument option that is underneath Events if necessary 4 Click on Special Any instrument Special Events that have been previously added appear in the contents page The contents page displays the Event Type the current scheduled Interval whether or not it is disabled the event Name and the Event Owner 5 Click on the Add Event dropdow...

Страница 116: ...If you select Weekly you must also select a Day e g Sunday Monday etc to indicate the day of the week on which the event should run and specify an Effective Date to indicate when the event should start running and a Run Time to indicate the time at which the event should run Monthly If you select Monthly you must also select a Day e g 1st 2nd 3rd or 31st to indicate the day of the month on which t...

Страница 117: ...special event click on Remove next to each instrument you wish to remove 12 Click Save to save the event The event is added to the list of Special Events in the contents page NOTE The next time that you view the special event the Last Journal Log section will be visible The Last Journal Log contains records of the last time that the event ran for various instruments 6 4 DSX L Defaults for Schedule...

Страница 118: ...SAGE OF TRADE OR OTHERWISE INDUSTRIAL SCIENTIFIC MAKES NO OTHER WARRANTIES EITHER EXPRESSED OR IMPLIED INCLUDING BUT NOT LIMITED TO THE WARRANTIES OF MERCHANTABILITY OR FITNESS FOR PARTICULAR PURPOSE SHOULD THE PRODUCT FAIL TO CONFORM TO THE ABOVE WARRANTY BUYER S ONLY REMEDY AND INDUSTRIAL SCIENTIFIC S ONLY OBLIGATION SHALL BE AT INDUSTRIAL SCIENTIFIC S SOLE OPTION REPLACEMENT OR REPAIR OF SUCH N...

Страница 119: ...structions set forth in Industrial Scientific s product literature Repair or maintenance by non qualified personnel will invalidate the warranty as will the use of non approved consumables or spare parts As with any other sophisticated product it is essential and a condition of Industrial Scientific s warranty that all personnel using the products be fully acquainted with their use capabilities an...

Страница 120: ...6 400 820 2515 To locate a nearby distributor of our products or an Industrial Scientific service center or business office visit us at www indsci com Rendez vous sur notre site Web www indsci com si vous voulez trouver un distributeur de nos produits près de chez vous ou si vous recherchez un centre de service ou un bureau Industrial Scientific Besuchen Sie uns unter www indsci com um einen Vertr...

Отзывы: