background image

H

iS

e

q

3

0

0

0

/4

0

0

0

F

lo

w
C

e

ll

cBot 2 System Guide

23

HiSeq 3000/4000 Flow Cell

Prepare the HiSeq 3000/4000 patterned flow cell, then prepare clustering reagents. To
prepare clustering reagents, thaw the cBot reagent plate and prepare the ExAmp reaction
master mix.

About Reagents

}

ExAmp reagents are viscous, especially EPX2 and EPX3. Aspirate and dispense
reagents slowly to ensure accurate pipetting.

}

EPX3 does not move when inverted due to viscosity.

}

Never vortex

ExAmp reagents, and do not refreeze after thawing.

}

The ExAmp master mix can be cloudy, which is normal. If the solution separates into a
cloudy portion and a transparent portion, slowly pipette to mix.

Prepare the Flow Cell

1

Remove a new flow cell package from 2°C to 8°C storage.

2

Set the flow cell package aside at room temperature for at least 30 minutes.

NOTE

If the foil packaging is intact, the flow cell can remain at room temperature up to 12
hours. You can return the packaged flow cell to 2°C to 8°C storage for later use 1 time
only. Avoid repeated cooling and warming of the flow cell.

3

Put on a new pair of powder-free gloves.

4

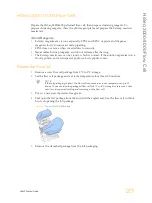
Peel open the foil package from the end with the angled seal. Use the flow cell within 4
hours of opening the foil package.

Figure 8

Open Flow Cell Package

5

Remove the clamshell package from the foil packaging.

Содержание cBot

Страница 1: ...ide with the Custom Protocol Selector support illumina com custom protocol selector html For Research Use Only Not for use in diagnostic procedures January 2016 Document 15065681 v01 Material 20004364 ILLUMINA PROPRIETARY cBot 2 System Guide ...

Страница 2: ...of this document must be fully read and understood prior to using such product s FAILURE TO COMPLETELY READ AND EXPLICITLY FOLLOW ALL OF THE INSTRUCTIONS CONTAINED HEREIN MAY RESULT IN DAMAGE TO THE PRODUCT S INJURY TO PERSONS INCLUDING TO USERS OR OTHERS AND DAMAGE TO OTHER PROPERTY ILLUMINA DOES NOT ASSUME ANY LIABILITY ARISING OUT OF THE IMPROPER USE OF THE PRODUCT S DESCRIBED HEREIN INCLUDING ...

Страница 3: ... library volumes to the PhiX spike in procedure for libraries clustered on a HiSeq 3000 4000 flow cell Recommendation for annual preventive maintenance service Updated instructions for unloading run components to include flow cell storage options Moved troubleshooting information to Appendix A Simplified software descriptions at the beginning of the guide Listed the cBot System Configuration Guide...

Страница 4: ...iv Material 20004364 Document 15065681 v01 ...

Страница 5: ...g 29 Introduction 30 Clustering With Sample Tracking Workflow 31 Perform a Pre Run Wash 32 Load Consumables 33 Load the Manifold 35 Select a Protocol 37 Scan Consumables 38 Perform a Pre Run Check 39 Monitor the Run 40 Unload Run Components 41 Perform a Post Run Wash 43 Confirm Reagent Delivery Optional 44 Chapter 5 Clustering Without Sample Tracking 45 Introduction 46 Clustering Without Sample Tr...

Страница 6: ...e Adapter Plate 65 Upgrade the Software 67 Upgrade Recipes 68 Shut Down the cBot 2 69 Appendix A Troubleshooting 71 Pause or Abort a Run 72 Troubleshoot Flow Check Failure 73 Troubleshoot Run Problems 75 Reset the External Barcode Scanner 76 Edit Protocols 77 Index 79 Technical Assistance 83 ...

Страница 7: ...Chapter 1 cBot 2 System Guide 1 Chapter 1 Overview Overview Introduction 2 Additional Resources 3 cBot 2 Components 4 Illumina Consumables 7 cBot Reagent Plates 9 ...

Страница 8: ...enced on the HiSeq Consumables are loaded and the instrument lid is closed Internal scanners then record the ID of the reagent plate flow cell and 8 tube strip Figure 1 cBot 2 Several cluster kits are available for use on the cBot Use a kit that is compatible with the sequencing instrument and type of sequencing run to be performed For a list of available kits see Illumina Consumables on page 7 Wo...

Страница 9: ...ent cBot 2 System Safety and Compliance Guide document 15065643 Provides information about instrument labeling compliance certifications and safety considerations HiSeq and GAIIx Systems Denature and Dilute Libraries Guide document 15050107 Provides instructions for denaturing and diluting prepared libraries before sequencing and preparing a PhiX control This step applies to most library types and...

Страница 10: ...containing template C Waste bottle compartment Holds a sensor controlled waste bottle that collects spent reagents D External barcode scanner Records the unique ID of the reagent plate and flow cell used with each run that does not include sample tracking E Power switch Turns on the instrument The start button located to the left of the waste bottle compartment starts the instrument software F Tou...

Страница 11: ...Flow Cell Adapter Plates The cBot performs cluster generation on GAIIx and HiSeq flow cells When switching flow cell types change the adapter plate on the flow cell stage For details see Change the Adapter Plate on page 65 Reagent Stage The reagent stage holds the cBot reagent plate The reagent plate is locked into position by the reagent plate lever Two 8 tube strip holders in front of the reagen...

Страница 12: ...nstalled Flow cell adapter plate type unknown Instrument lid is open Instrument lid is closed Waste bottle is present and ready for use Waste bottle is full Waste bottle is missing Coolant is flowing and coolant level is good Warning Coolant is flowing but coolant level is low Error Coolant is not flowing but coolant level is good Error Coolant is not flowing and coolant level is low Manifold is l...

Страница 13: ...SR Cluster Kit v3 HS Catalog GD 401 3001 TruSeq PE Cluster Kit v3 HS Catalog PE 401 3001 HiSeq Rapid Duo cBot Sample Loading Kit Catalog CT 403 2001 TruSeq Rapid Duo cBot Sample Loading Kit Catalog CT 402 4001 Cluster Kits for the HiSeq X Each kit contains multiple HiSeq X flow cells flow cell specific manifolds and the required reagents for clustering each flow cell on the cBot Single pack kits c...

Страница 14: ...low Cell document 15053711 HiSeq 3000 4000 Read 1 Primer Rehybridization on a HiSeq 3000 4000 Flow Cell document 15058794 TruSeq v3 or TruSeq v2 GAIIx Read 1 Primer Rehybridization on a TruSeq v3 or TruSeq v2 Flow Cell document 15018149 Read 1 Sequencing Primer for Nextera Libraries The Read 1 sequencing primer HP6 provided in the following kits is not compatible with Nextera libraries TruSeq Clus...

Страница 15: ...Output HiSeq v4 Contains 8 rows of foil sealed 8 tube strips filled with cluster generation reagents Rows 9 through 12 are empty HiSeq High Output TruSeq v3 Contains 11 rows of foil sealed 8 tube strips filled with cluster generation reagents Row 12 is empty HiSeq Rapid Contains 3 rows of foil sealed 8 tube strips filled with template hybridization and first extension reagents Rows 4 through 12 ar...

Страница 16: ...10 Material 20004364 Document 15065681 v01 ...

Страница 17: ...Chapter 2 cBot 2 System Guide 11 Chapter 2 Getting Started GettingStarted Start the cBot 2 12 Version Compatibility of Run Components 13 User Supplied Consumables 15 ...

Страница 18: ...cBot 2 A Start button B Power switch 1 Switch the power switch on the right side of the instrument to the ON position 2 Press the start button to the left of the waste bottle compartment to start the software When the start up routine is complete the Start screen appears ...

Страница 19: ...es GA cBot v1 4 36 or later TruSeq Cluster Kit v3 HS Version 8 0 recipes cBot v1 4 or later TruSeq Cluster Kit v2 GA Version 7 0 recipes cBot v1 3 or later cBot Recipes and Flow Cell Types Flow Cell Primary Recipe Name HiSeq 3000 4000 Patterned Flow Cell HiSeq_3000_4000_SR_HD_Exclusion_Amp_v1 0 HiSeq_3000_4000_HD_Exclusion_Amp_v1 0 HiSeq X Ten v2 5 Patterned Flow Cell HiSeq_X_HD_Exclusion_Amp_v2 0...

Страница 20: ...Getting Started 14 Material 20004364 Document 15065681 v01 To access v7 recipes navigate to C Illumina cBot bin Recipes Hidden on the instrument drive Copy recipes to C Illumina cBot bin Recipes ...

Страница 21: ...denaturation 200 mM Tris HCl pH 8 0 General lab supplier Use for library denaturation after diluting to 0 1 N NaOH Laboratory grade water Millipore or General lab supplier Use for library denaturation 8 tube strips with barcode labels 0 2 ml Illumina catalog 20002011 Use for the ExAmp reaction and library mix on the cBot clustering with sample tracking workflow 8 tube strips 0 2 ml Fisher Scientif...

Страница 22: ...16 Material 20004364 Document 15065681 v01 ...

Страница 23: ...Chapter 3 cBot 2 System Guide 17 Chapter 3 Preparing Reagents PreparingReagents Introduction 18 HiSeq X Flow Cell 19 HiSeq 3000 4000 Flow Cell 23 HiSeq High Output Flow Cell 27 HiSeq Rapid Flow Cell 28 ...

Страница 24: ...Bot when prompted by the software Best Practices Wear a fresh pair of gloves when preparing clustering reagents Do not remove the protective clear plastic lid on the reagent plate until you are ready to load reagents onto the cBot Never puncture the foil seals Hold reagent plates that contain 8 tube strips by the plate base to avoid dislodging reagent tubes Make sure that the tubes are securely se...

Страница 25: ... to ensure accurate pipetting EPX3 does not move when inverted due to viscosity Never vortex ExAmp reagents and do not refreeze after thawing The ExAmp master mix can be cloudy which is normal If the solution separates into a cloudy portion and a transparent portion slowly pipette to mix Prepare the Flow Cell 1 Remove a new flow cell package from 2 C to 8 C storage 2 Set the flow cell package asid...

Страница 26: ...ot reagent plate from 25 C to 15 C storage 2 Thaw in a room temperature water bath for 60 minutes Thaw EPX1 EPX2 EPX3 and RSB 1 Remove 1 tube each of the following reagents from 25 C to 15 C storage Single pack kit EPX1 EPX2 EPX3 and RSB Each tube contains enough reagent for 1 flow cell 10 pack kit EPX1M EPX2M EPX3M and RSB Each tube contains enough reagent for 4 flow cells 2 Thaw at room temperat...

Страница 27: ...d Illumina PhiX control to nondenatured libraries TruSeq Nano DNA libraries Add 0 5 µl 2 3 nM PhiX to 50 µl 2 3 nM library TruSeq DNA PCR Free libraries Add 0 5 µl 1 2 nM PhiX to 50 µl 1 2 nM library 3 Number the tubes of an 8 tube strip For clustering with sample tracking From the key end label the tubes 8 through 1 For clustering without sample tracking Label the tubes 1 through 8 When preparing...

Страница 28: ...ette to mix Change tips between samples 5 Briefly centrifuge and then set aside on ice until you are ready to load the cBot CAUTION Load the 8 tube strip onto the cBot within 15 minutes ExAmp Reaction for 4 Flow Cells 10 Pack Kit 1 Invert EPX1M and EPX2M to mix 2 Briefly centrifuge EPX1M EPX2M and EPX3M 3 Add the following volumes to a 1 5 ml tube in the order listed a Add 756 µl EPX1M b Add 108 µ...

Страница 29: ... normal If the solution separates into a cloudy portion and a transparent portion slowly pipette to mix Prepare the Flow Cell 1 Remove a new flow cell package from 2 C to 8 C storage 2 Set the flow cell package aside at room temperature for at least 30 minutes NOTE If the foil packaging is intact the flow cell can remain at room temperature up to 12 hours You can return the packaged flow cell to 2...

Страница 30: ...mperature Thaw the cBot Reagent Plate 1 Remove the cBot reagent plate from 25 C to 15 C storage 2 Place the reagent plate in a room temperature water bath for 60 minutes Thaw EPX1 EPX2 EPX3 and RSB 1 Remove EPX1 EPX2 EPX3 and RSB from 25 C to 15 C storage 2 Thaw at room temperature for 10 minutes 3 Set aside on ice Prepare a Fresh Dilution of NaOH 1 Combine the following volumes in a microcentrifu...

Страница 31: ...natured Illumina PhiX control to nondenatured libraries Library Type Spike In TruSeq DNA PCR Free Add 5 µl 100 200 pM PhiX to 45 µl 1 2 nM library TruSeq Nano DNA Add 5 µl 200 300 pM PhiX to 45 µl 2 3 nM library Nextera Rapid Capture Exome TruSeq Stranded Total RNA TruSeq Stranded mRNA 3 Number the tubes of an 8 tube strip For clustering with sample tracking From the key end label the tubes 8 thro...

Страница 32: ...a 1 5 ml tube as follows a Add 210 µl EPX1 b Add 30 µl EPX2 Slowly pipette to mix c Add 110 µl EPX3 Slowly pipette to mix Make sure that the bottom of the tube is free of bubbles 4 Add 35 µl master mix to the bottom of each well of the 8 tube strip Slowly pipette to mix Change tips between samples 5 Cap the tubes and briefly centrifuge 6 Set aside on ice until you are ready to load the cBot CAUTIO...

Страница 33: ... 1 Invert the cBot plate to mix reagents 2 Vortex to dislodge trapped air bubbles 3 Tap on a hard surface to collect reagent droplets at the bottom of the tubes Alternatively pulse centrifuge 4 Make sure that the tubes are free of air bubbles securely seated and ordered as numbered 5 Promptly proceed to setting up the cBot 6 If you are sequencing Nextera libraries on a TruSeq v3 flow cell proceed ...

Страница 34: ... the tubes Thaw the cBot Reagent Plate 1 Remove the cBot reagent plate from 25 C to 15 C storage 2 Make sure that the tube strips are securely seated in the plate 3 Thaw in a room temperature water bath for 60 minutes Prepare the cBot Reagent Plate 1 Invert the cBot reagent plate to mix reagents 2 Vortex to dislodge trapped air bubbles 3 Tap on a hard surface to collect reagent droplets at the bot...

Страница 35: ...g Introduction 30 Clustering With Sample Tracking Workflow 31 Perform a Pre Run Wash 32 Load Consumables 33 Load the Manifold 35 Select a Protocol 37 Scan Consumables 38 Perform a Pre Run Check 39 Monitor the Run 40 Unload Run Components 41 Perform a Post Run Wash 43 Confirm Reagent Delivery Optional 44 ...

Страница 36: ...ables are loaded and the instrument lid is closed Manual input and system input are shown on the screen if necessary For information on configuring your cBot for sample tracking see the cBot System Configuration Guide part 1000000005301 Library Prep Before setting up the cBot for cluster generation prepare libraries for sequencing The process differs depending on library type and flow cell type Mo...

Страница 37: ... sequencing and load libraries into a barcode labeled 8 tube strip Perform a pre run wash Load consumables and the cBot manifold and close the instrument lid Select a protocol and scan consumables Select Pre Run Check to initiate the automated pre run check Select Start Monitor run progress from the Run Status screen Optional Unload run components and confirm reagent delivery Perform a post run wa...

Страница 38: ... checkbox is not selected on the Wash screen remove the manifold 5 Raise the instrument lid by lifting from the cutout on the front of the lid 6 Fill the wash reservoir with about 12 ml deionized water 7 Close the instrument lid 8 Select the Reservoir filled with water checkbox 9 Select Wash 10 After the wash is finished blot excess water from the wash reservoir with a low lint tissue Figure 11 Dr...

Страница 39: ...ever toward you and place the reagent plate onto the reagent stage with the barcode label facing the back of the instrument Figure 12 Position the Reagent Plate 5 Release the lever to secure the reagent plate Load the Flow Cell 1 Lift the flow cell clamp 2 Wash the adapter plate on the thermal stage with a small amount of deionized water and then dry with a lint free tissue Do not allow fluids to ...

Страница 40: ...ckbox and proceed to Load the Manifold on page 35 Load Primers The Load Primers screen appears for workflows that allow custom primers or that require additional primers Sequencing Nextera libraries on a TruSeq v3 flow cell requires that you load an 8 tube strip containing HP10 1 Load the 8 tube strip containing primers into the primer row of the tube strip holder Tubes are numbered right to left ...

Страница 41: ...he manifold over the flow cell Seat evenly to form a tight seal 4 Select the Manifold seated over flow cell checkbox 5 Close the flow cell clamp to secure the manifold Figure 13 Close the Flow Cell Clamp 6 Select the Flow cell clamp closed checkbox 7 Connect the outlet end of the manifold to the outlet port in the wash reservoir Make sure that the outlet is evenly seated Figure 14 Secure Outlet En...

Страница 42: ...the comb 12 Make sure that the sippers are straight and perpendicular to the reagent plate and that the Sipper comb in place checkbox is selected 13 Close the instrument lid and select Next NOTE Do not reopen the lid unless prompted by the software If the lid is opened each consumable must be rescanned and validated during the pre run check A validation failure during the pre run check requires ca...

Страница 43: ... Protocol 1 Select Experiment Name 2 Using the onscreen keyboard type your experiment name and then select Enter 3 Select the appropriate recipe for your experiment from the list of protocols Scroll through to see all available protocols 4 Select Next ...

Страница 44: ...ning Errors If a scan fails perform the following steps 1 Open the instrument lid and remove the consumable with an indicated error 2 Wipe the barcode with a lint free cleaning tissue 3 Reload the consumable and close the lid 4 Select Scan to repeat the scan 5 If the scan fails 2 more times proceed with steps 6 through 8 Otherwise proceed with run setup 6 Open the instrument lid and remove the con...

Страница 45: ...mpletion of the pre run check select Start The Run Status screen opens and the run begins Run Component Errors If the pre run check fails due to errors related to run components or the lid being opened perform the following steps 1 Check any run component with an indicated error to make sure that it is present and loaded correctly 2 Select Rerun Check to repeat the check 3 If the check continues t...

Страница 46: ...PE or HiSeq X Allow approximately 3 hours HiSeq 3000 4000 SR Allow approximately 4 hours HiSeq Rapid v2 Allow approximately 1 hour TruSeq v3 Allow approximately 5 hours 3 After the run is complete you can leave the flow cell on the instrument overnight Otherwise proceed to unloading run components The cBot 2 holds the flow cell at 20 C Run Data Report The run data report provides a summary of the ...

Страница 47: ...low cell is stable after primer hybridization up to 10 days when properly stored in the flow cell tube HiSeq and TruSeq Rapid flow cells Perform the sequencing run on the same day as library loading HiSeq X and HiSeq 3000 4000 flow cells Store in storage buffer up to 48 hours at 2 C to 8 C 10 Pull the reagent plate lever toward you to release the reagent plate Remove the reagent plate from the rea...

Страница 48: ...8 tube strip containing additional primers if applicable 13 Select the checkbox to indicate that you have unloaded the reagents templates and primers 14 Choose a wash option Select Wash to proceed to the post run wash Select Exit to bypass the post run wash if the bypass option is available ...

Страница 49: ...tely 12 ml deionized water and close the instrument lid 3 Select the checkbox to indicate that water is present and then select Wash 4 When the wash is complete blot any excess water remaining in the wash reservoir Avoid the outlet ports to prevent fibers from entering the holes 5 Select the checkbox to indicate that the wash reservoir is dry and then select Exit The Start screen opens and your cB...

Страница 50: ...plate firmly with finger tips under the base b Gently press upward on the center tubes of the tube strip 3 Inspect each tube to confirm that a similar volume remains in each tube NOTE Small differences are normal Figure 18 Example of Successful Reagent Delivery 8 Lane Flow Cell Figure 19 Example of Successful Reagent Delivery 2 Lane Flow Cell 4 If reagent delivery was not successful and the foil s...

Страница 51: ...gWithoutSample Tracking Introduction 46 Clustering Without Sample Tracking Workflow 47 Perform a Pre Run Wash 48 Select a Protocol 49 Load Consumables 50 Perform a Pre Run Check 54 Monitor the Run 55 Unload Run Components 56 Perform a Post Run Wash 58 Confirm Reagent Delivery Optional 59 ...

Страница 52: ...nsumables are scanned using the external barcode scanner or entered manually Library Prep Before setting up the cBot for cluster generation prepare libraries for sequencing The process differs depending on library type and flow cell type Most libraries on TruSeq flow cells and HiSeq flow cells require a denaturation and dilution step For more information see HiSeq and GAIIx Systems Denature and Di...

Страница 53: ...Prepare libraries for sequencing and load libraries into an 8 tube strip Perform a pre run wash Select a protocol scan and load consumables and load tube strips containing prepared libraries Select Pre Run Check to initiate the automated pre run check Select Start Monitor run progress from the Run Status screen Unload run components and confirm reagent delivery Perform a post run wash ...

Страница 54: ...ed checkbox is not selected on the Wash screen remove the manifold 5 Raise the instrument lid by lifting from the cutout on the front of the lid 6 Fill the wash reservoir with about 12 ml deionized water 7 Close the instrument lid 8 Select the Reservoir filled with water checkbox 9 Select Wash 10 After the wash is finished blot excess water from the wash reservoir with a low lint tissue Figure 20 ...

Страница 55: ... Protocol 1 Select Experiment Name 2 Using the onscreen keyboard type your experiment name and then select Enter 3 Select the appropriate recipe for your experiment from the list of protocols Scroll through to see all available protocols 4 Select Next ...

Страница 56: ...appropriately b Select the onscreen checkbox to indicate that the seal is removed 5 Pull the reagent plate lever toward you and place the reagent plate onto the reagent stage All reagent plates except HiSeq X and HiSeq 3000 4000 Position with row 1 directly behind the tube strip holders The beveled corner of the plate is positioned in the front right corner HiSeq X and HiSeq 3000 4000 reagent plat...

Страница 57: ...is on the right side with the keyed corner GAIIx flow cells Lane 8 is on the right side with the barcode ID 7 Select the checkbox to indicate that the flow cell is loaded and then select Next Load the Manifold Use the manifold from the same cluster kit as the flow cell 1 Inspect the sippers on the sipper comb for damage Make sure that the black rubber gaskets are evenly seated 2 Position the manif...

Страница 58: ...plastic tabs on either side of the comb 12 Make sure that the sippers are straight and perpendicular to the reagent plate and that the Sipper comb in place checkbox is selected 13 Select the Sipper comb in place checkbox and then select Next Load Templates 1 Select Enter Template Name 2 Using the onscreen keyboard type the template ID and then select Enter 3 Load the 8 tube strip containing prepar...

Страница 59: ...n keyboard type the primer name and then select Enter 3 Load the 8 tube strip containing primers into the primer row Make sure that the order of numbered tubes aligns with the lane orientation of the flow cell HiSeq and HiSeq X flow cells Tubes are numbered right to left GAIIx flow cells Tubes are numbered left to right HiSeq X HiSeq 3000 4000 HiSeq v4 and TruSeq v3 HiSeq HiSeq Rapid v2 TruSeq Rap...

Страница 60: ...tatus screen opens and the run begins Run Component Errors If the pre run check fails due to errors related to run components perform the following steps 1 Check any run component with an indicated error to make sure that it is present and loaded correctly 2 Select Rerun Check to repeat the sensor check 3 If the check continues to fail select Cancel Run to end the run and set up a new one Flow Che...

Страница 61: ...y 3 hours HiSeq 3000 4000 SR Allow approximately 4 hours HiSeq Rapid v2 or TruSeq Rapid Allow approximately 1 hour TruSeq v2 or TruSeq v3 Allow approximately 5 hours 3 After the run is complete you can leave the flow cell on the instrument overnight Otherwise proceed to unloading run components The cBot 2 holds the flow cell at 20 C Run Data Report The run data report provides a summary of the run...

Страница 62: ...2 C to 8 C The flow cell is stable after primer hybridization up to 10 days when properly stored in the flow cell tube HiSeq and TruSeq Rapid flow cells Perform the sequencing run on the same day as library loading HiSeq X and HiSeq 3000 4000 flow cells Store in storage buffer up to 48 hours at 2 C to 8 C 10 Pull the reagent plate lever toward you to release the reagent plate Remove the reagent pl...

Страница 63: ...ntaining additional primers if applicable 13 Select the checkbox to indicate that you have unloaded the reagents templates and primers 14 Choose a wash option Select Wash to proceed to the post run wash Select Exit to bypass the post run wash if the bypass option is available ...

Страница 64: ... with approximately 12 ml deionized water and close the instrument lid 3 Select the checkbox to indicate that water is present and then select Wash 4 When the wash is complete blot any excess water remaining in the wash reservoir Avoid the outlet ports to prevent fibers from entering the holes 5 Select the checkbox to indicate that the wash reservoir is dry and then select Exit The Start screen op...

Страница 65: ...mly with finger tips under the base b Gently press upward on the center tubes of the tube strip 3 Inspect each tube to confirm that a similar volume remains in each tube NOTE Small differences are normal Figure 27 Example of Successful Reagent Delivery 8 Lane Flow Cell Figure 28 Example of Successful Reagent Delivery 2 Lane Flow Cell 4 If reagent delivery was not successful and the foil seals on t...

Страница 66: ...60 Material 20004364 Document 15065681 v01 ...

Страница 67: ...2 System Guide 61 Chapter 6 Maintenance Maintenance Perform Periodic Maintenance 62 Perform a Monthly Maintenance Wash 63 Change the Adapter Plate 65 Upgrade the Software 67 Upgrade Recipes 68 Shut Down the cBot 2 69 ...

Страница 68: ...ow cell barcode scanner windows One time per week Use deionized water and a lint free cleaning tissue to clean the external and flow cell barcode scanner windows Maintenance Wash One time per month Use 5 DECON or 100 mM NaOH to remove traces of reagents from internal cBot components and inhibit the growth of microorganisms For more information see Perform a Monthly Maintenance Wash on page 63 Chec...

Страница 69: ...cess water from the wash reservoir with a low lint tissue Avoid the outlet ports to prevent fibers from entering the holes DECON or NaOH Wash 1 Fill the wash reservoir with 10 ml 5 DECON or 100 mM NaOH 2 Select Wash 3 After the wash is complete put on a new pair of gloves 4 Blot the 5 DECON remaining in the wash reservoir with a low lint tissue Avoid the outlet ports CAUTION DECON is highly alkali...

Страница 70: ...Maintenance 64 Material 20004364 Document 15065681 v01 4 Close the instrument lid 5 Empty the waste bottle Your cBot is ready for the next cluster generation run ...

Страница 71: ... screws securing the adapter plate Figure 29 Flow Cell Adapter Plate A Captive screws B Adapter plate 4 Lift the existing adapter plate from the thermal stage and set aside 5 If salts are present on the thermal stage wipe with a lint free cleaning tissue slightly moistened with water 6 Position the new adapter plate on the thermal stage Align the sensor arm with the corresponding slot on the right...

Страница 72: ...Maintenance 66 Material 20004364 Document 15065681 v01 8 Wipe the installed adapter plate with a lint free cleaning tissue moistened with water Dry with a clean tissue ...

Страница 73: ...eyboard to type the default password admin and then select Enter 4 Select Menu and then select Upgrade 5 A dialog box opens with a message about the software version Message Action The software installer version is greater than the version currently installed on the cBot Select OK to proceed with the installation of the newer version cBot cannot find a valid software installer You can either inser...

Страница 74: ...rive not in a folder 2 Select Menu in the upper left corner of the Start screen and then select Configure Figure 32 Start Screen Menu 3 Use the onscreen keyboard to type the default password admin and then select Enter 4 Select Menu and then select Upgrade Recipes When the upgrade is complete the cBot restarts automatically The restart process takes about 10 minutes CAUTION Leave the USB drive in ...

Страница 75: ... Menu 2 Use the onscreen keyboard to type the default password admin and then select Enter 3 From the Configuration screen select Menu and then select Shut Down Station The cBot software shuts down Figure 34 Shut Down Station 4 After the software shuts down switch the power switch to the OFF position Reboot in FSE Mode The option to reboot in FSE Mode is for use by a trained Illumina Field Applica...

Страница 76: ...70 Material 20004364 Document 15065681 v01 ...

Страница 77: ...A cBot 2 System Guide 71 Appendix A Troubleshooting Troubleshooting Pause or Abort a Run 72 Troubleshoot Flow Check Failure 73 Troubleshoot Run Problems 75 Reset the External Barcode Scanner 76 Edit Protocols 77 ...

Страница 78: ...s the run Allow a few minutes before the run pauses When the run is paused the sippers lift from the reagent tubes the reagent stage returns the home position and the Pause button changes to the Resume button When the run is active select Pause to pause the run When the run is paused select Resume to resume the run Abort Run Ends the run without the option of resuming Select Unload to unload run c...

Страница 79: ...fails a second time note which lanes failed the flow check and do 1 of the following If all 8 lanes failed you probably have a faulty manifold Replace it with a new manifold If different lanes failed you probably do not have a faulty manifold Inspect the volumes of HT1 in row 1 to make sure that the tubes contain equal volumes 5 Select Rerun Check to repeat the flow check for a third time If this ...

Страница 80: ...shooting Flowchart The following flowchart illustrates the troubleshooting procedure Steps to repeat the flow check include a number to indicate how many of the allowed flow checks have been performed at that point in the procedure Figure 35 Troubleshooting Flowchart ...

Страница 81: ...d failure Email Illumina Technical Support Coolant is flowing and coolant level is low Coolant has slowly evaporated to a low level Add Illumina coolant part 1003709 to the coolant reservoir Coolant is not flowing and coolant level is low Coolant level might be too low to generate flow Add Illumina coolant part 1003709 to the coolant reservoir Coolant is not flowing and coolant level is not low Po...

Страница 82: ...e barcode Figure 36 Restore Defaults Barcode 2 From the start screen select Menu and then Manual Commands 3 Select the General tab to access the barcode reader manual control inputs Figure 37 Manual Commands General Tab 4 Select Turn Off and then select Turn On to activate the barcode scanner The laser line is visible on the scanner plate under the LCD screen 5 Place the barcode under the external...

Страница 83: ...Editor 2 From the Protocol Editor select Menu and then select the appropriate command Open Opens an existing protocol Select Load from Library Loads an existing chemistry definition or protocol step stored in the cBot library Select New Chemistry Definition or New Protocol Step Creates a definition or step and stores it in the cBot library 3 Use the down arrow to the left of the step to expand the...

Страница 84: ...section C Protocol section Protocol Editor Icons Icon Description Moves the highlighted step below the following step in the protocol Moves the highlighted step above the preceding step in the protocol Deletes the highlighted step Repeats the highlighted step Saves your changes to the protocol library ...

Страница 85: ...s 21 25 diluting 30 46 documentation 3 83 E ending a run 72 error messages 75 ExAmp master mix 26 ExAmp reaction preparing 1 flow cell 22 preparing 4 flow cells 22 ExAmp reagents about 19 23 preparing 26 preparing 1 flow cell 22 preparing 4 flow cells 22 thawing 20 24 external barcode scanner cleaning 62 resetting 76 F flow cell barcode scanning 38 cleaning 19 23 compatible recipes 13 packaging 19...

Страница 86: ... preparing 28 reagent plates positioning 33 50 reagent preparation best practices 18 reagent stage 5 reagents barcode scanning 38 reagents preparing GAIIx flow cell 18 high output 27 HiSeq 3000 4000 23 HiSeq X flow cell 19 rapid 28 recipes list of 13 upgrading 68 red foil seal 33 50 removing 8 tube strips 44 59 rerunning sensor checks 39 resuming a run 72 run starting 54 run component errors 54 ru...

Страница 87: ...Index cBot 2 System Guide 81 V version compatibility consumables 13 software 13 W wash reservoir 32 48 washes 32 48 frequency 62 washing adapter plates 33 50 washing the instrument 43 58 waste bottle 62 ...

Страница 88: ...Index 82 Material 20004364 Document 15065681 v01 ...
Страница 89: ...orway 800 16836 China 400 635 9898 Singapore 1 800 579 2745 Denmark 80882346 Spain 900 812168 Finland 0800 918363 Sweden 020790181 France 0800 911850 Switzerland 0800 563118 Germany 0800 180 8994 Taiwan 00806651752 Hong Kong 800960230 United Kingdom 0800 917 0041 Ireland 1 800 812949 Other countries 44 1799 534000 Italy 800 874909 Table 2 Illumina Customer Support Telephone Numbers Safety data she...

Страница 90: ...Illumina 5200 Illumina Way San Diego California 92122 U S A 1 800 809 ILMN 4566 1 858 202 4566 outside North America techsupport illumina com www illumina com ...

Отзывы: