


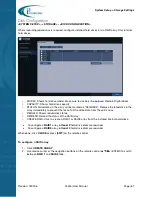


System Setup > Network Settings
Revision: 180906
Veo16i User Manual
Page | 55
>
SEARCH
>
ARCHIVING
>
SYSTEM SETUP
>
RECORD SETUP
>
EVENT ACTION CONTROL
>
LISTEN TO AUDIO
>
REMOTE LOG IN
>
SHUTDOWN (from the System Menu/Status Bar)
All users belonging to the USER/MANAGER group will share the same system access permissions
configured in this setup.
Click
APPLY
to save new configurations.
When done, click
CLOSE
or press [
EXIT
] on the remote control.
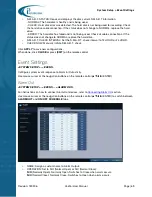
Network Settings
<SYSTEM SETUP> - <NETWORK>
Configure your Veo16i Network Settings for remote access, including IP address and port forwarding.
Use mouse cursor or the navigation buttons on the remote control (
▲▼
◀▶
/ ENTER)
IP Setup
<SYSTEM SETUP> - <NETWORK> - <IP SETUP>
>
DHCP: Enable to use Dynamic IP for your DVR. If
DHCP
option is checked, the network
information will be auto-filled.
Note:
IP camera connection will be lost briefly when DHCP lease time expires. Fixed IP address
is recommended for a stable network connection.
>
RENEW: Manually renew the dynamic IP address.
>
IP ADDRESS: Set fixed IP address (recommended).
>
GATEWAY: Set IP Gateway address.
>
SUBNET MASK: Set Subnet Mask address.